Tutorial: Create a Node.js and Express app in Visual Studio
Applies to: ![]() Visual Studio
Visual Studio ![]() Visual Studio for Mac
Visual Studio for Mac
Note
This article applies to Visual Studio 2017. If you're looking for the latest Visual Studio documentation, see Visual Studio documentation. We recommend upgrading to the latest version of Visual Studio. Download it here
This tutorial for Visual Studio development uses Node.js and Express. In this tutorial, you create a simple Node.js web app, add some code, explore some features of the IDE, and run the app.
In this tutorial, you learn how to:
- Create a Node.js project.
- Add some code.
- Use IntelliSense to edit code.
- Run the app.
- Hit a breakpoint in the debugger.
Before you begin, here's a quick FAQ to introduce you to some key concepts:
What is Node.js?
Node.js is a server-side JavaScript runtime environment that executes JavaScript code.
What is npm?
A package manager makes it easier to publish and share Node.js source code libraries. The default package manager for Node.js is npm. The npm package manager simplifies library installation, updating, and uninstallation.
What is Express?
Express is a server web application framework that Node.js uses to build web apps. With Express, you can use different front-end frameworks to create a user interface. This tutorial uses Pug, formerly called Jade, for its front-end framework.
Prerequisites
This tutorial requires the following prerequisites:
Visual Studio with the Node.js development workload installed.
If you haven't yet installed Visual Studio:
Go to the Visual Studio downloads page to install Visual Studio for free.
In the Visual Studio Installer, select the Node.js development workload, and select Install.

If you have Visual Studio installed already:
In Visual Studio, go to Tools > Get Tools and Features.
In the Visual Studio Installer, select the Node.js development workload, and select Modify to download and install the workload.
The Node.js runtime installed:
If you don't have the Node.js runtime installed, install the LTS version from the Node.js website. The LTS version has the best compatibility with other frameworks and libraries.
The Node.js tools in the Visual Studio Node.js workload support both Node.js 32-bit and 64-bit architecture versions. Visual Studio requires only one version, and the Node.js installer only supports one version at a time.
Visual Studio usually detects the installed Node.js runtime automatically. If not, you can configure your project to reference the installed runtime:
After you create a project, right-click the project node and select Properties.
In the Properties pane, set the Node.exe path to reference a global or local installation of Node.js. You can specify the path to a local interpreter in each of your Node.js projects.
Create a new Node.js project
Visual Studio manages files for a single application in a project. The project includes source code, resources, and configuration files.
In this tutorial, you begin with a simple project that has code for a Node.js and Express app.
Open Visual Studio.
Create a new project.
From the top menu bar, select File > New > Project. In the left pane of the New Project dialog box, expand JavaScript, then select Node.js. In the middle pane, select Basic Azure Node.js Express 4 application, then select OK.
If you don't see the Basic Azure Node.js Express 4 application project template, you need to add the Node.js development workload. For instructions, see Prerequisites.
Visual Studio creates the new solution and opens your project in the right pane. The app.js project file opens in the editor (left pane).

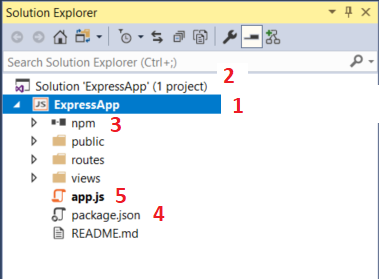
(1) Highlighted in bold is your project, using the name you gave in the New Project dialog box. In the file system, this project is represented by a .njsproj file in your project folder. You can set properties and environment variables associated with the project by right-clicking the project and choosing Properties. You can do round-tripping with other development tools, because the project file doesn't make custom changes to the Node.js project source.
(2) At the top level is a solution, which by default has the same name as your project. A solution, represented by a .sln file on disk, is a container for one or more related projects.
(3) The npm node shows any installed npm packages. You can right-click the npm node to search for and install npm packages by using a dialog box. You can also install and update packages by using the settings in package.json or the right-click options in the npm node.
(4) package.json is a file used by npm to manage package dependencies and package versions for locally installed packages. For more information, see Manage npm packages.
(5) Project files such as app.js show up under the project node. app.js is the project startup file and that's why it's bold. You can set the startup file by right-clicking a file in the project and selecting Set as Node.js startup file.
Open the npm node and make sure that all the required npm packages are present.
If a package is missing, its icon contains an exclamation point. To install any missing packages, you can right-click the npm node and select Install npm Packages.
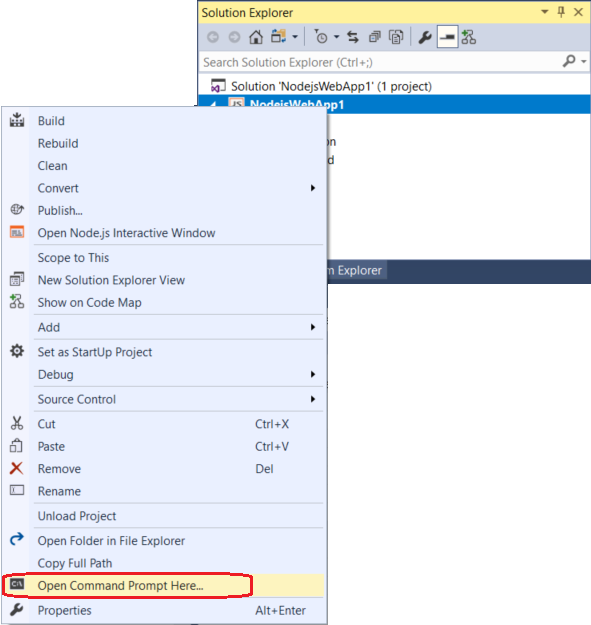
To install npm packages or Node.js commands from a command prompt, right-click the project node and select Open Command Prompt Here from the context menu.

Add some code
The application uses Pug for the front-end JavaScript framework. Pug uses simple markup code that compiles to HTML.
Pug is set as the view engine in app.js, with the code app.set('view engine', 'pug');.
In Solution Explorer, open the views folder, and then select index.pug to open the file.
Replace the file contents with the following markup.
extends layout

block content
  h1= title
  p Welcome to #{title}
  script.
    var f1 = function() { document.getElementById('myImage').src='#{data.item1}' }
  script.
    var f2 = function() { document.getElementById('myImage').src='#{data.item2}' }
  script.
    var f3 = function() { document.getElementById('myImage').src='#{data.item3}' }

  button(onclick='f1()') One!
  button(onclick='f2()') Two!
  button(onclick='f3()') Three!
  p
  a: img(id='myImage' height='300' width='300' src='')
The preceding code dynamically generates an HTML page with a title and welcome message. The page also includes code to display an image that changes whenever you select a button.
In the routes folder, open index.js.
Add the following code before the
router.getfunction call:var getData = function () { var data = { 'item1': 'https://images.unsplash.com/photo-1563422156298-c778a278f9a5', 'item2': 'https://images.unsplash.com/photo-1620173834206-c029bf322dba', 'item3': 'https://images.unsplash.com/photo-1602491673980-73aa38de027a' } return data; }This code creates a data object that you pass to the dynamically generated HTML page.
Replace the
router.getfunction call with the following code:router.get('/', function (req, res) { res.render('index', { title: 'Express', "data" }); });The preceding code sets the current page using the Express router object and renders the page, passing the title and data object to the page. The code specifies the index.pug file as the page to load when index.js runs. The app.js code, not shown here, configures index.js as the default route.
To demonstrate several Visual Studio features, there's a deliberate error in the line of code that contains
res.render. In the next section, IntelliSense helps you fix the error so the app can run.
Use IntelliSense
IntelliSense is a Visual Studio tool that helps you as you write code.
In index.js in the Visual Studio code editor, go to the line of code that contains
res.render.Put your cursor after the
"data"string and type: get. IntelliSense displays thegetDatafunction you defined earlier in the code. SelectgetData.Add parentheses to make the code a function call:
getData().Remove the comma before
"data". Green syntax highlighting appears on the expression. Hover over the syntax highlighting.The last line of the message tells you that the JavaScript interpreter expected a comma.
In the lower pane, select the Error List tab, and select Build + IntelliSense from the dropdown list for the type of issues reported.
The pane displays the warning and description along with the filename and line number.
Fix the code by replacing the comma before
"data".The corrected line of code should look like this:
res.render('index', { title: 'Express', "data": getData() });If you'd like to navigate to the source code of
render, use one of these options:- Select
renderand select F12. - Right-click
renderand select Go To Definition from the context menu.
These commands take you to the definition of the
renderfunction in index.d.ts.- Select
Run the app
Next, run the app with the Visual Studio debugger attached. Before you do that, you need to set a breakpoint.
Set a breakpoint
Breakpoints are the most basic and essential feature of reliable debugging. A breakpoint indicates where Visual Studio should suspend your running code. You can then observe variable values, memory behavior, or whether a branch of code is running.
To set a breakpoint, in index.js, select the left gutter before the following line of code:
res.render('index', { title: 'Express', "data": getData() });
Run the app in Debug mode
Select the debug target in the Debug toolbar, such as Web Server (Google Chrome) or Web Server (Microsoft Edge).

If you know your preferred debug target is available on your machine, but it doesn't appear as an option, select Browse With from the debug target dropdown list. Select your default browser target in the list, and select Set as Default.
Select F5 or select Debug > Start Debugging to run the app.
The debugger pauses at the breakpoint you set, so you can inspect your app state.
Hover over
getDatato see its properties in a DataTip:Select F5 or select Debug > Continue to continue running the app.
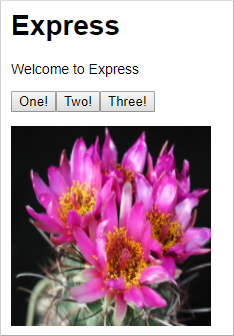
The app opens in a browser. In the browser window, you should see Express as the title and Welcome to Express as the first paragraph.
Select the One!, Two!, and Three! buttons to display different images.

Close the web browser.
Publish to Azure App Service (optional)
Congratulations on completing this tutorial!