Microsoft Entra Connect Sync: Configure preferred data location for Microsoft 365 resources
The purpose of this article is to walk you through how to configure the attribute for preferred data location in Microsoft Entra Connect Sync. When someone uses Multi-Geo capabilities in Microsoft 365, you use this attribute to designate the geo-location of the user’s Microsoft 365 data. (The terms region and geo are used interchangeably.)
Supported Multi-Geo locations
For a list of all geos supported by Microsoft Entra Connect, see Microsoft 365 Multi-Geo availability
Enable synchronization of preferred data location
By default, Microsoft 365 resources for your users are located in the same geo as your Microsoft Entra tenant. For example, if the Tenant is located in North America, then the users' Exchange mailboxes are also located in North America. For a multinational organization, this might not be optimal.
By setting the attribute preferredDataLocation, you can define a user's geo. You can have the user's Microsoft 365 resources, such as the mailbox and OneDrive, in the same geo as the user, and still have one tenant for your entire organization.
Important
As of June 1, 2023, Multi-Geo is available for CSP partners to purchase, at a minimum of 5% of their customer’s total Microsoft 365 subscription seats.
Multi-Geo is also available to customers with an active Enterprise Agreement. Please talk to your Microsoft representative for details.
For a list of all geos supported by Microsoft Entra Connect see Microsoft 365 Multi-Geo availability.
Microsoft Entra Connect support for synchronization
Microsoft Entra Connect supports synchronization of the preferredDataLocation attribute for User objects in version 1.1.524.0 and later. Specifically:
- The schema of the object type User in the Microsoft Entra Connector is extended to include the preferredDataLocation attribute. The attribute is of the type, single-valued string.
- The schema of the object type Person in the metaverse is extended to include the preferredDataLocation attribute. The attribute is of the type, single-valued string.
By default, preferredDataLocation isn't enabled for synchronization. This feature is intended for larger organizations. The Active Directory schema in Windows Server 2019 has an attribute msDS-preferredDataLocation you should use for this purpose. If you haven't updated the Active Directory schema and cannot do so, then you must identify an attribute to hold the Microsoft 365 geo for your users. This is going to be different for each organization.
Important
Microsoft Entra ID allows the preferredDataLocation attribute on cloud User objects to be directly configured by using Microsoft Graph PowerShell. To configure this attribute on synchronized User objects, you must use Microsoft Entra Connect.
Before enabling synchronization:
If you haven't upgraded the Active Directory schema to 2019, then decide which on-premises Active Directory attribute to be used as the source attribute. It should be of the type, single-valued string.
If you previously configured the preferredDataLocation attribute on existing synchronized User objects in Microsoft Entra ID by using Microsoft Graph PowerShell, you must backport the attribute values to the corresponding User objects in on-premises Active Directory.
Important
If you don't backport these values, Microsoft Entra Connect removes the existing attribute values in Microsoft Entra ID when synchronization for the preferredDataLocation attribute is enabled.
Configure the source attribute on at least a couple of on-premises Active Directory User objects now. You can use this for verification later.
The following sections provide the steps to enable synchronization of the preferredDataLocation attribute.
Note
The steps are described in the context of a Microsoft Entra deployment with single-forest topology, and without custom synchronization rules. If you have a multi-forest topology, custom synchronization rules configured, or have a staging server, you should adjust the steps accordingly.
Step 1: Disable sync scheduler and verify there is no synchronization in progress
To avoid unintended changes being exported to Microsoft Entra ID, ensure that no synchronization takes place while you are in the middle of updating synchronization rules. To disable the built-in sync scheduler:
- Start a PowerShell session on the Microsoft Entra Connect server.
- Disable scheduled synchronization by running this cmdlet:
Set-ADSyncScheduler -SyncCycleEnabled $false. - Start the Synchronization Service Manager by going to START > Synchronization Service.
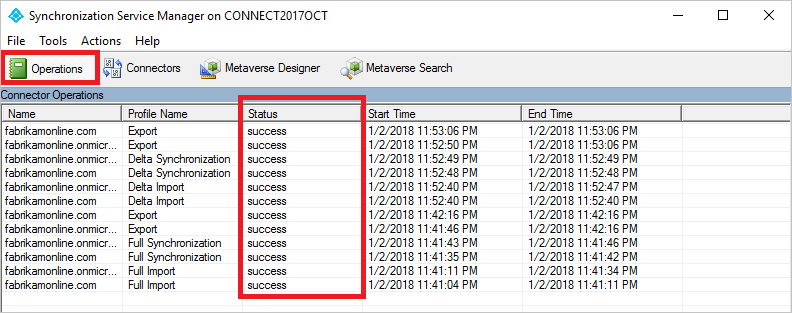
- Select the Operations tab, and confirm there's no operation with the status in progress.
Step 2: Refresh the schema for Active Directory
If you updated the Active Directory schema to 2019 and Connect was installed before the schema extension, then the Connect schema cache doesn't have the updated schema. You must then refresh the schema from the wizard for it to appear in the UI.
- Start the Microsoft Entra Connect wizard from the desktop.
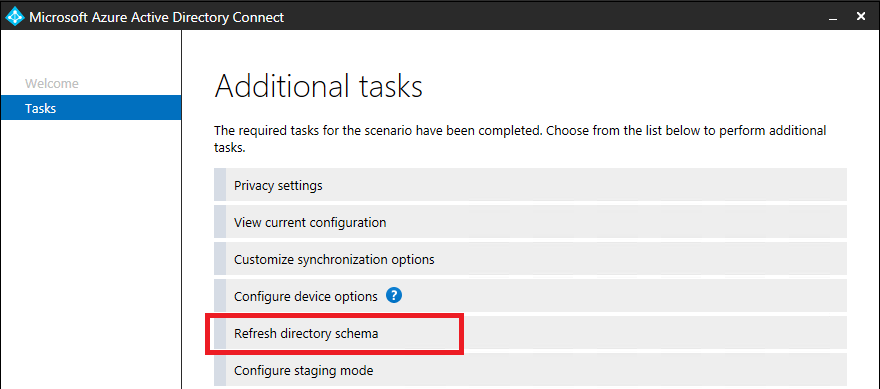
- Select the option Refresh directory schema and select Next.
- Enter your Microsoft Entra credentials and select Next.
- On the Refresh Directory Schema page, make sure all forests are selected, and select Next.
- When completed, close the wizard.
Step 3: Add the source attribute to the on-premises Active Directory Connector schema
This step is only needed if you run Connect version 1.3.21 or older. If you are on 1.4.18 or newer, then skip to step 5.
Not all Microsoft Entra attributes are imported into the on-premises Active Directory connector space. If you selected to use an attribute that isn't synchronized by default, then you need to import it. To add the source attribute to the list of the imported attributes:
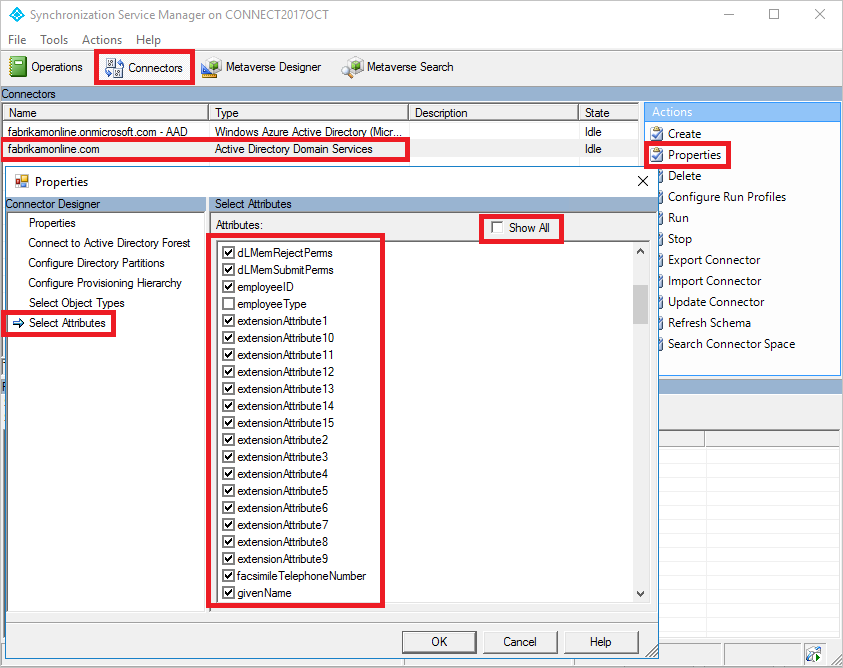
- Select the Connectors tab in the Synchronization Service Manager.
- Right-select the on-premises Active Directory Connector, and select Properties.
- In the pop-up dialog box, go to the Select Attributes tab.
- Make sure the source attribute you selected to use is checked in the attribute list. If you don't see your attribute, select the Show All check box.
- To save, select OK.
Step 4: Add preferredDataLocation to the Microsoft Entra Connector schema
This step is only needed if you run Connect version 1.3.21 or older. If you are on 1.4.18 or newer, then skip to step 5.
By default, the preferredDataLocation attribute isn't imported into the Microsoft Entra Connector space. To add it to the list of imported attributes:
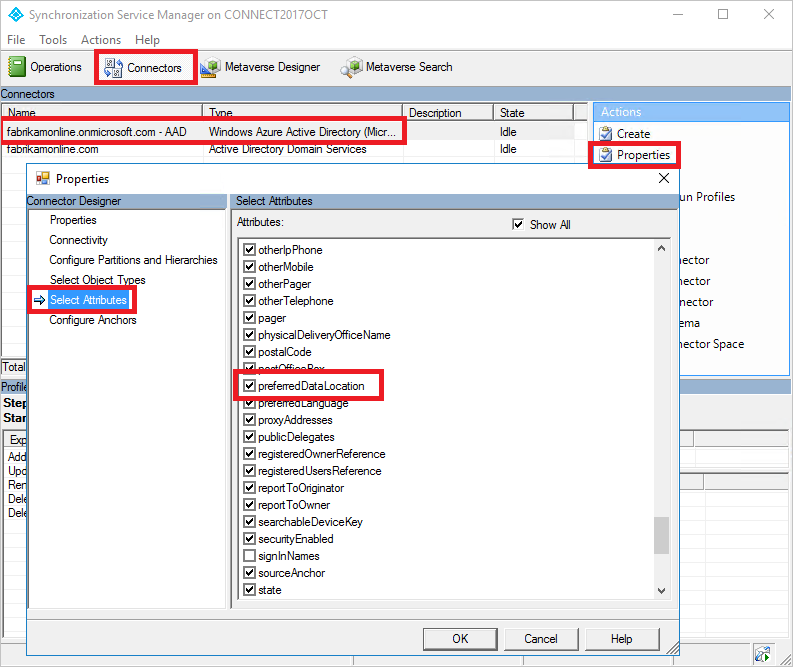
- Select the Connectors tab in the Synchronization Service Manager.
- Right-select the Microsoft Entra connector, and select Properties.
- In the pop-up dialog box, go to the Select Attributes tab.
- Select the preferredDataLocation attribute in the list.
- To save, select OK.
Step 5: Create an inbound synchronization rule
The inbound synchronization rule permits the attribute value to flow from the source attribute in on-premises Active Directory to the metaverse.
Start the Synchronization Rules Editor by going to START > Synchronization Rules Editor.
Set the search filter Direction to be Inbound.
To create a new inbound rule, select Add new rule.
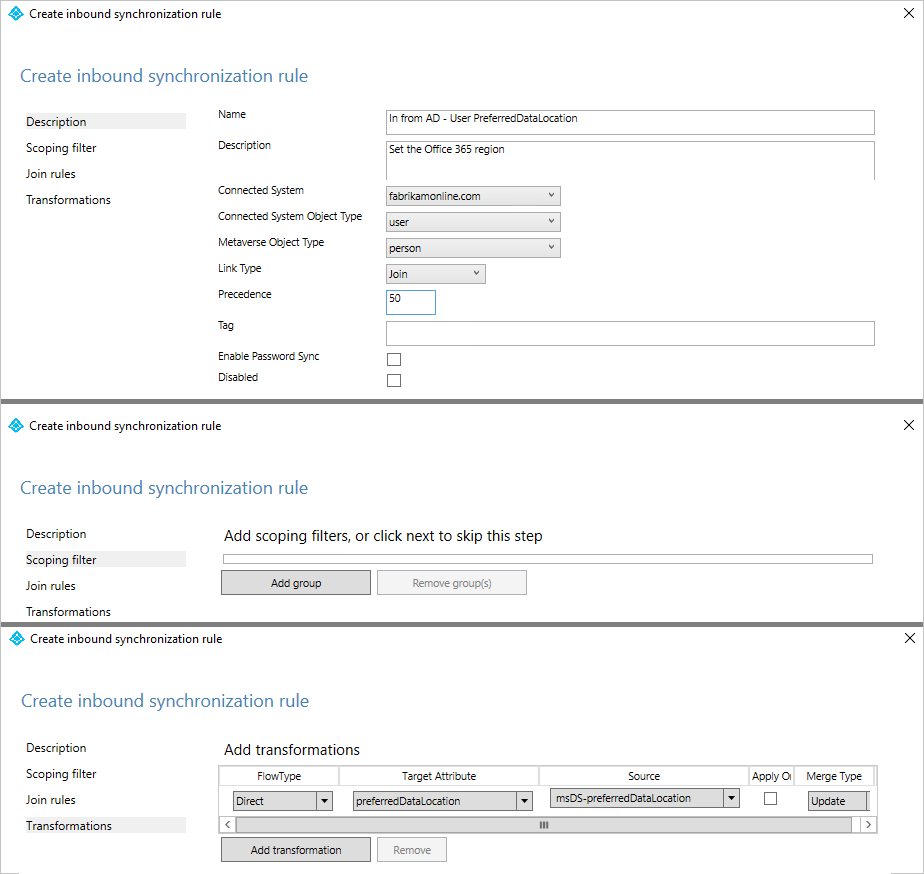
Under the Description tab, provide the following configuration:
Attribute Value Details Name Provide a name For example, “In from AD – User preferredDataLocation” Description Provide a custom description Connected System Pick the on-premises Active Directory Connector Connected System Object Type User Metaverse Object Type Person Link Type Join Precedence Choose a number between 1–99 1–99 is reserved for custom sync rules. Do not pick a value that is used by another synchronization rule. Keep the Scoping filter empty, to include all objects. You might need to tweak the scoping filter according to your Microsoft Entra Connect deployment.
Go to the Transformation tab, and implement the following transformation rule:
Flow type Target attribute Source Apply once Merge type Direct preferredDataLocation Pick the source attribute Unchecked Update To create the inbound rule, select Add.
Step 6: Create an outbound synchronization rule
The outbound synchronization rule permits the attribute value to flow from the metaverse to the preferredDataLocation attribute in Microsoft Entra ID:
Go to the Synchronization Rules Editor.
Set the search filter Direction to be Outbound.
Select Add new rule.
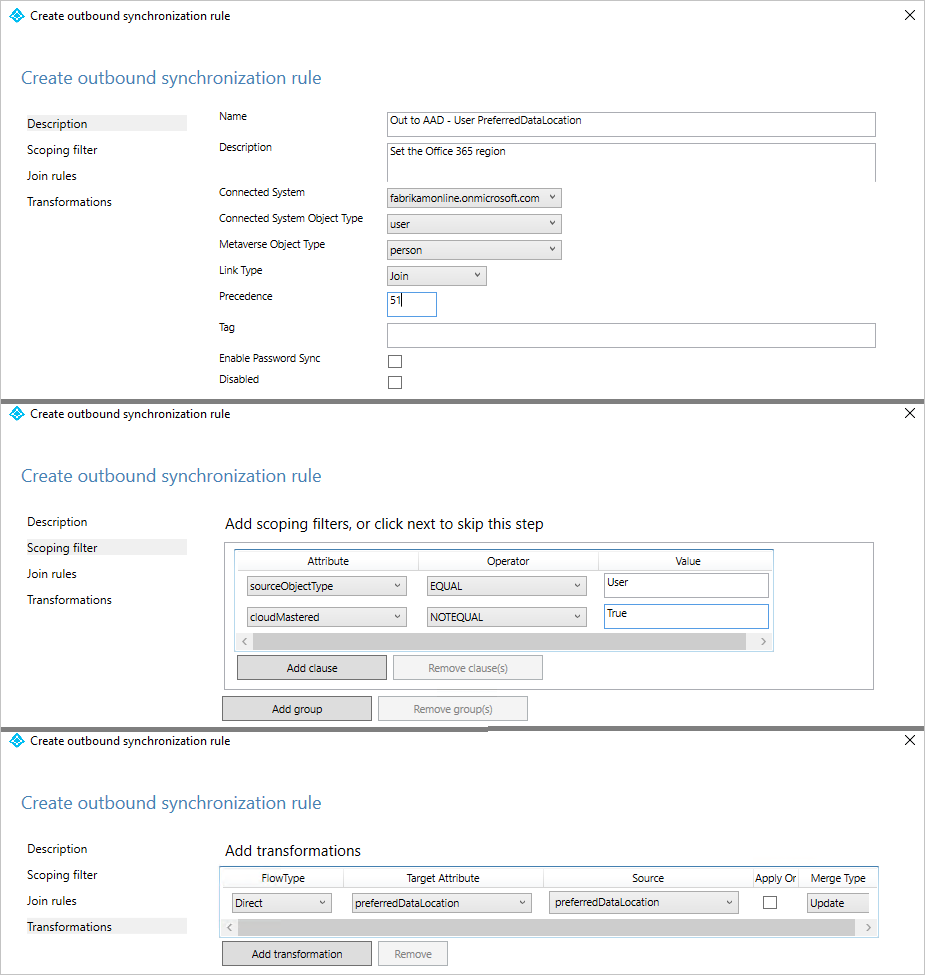
Under the Description tab, provide the following configuration:
Attribute Value Details Name Provide a name For example, “Out to Microsoft Entra ID – User preferredDataLocation” Description Provide a description Connected System Select the Microsoft Entra Connector Connected System Object Type User Metaverse Object Type Person Link Type Join Precedence Choose a number between 1–99 1–99 is reserved for custom sync rules. Do not pick a value that is used by another synchronization rule. Go to the Scoping filter tab, and add a single scoping filter group with two clauses:
Attribute Operator Value sourceObjectType EQUAL User cloudMastered NOTEQUAL True Scoping filter determines which Microsoft Entra objects this outbound synchronization rule is applied to. In this example, we use the same scoping filter from “Out to Microsoft Entra ID – User Identity” OOB (out-of-box) synchronization rule. It prevents the synchronization rule from being applied to User objects that are not synchronized from an on-premises Active Directory. You might need to tweak the scoping filter according to your Microsoft Entra Connect deployment.
Go to the Transformation tab, and implement the following transformation rule:
Flow type Target attribute Source Apply once Merge type Direct preferredDataLocation preferredDataLocation Unchecked Update Close Add to create the outbound rule.
Step 7: Run full synchronization cycle
In general, full synchronization cycle is required. This is because you added new attributes to both the Active Directory and Microsoft Entra Connector schema, and introduced custom synchronization rules. Verify the changes before exporting them to Microsoft Entra ID. You can use the following steps to verify the changes, while manually running the steps that make up a full synchronization cycle.
Run Full import on the on-premises Active Directory Connector:
Go to the Connectors tab in the Synchronization Service Manager.
Right-select the on-premises Active Directory Connector, and select Run.
In the dialog box, select Full Import, and select OK.
Wait for the operation to complete.
Note
You can skip full import on the on-premises Active Directory Connector if the source attribute is already included in the list of imported attributes. In other words, you did not have to make any change during step 2 earlier in this article.
Run Full import on the Microsoft Entra Connector:
- Right-select the Microsoft Entra Connector, and select Run.
- In the dialog box, select Full Import, and select OK.
- Wait for the operation to complete.
Verify the synchronization rule changes on an existing User object.
The source attribute from on-premises Active Directory, and preferredDataLocation from Microsoft Entra ID, is imported into each respective connector space. Before proceeding with the full synchronization step, do a preview on an existing User object in the on-premises Active Directory Connector space. The object you picked should have the source attribute populated. A successful preview with preferredDataLocation populated in the metaverse is a good indicator that you configured the synchronization rules correctly. For information about how to do a preview, see Verify the change.
Run Full Synchronization on the on-premises Active Directory Connector:
- Right-select the on-premises Active Directory Connector, and select Run.
- In the dialog box, select Full Synchronization, and select OK.
- Wait for the operation to complete.
Verify Pending Exports to Microsoft Entra ID:
Right-select the Microsoft Entra Connector, and select Search Connector Space.
In the Search Connector Space dialog box:
a. Set Scope to Pending Export.
b. Select all three check boxes, including Add, Modify, and Delete.
c. To view the list of objects with changes to be exported, select Search. To examine the changes for a given object, double-select the object.
d. Verify that the changes are expected.
Run Export on the Microsoft Entra Connector
- Right-select the Microsoft Entra Connector, and select Run.
- In the Run Connector dialog box, select Export, and select OK.
- Wait for the operation to complete.
Note
You might notice that the steps don't include the full synchronization step on the Microsoft Entra Connector, or the export step on the Active Directory Connector. The steps are not required, because the attribute values are flowing from on-premises Active Directory to Microsoft Entra-only.
Step 8: Re-enable sync scheduler
Re-enable the built-in sync scheduler:
- Start a PowerShell session.
- Re-enable scheduled synchronization by running this cmdlet:
Set-ADSyncScheduler -SyncCycleEnabled $true
Step 9: Verify the result
It's now time to verify the configuration and enable it for your users.
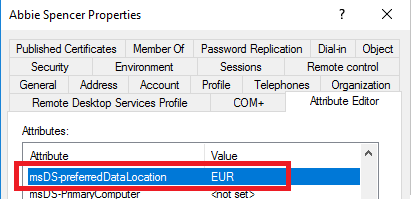
- Add the geo to the selected attribute on a user. The list of available geos can be found in this table.
- Wait for the attribute to be synchronized to Microsoft Entra ID.
- Using Exchange Online PowerShell, verify that the mailbox region is set correctly.

Assuming your tenant is marked to use this feature, the mailbox is moved to the correct geo. This can be verified by looking at the server name where the mailbox is located.
Next steps
Learn more about Multi-Geo in Microsoft 365:
Learn more about the configuration model in the sync engine:
- Read more about the configuration model in Understanding Declarative Provisioning.
- Read more about the expression language in Understanding Declarative Provisioning Expressions.
Overview topics: