Tutorial: Configure a sidecar container for custom container in Azure App Service
In this tutorial, you add an OpenTelemetry collector as a sidecar container to a Linux custom container app in Azure App Service. For bring-your-own-code Linux apps, see Tutorial: Configure a sidecar container for a Linux app in Azure App Service.
In Azure App Service, you can add up to nine sidecar containers for each sidecar-enabled custom container app. Sidecar containers let you deploy extra services and features to your container application without making them tightly coupled to your main application container. For example, you can add monitoring, logging, configuration, and networking services as sidecar containers. An OpenTelemetry collector sidecar is one such monitoring example.
For more information about side container in App Service, see:
- Introducing Sidecars for Azure App Service for Linux: Now Generally Available
- Announcing the general availability of sidecar extensibility in Azure App Service
If you don't have an Azure subscription, create an Azure free account before you begin.
1. Set up the needed resources
First you create the resources that the tutorial uses. They're used for this particular scenario and aren't required for sidecar containers in general.
In the Azure Cloud Shell, run the following commands:
git clone https://github.com/Azure-Samples/app-service-sidecar-tutorial-prereqs
cd app-service-sidecar-tutorial-prereqs
azd env new my-sidecar-env
azd provision
When prompted, supply the subscription and region you want. For example:
- Subscription: Your subscription.
- Region: (Europe) West Europe.
When deployment completes, you should see the following output:
 APPLICATIONINSIGHTS_CONNECTION_STRING = InstrumentationKey=...;IngestionEndpoint=...;LiveEndpoint=...

 Open resource group in the portal: https://portal.azure.com/#@/resource/subscriptions/.../resourceGroups/...
Open the resource group link in a browser tab. You'll need to use the connection string later.
Note
azd provisionuses the included templates to create the following Azure resources:- A resource group called my-sidecar-env_group.
- A container registry with two images deployed:
- An Nginx image with the OpenTelemetry module.
- An OpenTelemetry collector image, configured to export to Azure Monitor.
- A log analytics workspace
- An Application Insights component
2. Create a sidecar-enabled app
In the resource group's management page, select Create.
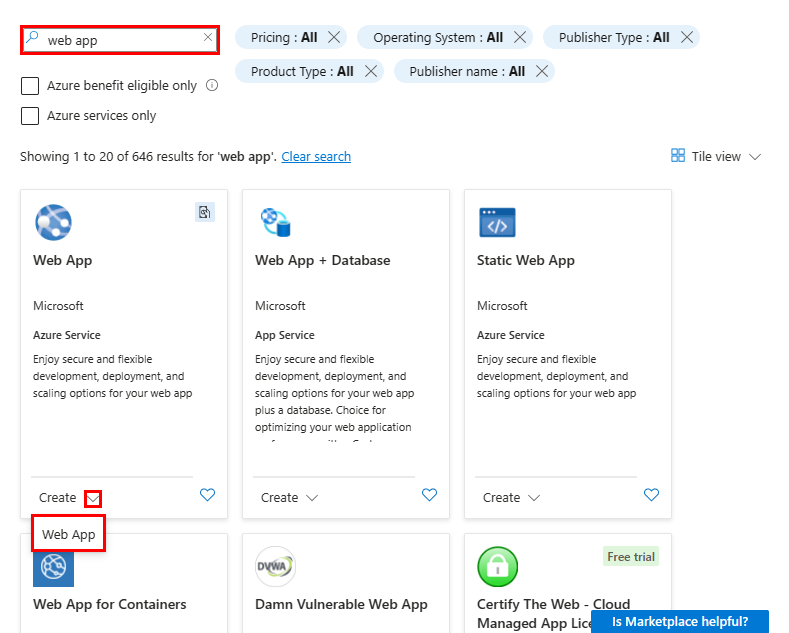
Search for web app, then select the down arrow on Create and select Web App.
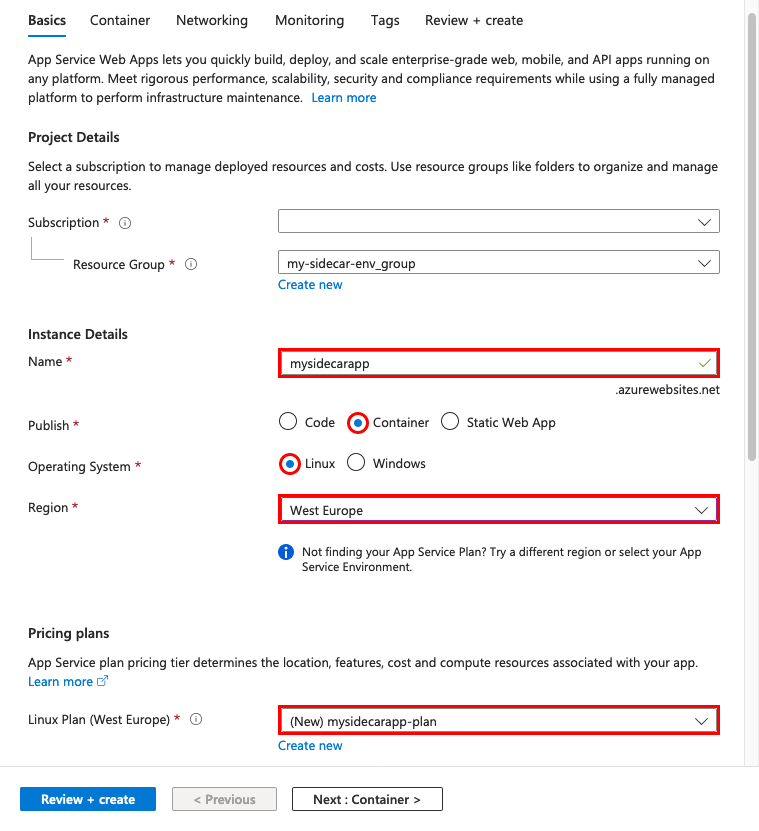
Configure the Basics panel as follows:
- Name: A unique name
- Publish: Container
- Operating System: Linux
- Region: Same region as the one you chose with
azd provision - Linux Plan: A new App Service plan
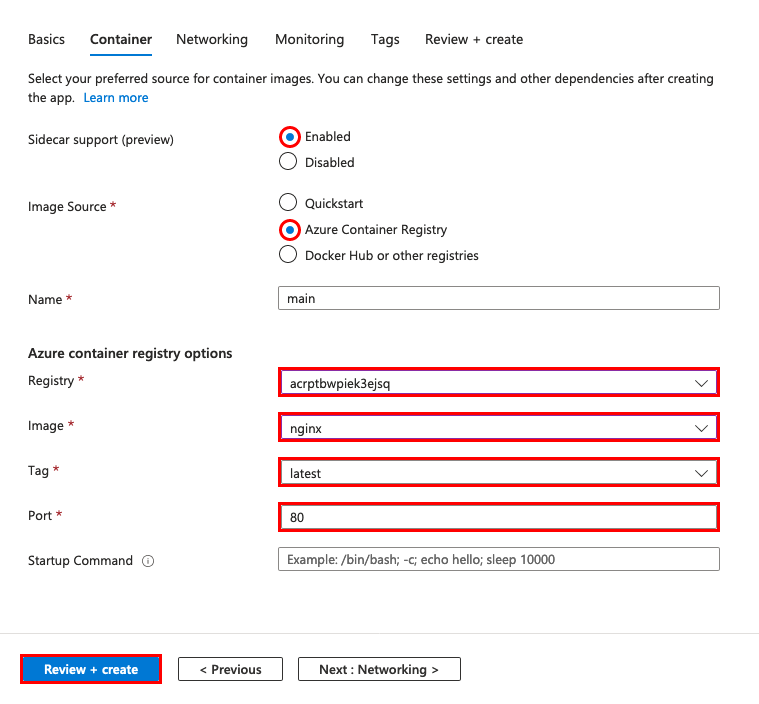
Select Container. Configure the Container panel as follows:
- Sidecar support: Enabled
- Image Source: Azure Container Registry
- Registry: The registry created by
azd provision - Image: nginx
- Tag: latest
- Port: 80
Note
These settings are configured differently in sidecar-enabled apps. For more information, see Differences for sidecar-enabled apps.
Select Review + create, then select Create.
Once the deployment completes, select Go to resource.
In a new browser tab, navigate to
https://<app-name>.azurewebsites.netand see the default Nginx page.
3. Add a sidecar container
In this section, you add a sidecar container to your custom container app.
In the app's management page, from the left menu, select Deployment Center.
The deployment center shows you all the containers in the app. Right now, it only has the main container.
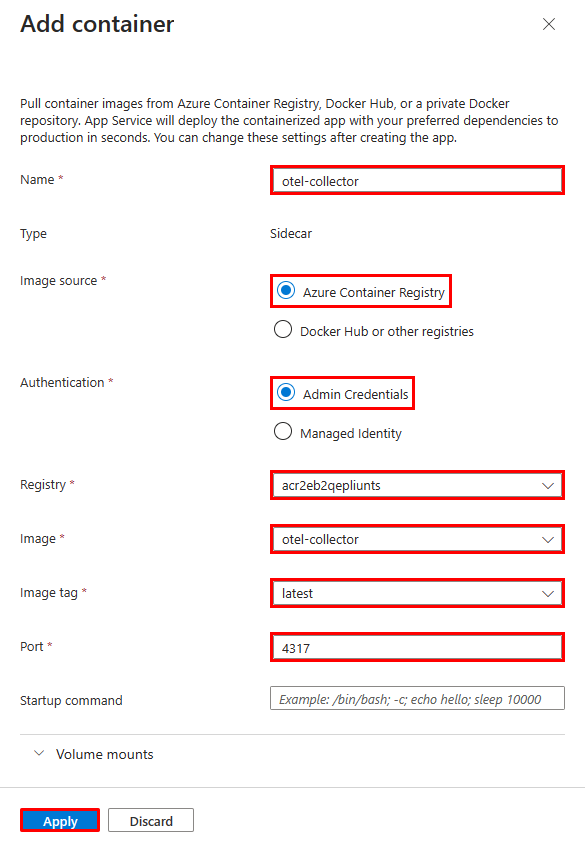
Select Add and configure the new container as follows:
- Name: otel-collector
- Image source: Azure Container Registry
- Registry: The registry created by
azd provision - Image: otel-collector
- Tag: latest
Select Apply.
You should now see two containers in the deployment center. The main container is marked Main, and the sidecar container is marked Sidecar. Each app must have one main container but can have multiple sidecar containers.
4. Configure environment variables
For the sample scenario, the otel-collector sidecar is configured to export the OpenTelemetry data to Azure Monitor, but it needs the connection string as an environment variable (see the OpenTelemetry configuration file for the otel-collector image).
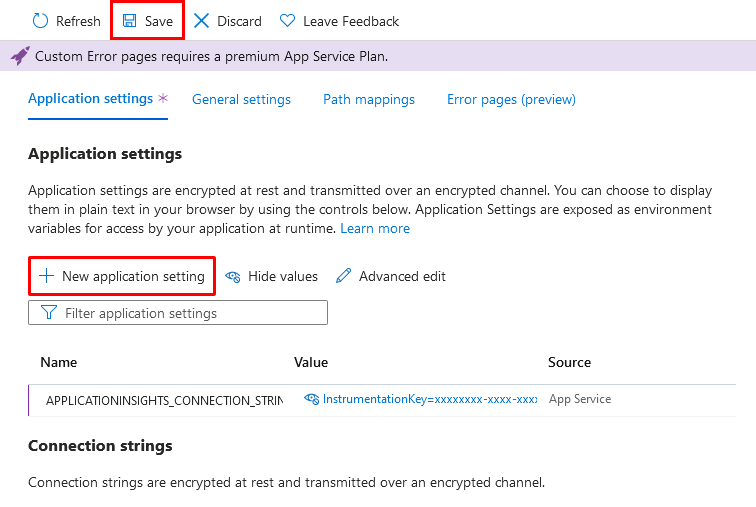
You configure environment variables for the containers like any App Service app, by configuring app settings. The app settings are accessible to all the containers in the app.
In the app's management page, from the left menu, select Environment variables.
Add an app setting by selecting Add and configure it as follows:
- Name: APPLICATIONINSIGHTS_CONNECTION_STRING
- Value: The connection string in the output of
azd provision. If you lost the Cloud Shell session, you can also find it in the Overview page of the Application Insight resource, under Connection String.
Select Apply, then Apply, then Confirm.
Note
Certain app settings don't apply to sidecar-enabled apps. For more information, see Differences for sidecar-enabled apps
5. Verify in Application Insights
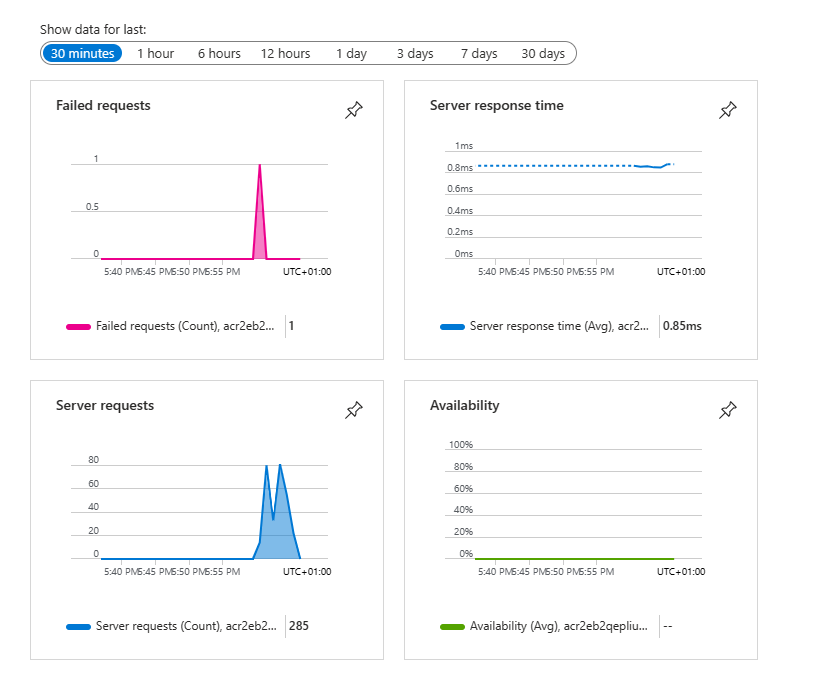
The otel-collector sidecar should export data to Application Insights now.
Back in the browser tab for
https://<app-name>.azurewebsites.net, refresh the page a few times to generate some web requests.Go back to the resource group overview page, then select the Application Insights resource. You should now see some data in the default charts.
Note
In this very common monitoring scenario, Application Insights is just one of the OpenTelemetry targets you can use, such as Jaeger, Prometheus, and Zipkin.
Clean up resources
When you no longer need the environment, you can delete the resource group, App service, and all related resources. Just run this command in the Cloud Shell, in the cloned repository:
azd down
How do sidecar containers handle internal communication?
Sidecar containers share the same network host as the main container, so the main container (and other sidecar containers) can reach any port on the sidecar with localhost:<port>. This is exactly how the Nginx container sends data to the sidecar (see the OpenTelemetry module configuration for the sample Nginx image).
In the Edit container dialog, the Port box isn't currently used by App Service. You can use it as part of the sidecar metadata, such as to indicate which port the sidecar is listening to.
Differences for sidecar-enabled apps
You configure sidecar-enabled apps differently than apps that aren't sidecar-enabled. Specifically, you don't configure the main container and sidecars with app settings, but directly in the resource properties. These app settings don't apply for sidecar-enabled apps:
- Registry authentication settings:
DOCKER_REGISTRY_SERVER_URL,DOCKER_REGISTRY_SERVER_USERNAMEandDOCKER_REGISTRY_SERVER_PASSWORD. - Container port:
WEBSITES_PORT