Tutorial: Configure outbound connectivity with a gateway load balancer
Azure Load Balancer consists of Standard, Basic, and Gateway SKUs. Gateway Load Balancer (GWLB) is used for transparent insertion of Network Virtual Appliances (NVA). Use Gateway Load Balancer for scenarios that require high performance and high scalability of NVAs.
In this tutorial, you learn how to:
- Chain a virtual machine’s IP or to a Gateway Load Balancer.
- Create a new load balancer frontend IP configuration.
- Create an outbound rule for virtual machine traffic.
Prerequisites
- An Azure account with an active subscription. Create an account for free.
- An existing public standard SKU Azure Load Balancer. For more information on creating a load balancer, see Create a public load balancer using the Azure portal.
- For the purposes of this tutorial, the standard load balancer is named myLoadBalancer and is located in a resource group called myResourceGroup.
- An existing Gateway SKU Azure Load Balancer. For more information on creating a gateway load balancer, see Create a gateway load balancer using the Azure portal.
- For the purposes of this tutorial, the gateway load balancer in the examples is name myGatewayLoadBalancer.
- A virtual machine or network virtual appliance deployed in the same region and resource group as the load balancers. For more information on deploying a virtual machine, see Create a Windows VM in the Azure portal.
- For the purposes of this tutorial, the virtual machine is named myVM1.
Chain a virtual machine to a gateway load balancer
In this section, you chain an existing virtual machine’s public IP to a gateway load balancer. A gateway load balancer can be inserted in the path of outbound traffic by chaining to virtual machine instance level public IPs. This method secures both inbound and outbound traffic reaching or originating from this virtual machine’s public IP.
Navigate to your existing virtual machine. This example uses a virtual machine named myVM1.
To verify your virtual machine has a standard SKU public IP associated with it, select Public IP address > Overview and confirm that the SKU is Standard.
Return to your virtual machine.
In Overview of the virtual machine, select Networking under Settings.
Select the network interface attached to the virtual machine. This example uses myvm1185_z1.

In Network interface, select IP configurations under Settings.
Select myFrontend in Gateway Load balancer.

Select Save.
Create a load balancer frontend
In this section, you create a new frontend IP configuration for outbound traffic in our existing standard public load balancer. Using separate public IPs for inbound and outbound traffic is a recommend best practice. Reusing the same public IP for inbound and outbound traffic can increase the risk of SNAT exhaustion, as load balancing and inbound NAT rules decrease the number of available SNAT ports.
Navigate to myLoadBalancer or your existing standard public load balancer and go to the Frontend IP configuration under Settings.
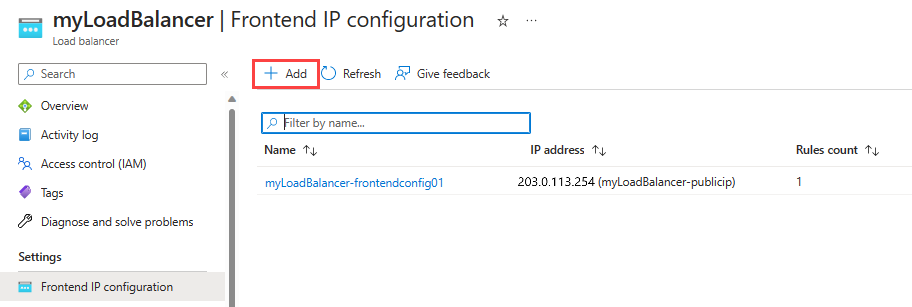
Select + Add to create a new frontend IP configuration
In the Add frontend IP configuration page, enter or select the following information:
Setting Value Name Enter myOutboundFrontend. IP version Select IPv4. IP type Select IP address. Public IP address
Select Create new.
In Add a public IP address, enter myOutboundPublicIP for name, and select Ok.Gateway Load balancer Select myGatewayLoadBalancerFrontEnd. 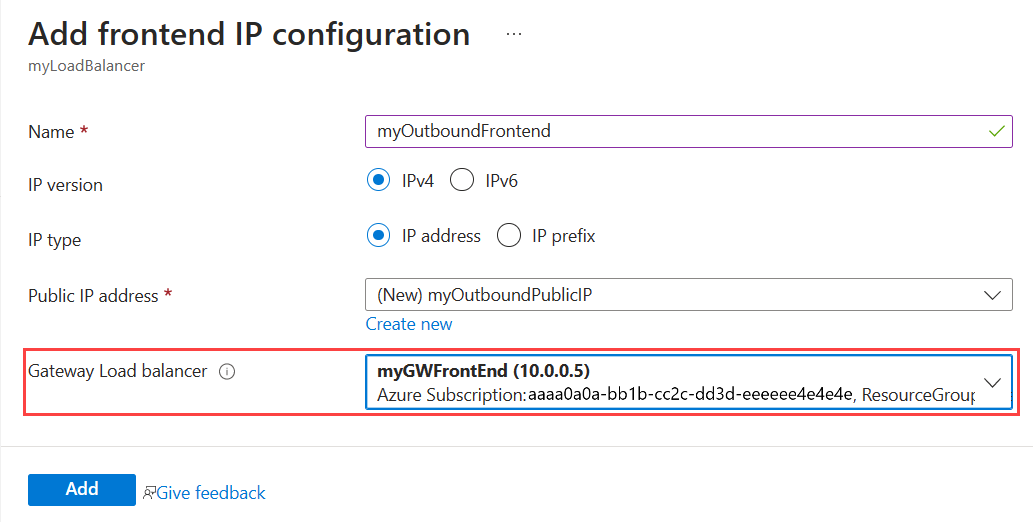
Select Add.
Note
This step will chain your frontend to the gateway load balancer frontend specified. Any inbound or outbound traffic served by this frontend is redirected to the gateway load balancer for inspection by the configured NVAs before being distributed to this load balancer’s backend instances.
Create outbound rule
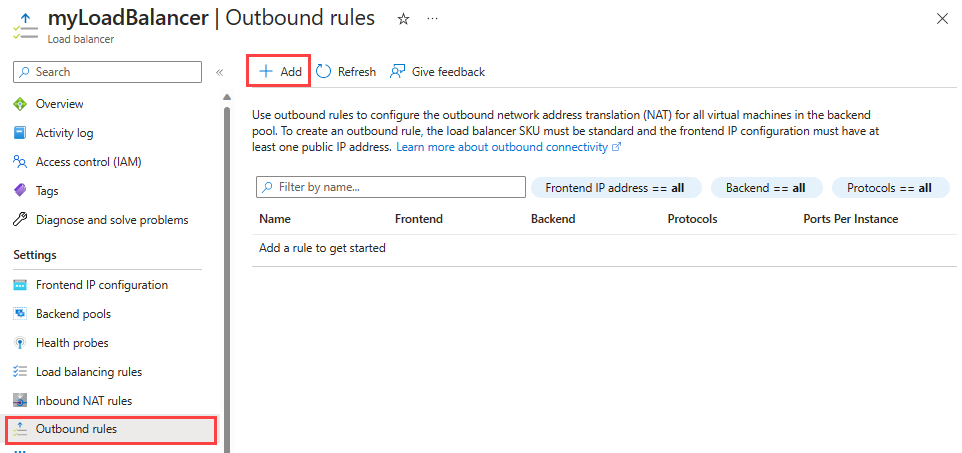
In Load balancer, select Outbound rules under Settings.
Select + Add in Outbound rules to add a rule.
In Add outbound rule window, Enter or select the following information in:
Setting Value Name Enter myOutboundRule. IP version Select IPv4. Frontend IP address Select the frontend IP address of the load balancer. This example uses myOutboundFrontend. Protocol Leave the default of All. Idle timeout (minutes) Enter 4 or your desired value. TCP Reset Leave the default of Enabled. Backend pool Select the backend pool of the load balancer. This example uses myBackendPool. Port allocation Port allocation Select Manually choose number of outbound ports Outbound ports Choose by Select Maximum number of backend instances. Ports per instance Enter the anticipated maximum number of backend instances. This example uses 2 backend instances. 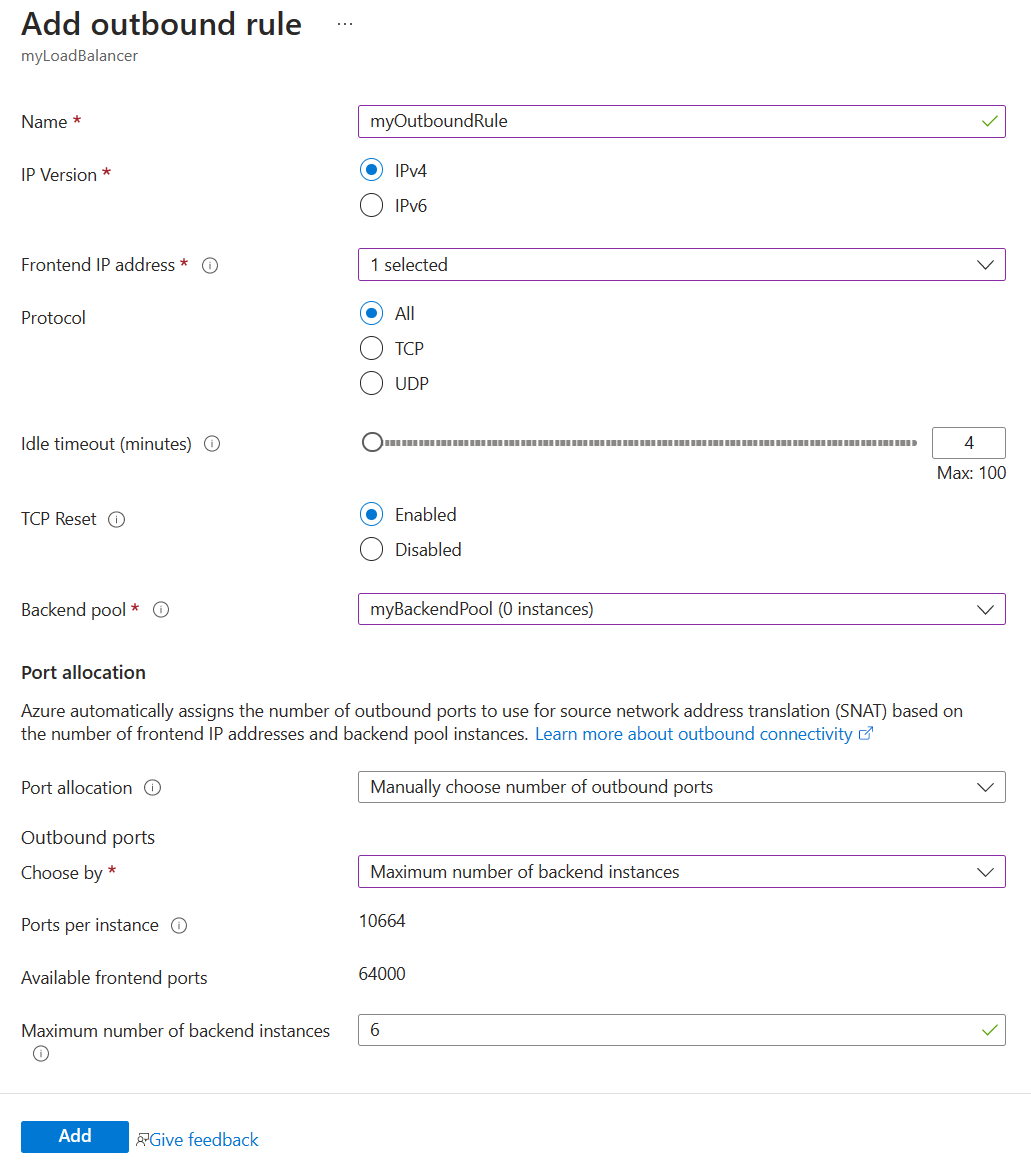
Select Add.
Important
Gateway load balancer doesn't currently support chaining with NAT Gateway. Outbound traffic originating from Azure virtual machines, served through NAT Gateway, goes directly to the Internet. And that NAT Gateway takes precedence over any instance-level public IPs or load balancers for outbound traffic.
NAT Gateway can be configured for outbound connectivity together with a Standard Public Load Balancer and Gateway Load Balancer architecture for inbound connectivity. In this scenario, all inbound traffic flows as expected through the gateway load balancer to the Standard load balancer, while outbound traffic goes to the Internet directly.
If NVAs need to be inserted for outbound traffic, apply the methods described in this article. For example, chaining an instance-level public IP or outbound rules load balancer frontend to a gateway load balancer.
Clean up resources
When no longer needed, delete the resource group, load balancer, and all related resources. To do so, select the resource group myResourceGroup that contains the resources and then select Delete.
Next steps
In this tutorial, you learned how to:
- Chained a virtual machine’s IP address to a Gateway Load Balancer.
- Created a new load balancer frontend IP configuration.
- Created an outbound rule for virtual machine traffic.
Learn how to deploy highly available NVAs with Azure Load Balancer.