Create and publish workflow templates for Azure Logic Apps (Preview)
Important
This capability is in preview and is subject to the Supplemental Terms of Use for Microsoft Azure Previews.
Applies to: Azure Logic Apps (Standard)
Azure Logic Apps provides prebuilt integration workflow templates that you can use to accelerate the process of building integration applications. These templates follow commonly used patterns and help you streamline development by providing a starting point or baseline with predefined business logic and configurations.
Not only can you kickstart development with workflow templates, you can create workflow templates for your own use or share them with others. Your template can include artifacts such as schemas, maps, and custom assemblies. To add your template to the templates gallery in the Azure portal, create a template package by using this how-to guide. When you're done, visit the workflow template repository in GitHub for Azure Logic Apps where you can create a pull request for your template package and have the Azure Logic Apps team review your template.
Limitations
Workflow templates currently support only Standard logic apps and single workflows.
What does a template package include?
The following table describes the required and optional files in a template package:
| File name | Required | Description |
|---|---|---|
| workflow.json | Yes | A JSON file with your workflow definition. |
| manifest.json | Yes | A JSON file with information about your workflow and related components. |
| <image-name>-dark.png | Yes | An image file with the workflow as a read-only screenshot in .png format and works with a browser's dark theme. |
| <image-name>-light.png | Yes | An image file with the workflow as a read-only screenshot in .png format and works with a browser's light theme. |
| <map-name>.json, .xml, or .xslt | No | Any artifacts such as maps and schemas that support your workflow template. |
| <custom-assembly>.dll | No | Any custom assemblies that support your workflow template. |
| readme.md | No | A Markdown file with instructions, procedures, or other information for your workflow template. |
You can also include any other files to maintain and support your template, for example, files with test or sample data.
Create a template package folder
Before you create the template package folder, get familiar with Names and style conventions.
To keep the template repository easier to browse, organize, and maintain, use the following syntax for your folder name and the fewest number of words to avoid exceeding the character limit for file paths:
<workflow-task>-<product>-<pattern-or-protocol, if any>
For examples, see the workflow template repository for Azure Logic Apps in GitHub.
To correctly register your template package folder, you must add the folder name to the repository's root-level manifest.json file.
Create a workflow.json file
The workflow.json file contains the underlying definition for a workflow in JSON format. To create the workflow.json file, you need to copy and save your workflow definition as a file named workflow.json.
For the easiest and best way to get the workflow definition, create your workflow using the designer. Make sure to review Workflow best practices along with Names and style conventions. Or, as a starting point, you can use the prebuilt workflow templates from the template gallery in the Azure portal.
As you build your workflow, the designer automatically includes references to any added built-in, service provider connections, managed API connections, or libraries in the underlying workflow definition.
After you're done, copy the underlying workflow definition to an empty workflow.json file.
Workflow best practices
Use the built-in operations as much as possible. For example, the Azure Blob Storage connector has the following versions available for Standard workflows:
A built-in, service provider version, which appears in the connectors gallery with the In App label. This version is hosted and run with the single-tenant Azure Logic Apps runtime, offering better performance, throughput, and other benefits.
A Microsoft-managed API version, which appears in the connectors gallery with the Shared label. This version is hosted and run in multitenant Azure using shared global resources.
Don't use hardcoded properties and their values in trigger and action definitions.
Provide more context about trigger and action definitions by adding descriptive and helpful comments.
Copy the underlying workflow definition
In the Azure portal, on the workflow menu, under Developer, select Code.
From the code view window, copy the entire workflow definition, for example:
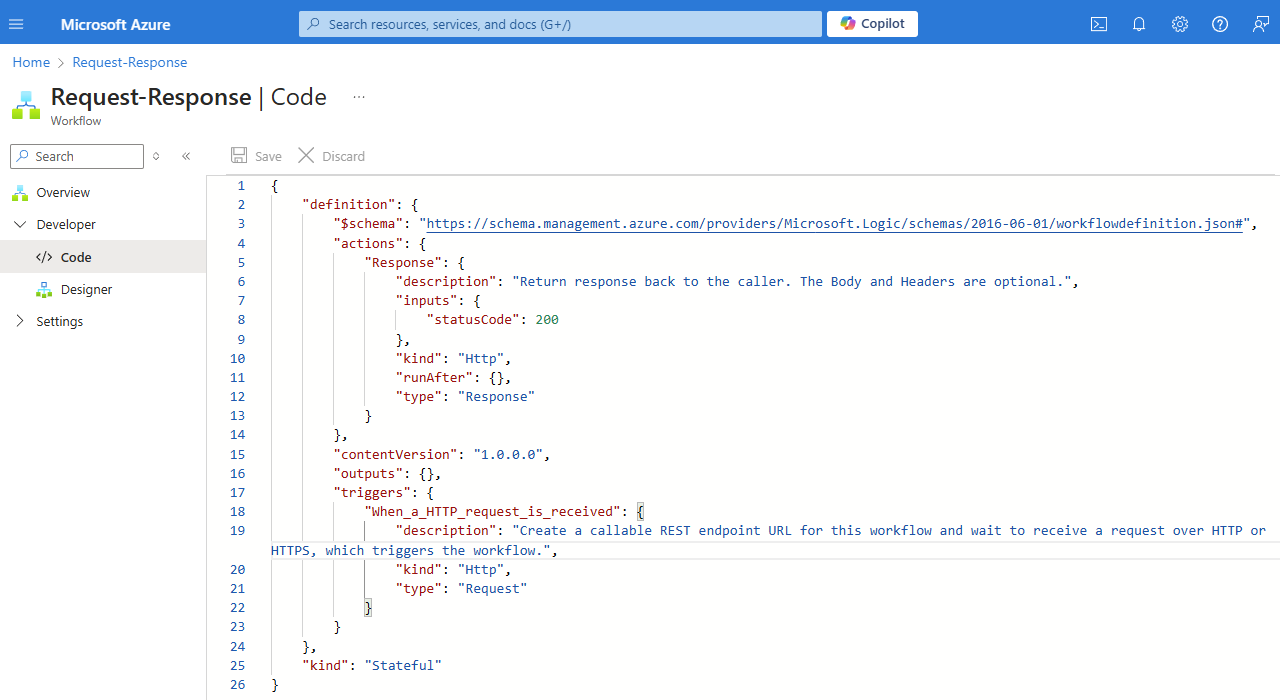
In an empty file named workflow.json, save the workflow definition.

Parameter references in workflow.json
When you reference parameters in the workflow.json file, you must reflect the parameter names that use the suffix _#workflowname# in the following way:
"name": "@parameters('<parameter-name>_#workflowname#')"
For example:
"name": "@parameters('sharepoint-folder-path_#workflowname#')"
Connection references in workflow.json
When you reference connections in the workflow.json file, you must reflect the connection names that use the suffix _#workflowname# in the following way:
"referenceName": "<connector-ID>_#workflowname#",
"connectionName": "<connector-ID>_#workflowname#"
For example:
"referenceName": "azureaisearch_#workflowname#",
"connectionName": "azureaisearch_#workflowname#"
For more information about the connector ID, see Find the connector ID.
Create a workflow template image
In the Azure portal, each workflow template has an overview pane in the workflow templates gallery. This pane includes a read-only preview image for the workflow that the template creates plus other template information.
To create this preview image, follow these steps:
In the designer, set up your workflow for creating two screenshots.
You need to create a version each for the browser light theme and dark theme.
Create the workflow screenshots using your preferred screen capture tool. Don't include too much whitespace around the workflow.
Save each image using the .png file name extension and any name that you want, following the Names and style conventions.
In the manifest.json file for your workflow template package, add the same image names to the
imagessection without the .png file name extension, for example:"images": { "dark": "workflow-dark", "light": "workflow-light" }
Create a manifest.json file
The manifest.json file describes the relationship between a workflow and related components. Currently, you need to manually create this file, or you can repurpose the manifest.json file from an existing prebuilt template in the Azure Logic Apps workflow template repository in GitHub. As you create the manifest.json file, make sure to review the names and style conventions.
The following table describes the attributes in the manifest.json file:
| Attribute name | Required | Value | Description |
|---|---|---|---|
title |
Yes | <template-title> | The title that appears in the templates gallery, which opens when you add a workflow from a template in the Azure portal. |
description |
Yes | <template-description> | The template description, which appears on the template's overview pane in the template gallery. |
prerequisites |
No | <template-prerequisites> | Any prerequisites to meet for using the template. Appears in the template's overview pane. You can link to other documents from this section. |
tags |
No | <template-tags-array> | The template tags to use for searching or filtering templates. |
skus |
Yes | standard, consumption |
The logic app workflow type supported by the template. If you're not sure, use standard. |
kinds |
No | stateful, stateless |
The workflow mode, which determines whether run history and operation states are stored. By default, all workflows are available in both stateful and stateless mode. If your workflow only runs in stateful mode, use this attribute to make this requirement explicit. |
detailsDescription |
No | See description. | Any other detailed description information for the template. |
details |
No | See description. | Template information to use for filtering the templates gallery. - By: The template publisher, for example, Microsoft. - Type: Workflow - Trigger: The trigger type, for example, Recurrence, Event, or Request. |
artifacts |
Yes | <artifacts-array> | All the relevant files in the template package and includes the following attributes: - type: The file type, which determines the appropriate location for where to copy the file, for example, workflow. - file: The file name and extension, for example, workflow.json. |
images |
Yes | See description. | The workflow image file names for both browser light and dark themes: - light: Image name for light theme, for example, workflow-light - dark: Image name for dark theme, for example, workflow-dark. |
parameters |
Yes, but can be empty if none exist | <workflow-parameters-array> | The parameters for the actions in the workflow template. For each parameter, you need to specify the following properties: - name: The parameter name must have the suffix, _#workflowname#. Use only alphanumeric characters, hyphens or underscores, and follow this format: <parameter-name>_#workflowname# - displayName: The parameter's friendly display name. See Names and style conventions. - type: The parameter's data type, for example, String or Int. - default: The parameter's default value, if any. If none, leave this value as an empty string. - description The parameter's details and other important or helpful information. - required: true or false |
connections |
Yes, but can be empty if none exist. | <connections-array> | The connections to create using the workflow template. Each connection has the following properties: - connectorId: The connector ID must have the suffix, _#workflowname#. Use only alphanumeric characters, hyphens or underscores, and follow this format: <connector-ID>_#workflowname# To find the connector ID, see Find the connector ID. - kind: The connector's runtime host type, which is either inapp for built-in operations and service provider connectors or shared for managed, Azure-hosted connectors. In the connectors gallery, built-in operations and service provider connectors are labeled as In App, while managed connectors are labeled as Shared. |
featuredConnections |
No | <featured-connections-array> | By default, the template gallery shows icons for the prebuilt operations and connectors in Azure Logic Apps used by each template. To include icons for any other operations, you can use the featuredConnections attribute. Each operation must have the following attributes: - kind: The operation kind - type: The operation type To find these values, see Find the operation kind and type for featuredConnections section. |
Find the connector ID
To find the connector ID to use for a connection in the manifest.json file or a connection reference in the workflow.json file, follow these steps:
In the Azure portal, open your logic app resource.
On the logic app menu, under Workflows, select Connections.
Select the JSON View tab.
Based on the connection type, follow these steps:
For a managed, "shared" API connection that is hosted and run in Azure:
Find the
managedApiConnectionssection.In the
connectionattribute, copy and save theidvalue, but replace any personal or sensitive data, such as the subscription ID, resource group name, and so on, with#<item>#:/subscriptions/#subscription#/providers/Microsoft.Web/locations/#location#/managedApis/<connection-name>For example, the following text shows the connector ID for the SharePoint connector:
/subscriptions/#subscription#/providers/Microsoft.Web/locations/#location#/managedApis/sharepointonline
For a service provider connection that is hosted on the single-tenant Azure Logic Apps runtime:
Find the
serviceProviderConnectionssection.For each connection, find the
idattribute in theserviceProviderattribute.Copy and save the following value:
/serviceProviders/<connection-name>For example, the following text shows the connector ID for the Azure AI Search connector:
/serviceProviders/azureaisearch.
Find the operation 'kind' and 'type' properties for featuredConnections
In the manifest.json file, the featuredConnections section can include icons for any other operations that you want to include with the template gallery in the Azure portal. For this section, which is an array, you need to provide the kind and type attributes for each operation.
To get these attribute values, follow these steps in the Azure portal with your opened workflow:
On the workflow menu, under Developer, select Code.
In the code view window, in the
actionssection, find the operation that you want, and then find thekindandtypevalues.
Add template package to GitHub repository
To publish your template to the templates gallery in the Azure portal, set up GitHub, and create a pull request with your template package for validation and review:
Create a GitHub account, if you don't have one.
For more information, see Get started with your GitHub account.
Go to the workflow template repository named LogicAppsTemplates for Azure Logic Apps in GitHub.
Create your own fork, which is a remote copy of the LogicAppsTemplates repository in GitHub.
For more information, see Forking a repository.
To work locally, clone your fork onto your computer.
Go to your fork, which has the following URL:
https://github.com/<your-username>/LogicAppsTemplatesOn your local computer, create a folder named GitHub, if you don't have one already. Don't clone to a OneDrive synced folder.
Follow these steps to clone your fork, not the production repository.
In your local repository, follow these steps to create a working branch.
After you check out your working branch, go to the root level in your local repository, and create the template package folder.
Add your template files to the template package folder, and update the root-level manifest.json file with the folder name.
When you're ready to commit your changes to your local repository, which is like saving a snapshot, run the following commands using the Git command-line tool or other tools:
git add .git commit -m "<commit-short-description>"To upload your snapshot to your remote fork, run the following command:
git push origin <your-working-branch>
In GitHub, create a pull request to compare <your-working-branch> with the main branch in the LogicAppsTemplates repository.
Go to the repository's Pull requests page, and select New pull request.
Under Compare changes, select Compare across forks.
Make sure that your pull request has the following settings, and then select Create pull request.
Base repository Base Head repository Compare Azure/LogicAppsTemplates main <user-name>/LogicAppsTemplates <your-working-branch> 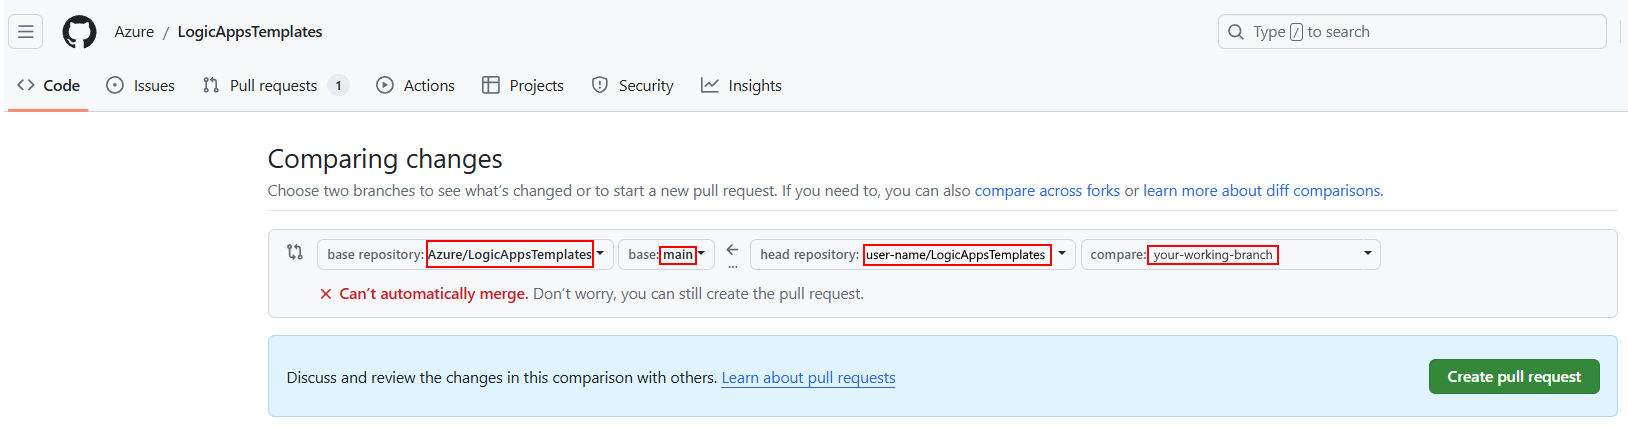
Enter a title and description for your pull request. To finish, select Create pull request.
Wait for the Azure Logic Apps team to review your pull request.
For more information, see Creating a pull request from a fork.

Names and style conventions
| Area | Convention |
|---|---|
| Sensitive data | Don't include or upload personal and sensitive data in template files, screenshots, descriptions, or test data. For example, this data includes subscription IDs, usernames, passwords, and so on. |
| Folder names | For easier readability, use lowercase and hyphens when possible. See Capitalization – Microsoft Style Guide. |
| Image file names | Use the .png as the file name extension, lowercase, and hyphens, for example, workflow-light.png. |
| Product, service, technology, and brand names | Follow the official spelling and capitalization. For example: - When you refer to the service name or platform, use "Azure Logic Apps", not "Logic Apps". - When you refer to the resource or instance, use "logic apps" or "logic app", not "Logic App" or "Logic Apps". - When you refer to the sequence of trigger and actions, use "logic app workflow" or "workflow". |
| Abbreviations and acronyms | Use the expanded name for product, service, technology, brand names, and uncommon technical terms, not abbreviations or acronyms. Common acronyms, such as "HTTP" and "URL", are acceptable. For example, use "Visual Studio Code", not "VS Code". See Acronyms – Microsoft Style Guide. |
| Other text | - Use sentence case for titles, headings, and body content, which means that you capitalize only the first letter unless you have product, service, technology, or brand name. - Don't capitalize ordinary nouns and articles, such as "a", "an", "and", "or", "the", and so on. |
| Voice | - Use second person voice (you and your), rather than third person (users, developers, customers) unless you need to refer to specific roles. See Person – Microsoft Style Guide. - Use an active, direct, but friendly tone when possible. Active voice focuses on the subject and verb in text, while passive voice focuses on the object in text. |
| Vocabulary | - Use simple, common, everyday words, such as "use", rather than "utilize" or "leverage". - Don't use words, phrases, jargon, colloquialisms, idioms, or slang that don't translate well across languages. - Use "please" only for specific scenarios. See please – Microsoft Style Guide. - Use "for example" or "such as", not "e.g." or "i.e.". - Don't use directional terms such as "here", "above", "below", "right", and "left", which aren't accessible friendly. |
| Punctuation | - For a series of items, include the last comma before the conjunction, such as "and". For example, "apples, oranges, and bananas". See Commas – Microsoft Style Guide. - End full sentences with appropriate punctuation. Don't use exclamation points. See Punctuation – Microsoft Style Guide. |
| Formatting | - For code, follow the style convention for that code's language. - Don't use hardcoded links, which break if the URLs change. In your PR request, ask for a redirection link to use instead. - For links, use the following format: " For more information, see [descriptive-link-text](URL)].". - Use descriptive link text, not generic or vague link text, such as " See [here](URL)." - Use numbers only for steps in a procedure, not for lists that have no specific order. See Lists – Microsoft Style Guide. - Use only one space after punctuation unless you're indenting code. |
For more guidance, see the Microsoft Style Guide and Global writing tips.
Related content
Create a Standard logic app workflow from a prebuilt template