Tutorial: Using Service Connector to build a Django app with Postgres on Azure App Service
Note
In this tutorial, you use Service Connector to connect a web app to a database service. This tutorial is a modification of the App Service tutorial, so you may see some similarities. Look into section Create a passwordless connector to Postgres database to see where Service Connector comes into play and simplifies the connection process given in the App Service tutorial.
This tutorial shows how to deploy a data-driven Python Django web app to Azure App Service and connect it to an Azure Database for PostgreSQL Flexible server database.
In this tutorial, you use the Azure CLI to complete the following tasks:
- Set up your initial environment with Python and the Azure CLI
- Create an Azure Database for PostgreSQL Flexible server database
- Deploy code to Azure App Service and connect to PostgreSQL Flexible server
- Update your code and redeploy
- View diagnostic logs
- Manage the web app in the Azure portal
Set up your initial environment
Launch from Azure Cloud Shell in the Azure Portal and install the service connector passwordless extension for the Azure CLI.
az extension add --name serviceconnector-passwordless --upgrade
Clone or download the sample app
Clone the sample repository:
git clone https://github.com/Azure-Samples/serviceconnector-webapp-postgresql-django-passwordless.git
Navigate into the following folder:
cd serviceconnector-webapp-postgresql-django-passwordless
In this tutorial, you deploy a Django web app to Azure App Service. The web app uses a system-assigned managed identity (passwordless connections) with Azure role-based access control to access Azure Storage and Azure Database for PostgreSQL - Flexible Server resources. The code uses the DefaultAzureCredential class of the Azure Identity client library for Python. The DefaultAzureCredential class automatically detects that a managed identity exists for the App Service and uses it to access other Azure resources.
- Production settings are in the azuresite/production.py file. Development settings are in azuresite/settings.py.
- The app uses production settings when the
WEBSITE_HOSTNAMEenvironment variable is set. Azure App Service automatically sets this variable to the URL of the web app, such asmsdocs-django.azurewebsites.net.
The production settings are specific to configuring Django to run in any production environment and aren't particular to App Service. For more information, see the Django deployment checklist. Also see Production settings for Django on Azure for details on some of the changes.
Having issues? Let us know.
Create Postgres database in Azure
Set up the environment variables needed for the tutorial.
LOCATION="eastus"
RAND_ID=$RANDOM
RESOURCE_GROUP_NAME="msdocs-mi-web-app"
APP_SERVICE_NAME="msdocs-mi-web-$RAND_ID"
DB_SERVER_NAME="msdocs-mi-postgres-$RAND_ID"
ADMIN_USER="demoadmin"
ADMIN_PW="{your database password}"
Important
The
ADMIN_PWmust contain 8 to 128 characters from three of the following categories: English uppercase letters, English lowercase letters, numbers, and nonalphanumeric characters. When creating usernames or passwords do not use the$character. Later you create environment variables with these values where the$character has a specific meaning within the Linux container used to run Python apps.Create a resource group (you can change the name, if desired). The resource group name is cached and automatically applied to subsequent commands.
az group create --name $RESOURCE_GROUP_NAME --location $LOCATIONCreate the database server. If prompted to enable access to current client IP address, type
yfor yes. This process takes a few minutes:az postgres flexible-server create \ --resource-group $RESOURCE_GROUP_NAME \ --name $DB_SERVER_NAME \ --location $LOCATION \ --admin-user $ADMIN_USER \ --admin-password $ADMIN_PW \ --sku-name Standard_D2ds_v4 --active-directory-auth EnabledIf the
azcommand isn't recognized, be sure you have the Azure CLI installed as described in Set up your initial environment.The az postgres flexible-server create command performs the following actions, which take a few minutes:
- Create a default resource group if there's not a cached name already.
- Create a PostgreSQL Flexible server:
- With the server name specified with the
--nameparameter. The name must be unique across all of Azure. - With the sku specified with the
--sku-nameparameter.
- With the server name specified with the
- Create an administrator account with a username and password specified with the
--admin-userand--admin-passwordparameters. - Create a database which name is specified with the
--database-nameparameter.
Configure a firewall rule on your server with the az postgres flexible-server firewall-rule create command. This rule allows your local environment access to the server. (If you're prompted to enable access from your client IP address in previous step, you can skip this step.)
IP_ADDRESS=<your IP>
az postgres flexible-server firewall-rule create \
   --resource-group $RESOURCE_GROUP_NAME \
   --name $DB_SERVER_NAME \
   --rule-name AllowMyIP \
   --start-ip-address $IP_ADDRESS \
   --end-ip-address $IP_ADDRESS
Use any tool or website that shows your IP address to substitute
<your IP>in the command. For example, you can use the What's My IP Address? website.Create a database named
restaurantusing the az postgres flexible-server execute command.az postgres flexible-server execute \ --name $DB_SERVER_NAME \ --admin-user $ADMIN_USER \ --admin-password $ADMIN_PW \ --database-name postgres \ --querytext 'create database restaurant;'
Deploy the code to Azure App Service
In this section, you create app host in App Service app, connect this app to the Postgres database, then deploy your code to that host.
Create the App Service app
In the terminal, make sure you're in the serviceconnector-webapp-postgresql-django-passwordless repository folder that contains the app code.
Run the following
az webapp upcommand to create the App Service host for the app:az webapp up \ --resource-group $RESOURCE_GROUP_NAME \ --location $LOCATION \ --name $APP_SERVICE_NAME \ --runtime PYTHON:3.9 \ --sku B1The sku defines the size (CPU, memory) and cost of the App Service plan. The B1 (Basic) service plan incurs a small cost in your Azure subscription. For a full list of App Service plans, view the App Service pricing page.
This command performs the following actions, which may take a few minutes, using resource group and location cached from the previous
az group createcommand (the group$RESOURCE_GROUP_NAMEin theeastusregion in this example).- Create an App Service plan in the Basic pricing tier (B1). You can omit
--skuto use default values. - Create the App Service app.
- Enable default logging for the app.
- Upload the repository using ZIP deployment with build automation enabled.
- Create an App Service plan in the Basic pricing tier (B1). You can omit
Configure App Service to use the start.sh in the repo with the az webapp config set command.
az webapp config set \
  --resource-group $RESOURCE_GROUP_NAME \
  --name $APP_SERVICE_NAME \
  --startup-file "start.sh"
Create a passwordless connector to Postgres database
With the code now deployed to App Service, the next step is to connect the app to the Postgres database in Azure. The app code expects to find database information in an environment variable named AZURE_POSTGRESQL_CONNECTIONSTRING for PostgresSQL flexible server and an environment variable named AZURE_STORAGEBLOB_RESOURCEENDPOINT for Azure Storage account.
The Service Connector commands configure Azure Storage and Azure Database for PostgreSQL resources to use managed identity and Azure role-based access control. The commands create app settings in the App Service that connect your web app to these resources. The output from the commands lists the service connector actions taken to enable passwordless capability.
- Add a PostgreSQL service connector with the az webapp connection create postgres-flexible command. The system-assigned managed identity is used to authenticate the web app to the target resource, PostgreSQL in this case.
az webapp connection create postgres-flexible \
  --resource-group $RESOURCE_GROUP_NAME \
  --name $APP_SERVICE_NAME \
  --target-resource-group $RESOURCE_GROUP_NAME \
  --server $DB_SERVER_NAME \
  --database restaurant \
  --client-type python \
  --system-identity
Note
If you see the error message "The subscription is not registered to use Microsoft.ServiceLinker", please run az provider register -n Microsoft.ServiceLinker to register the Service Connector resource provider and run the connection command again.
In your Python code, you access these settings as environment variables with statements like os.environ.get('AZURE_POSTGRESQL_HOST'). For more information, see Access environment variables.
Having issues? Refer first to the Troubleshooting guide, otherwise, let us know.
Create a storage account and connect to it
- Use the az webapp connection create storage-blob command to create a storage account and creates a service connector that does the following configurations:
Enables system-assigned managed identity on the web app
Adds the web app with role Storage Blob Data Contributor to the newly created storage account.
Configure the storage account network to accept access from the web app.
STORAGE_ACCOUNT_URL=$(az webapp connection create storage-blob \
  --new true \
  --resource-group $RESOURCE_GROUP_NAME \
  --name $APP_SERVICE_NAME \
  --target-resource-group $RESOURCE_GROUP_NAME \
  --client-type python \
  --system-identity \
  --query configurations[].value \
  --output tsv)
STORAGE_ACCOUNT_NAME=$(cut -d . -f1 <<< $(cut -d / -f3 <<< $STORAGE_ACCOUNT_URL))
Update the storage account to allow blob public access for the restaurant app users to access images.
 az storage account update  \
   --name $STORAGE_ACCOUNT_NAME \
   --allow-blob-public-access
Create a container called
photosin the storage account with the az storage container create command. Allow anonymous read (public) access to blobs in the newly created container.# Set the BLOB_ENDPOINT variable BLOB_ENDPOINT=$(az storage account show --name $STORAGE_ACCOUNT_NAME --query "primaryEndpoints.blob" | sed 's/"//g') echo $BLOB_ENDPOINT # Create the storage container using the BLOB_ENDPOINT variable az storage container create \ --account-name $STORAGE_ACCOUNT_NAME \ --name photos \ --public-access blob \ --auth-mode login \ --blob-endpoint $BLOB_ENDPOINT
Test the Python web app in Azure
The sample Python app uses the azure.identity package and its DefaultAzureCredential class. When the app is running in Azure, DefaultAzureCredential automatically detects if a managed identity exists for the App Service and, if so, uses it to access other Azure resources (storage and PostgreSQL in this case). There's no need to provide storage keys, certificates, or credentials to the App Service to access these resources.
Browse to the deployed application at the URL
http://$APP_SERVICE_NAME.azurewebsites.net.It can take a minute or two for the app to start. If you see a default app page that isn't the default sample app page, wait a minute and refresh the browser.
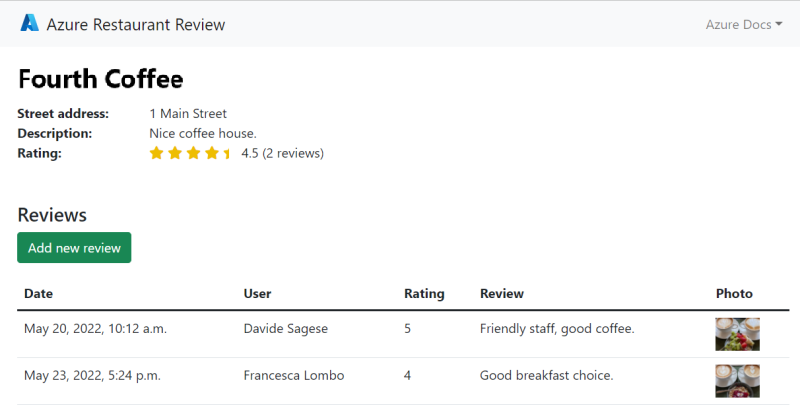
Test the functionality of the sample app by adding a restaurant and some reviews with photos for the restaurant. The restaurant and review information is stored in Azure Database for PostgreSQL and the photos are stored in Azure Storage. Here's an example screenshot:

Clean up resources
If you'd like to keep the app or continue to more tutorials, skip ahead to Next steps. Otherwise, to avoid incurring ongoing charges, delete the resource group created for this tutorial:
az group delete --name $RESOURCE_GROUP_NAME --no-wait
By deleting the resource group, you also deallocate and delete all the resources contained within it. Be sure you no longer need the resources in the group before using the command.
Deleting all the resources can take some time. The --no-wait argument allows the command to return immediately.
Having issues? Let us know.