Troubleshoot the Global Secure Access client: Health check tab
This document provides troubleshooting guidance for the Global Secure Access client using the Health check tab in the Advanced diagnostics utility.
Introduction
The Advanced diagnostics Health check runs tests to verify that the Global Secure Access client is working correctly and that its components are running.
Run the health check
To run a health check for the Global Secure Access client:
- Right-click the Global Secure Access client system tray icon and select Advanced Diagnostics.
- The User Account Control dialog box opens. Select Yes to allow the client application to make changes to your device.
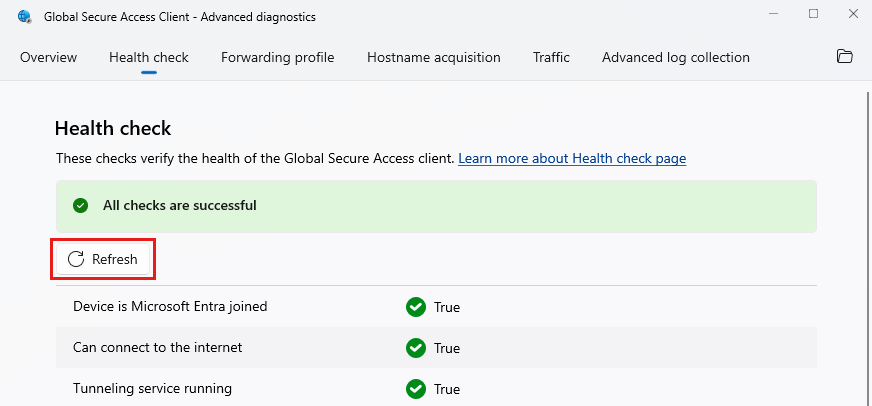
- In the Global Secure Access Client - Advanced diagnostics dialog box, select the Health check tab. Switching tabs runs the health check.
Resolution process
Most of the Health check tests depend on one another. If tests fail:
- Resolve the first failed test in the list.
- Select Refresh to view the updated test status.
- Repeat until you resolve all failed tests.
Check the Event Viewer
As part of the troubleshooting process, it can be useful to check the Event Viewer for the Global Secure Access client. The log contains valuable events regarding errors and their cause.
- Navigate to Control Panel > System and Security > Windows Tools.
- Launch Event Viewer.
- Navigate to Applications and Services Logs > Microsoft > Windows > Global Secure Access Client.
- Select Operational.
Health check tests
The following checks verify the health of the Global Secure Access client.
Device is Microsoft Entra joined
The Windows client authenticates the user and the device to Global Secure Access services. The device authentication, based on a device token, requires that the device is either Microsoft Entra joined or Microsoft Entra hybrid joined. Microsoft Entra registered devices are currently not supported.
To check the status of your device, enter the following command in the Command Prompt: dsregcmd.exe /status.

Can connect to the internet
This check indicates whether or not the device is connected to the internet. The Global Secure Access client requires an internet connection. This test is based on the Network Connectivity Status Indicator (NCSI) feature.
Tunneling service running
Global Secure Access Tunneling service must be running.
- To verify that this service running, enter the following command in the Command Prompt:
sc query GlobalSecureAccessTunnelingService - If the Global Secure Access Tunneling service isn't running, start it from the
services.msc. - If the service fails to start, look for errors in the Event Viewer.
Management service running
Global Secure Access Management service must be running.
- To verify that this service running, enter the following command in the Command Prompt:
sc query GlobalSecureAccessManagementService - If the Global Secure Access Management Service isn't running, start it from the
services.msc. - If the service fails to start, look for errors in the Event Viewer.
Policy Retriever service running
Global Secure Access Policy Retriever service must be running.
- To verify that this service running, enter the following command in the Command Prompt:
sc query GlobalSecureAccessPolicyRetrieverService - If the Global Secure Access Policy Retriever service isn't running, start it from the
services.msc. - If the service fails to start, look for errors in the Event Viewer.
Driver running
The Global Secure Access driver must be running.
To verify that this service running, enter the following command in the Command Prompt:
sc query GlobalSecureAccessDriver
If the driver isn't running:
- Open the Event Viewer and search the Global Secure Access client log for event 304.
- If the driver isn't running, reboot the machine.
- Run the
sc query GlobalSecureAccessDrivercommand again. - If the issue remains unresolved, reinstall the Global Secure Access client.
Client tray application running
The GlobalSecureAccessClient.exe process runs the client UX in the system tray.
If you can't see the Global Secure Access icon in the system tray, you can run it from the following path:
C:\Program Files\Global Secure Access Client\GlobalSecureAccessClient.exe
Forwarding profile registry exists
This test verifies that the following registry key exists:
Computer\HKEY_LOCAL_MACHINE\SOFTWARE\Microsoft\Global Secure Access Client\ForwardingProfile
If the registry key doesn't exist, try to force forwarding policy retrieval:
- Delete the
Computer\HKEY_LOCAL_MACHINE\SOFTWARE\Microsoft\Global Secure Access Client\ForwardingProfileTimestampregistry key, if it exists. - Restart the service,
Global Secure Access Policy Retriever Service. - Check if the two registry keys are created.
- If not, look for errors in the Event Viewer.
Forwarding profile matches expected schema
This test verifies that the forwarding profile in the registry has a valid format that the client can read.
If this test fails, make sure you're using the most updated forwarding profile of your tenant by following these steps:
- Delete the following registry keys:
Computer\HKEY_LOCAL_MACHINE\SOFTWARE\Microsoft\Global Secure Access Client\ForwardingProfileComputer\HKEY_LOCAL_MACHINE\SOFTWARE\Microsoft\Global Secure Access Client\ForwardingProfileTimestamp
- Restart the service,
Global Secure Access Policy Retriever Service. - Restart the Global Secure Access client.
- Run the health check again.
- If the previous steps don't solve the problem, upgrade the Global Secure Access client to the latest version.
- If the problem still exists, contact Microsoft Support.
Break-glass mode disabled
Break-glass mode prevents the Global Secure Access client from tunneling network traffic to the Global Secure Access cloud service. In Break-glass mode, all traffic profiles in the Global Secure Access portal are unchecked and the Global Secure Access client isn't expected to tunnel any traffic.
To set the client to acquire traffic and tunnel that traffic to the Global Secure Access service:
- Sign in to the Microsoft Entra admin center as a tenant administrator.
- Navigate to Global Secure Access > Connect > Traffic forwarding.
- Enable at least one of the traffic profiles that match your organization's needs.
The Global Secure Access client should receive the updated forwarding profile within one hour after you make changes in the portal.
Diagnostic URLs in forwarding profile
For each channel activated in the forwarding profile, this test checks that the configuration contains a URL to probe the service's health.
To view the health status, double-click the Global Secure Access client system tray icon.

If this test fails, it's usually because of an internal problem with Global Secure Access. Contact Microsoft Support.
Authentication certificate exists
This test verifies that a certificate exists on the device for the Mutual Transport Layer Security (mTLS) connection to the Global Secure Access cloud service.
Tip
This test doesn't appear if mTLS isn't enabled for your tenant yet.
If this test fails, enroll in a new certificate by completing the following steps:
- Launch the Microsoft Management console by entering the following command in the Command Prompt:
certlm.msc. - In the certlm window, navigate to Personal > Certificates.
- Delete the certificate that ends with gsa.client, if it exists.

- Delete the following registry key:
Computer\HKEY_LOCAL_MACHINE\SOFTWARE\Microsoft\Global Secure Access Client\CertCommonName - Restart the Global Secure Access Management Service in the services MMC.
- Refresh the certificates MMC to verify that a new certificate was created.
Provisioning a new certificate might take a few minutes. - Check the Global Secure Access client event log for errors.
- Run the Health check tests again.
Authentication certificate is valid
This test verifies that the authentication certificate used for the mTLS connection to the Global Secure Access cloud service is valid.
Tip
This test doesn't appear if mTLS isn't enabled for your tenant yet.
If this test fails, enroll in a new certificate by completing the following steps:
- Launch the Microsoft Management console by entering the following command in the Command Prompt:
certlm.msc. - In the certlm window, navigate to Personal > Certificates.
- Delete the certificate that ends with gsa.client.
- Delete the following registry key:
Computer\HKEY_LOCAL_MACHINE\SOFTWARE\Microsoft\Global Secure Access Client\CertCommonName - Restart the Global Secure Access Management Service in the services MMC.
- Refresh the certificates MMC to verify that a new certificate was created.
Provisioning a new certificate might take a few minutes. - Check the Global Secure Access client event log for errors.
- Run the Health check tests again.
DNS over HTTPS not supported
For the Global Secure Access client to acquire network traffic by a fully qualified domain name (FQDN) destination (as opposed to an IP destination), the client needs to read the DNS requests sent by the device to the DNS server. This means that if the forwarding profile contains FQDN rules, you must disable DNS over HTTPS.
Secure DNS disabled in OS
To disable DNS over HTTPS in Windows, refer to Secure DNS Client over HTTPS (DoH).
Important
You must disable DNS over HTTPS to successfully run the Global Secure Access client Health check.
Secure DNS disabled in browsers (Microsoft Edge, Chrome, Firefox)
Check that Secure DNS is disabled for each of the following browsers:
Secure DNS disabled in Microsoft Edge
To disable DNS over HTTPS in Microsoft Edge:
- Launch Microsoft Edge.
- Open the Settings and more menu and select Settings.
- Select Privacy, search, and services.
- In the Security section, set the Use secure DNS to specify how to lookup the network address for websites toggle to off.
Secure DNS disabled in Chrome
To disable DNS over HTTPS in Google Chrome:
- Open Chrome.
- Select Customize and control Google Chrome and then select Settings.
- Select Privacy and security.
- Select Security.
- In the Advanced section, set the Use secure DNS toggle to off.
Secure DNS disabled in Firefox
To disable DNS over HTTPS in Mozilla Firefox:
- Open Firefox.
- Select the Open application menu button and then select Settings.
- Select Privacy & Security.
- In the DNS over HTTPS section, select Off.
DNS Responsive
This test checks whether the DNS server configured to Windows returns a DNS response.
If this test fails:
- Pause the Global Secure Access client.
- Check if the DNS server configured to Windows is reachable. For example, try resolving "microsoft.com" using the
nslookuptool. - Verify that no firewalls are blocking traffic to the DNS server.
- Configure an alternate DNS server and test again.
- Resume the Global Secure Access client.
Magic IP received
This check verifies that the client is able to acquire traffic from a fully qualified domain name (FQDN).
If the test fails:
- Restart the client and test again.
- Restart Windows. This step might be necessary in rare cases to delete volatile cache.
Cached token
This test verifies that the client successfully authenticated to Microsoft Entra.
If the cached token test fails:
- Verify that the services and the driver are running.
- Verify that the system tray icon is visible.
- If the sign-in notification appears, select Sign in.
- If the sign-in notification doesn't appear, check if it is in the Notification Center and select Sign in.
- Sign in with a user that is a member of the same Entra tenant that the device is joined to.
- Verify the network connection.
- Hover over the system tray icon and verify that the client is not disabled by your organization.
- Restart the client and wait for a few seconds.
- Look for errors in the Event Viewer.
IPv4 preferred
Global Secure Access doesn't yet support traffic acquisition for destinations with IPv6 addresses. We recommend that you configure the client to prefer IPv4 over IPv6, if:
- The forwarding profile is set to acquire traffic by IPv4 (as opposed to by FQDN).
- The FQDN resolved to this IP is also resolved to an IPv6 address.
To configure the client to prefer IPv4 over IPv6, set the following registry key:
HKEY_LOCAL_MACHINE\SYSTEM\CurrentControlSet\Services\Tcpip6\Parameters\ Name: DisabledComponents Type: REG_DWORD Value: 0x20 (Hex)
Important
Changes to this registry value require a computer restart. For more information, see Guidance for configuring IPv6 in Windows for advanced users.
Edge hostname resolved by DNS
This test checks all active traffic types: Microsoft 365, Private Access, and Internet Access. If this test fails, the DNS can't resolve the hostnames of the Global Secure Access cloud service, and therefore the service isn't reachable. This failed test could be due to an internet connectivity problem or a DNS server that doesn't resolve public internet hostnames.
To verify that the hostname resolution works correctly:
- Pause the client.
- Run the PowerShell command:
Resolve-DnsName -Name <edge's FQDN> - If the hostname resolution fails, try running:
Resolve-DnsName -Name microsoft.com - Verify that the DNS servers are configured for this machine:
ipconfig /all - If the previous steps don't resolve the issue, consider setting another public DNS server.
Edge is reachable
This test checks all active traffic types: Microsoft 365, Private Access, and Internet Access. If this test fails, the device doesn't have a network connection to the Global Secure Access cloud service.
If the test fails:
- Verify that the device has an internet connection.
- Verify that the firewall or proxy doesn't block the connection to the edge.
- Make sure IPv4 is active on the device. Currently the edge works only with an IPv4 address.
- Stop the client and retry
Test-NetConnection -ComputerName <edge's fqdn> -Port 443. - Try the PowerShell command from another device connected to the internet from a public network.
Proxy disabled
This test checks whether the proxy is configured on the device. If the end-user device is configured to use a proxy for outgoing traffic to the internet, you must exclude the destination IPs/FQDNs acquired by the client with a Proxy Auto-Configuration (PAC) file or with the Web Proxy Auto-Discovery (WPAD) protocol.
Change the PAC file
Add the IPs/FQDNs to be tunneled to Global Secure Access edge as exclusions in the PAC file, so that HTTP requests for these destinations won't redirect to the proxy. (These IPs/FQDNs are also set to tunnel to Global Secure Access in the forwarding profile.)
To show the client's health status properly, add the FQDN used for health probing to the exclusions list: .edgediagnostic.globalsecureaccess.microsoft.com.
Example PAC file containing exclusions:
function FindProxyForURL(url, host) {
        if (isPlainHostName(host) ||
            dnsDomainIs(host, ".edgediagnostic.globalsecureaccess.microsoft.com") || //tunneled
            dnsDomainIs(host, ".contoso.com") || //tunneled
            dnsDomainIs(host, ".fabrikam.com")) // tunneled
           return "DIRECT";                    // For tunneled destinations, use "DIRECT" connection (and not the proxy)
        else                                   // for all other destinations
           return "PROXY 10.1.0.10:8080";  // route the traffic to the proxy.
}
Add a system variable
Configuring the Global Secure Access client to route Global Secure Access traffic through a proxy:
- Set a system environment variable in Windows named
grpc_proxyto the value of the proxy address. For example,http://10.1.0.10:8080. - Restart the Global Secure Access client.
Tunneling succeeded
This test checks each active traffic profile in the forwarding profile (Microsoft 365, Private Access, and Internet Access) to verify that connections to the health service of the corresponding channel are tunneled successfully.
If this test fails:
- Check the Event Viewer for errors.
- Restart the client and try again.
Global Secure Access processes healthy (last 24 h)
If this test fails, it means that at least one process of the client crashed in the last 24 hours.
If all other tests pass, the client should be currently functioning. However, it can be helpful to investigate the process dump file to increase future stability and to better understand why the process crashed.
To investigate the process dump file when a process crashes:
- Configure user mode dumps:
- Add the following registry key:
HKEY_LOCAL_MACHINE\SOFTWARE\Microsoft\Windows\Windows Error Reporting\LocalDumps - Add a
REG_SZ DumpFolderregistry value and set its data to the existing DumpFolder where you want to save the dump file.
- Add the following registry key:
- Reproduce the issue to create a new dump file in the selected DumpFolder.
- Open a ticket for Microsoft Support and attach the dump file and the steps to reproduce the issue.
- Review the Event Viewer logs and filter for crash events (Filter current logs: Event ID = 1000).
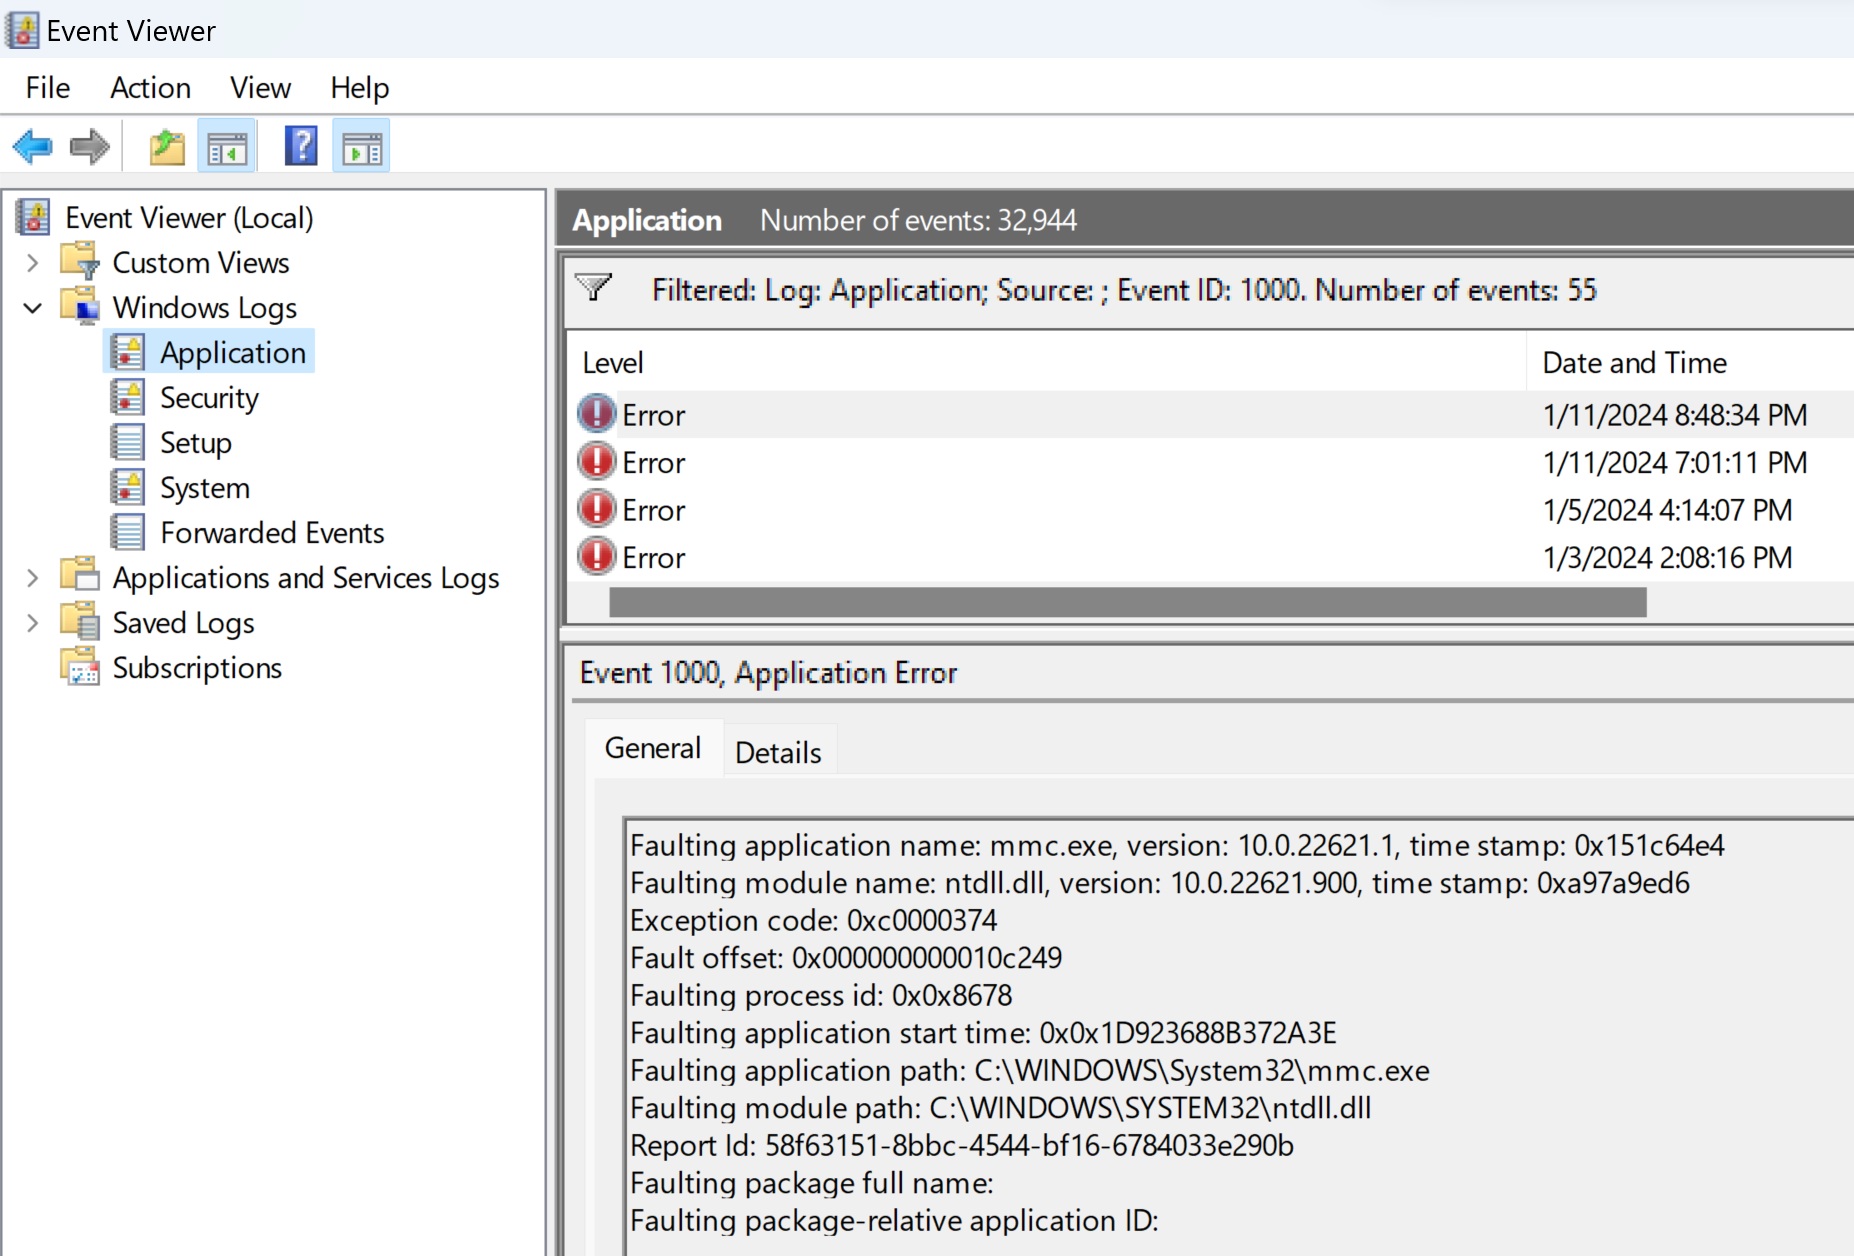
- Save the filtered log as a file and attach the log file to the support ticket.
QUIC not supported for Internet Access
Since QUIC isn't yet supported for Internet Access, traffic to ports 80 UDP and 443 UDP can't be tunneled.
Tip
QUIC is currently supported in Private Access and Microsoft 365 workloads.
Administrators can disable QUIC protocol triggering clients to fall back to HTTPS over TCP, which is fully supported in Internet Access.
QUIC disabled in Microsoft Edge
To disable QUIC in Microsoft Edge:
- Open Microsoft Edge.
- Paste
edge://flags/#enable-quicin the Address bar. - Set the Experimental QUIC protocol drop-down to Disabled.
QUIC disabled in Chrome
To disable QUIC in Google Chrome:
- Open Google Chrome.
- Paste
chrome://flags/#enable-quicin the Address bar. - Set the Experimental QUIC protocol drop-down to Disabled.
QUIC disabled in Mozilla Firefox
To disable QUIC in Mozilla Firefox:
- Open Firefox.
- Paste
about:configin the Address bar. - In the Search preference name field, paste
network.http.http3.enable. - Toggle the network.http.http3.enable option to false.