Introduction to Azure managed disks
Applies to: ✔️ Linux VMs ✔️ Windows VMs ✔️ Flexible scale sets ✔️ Uniform scale sets
Azure managed disks are block-level storage volumes that are managed by Azure and used with Azure Virtual Machines. Managed disks are like physical disks in an on-premises server, but they're virtualized. With managed disks, all you have to do is specify the disk size, specify the disk type, and provision the disk. After you provision the disk, Azure handles the rest.
The available types of managed disks are ultra disks, premium solid-state drives (SSDs), standard SSDs, and standard hard disk drives (HDDs). For information about each disk type, see Azure managed disk types.
An alternative is to use Azure Elastic SAN as the storage for your virtual machine (VM). With Elastic SAN, you can consolidate the storage for all your workloads into a single storage back end. This choice can be more cost effective if you have many large-scale, I/O-intensive workloads and top-tier databases. To learn more, see What is Azure Elastic SAN?.
Benefits of managed disks
Let's explore some of the benefits that you gain by using managed disks.
High durability and availability
Managed disks are designed for 99.999% availability. Managed disks achieve this availability by providing three replicas of your data. If one or even two replicas experience problems, the remaining replicas help ensure persistence of your data and high tolerance against failures.
This architecture has helped Azure consistently deliver high durability for infrastructure as a service (IaaS) disks, with a 0% annualized failure rate. Locally redundant storage (LRS) disks provide at least 99.999999999% (11 9's) of durability over a year. Zone-redundant storage (ZRS) disks provide at least 99.9999999999% (12 9's) of durability over a year.
Simple and scalable VM deployment
By using managed disks, you can create up to 50,000 VM disks of a type in a subscription per region. You can then create thousands of VMs in a single subscription.
Managed disks increase the scalability of virtual machine scale sets. You can create up to 1,000 VMs in a virtual machine scale set by using an Azure Marketplace image or an Azure Compute Gallery image with managed disks.
Integration with availability sets
Managed disks are integrated with availability sets to help ensure that the disks of VMs in an availability set are sufficiently isolated from each other to avoid a single point of failure.
Disks are automatically placed in different storage scale units (stamps). If a stamp fails due to hardware or software failure, only the VM instances with disks on those stamps fail.
For example, let's say you have an application running on five VMs, and the VMs are in an availability set. The disks for those VMs aren't all stored in the same stamp. So if one stamp goes down, the other instances of the application continue to run.
Integration with availability zones
Managed disks support availability zones, which help protect your applications from datacenter failures.
Availability zones are unique physical locations within an Azure region. Each zone consists of one or more datacenters equipped with independent power, cooling, and networking. To ensure resiliency, there's a minimum of three separate zones in all enabled regions.
For information about the service-level agreement (SLA) for VM uptime with availability zones, see the page for Azure SLAs.
Azure Backup support
To help protect against regional disasters, you use Azure Backup to create a backup job with time-based backups and backup retention policies. You can then perform VM or managed disk restorations at will.
Currently, Azure Backup supports disk sizes up to 32 tebibytes (TiB). Learn more about Azure VM backup support.
Azure Disk Backup
Azure Backup offers Azure Disk Backup as a native, cloud-based backup solution that helps protect your data in managed disks. You can use this solution to configure protection for managed disks in only a few steps.
Azure Disk Backup provides snapshot lifecycle management for managed disks. It automates the periodic creation of snapshots and retains them for a configured duration by using a backup policy. For more information, see Overview of Azure Disk Backup.
Granular access control
You can use Azure role-based access control (Azure RBAC) to assign specific permissions for a managed disk to one or more users.
Managed disks expose a variety of operations, including read, write (create/update), and delete, along with retrieving a shared access signature (SAS) URI for the disk. You can grant access to only the operations that a person needs to perform a job.
For example, if you don't want a person to copy a managed disk to a storage account, don't grant access to the export action for that managed disk. Similarly, if you don't want a person to use a SAS URI to copy a managed disk, don't grant that permission to the managed disk.
Ability to upload your VHD
You can use direct upload to transfer your VHD to an Azure managed disk. Previously, you had to follow a process that included staging your data in a storage account. Now, there are fewer steps. It's easier to upload on-premises VMs to Azure and upload VMs to large managed disks. The backup and restore process is also simplified.
You can reduce costs by uploading data to managed disks directly, without attaching them to VMs. With direct upload, you can upload VHDs up to 32 TiB in size.
To learn how to transfer your VHD to Azure, see the Azure CLI or Azure PowerShell article.
Security
Private Link
You can use Azure Private Link support for managed disks to import or export a managed disk that's internal to your network. With Private Link, you can generate a time-bound SAS URI for unattached managed disks and snapshots. You can then use that SAS URI to export the data to other regions for regional expansion, disaster recovery, and forensic analysis. You can also use the SAS URI to directly upload a VHD to an empty disk from on-premises.
Private Link can help you restrict the export and import of managed disks so that it occurs only within your Azure virtual network. Using Private Link helps ensure that your data travels only within the secure Microsoft backbone network.
To learn how to enable Private Link for importing or exporting a managed disk, see the Azure CLI or Azure portal article.
Encryption
Managed disks offer two kinds of encryption. The first is server-side encryption, which the storage service performs. The second is Azure Disk Encryption, which you can enable on the OS and data disks for your VMs.
Server-side encryption
Server-side encryption provides encryption at rest and helps safeguard your data to meet your organizational security and compliance commitments. Server-side encryption is enabled by default for all managed disks, snapshots, and images, in all the regions where managed disks are available.
Server-side encryption doesn't encrypt temporary disks unless you enable encryption at the host. For more information, see the Temporary disk section later in this article.
You have these options for key management:
- Platform-managed keys: Azure manages your keys for you.
- Customer-managed keys: You manage the keys yourself.
For more information, see Server-side encryption of Azure Disk Storage.
Azure Disk Encryption
You can use Azure Disk Encryption to encrypt the OS and data disks that an IaaS virtual machine uses. This encryption includes managed disks.
On Windows VMs, the drives are encrypted through industry-standard BitLocker encryption technology. On Linux VMs, the disks are encrypted through DM-Crypt technology. The encryption process is integrated with Azure Key Vault so that you can control and manage the disk encryption keys. For more information, see Azure Disk Encryption for Linux VMs or Azure Disk Encryption for Windows VMs.
Disk roles
There are three main disk roles in Azure: the OS disk, the data disk, and the temporary disk. These roles map to disks that are attached to your virtual machine.
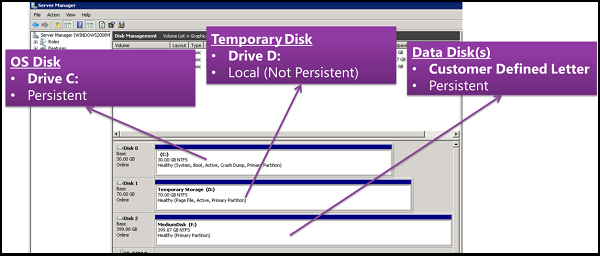
OS disk
Every virtual machine has one attached OS disk. This disk has a pre-installed operating system, which was selected when the VM was created. This disk contains the boot volume.
Generally, you should store only your OS information on the OS disk. You should store all applications and data on data disks. But if cost is a concern, you can use the OS disk instead of creating a data disk.
The OS disk has a maximum capacity of 4,095 gibibytes (GiB). However, many operating systems are partitioned with master boot records (MBRs) by default. An MBR limits the usable size to 2 TiB. If you need more than 2 TiB, create and attach data disks and use them for data storage. If you need to store data on the OS disk and require the additional space, convert it to a GUID partition table (GPT). To learn about the differences between an MBR and a GPT on Windows deployments, see Windows and GPT FAQ.
On Azure Windows VMs, drive C is your OS disk and is persistent storage, unless you're using ephemeral OS disks.
Data disk
A data disk is a managed disk that's attached to a virtual machine to store application data or other data that you need to keep. Data disks are registered as SCSI drives and are labeled with a letter that you choose. The size of the virtual machine determines how many data disks you can attach to it and the type of storage that you can use to host the disks.
Generally, you should use the data disk to store your applications and data, instead of storing them on OS disks. Using data disks to store applications and data offers the following benefits over using OS disks:
- Improved backup and disaster recovery
- More flexibility and scalability
- Performance isolation
- Easier maintenance
- Improved security and access control
For more information on these benefits, see Why should I use the data disk to store applications and data instead of the OS disk?.
Temporary disk
Most VMs contain a temporary disk, which is not a managed disk. The temporary disk provides short-term storage for applications and processes. It's intended for storing only data such as page files, swap files, or SQL Server tempdb files.
Data on the temporary disk might be lost during a maintenance event, when you redeploy a VM, or when you stop the VM. During a successful standard restart of the VM, data on the temporary disk persists. For more information about VMs without temporary disks, see Azure VM sizes with no local temporary disk.
On Azure Linux VMs, the temporary disk is typically /dev/sdb. On Windows VMs, the temporary disk is drive D by default. The temporary disk is not encrypted unless:
- For server-side encryption, you enable encryption at the host.
- For Azure Disk Encryption, you set the
VolumeTypeparameter to All on Windows or EncryptFormatAll on Linux.
Managed disk snapshots
A managed disk snapshot is a read-only, crash-consistent full copy of a managed disk that's stored as a standard managed disk by default. With snapshots, you can back up your managed disks at any point in time. These snapshots exist independently of the source disk, and you can use them to create new managed disks.
Snapshots are billed based on the used size. For example, if you create a snapshot of a managed disk with provisioned capacity of 64 GiB and an actual used data size of 10 GiB, that snapshot is billed only for the used data size of 10 GiB. You can see the used size of your snapshots by checking the Azure usage report. For example, if the used data size of a snapshot is 10 GiB, the daily usage report will show 10 GiB/(31 days) = 0.3226 as the consumed quantity.
To learn more about how to create snapshots for managed disks, see Create a snapshot of a virtual hard disk.
Images
Managed disks support creating managed custom images. You can create an image from your custom VHD in a storage account or directly from a generalized (via Sysprep) VM. The image contains all managed disks associated with a VM, including both the OS and data disks. A managed custom image enables the creation of hundreds of VMs without the need to copy or manage any storage accounts.
For information on creating images, see Create a legacy managed image of a generalized VM in Azure.
Images versus snapshots
It's important to understand the difference between images and snapshots. With managed disks, you can take an image of a generalized VM that you deallocated. This image includes all of the disks attached to the VM. You can use this image to create a VM.
A snapshot is a copy of a disk at a point in time. It applies only to one disk. If you have a VM that has one disk (the OS disk), you can take a snapshot or an image of it and create a VM from either the snapshot or the image.
A snapshot doesn't have awareness of any disk except the one that it contains. Using snapshots in scenarios that require the coordination of multiple disks, such as striping, is problematic. Snapshots would need to be able to coordinate with each other, and that's currently not supported.
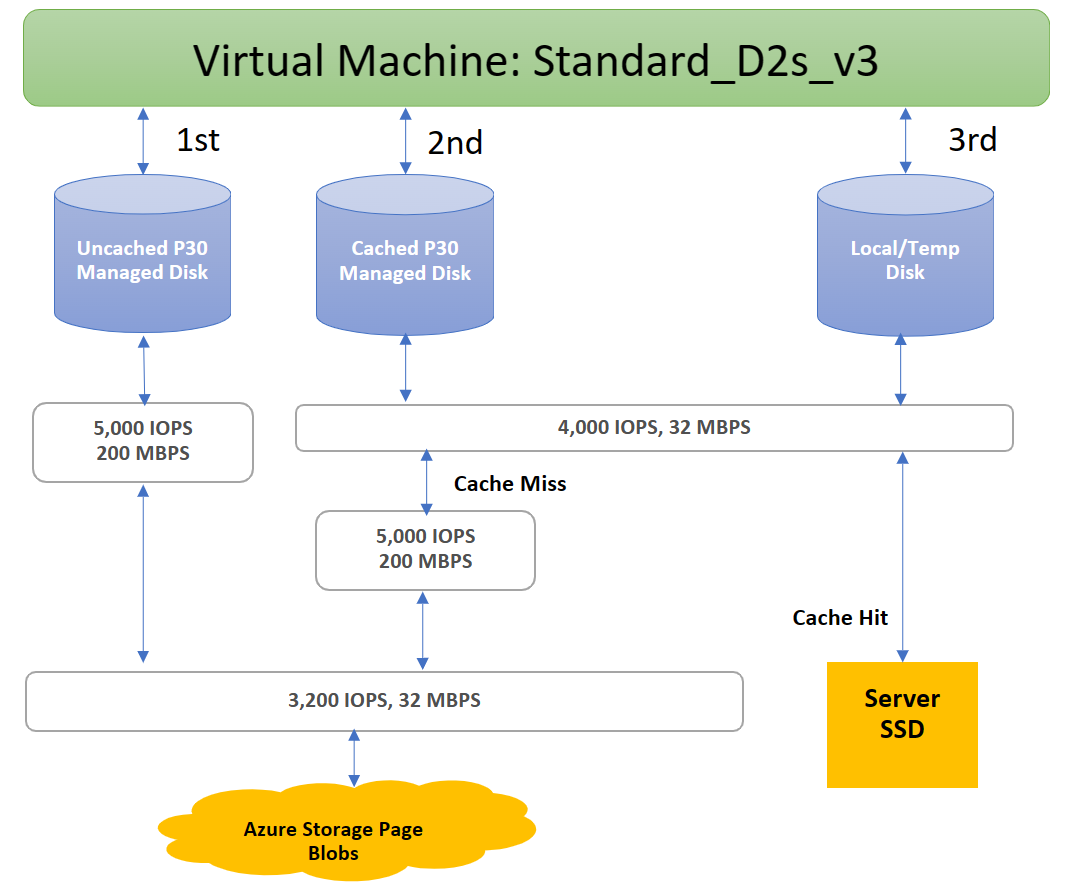
Disk allocation and performance
The following diagram depicts real-time allocation of bandwidth and I/O operations per second (IOPS) for disks, with three paths that I/O can take.

The first I/O path is the uncached managed disk path. An I/O operation uses this path if you're using a managed disk and you set the host caching to none. An I/O operation that uses this path will run based on disk-level provisioning and then VM network-level provisioning for IOPS and throughput.
The second I/O path is the cached managed disk path. Cached managed disk I/O uses an SSD that's close to the VM. This SSD has its own IOPS and throughput provisioned, and it appears as "SSD-level provisioning" in the diagram.
When a cached managed disk initiates a read, the request first checks to see if the data is in the server SSD. If the data isn't present, this creates a cached miss. The I/O then runs based on SSD-level provisioning, disk-level provisioning, and then VM network-level provisioning for IOPS and throughput.
When the server SSD initiates reads on cached I/O that are present on the server SSD, it creates a cache hit. The I/O then runs based on the SSD-level provisioning. Writes that a cached managed disk initiates always follow the path of a cached miss. They need to go through SSD-level, disk-level, and VM network-level provisioning.
The third path is for the Local/Temp disk. It's available only on VMs that support Local/Temp disks. An I/O operation that uses this path will run based on SSD-level provisioning for IOPS and throughput.
The following diagram shows an example of these limitations. The system prevents a Standard_D2s_v3 VM from achieving the 5,000 IOPS potential of a P30 disk, whether it's cached or not, because of limits at the SSD and network levels.
Azure uses a prioritized network channel for disk traffic. Disk traffic takes precedence over low-priority network traffic. This prioritization helps disks maintain their expected performance in case of network contentions.
Similarly, Azure Storage handles resource contentions and other issues in the background with automatic load balancing. Azure Storage allocates required resources when you create a disk, and it applies proactive and reactive balancing of resources to handle the traffic level. This behavior further ensures that disks can sustain their expected IOPS and throughput targets. You can use the VM-level and disk-level metrics to track the performance and set up alerts as needed.
To learn the best practices for optimizing VM and disk configurations so that you can achieve your desired performance, see Design for high performance.
Related content
- If you want to watch a video that gives more detail on managed disks, check out Better Azure VM Resiliency with Managed Disks.
- To learn more about the individual disk types that Azure offers, which type is a good fit for your needs, and their performance targets, see Select a disk type for IaaS VMs.