Simplify network configuration requirements through Azure Arc gateway (Limited preview)
Note
This is a Limited Public Preview, so customer subscriptions must be allowed by Microsoft to use the feature. To participate, complete the Azure Arc gateway Limited Public Preview Sign-up form.
If you use enterprise firewalls or proxies to manage outbound traffic, the Azure Arc gateway lets you onboard infrastructure to Azure Arc using only seven (7) endpoints. With Azure Arc gateway, you can:
- Connect to Azure Arc by opening public network access to only seven Fully Qualified Domains (FQDNs).
- View and audit all traffic an Azure Connected Machine agent sends to Azure via the Arc gateway.
This article explains how to set up and use an Arc gateway Resource.
Important
The Arc gateway feature for Azure Arc-enabled servers is currently in Limited preview in all regions where Azure Arc-enabled servers is present. See the Supplemental Terms of Use for Microsoft Azure Limited previews for legal terms that apply to Azure features that are in beta, limited preview, or otherwise not yet released into general availability.
Supported scenarios
Azure Arc gateway supports the following scenarios:
- Azure Monitor (Azure Monitor Agent + Dependency Agent) 1
- Microsoft Defender for Cloud 2
- Windows Admin Center
- SSH
- Microsoft Sentinel
- Azure Update Management
- Azure Extension for SQL Server
1 Traffic to Log Analytics workspaces isn't covered by Arc gateway, so the FQDNs for your Log Analytics workspaces must still be allowed in your firewalls or enterprise proxies.
2 To send Microsoft Defender traffic via Arc gateway, you must configure the extension’s proxy settings.
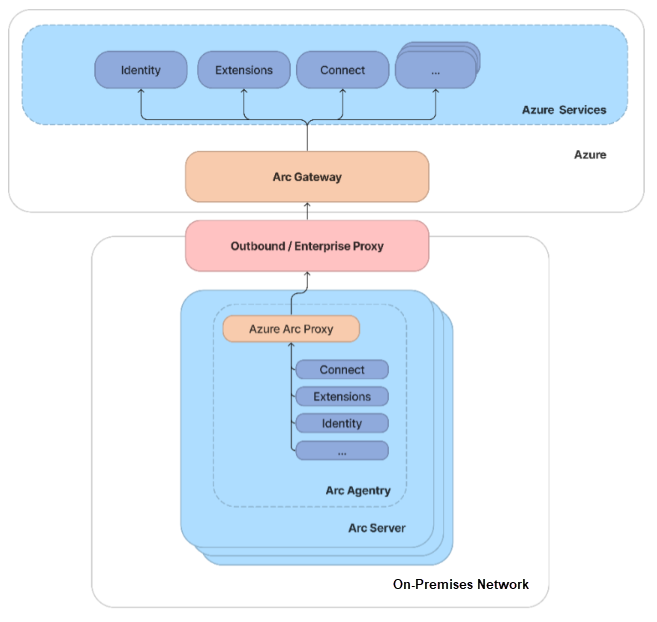
How it works
Azure Arc gateway consists of two main components:
The Arc gateway resource: An Azure resource that serves as a common front-end for Azure traffic. This gateway resource is served on a specific domain. Once the Arc gateway resource is created, the domain is returned to you in the success response.
The Arc Proxy: A new component added to Arc agentry. This component runs as a service called "Azure Arc Proxy" and acts as a forward proxy used by the Azure Arc agents and extensions. No configuration is required on your part for the gateway router. This router is part of Arc core agentry and runs within the context of an Arc-enabled resource.
When the gateway is in place, traffic flows via the following hops: Arc agentry → Arc Proxy → Enterprise proxy → Arc gateway → Target service
Restrictions and limitations
The Arc gateway object has limits you should consider when planning your setup. These limitations apply only to the Limited public preview. These limitations might not apply when the Arc gateway feature is generally available.
- TLS Terminating Proxies aren't supported.
- ExpressRoute/Site-to-Site VPN used with the Arc gateway (Limited preview) isn't supported.
- The Arc gateway (Limited preview) is only supported for Azure Arc-enabled servers.
- There's a limit of five Arc gateway (Limited preview) resources per Azure subscription.
How to use the Arc gateway (Limited preview)
After completing the Azure Arc gateway Limited Public Preview Sign-up form, your subscription will be allowed to use the feature within 1 business day. You'll receive an email when the Arc gateway (Limited preview) feature has been allowed on the subscription you submitted.
There are six main steps to use the feature:
- Download the az connected.whl file and use it to install the az connectedmachine extension.
- Create an Arc gateway resource.
- Ensure the required URLs are allowed in your environment.
- Associate new or existing Azure Arc resources with your Arc gateway resource.
- Verify that the setup succeeded.
- Ensure other scenarios use the Arc gateway (Linux only).
Step 1: Download the az connectedmachine.whl file
Select the link to download the az connectedmachine.whl file.
This file contains the az connected machine commands required to create and manage your gateway Resource.
Install the Azure CLI (if you haven't already).
Execute the following command to add the connectedmachine extension:
az extension add --allow-preview true --source [whl file path]
Step 2: Create an Arc gateway resource
On a machine with access to Azure, run the following commands to create your Arc gateway resource:
az login --use-device-code
az account set --subscription [subscription name or id]
az connectedmachine gateway create --name [Your gateway’s Name] --resource-group [Your Resource Group] --location [Location] --gateway-type public --allowed-features * --subscription [subscription name or id]
The gateway creation process takes 9-10 minutes to complete.
Step 3: Ensure the required URLs are allowed in your environment
When the resource is created, the success response includes the Arc gateway URL. Ensure your Arc gateway URL and all URLs in the following table are allowed in the environment where your Arc resources live:
| URL | Purpose |
|---|---|
| [Your URL Prefix].gw.arc.azure.com | Your gateway URL (This URL can be obtained by running az connectedmachine gateway list after you create your gateway Resource) |
| management.azure.com | Azure Resource Manager Endpoint, required for Azure Resource Manager control channel |
| login.microsoftonline.com | Microsoft Entra ID’s endpoint, for acquiring Identity access tokens |
| gbl.his.arc.azure.com | The cloud service endpoint for communicating with Azure Arc agents |
| <region>.his.arc.azure.com | Used for Arc’s core control channel |
| packages.microsoft.com | Required to acquire Linux based Arc agentry payload, only needed to connect Linux servers to Arc |
| download.microsoft.com | Used to download the Windows installation package |
Step 4: Associate new or existing Azure Arc resources with your gateway resource
To onboard a new server with Arc gateway, generate an installation script, then edit the script to specify your gateway resource:
Generate the installation script. Follow the instructions at Quickstart: Connect hybrid machines with Azure Arc-enabled servers to create a script that automates the downloading and installation of the Azure Connected Machine agent and establishes the connection with Azure Arc.
Edit the installation script. Your gateway Resource must be specific in the installation script. To accomplish this, a new parameter called
--gateway-idis added to the connect command.For Linux servers:
- Obtain your gateway's Resource ID by running the
az connectedmachine gateway listcommand. Note the "id" parameter in the output (that is, the full ARM resource ID). - In the installation script, add the "id" found in the previous step as the following parameter:
--gateway-id "[Your-gateway’s-Resource-ID]"
Linux server onboarding script example:
This script template includes parameters for you to specify your enterprise proxy server.
export subscriptionId="SubscriptionId";
export resourceGroup="ResourceGroup";
export tenantId="TenantID";
export location="Region";
export authType="AuthType";
export cloud="AzureCloud";
export gatewayID="gatewayResourceID";

# Download the installation package
output=$(wget https://aka.ms/azcmagent -e use_proxy=yes -e https_proxy="[Your Proxy URL]" -O /tmp/install_linux_azcmagent.sh 2>&1);
if [ $? != 0 ]; then wget -qO- -e use_proxy=yes -e https_proxy="[Your Proxy URL]" --method=PUT --body-data="{\"subscriptionId\":\"$subscriptionId\",\"resourceGroup\":\"$resourceGroup\",\"tenantId\":\"$tenantId\",\"location\":\"$location\",\"correlationId\":\"$correlationId\",\"authType\":\"$authType\",\"operation\":\"onboarding\",\"messageType\":\"DownloadScriptFailed\",\"message\":\"$output\"}" "https://gbl.his.arc.azure.com/log" &> /dev/null || true; fi;
echo "$output";

# Install the hybrid agent
bash /tmp/install_linux_azcmagent.sh --proxy "[Your Proxy URL]";

# Run connect command
sudo azcmagent connect --resource-group "$resourceGroup" --tenant-id "$tenantId" --location "$location" --subscription-id "$subscriptionId" --cloud "$cloud" --correlation-id "$correlationId" --gateway-id "$gatewayID";
For Windows servers:
- Obtain your gateway's Resource ID by running the
az connectedmachine gateway listcommand. This command outputs information about all the gateway resources in your subscription. Note the ID parameter in the output (that is, the full ARM resource ID). - In the try section of the installation script, add the ID found in the previous step as the following parameter:
--gateway-id "[Your-gateway’s-Resource-ID]" - In the catch section of the installation script, add the ID found in the previous step as the following parameter:
gateway-id="[Your-gateway’s-Resource-ID]"
Windows server onboarding script example:
This script template includes parameters for you to specify your enterprise proxy server.
$global:scriptPath = $myinvocation.mycommand.definition function Restart-AsAdmin { $pwshCommand = "powershell" if ($PSVersionTable.PSVersion.Major -ge 6) { $pwshCommand = "pwsh" } try { Write-Host "This script requires administrator permissions to install the Azure Connected Machine Agent. Attempting to restart script with elevated permissions..." $arguments = "-NoExit -Command `"& '$scriptPath'`"" Start-Process $pwshCommand -Verb runAs -ArgumentList $arguments exit 0 } catch { throw "Failed to elevate permissions. Please run this script as Administrator." } } try { if (-not ([Security.Principal.WindowsPrincipal] [Security.Principal.WindowsIdentity]::GetCurrent()).IsInRole([Security.Principal.WindowsBuiltInRole]::Administrator)) { if ([System.Environment]::UserInteractive) { Restart-AsAdmin } else { throw "This script requires administrator permissions to install the Azure Connected Machine Agent. Please run this script as Administrator." } } $env:SUBSCRIPTION_ID = "SubscriptionId"; $env:RESOURCE_GROUP = "ResourceGroup"; $env:TENANT_ID = "TenantID"; $env:LOCATION = "Region"; $env:AUTH_TYPE = "AuthType"; $env:CLOUD = "AzureCloud"; $env:GATEWAY_ID = "gatewayResourceID"; [Net.ServicePointManager]::SecurityProtocol = [Net.ServicePointManager]::SecurityProtocol -bor 3072; # Download the installation package Invoke-WebRequest -UseBasicParsing -Uri "https://aka.ms/azcmagent-windows" -TimeoutSec 30 -OutFile "$env:TEMP\install_windows_azcmagent.ps1" -proxy "[Your Proxy URL]"; # Install the hybrid agent & "$env:TEMP\install_windows_azcmagent.ps1" -proxy "[Your Proxy URL]"; if ($LASTEXITCODE -ne 0) { exit 1; } # Run connect command & "$env:ProgramW6432\AzureConnectedMachineAgent\azcmagent.exe" connect --resource-group "$env:RESOURCE_GROUP" --tenant-id "$env:TENANT_ID" --location "$env:LOCATION" --subscription-id "$env:SUBSCRIPTION_ID" --cloud "$env:CLOUD" --gateway-id "$env:GATEWAY_ID"; } catch { $logBody = @{subscriptionId="$env:SUBSCRIPTION_ID";resourceGroup="$env:RESOURCE_GROUP";tenantId="$env:TENANT_ID";location="$env:LOCATION";authType="$env:AUTH_TYPE";gatewayId="$env:GATEWAY_ID";operation="onboarding";messageType=$_.FullyQualifiedErrorId;message="$_";}; Invoke-WebRequest -UseBasicParsing -Uri "https://gbl.his.arc.azure.com/log" -Method "PUT" -Body ($logBody | ConvertTo-Json) -proxy "[Your Proxy URL]" | out-null; Write-Host -ForegroundColor red $_.Exception; }- Obtain your gateway's Resource ID by running the
Run the installation script to onboard your servers to Azure Arc.
To configure an existing machine to use Arc gateway, follow these steps:
Note
The existing machine must be using the Arc-enabled servers connected machine agent version 1.43 or higher to use the Arc gateway Limited Public preview.
Associate your existing machine with your Arc gateway resource:
az connectedmachine setting update --resource-group [res-group] --subscription [subscription name] --base-provider Microsoft.HybridCompute --base-resource-type machines --base-resource-name [Arc-server's resource name] --settings-resource-name default --gateway-resource-id [Full Arm resourceid]Update the machine to use the Arc gateway resource. Run the following command on the Arc-enabled server to set it to use Arc gateway:
azcmagent config set connection.type gatewayAwait reconciliation.
Once your machines have been updated to use the Arc gateway, some Azure Arc endpoints that were previously allowed in your enterprise proxy or firewalls won't be needed. However, there's a transition period, so allow 1 hour before removing unneeded endpoints from your firewall/enterprise proxy.
Step 5: Verify that the setup succeeded
On the onboarded server, run the following command: azcmagent show
The result should indicate the following values:
- Agent Status should show as Connected.
- Using HTTPS Proxy should show as http://localhost:40343
- Upstream Proxy should show as your enterprise proxy (if you set one)
Additionally, to verify successful set-up, you can run the following command: azcmagent check
The result should indicate that the connection.type is set to gateway, and the Reachable column should indicate true for all URLs.
Step 6: Ensure additional scenarios use the Arc gateway (Linux only)
On Linux, to use Azure Monitor or Microsoft Defender for Endpoint, additional commands need to be executed to work with the Azure Arc gateway (Limited preview).
For Azure Monitor, explicit proxy settings should be provided when deploying Azure Monitor Agent. From Azure Cloud Shell, execute the following commands:
$settings = @{"proxy" = @{mode = "application"; address = "http://127.0.0.1:40343"; auth = false}}

New-AzConnectedMachineExtension -Name AzureMonitorLinuxAgent -ExtensionType AzureMonitorLinuxAgent -Publisher Microsoft.Azure.Monitor -ResourceGroupName <resource-group-name> -MachineName <arc-server-name> -Location <arc-server-location> -Setting $settings
If you’re deploying Azure Monitor through the Azure portal, be sure to select the Use Proxy setting and set the Proxy Address to http://127.0.0.1:40343.
For Microsoft Defender for Endpoint, run the following command:
mdatp config proxy set --value http://127.0.0.1:40343
Cleanup instructions
To clean up your gateway, detach the gateway resource from the applicable server(s); the resource can then be deleted safely:
Set the connection type of the Azure Arc-enabled server to "direct" instead of "gateway":
azcmagent config set connection.type directRun the following command to delete the resource:
az connectedmachine gateway delete --resource group [resource group name] --gateway-name [gateway resource name]This operation can take couple of minutes.
Troubleshooting
You can audit your Arc gateway’s traffic by viewing the gateway Router’s logs.
To view gateway Router logs on Windows:
- Run
azcmagent logsin PowerShell. - In the resulting .zip file, the logs are located in the
C:\ProgramData\Microsoft\ArcGatewayRouterfolder.
To view gateway Router logs on Linux:
- Run
sudo azcmagent logs. - In the resulting log file, the logs are located in the
/usr/local/arcrtr/logs/folder.
Known issues
It's not yet possible to use the Azure CLI to disassociate a gateway Resource from an Arc-enabled server. To make an Arc-enabled server stop using an Arc gateway, use the azcmagent config set connection.type direct command. This command configures the Arc-enabled resource to use the direct route instead of the Arc gateway.