Scale SignalR Service with multiple instances
SignalR Service SDK supports multiple endpoints for SignalR Service instances. You can use this feature to scale the concurrent connections, or use it for cross-region messaging.
For ASP.NET Core
Add multiple endpoints from config
Configure with key Azure:SignalR:ConnectionString or Azure:SignalR:ConnectionString: for SignalR Service connection string.
If the key starts with Azure:SignalR:ConnectionString:, it should be in the format Azure:SignalR:ConnectionString:{Name}:{EndpointType}, where Name and EndpointType are properties of the ServiceEndpoint object, and are accessible from code.
You can add multiple instance connection strings using the following dotnet commands:
dotnet user-secrets set Azure:SignalR:ConnectionString:east-region-a <ConnectionString1>
dotnet user-secrets set Azure:SignalR:ConnectionString:east-region-b:primary <ConnectionString2>
dotnet user-secrets set Azure:SignalR:ConnectionString:backup:secondary <ConnectionString3>
Add multiple endpoints from code
A ServiceEndpoint class describes the properties of an Azure SignalR Service endpoint.
You can configure multiple instance endpoints when using Azure SignalR Service SDK through:
services.AddSignalR()
        .AddAzureSignalR(options =>
        {
            options.Endpoints = new ServiceEndpoint[]
            {
                // Note: this is just a demonstration of how to set options.Endpoints
                // Having ConnectionStrings explicitly set inside the code is not encouraged
                // You can fetch it from a safe place such as Azure KeyVault
                new ServiceEndpoint("<ConnectionString0>"),
                new ServiceEndpoint("<ConnectionString1>", type: EndpointType.Primary, name: "east-region-a"),
                new ServiceEndpoint("<ConnectionString2>", type: EndpointType.Primary, name: "east-region-b"),
                new ServiceEndpoint("<ConnectionString3>", type: EndpointType.Secondary, name: "backup"),
            };
        });
Customize endpoint router
By default, the SDK uses the DefaultEndpointRouter to pick up endpoints.
Default behavior
Client request routing:
When client
/negotiatewith the app server. By default, SDK randomly selects one endpoint from the set of available service endpoints.Server message routing:
When sending a message to a specific connection and the target connection is routed to the current server, the message goes directly to that connected endpoint. Otherwise, the messages are broadcasted to every Azure SignalR endpoint.
Customize routing algorithm
You can create your own router when you have special knowledge to identify which endpoints the messages should go to.
The following example defines a custom router that routes messages with a group starting with east- to the endpoint named east:
private class CustomRouter : EndpointRouterDecorator
{
    public override IEnumerable<ServiceEndpoint> GetEndpointsForGroup(string groupName, IEnumerable<ServiceEndpoint> endpoints)
    {
        // Override the group broadcast behavior, if the group name starts with "east-", only send messages to endpoints inside east
        if (groupName.StartsWith("east-"))
        {
            return endpoints.Where(e => e.Name.StartsWith("east-"));
        }

        return base.GetEndpointsForGroup(groupName, endpoints);
    }
}
The following example overrides the default negotiate behavior and selects the endpoint depending on the location of the app server.
private class CustomRouter : EndpointRouterDecorator
{    public override ServiceEndpoint GetNegotiateEndpoint(HttpContext context, IEnumerable<ServiceEndpoint> endpoints)
    {
        // Override the negotiate behavior to get the endpoint from query string
        var endpointName = context.Request.Query["endpoint"];
        if (endpointName.Count == 0)
        {
            context.Response.StatusCode = 400;
            var response = Encoding.UTF8.GetBytes("Invalid request");
            context.Response.Body.Write(response, 0, response.Length);
            return null;
        }

        return endpoints.FirstOrDefault(s => s.Name == endpointName && s.Online) // Get the endpoint with name matching the incoming request
               ?? base.GetNegotiateEndpoint(context, endpoints); // Or fallback to the default behavior to randomly select one from primary endpoints, or fallback to secondary when no primary ones are online
    }
}
Don't forget to register the router to DI container using:
services.AddSingleton(typeof(IEndpointRouter), typeof(CustomRouter));
services.AddSignalR()
        .AddAzureSignalR(
            options =>
            {
                options.Endpoints = new ServiceEndpoint[]
                {
                    new ServiceEndpoint(name: "east", connectionString: "<connectionString1>"),
                    new ServiceEndpoint(name: "west", connectionString: "<connectionString2>"),
                    new ServiceEndpoint("<connectionString3>")
                };
            });
For ASP.NET
Add multiple endpoints from config
Configuration with key Azure:SignalR:ConnectionString or Azure:SignalR:ConnectionString: for SignalR Service connection string.
If the key starts with Azure:SignalR:ConnectionString:, it should be in format Azure:SignalR:ConnectionString:{Name}:{EndpointType}, where Name and EndpointType are properties of the ServiceEndpoint object, and are accessible from code.
You can add multiple instance connection strings to web.config:
<?xml version="1.0" encoding="utf-8" ?>
<configuration>
  <connectionStrings>
    <add name="Azure:SignalR:ConnectionString" connectionString="<ConnectionString1>"/>
    <add name="Azure:SignalR:ConnectionString:en-us" connectionString="<ConnectionString2>"/>
    <add name="Azure:SignalR:ConnectionString:zh-cn:secondary" connectionString="<ConnectionString3>"/>
    <add name="Azure:SignalR:ConnectionString:Backup:secondary" connectionString="<ConnectionString4>"/>
  </connectionStrings>
  ...
</configuration>
Add multiple endpoints from code
A ServiceEndpoint class describes the properties of an Azure SignalR Service endpoint.
You can configure multiple instance endpoints when using Azure SignalR Service SDK through:
app.MapAzureSignalR(
    this.GetType().FullName,
    options => {
            options.Endpoints = new ServiceEndpoint[]
            {
                // Note: this is just a demonstration of how to set options. Endpoints
                // Having ConnectionStrings explicitly set inside the code is not encouraged.
                // You can fetch it from a safe place such as Azure KeyVault
                new ServiceEndpoint("<ConnectionString1>"),
                new ServiceEndpoint("<ConnectionString2>"),
                new ServiceEndpoint("<ConnectionString3>"),
            }
        });
Customize a router
The only difference between ASP.NET SignalR and ASP.NET Core SignalR is the http context type for GetNegotiateEndpoint. For ASP.NET SignalR, it is of IOwinContext type.
The following code is a custom negotiate example for ASP.NET SignalR:
private class CustomRouter : EndpointRouterDecorator
{
    public override ServiceEndpoint GetNegotiateEndpoint(IOwinContext context, IEnumerable<ServiceEndpoint> endpoints)
    {
        // Override the negotiate behavior to get the endpoint from query string
        var endpointName = context.Request.Query["endpoint"];
        if (string.IsNullOrEmpty(endpointName))
        {
            context.Response.StatusCode = 400;
            context.Response.Write("Invalid request.");
            return null;
        }

        return endpoints.FirstOrDefault(s => s.Name == endpointName && s.Online) // Get the endpoint with name matching the incoming request
               ?? base.GetNegotiateEndpoint(context, endpoints); // Or fallback to the default behavior to randomly select one from primary endpoints, or fallback to secondary when no primary ones are online
    }
}
Don't forget to register the router to DI container using:
var hub = new HubConfiguration();
var router = new CustomRouter();
hub.Resolver.Register(typeof(IEndpointRouter), () => router);
app.MapAzureSignalR(GetType().FullName, hub, options => {
    options.Endpoints = new ServiceEndpoint[]
                {
                    new ServiceEndpoint(name: "east", connectionString: "<connectionString1>"),
                    new ServiceEndpoint(name: "west", connectionString: "<connectionString2>"),
                    new ServiceEndpoint("<connectionString3>")
                };
});
Service Endpoint Metrics
To enable an advanced router, SignalR server SDK provides multiple metrics to help server make smart decisions. The properties are under ServiceEndpoint.EndpointMetrics.
| Metric Name | Description |
|---|---|
ClientConnectionCount |
Total count of concurrent client connections on all hubs for the service endpoint |
ServerConnectionCount |
Total count of concurrent server connections on all hubs for the service endpoint |
ConnectionCapacity |
Total connection quota for the service endpoint, including client and server connections |
The following code is an example of customizing a router according to ClientConnectionCount.
private class CustomRouter : EndpointRouterDecorator
{
    public override ServiceEndpoint GetNegotiateEndpoint(HttpContext context, IEnumerable<ServiceEndpoint> endpoints)
    {
        return endpoints.OrderBy(x => x.EndpointMetrics.ClientConnectionCount).FirstOrDefault(x => x.Online) // Get the available endpoint with minimal clients load
               ?? base.GetNegotiateEndpoint(context, endpoints); // Or fallback to the default behavior to randomly select one from primary endpoints, or fallback to secondary when no primary ones are online
    }
}
Dynamic Scale ServiceEndpoints
From SDK version 1.5.0, we're enabling dynamic scale ServiceEndpoints for ASP.NET Core version first. So you don't have to restart app server when you need to add/remove a ServiceEndpoint. As ASP.NET Core is supporting a default configuration like appsettings.json with reloadOnChange: true, you don't need to change code, and it's supported by nature. And if you'd like to add some customized configuration and work with hot-reload, refer to Configuration in ASP.NET Core.
Note
Considering the time of connection set-up between server/service and client/service may be different, to ensure no message loss during the scale process, we have a staging period waiting for server connections to be ready before opening the new ServiceEndpoint to clients. Usually it takes seconds to complete and you'll be able to see a log message like Succeed in adding endpoint: '{endpoint}' which indicates the process complete.
In some expected situations, like cross-region network issues or configuration inconsistencies on different app servers, the staging period may not finish correctly. In these cases, it's suggested to restart the app server when you find the scaling process not working correctly.
The default timeout period for the scale is 5 minutes, and it can be customized by changing the value in ServiceOptions.ServiceScaleTimeout. If you have a lot of app servers, it's suggested to extend the value a little bit more.
Note
Currently multiple-endpoint feature is only supported on Persistent transport type.
For SignalR Functions extensions
Configuration
To enable multiple SignalR Service instances, you should:
Use
Persistenttransport type.The default transport type is
Transientmode. You should add the following entry to yourlocal.settings.jsonfile or the application setting on Azure.{ "AzureSignalRServiceTransportType":"Persistent" }Note
When switching from
Transientmode toPersistentmode, there may be JSON serialization behavior change, because underTransientmode,Newtonsoft.Jsonlibrary is used to serialize arguments of hub methods, however, underPersistentmode,System.Text.Jsonlibrary is used as default.System.Text.Jsonhas some key differences in default behavior withNewtonsoft.Json. If you want to useNewtonsoft.JsonunderPersistentmode, you can add a configuration item:"Azure:SignalR:HubProtocol":"NewtonsoftJson"inlocal.settings.jsonfile orAzure__SignalR__HubProtocol=NewtonsoftJsonon Azure portal.Configure multiple SignalR Service endpoints entries in your configuration.
We use a
ServiceEndpointobject to represent a SignalR Service instance. You can define a service endpoint with its<EndpointName>and<EndpointType>in the entry key, and the connection string in the entry value. The keys are in the following format:Azure:SignalR:Endpoints:<EndpointName>:<EndpointType><EndpointType>is optional and defaults toprimary. See samples below:{ "Azure:SignalR:Endpoints:EastUs":"<ConnectionString>", "Azure:SignalR:Endpoints:EastUs2:Secondary":"<ConnectionString>", "Azure:SignalR:Endpoints:WestUs:Primary":"<ConnectionString>" }Note
When you configure Azure SignalR endpoints in the App Service on Azure portal, don't forget to replace
":"with"__", the double underscore in the keys. For reasons, see Environment variables.Connection string configured with the key
{ConnectionStringSetting}(defaults to "AzureSignalRConnectionString") is also recognized as a primary service endpoint with empty name. But this configuration style is not recommended for multiple endpoints.
Routing
Default behavior
By default, the functions binding uses the DefaultEndpointRouter to pick up endpoints.
Client routing: Randomly select one endpoint from primary online endpoints. If all the primary endpoints are offline, then randomly select one secondary online endpoint. If the selection fails again, then exception is thrown.
Server message routing: All service endpoints are returned.
Customization
C# in-process model
Here are the steps:
Implement a customized router. You can leverage information provided from
ServiceEndpointto make routing decision. See guide here: customize-route-algorithm. Please note that Http trigger is required in the negotiation function when you needHttpContextin custom negotiation method.Register the router to DI container.
using Microsoft.Azure.Functions.Extensions.DependencyInjection;
using Microsoft.Azure.SignalR;
using Microsoft.Extensions.DependencyInjection;

[assembly: FunctionsStartup(typeof(SimpleChatV3.Startup))]
namespace SimpleChatV3
{
    public class Startup : FunctionsStartup
    {
        public override void Configure(IFunctionsHostBuilder builder)
        {
            builder.Services.AddSingleton<IEndpointRouter, CustomizedRouter>();
        }
    }
}
Isolated-process model
For functions running on isolated-process model, we support specifying target endpoints in each request. You will use new binding types to get endpoint information.
Client routing
The SignalRConnectionInfo binding selects one endpoint according to the default routing rule. If you want to customize routing rule, you should use SignalRNegotiation binding instead of SignalRConnectionInfo binding.
SignalRNegotiation binding configuration properties are the same as SignalRConnectionInfo. Here's a function.json file sample:
{
    "type": "signalRNegotiation",
    "name": "negotiationContext",
    "hubName": "<HubName>",
    "direction": "in"
}
You could also add other binding data such as userId, idToken and claimTypeList just like SignalRConnectionInfo.
The object you get from SignalRNegotiation binding is in the following format:
{
    "endpoints": [
        {
            "endpointType": "Primary",
            "name": "<EndpointName>",
            "endpoint": "https://****.service.signalr.net",
            "online": true,
            "connectionInfo": {
                "url": "<client-access-url>",
                "accessToken": "<client-access-token>"
            }
        },
        {
            "...": "..."
        }
    ]
}
Here's a JavaScript usage sample of SignalRNegotiation binding:
module.exports = function (context, req, negotiationContext) {
    var userId = req.query.userId;
    if (userId.startsWith("east-")) {
        //return the first endpoint whose name starts with "east-" and status is online.
        context.res.body = negotiationContext.endpoints.find(endpoint => endpoint.name.startsWith("east-") && endpoint.online).connectionInfo;
    }
    else {
        //return the first online endpoint
        context.res.body = negotiationContext.endpoints.filter(endpoint => endpoint.online)[0].connectionInfo;
    }
}
Messages routing
Messages or actions routing needs two binding types to cooperate. In general, firstly you need a new input binding type SignalREndpoints to get all the available endpoint information. Then you filter the endpoints and get an array containing all the endpoints that you want to send to. Lastly you specify the target endpoints in the SignalR output binding.
Here's the SignalREndpoints binding configuration properties in functions.json file:
{
      "type": "signalREndpoints",
      "direction": "in",
      "name": "endpoints",
      "hubName": "<HubName>"
}
The object you get from SignalREndpoints is an array of endpoints each of which is represented as a JSON object with the following schema:
{
    "endpointType": "<EndpointType>",
    "name": "<EndpointName>",
    "endpoint": "https://****.service.signalr.net",
    "online": true
}
After you get the target endpoint array, add an endpoints property to the output binding object. This is a JavaScript example:
module.exports = function (context, req, endpoints) {
    var targetEndpoints = endpoints.filter(endpoint => endpoint.name.startsWith("east-"));
    context.bindings.signalRMessages = [{
        "target": "chat",
        "arguments": ["hello-world"],
        "endpoints": targetEndpoints,
    }];
    context.done();
}
For Management SDK
Add multiple endpoints from config
Configure with key Azure:SignalR:Endpoints for SignalR Service connection string. The key should be in the format Azure:SignalR:Endpoints:{Name}:{EndpointType}, where Name and EndpointType are properties of the ServiceEndpoint object, and are accessible from code.
You can add multiple instance connection strings using the following dotnet commands:
dotnet user-secrets set Azure:SignalR:Endpoints:east-region-a <ConnectionString1>
dotnet user-secrets set Azure:SignalR:Endpoints:east-region-b:primary <ConnectionString2>
dotnet user-secrets set Azure:SignalR:Endpoints:backup:secondary <ConnectionString3>
Add multiple endpoints from code
A ServiceEndpoint class describes the properties of an Azure SignalR Service endpoint.
You can configure multiple instance endpoints when using Azure SignalR Management SDK through:
var serviceManager = new ServiceManagerBuilder()
                    .WithOptions(option =>
                    {
                        options.Endpoints = new ServiceEndpoint[]
                        {
                            // Note: this is just a demonstration of how to set options.Endpoints
                            // Having ConnectionStrings explicitly set inside the code is not encouraged
                            // You can fetch it from a safe place such as Azure KeyVault
                            new ServiceEndpoint("<ConnectionString0>"),
                            new ServiceEndpoint("<ConnectionString1>", type: EndpointType.Primary, name: "east-region-a"),
                            new ServiceEndpoint("<ConnectionString2>", type: EndpointType.Primary, name: "east-region-b"),
                            new ServiceEndpoint("<ConnectionString3>", type: EndpointType.Secondary, name: "backup"),
                        };
                    })
                    .BuildServiceManager();
Customize endpoint router
By default, the SDK uses the DefaultEndpointRouter to pick up endpoints.
Default behavior
Client request routing:
When client
/negotiatewith the app server. By default, SDK randomly selects one endpoint from the set of available service endpoints.Server message routing:
When sending a message to a specific connection and the target connection is routed to the current server, the message goes directly to that connected endpoint. Otherwise, the messages are broadcasted to every Azure SignalR endpoint.
Customize routing algorithm
You can create your own router when you have special knowledge to identify which endpoints the messages should go to.
The following example defines a custom router that routes messages with a group starting with east- to the endpoint named east:
private class CustomRouter : EndpointRouterDecorator
{
    public override IEnumerable<ServiceEndpoint> GetEndpointsForGroup(string groupName, IEnumerable<ServiceEndpoint> endpoints)
    {
        // Override the group broadcast behavior, if the group name starts with "east-", only send messages to endpoints inside east
        if (groupName.StartsWith("east-"))
        {
            return endpoints.Where(e => e.Name.StartsWith("east-"));
        }

        return base.GetEndpointsForGroup(groupName, endpoints);
    }
}
The following example overrides the default negotiate behavior and selects the endpoint depending on the location of the app server.
private class CustomRouter : EndpointRouterDecorator
{    public override ServiceEndpoint GetNegotiateEndpoint(HttpContext context, IEnumerable<ServiceEndpoint> endpoints)
    {
        // Override the negotiate behavior to get the endpoint from query string
        var endpointName = context.Request.Query["endpoint"];
        if (endpointName.Count == 0)
        {
            context.Response.StatusCode = 400;
            var response = Encoding.UTF8.GetBytes("Invalid request");
            context.Response.Body.Write(response, 0, response.Length);
            return null;
        }

        return endpoints.FirstOrDefault(s => s.Name == endpointName && s.Online) // Get the endpoint with name matching the incoming request
               ?? base.GetNegotiateEndpoint(context, endpoints); // Or fallback to the default behavior to randomly select one from primary endpoints, or fallback to secondary when no primary ones are online
    }
}
Don't forget to register the router to DI container using:
var serviceManager = new ServiceManagerBuilder()
                    .WithOptions(option =>
                    {
                        options.Endpoints = new ServiceEndpoint[]
                        {
                            // Note: this is just a demonstration of how to set options.Endpoints
                            // Having ConnectionStrings explicitly set inside the code is not encouraged
                            // You can fetch it from a safe place such as Azure KeyVault
                            new ServiceEndpoint("<ConnectionString0>"),
                            new ServiceEndpoint("<ConnectionString1>", type: EndpointType.Primary, name: "east-region-a"),
                            new ServiceEndpoint("<ConnectionString2>", type: EndpointType.Primary, name: "east-region-b"),
                            new ServiceEndpoint("<ConnectionString3>", type: EndpointType.Secondary, name: "backup"),
                        };
                    })
                    .WithRouter(new CustomRouter())
                    .BuildServiceManager();
Configuration in cross-region scenarios
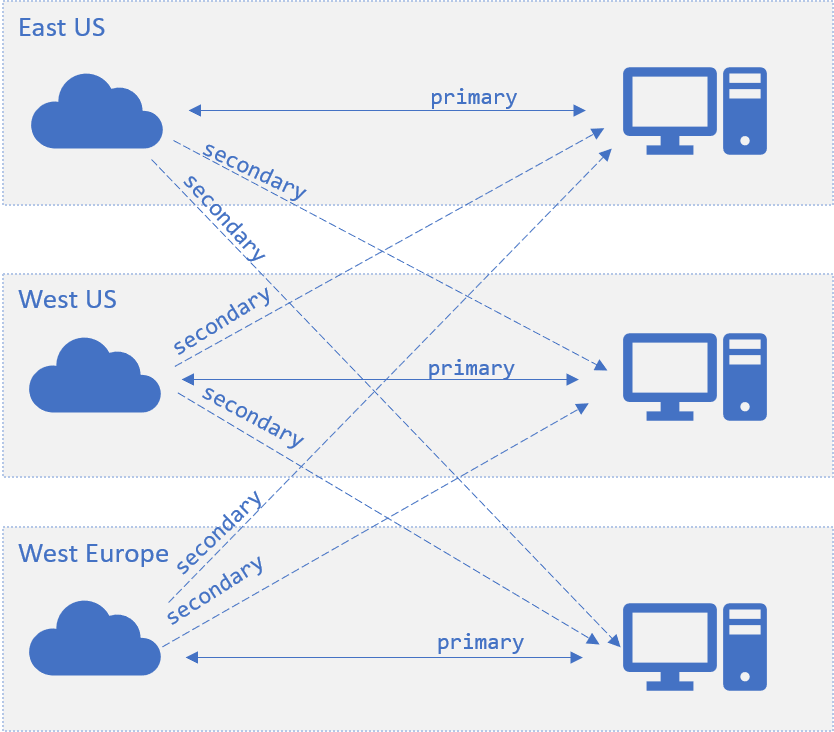
The ServiceEndpoint object has an EndpointType property with value primary or secondary.
Primary endpoints are preferred endpoints to receive client traffic because they've have more reliable network connections. Secondary endpoints have less reliable network connections and are used only for server to client traffic. For example, secondary endpoints are used for broadcasting messages instead of client to server traffic.
In cross-region cases, the network can be unstable. For an app server located in East US, the SignalR Service endpoint located in the same East US region is primary and endpoints in other regions marked as secondary. In this configuration, service endpoints in other regions can receive messages from this East US app server, but no cross-region clients are routed to this app server. The following diagram shows the architecture:
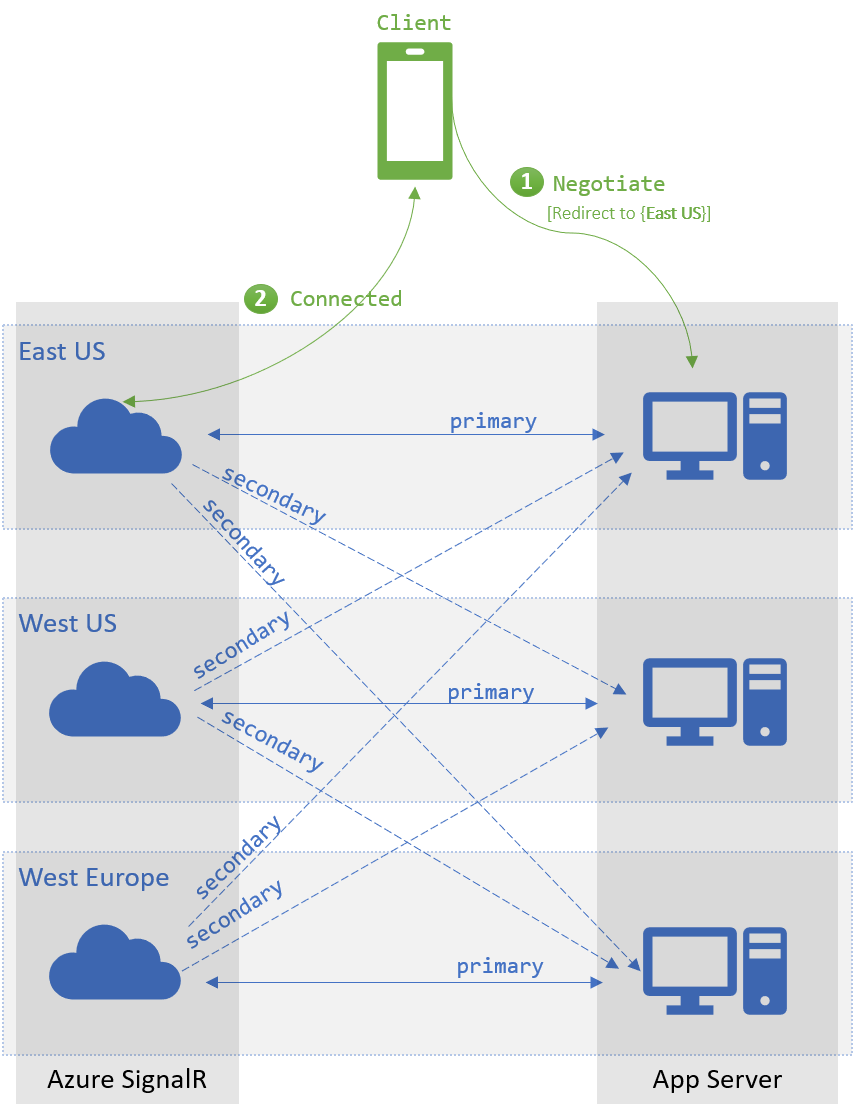
When a client tries /negotiate with the app server with a default router, the SDK randomly selects one endpoint from the set of available primary endpoints. When the primary endpoint isn't available, the SDK then randomly selects from all available secondary endpoints. The endpoint is marked as available when the connection between server and the service endpoint is alive.
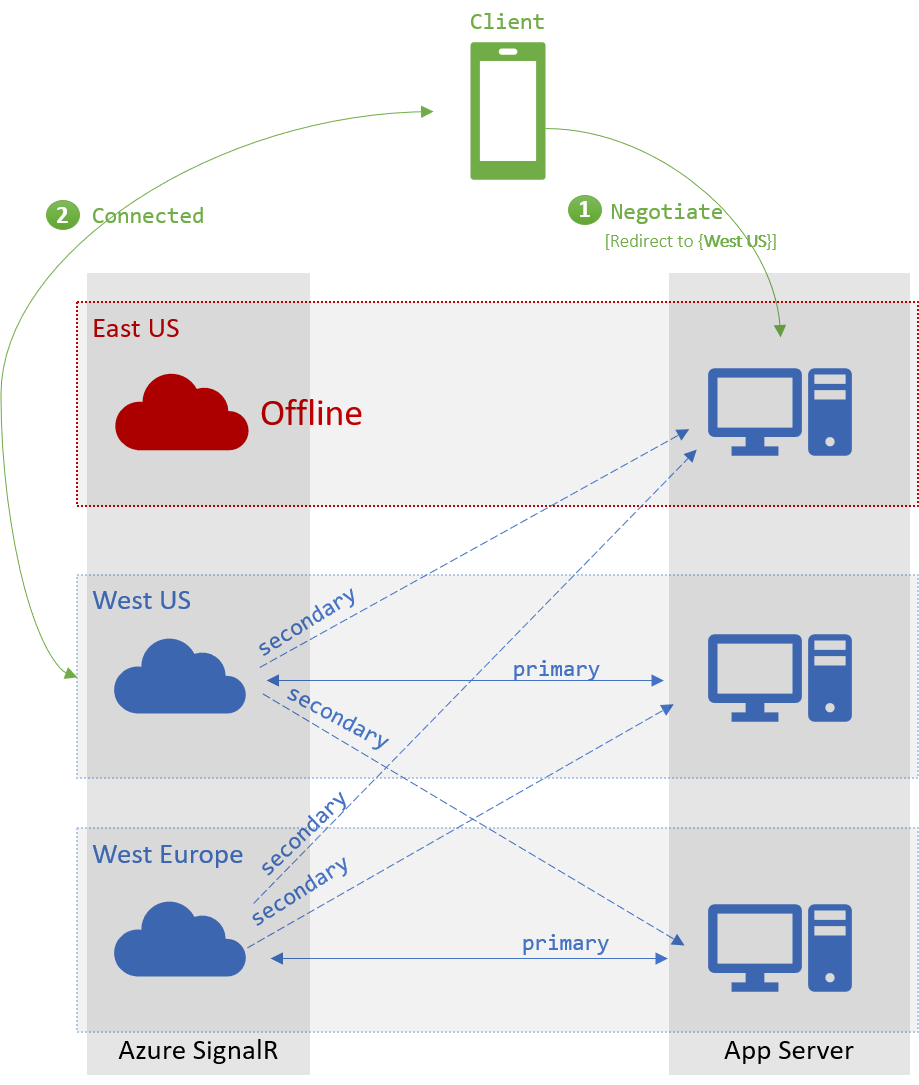
In a cross-region scenario, when a client tries /negotiate with the app server hosted in East US, by default it always returns the primary endpoint located in the same region. When all East US endpoints aren't available, the router redirects the client to endpoints in other regions. The following failover section describes the scenario in detail.
Failover
When no primary endpoint is available, the client's /negotiate picks from the available secondary endpoints. This failover mechanism requires that each endpoint serves as a primary endpoint to at least one app server.
Next steps
You can use multiple endpoints in high availability and disaster recovery scenarios.