How to translate your infrastructure to an IaC template
Service Connector helps users connect their compute services to target backing services in just a few clicks or commands. When moving from a getting-started to a production stage, users also need to make the transition from using manual configurations to using Infrastructure as Code (IaC) templates in their CI/CD pipelines. In this guide, we show how to translate your connected Azure services to IaC templates.
Prerequisites
- This guide assumes that you're aware of the Service Connector IaC limitations.
Solution overview
Translating the infrastructure to IaC templates usually involves two major parts: the logic to provision source and target services, and the logic to build connections. To implement the logic to provision source and target services, there are two options:
- Authoring the template from scratch
- Exporting the template from Azure and polish it
To implement the logic to build connections, there are three options:
- Using Service Connector and store configuration in App Configuration
- Using Service Connector in the template
- Using template logic to configure source and target services directly
Combinations of these different options can produce different solutions. Due to IaC limitations in Service Connector, we recommend that you implement the following solutions in the order presented below. To apply these solutions, you must understand the IaC tools and the template authoring grammar.
| Solution | Provision source and target | Build connection | Applicable scenario | Pros | Cons |
|---|---|---|---|---|---|
| 1 | Authoring from scratch | Use Service Connector and store configuration in App Configuration | Has liveness check on the cloud resources before allowing live traffic | - Template is simple and readable - Service Connector brings additional value - No IaC problem is introduced by Service Connector |
- Need extra dependency to read configuration from App Configuration - Cost to check cloud resources liveness |
| 2 | Authoring from scratch | Use Service Connector | Has liveness check on the cloud resources before allowing live traffic | - Template is simple and readable - Service Connector brings additional value |
- Cost to check cloud resources liveness |
| 3 | Authoring from scratch | Configure source and target services directly in template | No liveness check on the cloud resources | - Template is simple and readable | - Service Connector features aren't available |
| 4 | Export and polish | Use Service Connector and store configuration in App Configuration | Has liveness check on the cloud resources before allowing live traffic | - Resources are exactly the same as in the cloud - Service Connector brings additional value - No IaC problem is introduced by Service Connector |
- Need extra dependency to read configuration from App Configuration - Cost to check cloud resources liveness - Supports only ARM templates - Efforts required to understand and polish the template |
| 5 | Export and polish | Use Service Connector | Has liveness check on the cloud resources before allowing live traffic | - Resources are exactly the same as in the cloud - Service Connector brings additional value |
- Cost to check cloud resources liveness - Supports only ARM templates - Efforts required to understand and polish the template |
| 6 | Export and polish | Configure source and target services directly in template | No liveness check on the cloud resources | - Resources are exactly same as on the cloud | - Support only ARM template - Efforts to understand and polish the template - Service Connector features aren't available |
Authoring templates
The following sections show how to create a web app and a storage account and connect them with a system-assigned identity using Bicep. It shows how to do this both using Service Connector and using template logic.
Provision source and target services
Authoring from scratch
Authoring the template from scratch is the preferred and recommended way to provision source and target services, as it's easy to get started and makes the template simple and readable. Following is an example, using a minimal set of parameters to create a webapp and a storage account.
// This template creates a webapp and a storage account.
// In order to make it more readable, we use only the mininal set of parameters to create the resources.

param location string = resourceGroup().location
// App Service plan parameters
param planName string = 'plan_${uniqueString(resourceGroup().id)}'
param kind string = 'linux'
param reserved bool = true
param sku string = 'B1'
// Webapp parameters
param webAppName string = 'webapp-${uniqueString(resourceGroup().id)}'
param linuxFxVersion string = 'PYTHON|3.8'
param identityType string = 'SystemAssigned'
param appSettings array = []
// Storage account parameters
param storageAccountName string = 'account${uniqueString(resourceGroup().id)}'


// Create an app service plan
resource appServicePlan 'Microsoft.Web/serverfarms@2022-09-01' = {
  name: planName
  location: location
  kind: kind
  sku: {
    name: sku
  }
  properties: {
    reserved: reserved
  }
}


// Create a web app
resource appService 'Microsoft.Web/sites@2022-09-01' = {
  name: webAppName
  location: location
  properties: {
    serverFarmId: appServicePlan.id
    siteConfig: {
      linuxFxVersion: linuxFxVersion
      appSettings: appSettings
    }
  }
  identity: {
    type: identityType
  }
}


// Create a storage account
resource storageAccount 'Microsoft.Storage/storageAccounts@2023-01-01' = {
  name: storageAccountName
  location: location
  sku: {
    name: 'Standard_LRS'
  }
  kind: 'StorageV2'
}
Export and polish
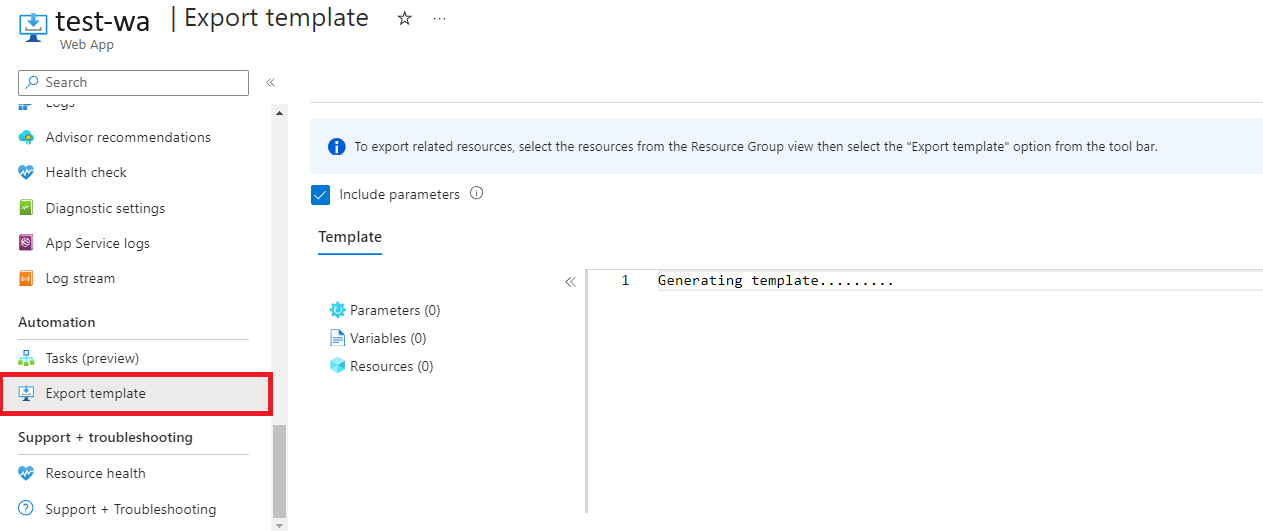
If the resources you're provisioning are exactly the same ones as the ones you have in the cloud, exporting the template from Azure might be another option. The two premises of this approach are: the resources exist in Azure and you're using ARM templates for your IaC. The Export template button is usually at the bottom of the sidebar on Azure portal. The exported ARM template reflects the resource's current states, including the settings configured by Service Connector. You usually need to know about the resource properties to polish the exported template.
Build connection logic
Using Service Connector and storing configuration in App Configuration
Using the App Configuration to store configuration naturally supports IaC scenarios. We therefore recommend you use this method to build your IaC template if possible.
For simple portal instructions, you can refer to this App Configuration tutorial. To add this feature into a bicep file, add the App Configuration ID in the Service Connector payload.
resource webApp 'Microsoft.Web/sites@2022-09-01' existing = {
  name: webAppName
}

resource storageAccount 'Microsoft.Storage/storageAccounts@2023-01-01' existing = {
  name: storageAccountName
}

resource appConfiguration 'Microsoft.AppConfiguration/configurationStores@2023-03-01' existing = {
  name: appConfigurationName
}

resource serviceConnector 'Microsoft.ServiceLinker/linkers@2022-05-01' = {
  name: connectorName
  scope: webApp
  properties: {
    clientType: 'python'
    targetService: {
      type: 'AzureResource'
      id: storageAccount.id
    }
    authInfo: {
      authType: 'systemAssignedIdentity'
    }
    configurationInfo: {
      configurationStore: {
        appConfigurationId: appConfiguration.id
      }
    }
  }
}
Using Service Connector
Creating connections between the source and target service using Service Connector is the preferred and recommended way if the Service Connector IaC limitation doesn't matter for your scenario. Service Connector makes the template simpler and also provides additional elements, such as the connection health validation, which you won't have if you're building connections through template logic directly.
// The template builds a connection between a webapp and a storage account
// with a system-assigned identity using Service Connector

param webAppName string = 'webapp-${uniqueString(resourceGroup().id)}'
param storageAccountName string = 'account${uniqueString(resourceGroup().id)}'
param connectorName string = 'connector_${uniqueString(resourceGroup().id)}'

// Get an existing webapp
resource webApp 'Microsoft.Web/sites@2022-09-01' existing = {
  name: webAppName
}

// Get an existig storage
resource storageAccount 'Microsoft.Storage/storageAccounts@2023-01-01' existing = {
  name: storageAccountName
}

// Create a Service Connector resource for the webapp
// to connect to a storage account using system identity
resource serviceConnector 'Microsoft.ServiceLinker/linkers@2022-05-01' = {
  name: connectorName
  scope: webApp
  properties: {
    clientType: 'python'
    targetService: {
      type: 'AzureResource'
      id: storageAccount.id
    }
    authInfo: {
      authType: 'systemAssignedIdentity'
    }
  }
}
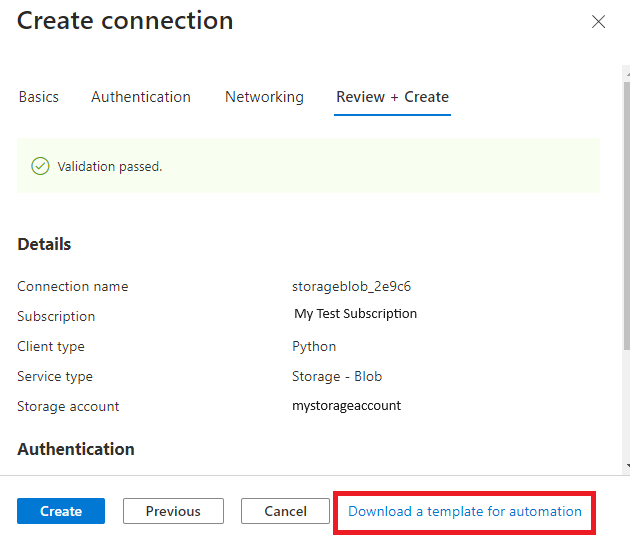
For the formats of properties and values needed when creating a Service Connector resource, check how to provide correct parameters. You can also preview and download an ARM template for reference when creating a Service Connector resource in the Azure portal.
Using template logic
For the scenarios where the Service Connector IaC limitation matters, consider building connections using the template logic directly. The following template is an example showing how to connect a storage account to a web app using a system-assigned identity.
// The template builds a connection between a webapp and a storage account
// with a system-assigned identity without using Service Connector

param webAppName string = 'webapp-${uniqueString(resourceGroup().id)}'
param storageAccountName string = 'account${uniqueString(resourceGroup().id)}'
param storageBlobDataContributorRole string  = 'ba92f5b4-2d11-453d-a403-e96b0029c9fe'

// Get an existing webapp
resource webApp 'Microsoft.Web/sites@2022-09-01' existing = {
  name: webAppName
}

// Get an existing storage account
resource storageAccount 'Microsoft.Storage/storageAccounts@2023-01-01' existing = {
  name: storageAccountName
}

// Operation: Enable system-assigned identity on the source service
// No action needed as this is enabled when creating the webapp

// Operation: Configure the target service's endpoint on the source service's app settings
resource appSettings 'Microsoft.Web/sites/config@2022-09-01' = {
  name: 'appsettings'
  parent: webApp
  properties: {
    AZURE_STORAGEBLOB_RESOURCEENDPOINT: storageAccount.properties.primaryEndpoints.blob
  }
}

// Operation: Configure firewall on the target service to allow the source service's outbound IPs
// No action needed as storage account allows all IPs by default

// Operation: Create role assignment for the source service's identity on the target service
resource roleAssignment 'Microsoft.Authorization/roleAssignments@2022-04-01' = {
  scope: storageAccount
  name: guid(resourceGroup().id, storageBlobDataContributorRole)
  properties: {
    roleDefinitionId: resourceId('Microsoft.Authorization/roleDefinitions', storageBlobDataContributorRole)
    principalId: webApp.identity.principalId
  }
}
When building connections using template logic directly, it's crucial to understand what Service Connector does for each kind of authentication type, as the template logic is equivalent to the Service Connector backend operations. The following table shows the operation details that you need to translate to template logic for each kind of authentication type.
| Auth type | Service Connector operations |
|---|---|
| Secret / Connection string | - Configure the target service's connection string on the source service's app settings - Configure firewall on the target service to allow the source service's outbound IPs |
| System-assigned managed identity | - Configure the target service's endpoint on the source service's app settings - Configure firewall on the target service to allow the source service's outbound IPs - Enable system assigned identity on the source service - Create role assignment for the source service's identity on the target service |
| User-assigned managed identity | - Configure the target service's endpoint on the source service's app settings - Configure firewall on the target service to allow the source service's outbound IPs - Bind user assigned identity to the source service - Create role assignment for the user assigned identity on the target service |
| Service principal | - Configure the target service's endpoint on the source service's app settings - Configure the service principal's appId and secret on the source service's app settings - Configure firewall on the target service to allow the source service's outbound IPs - Create role assignment for the service principal on the target service |