Print Server on Server 2019 unsharing printers on reboot

David Hoeft 11 Reputation points
2020-08-05T15:03:43.59+00:00

We have a dedicated Server 2019 as a print server hosting around 12 printers. After a reboot, we noticed that 2 printers are no longer shared. We have to go back and reshare them for users to be able to print again. The printers are Kyocera ECOSYS P3055dn KX with the newest V4 universal print driver. 5.3.729.0

Any ideas on how to troubleshoot this?

Windows Server Printing
Windows Server: A family of Microsoft server operating systems that support enterprise-level management, data storage, applications, and communications.Printing: Printer centralized deployment and management, scan and fax resources management, and document services
675 questions
{count} votes

3 answers

Sort by: Most helpful
  1. Vriznunt Zhangchompuu 11 Reputation points
    2020-08-05T16:10:05.743+00:00

    Hello, Mr.David. If you use Windows 7 and Windows 8, the Print Management console is part of Administrative Tools. However, it is not available in all editions of Windows. Only users of Windows 7 Professional, Ultimate and Enterprise will be able to use it. In Windows 8 it is available in Windows 8 Pro and Enterprise.

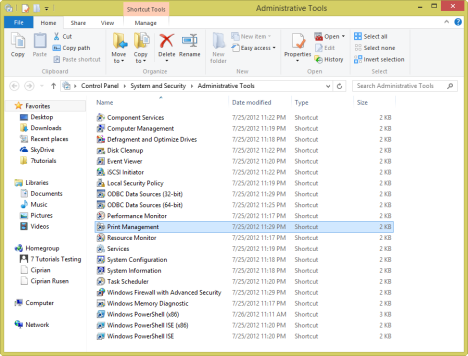
    While a search for the term Print Management in Windows 7's Start Menu will return the appropriate result, doing the same in Windows 8's Start screen will not. That's why, to make sure you find it, it is best to open the Control Panel and go to System and Security -> Administrative Tools.
    15709-pmc1.png
    This will work both in Windows 7 and Windows 8.
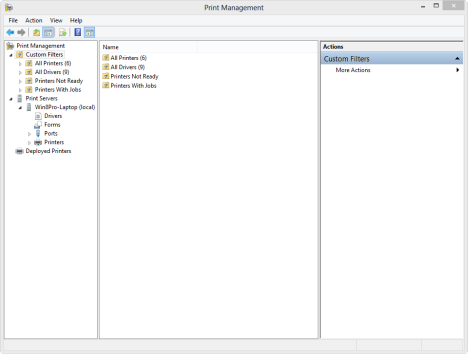
    When you first launch Print Management, its window will look similar to the screenshot below.
    15871-pmc2.png

    How to Work with the Print Servers Section
    Even though Print Servers is the second section on the left, I would like to showcase it first, as it is the most interesting part of the Print Management console.

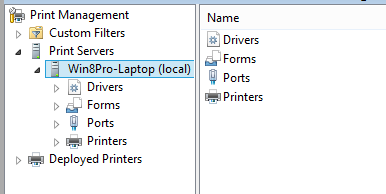
    Under Print Servers you find your computer. If you are part of a network domain and you have administrative permissions over it, you will see also other computers from that domain. For each computer listed, there is information about drivers installed, printing forms, ports used and the printers installed.
    15863-pmc3.png
    The Drivers section displays all the print drivers installed on the selected computer, including drivers installed by software that emulates the presence of a printer.
    15669-pmc4.png
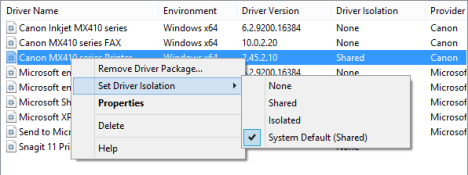
    With a right click on a driver, you can manage different aspects of it, such as its isolation from other drivers or its properties. You can also delete the selected driver.
    15847-pmc5.png
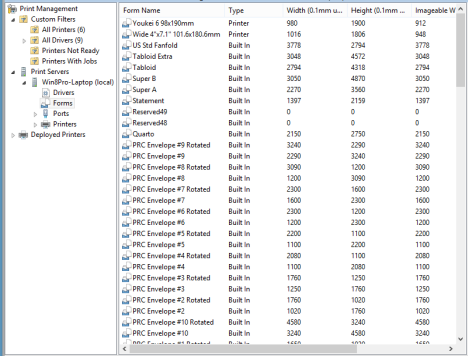
    Next is Forms. There you see the list of all forms that can be used for printing by all your printers. For each, there is useful information shown such as its width, height or type.
    15854-pmc6.png
    If you don't remember the size of an A3 page, look for it here and you can see its size in millimeters. Useful, isn't it?
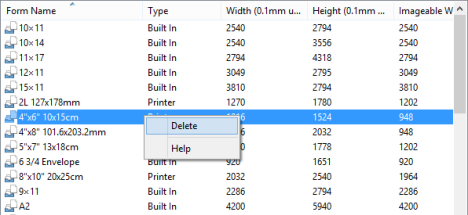
    An important column in this list is named Type. The most common values for it are Built In and Printer. The Built In forms come with Windows and cannot be removed or changed. The Printer forms are installed by one of your printers and supported by it. These forms can be deleted, with a right click and then a press on Delete. You should delete them only if you do not plan to use them.
    15609-pmc7.png
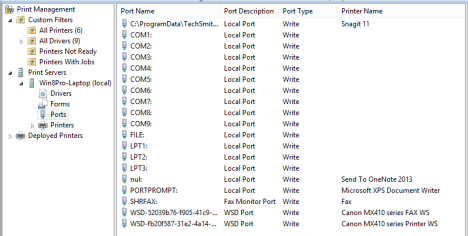
    The third list is Ports. All the printing ports installed and used on your computer are shown. Some are standard ports that come with your computer and might never be used. However, they will be listed as available.
    15610-pmc8.png
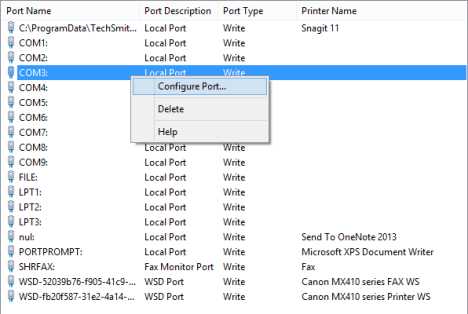
    With a port you can right click and delete it or configure it. Deleting a port means it won't be used. If a real printer is attached to your computer, you won't be able to use it anymore and you will have to reinstall it.
    15819-pmc9.png
    Another option is to configure a port. However, few ports can be really configured.
    15820-pmc10.png
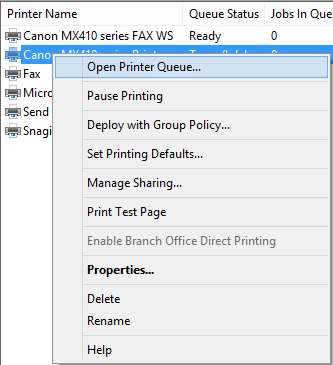
    The most interesting list is named Printers. It shows all the printers installed, including software ones. A right click on a printer reveals many configuration options. You can: open the printer queue, pause printing, deploy the printer with Group Policy over a network domain, set printing defaults, manage sharing, print a test page, edit its properties, delete or rename the printer and access Help.
    15881-pmc11.png
    All this just from the right click menu.

    How to Work with Custom Filters
    The first section - Custom Filters - displays the same information as Print Servers with the use of filters that can be configured to show only what interests you.
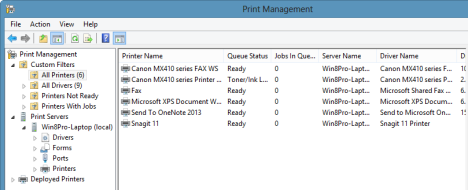
    15798-pmc12.png
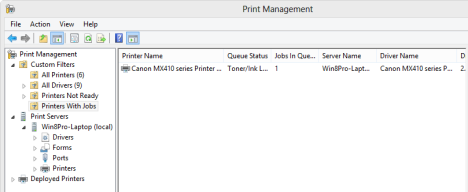
    Some of the most interesting filters are Printers With Jobs and Printers Not Ready.
    15864-pmc13.png
    For example, the Printers With Jobs filter displays the printers that are printing something at the moment and how many jobs they have in queue.

    Don't Forget to Use the Actions Menu or the Right Click on Categories
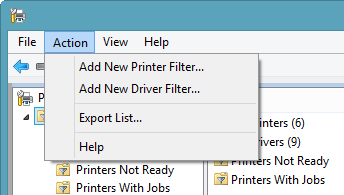
    A very useful menu in the Print Management console is the Action menu. It displays the same options as a right click on a category would.
    For example, when in the Custom Filters category, it lets you create custom printer or driver filters.
    15891-pmc14.png
    In the Print Servers -> Drivers section, it allows you to add new drivers or manage existing ones.
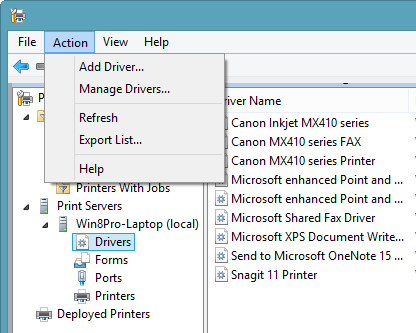
    15865-pmc15.png
    In the Print Servers -> Printers section, it offers the possibility to export all your printers to a file or import printers from a file.
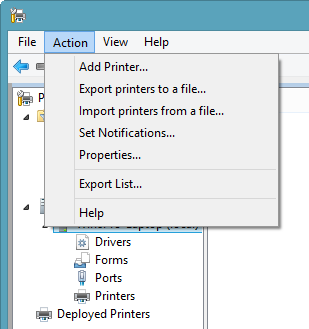
    15750-pmc16.png
    Very useful options if you ask me, so don't hesitate to experiment and learn this tool and all its contextual options.

    Conclusion
    As you can see from this tutorial, the Print Management console is a very useful tool. After getting to know it better, I preferred it to the Devices and Printers Panel, when managing my printers. For more interesting tips and tricks about Windows, don't hesitate to read our recommendations below.

    1 person found this answer helpful.
    0 comments No comments

  2. Vriznunt Zhangchompuu 11 Reputation points
    2020-08-05T16:20:43.33+00:00

    But if you use Windows 10 Please try follow this step

    Step 1. Unplug and restart your printer
    Sometimes power cycling your printer can resolve the issue. Turn off your printer and unplug it, wait 30 seconds, plug your printer back in, and then turn the printer back on.

    If your printer still doesn’t work, continue to step 2.

    Step 2. Check cables or wireless connection
    Check the cables (for wired printers). Make sure that the printer's USB cable is properly connected from the printer to your PC. If your USB isn’t recognized, see Automatically diagnose and fix Windows USB problems.

    Check the wireless connection (for wireless printers). Do one of the following:

    Make sure the printer’s wireless option is turned on and available. Many printers have a button that displays a blue wireless icon when a wireless connection option for the printer is available. To learn where this button is located on your printer and to find instructions about how to turn it on, see the instructions that came with the printer or check the manufacturer's website for instructions.
    Run the printer’s wireless connectivity test. Many printers have a menu option to test the printer’s wireless connectivity. Read the instructions that came with the printer or check the printer manufacturer’s website for instructions about how to do this.
    If those check out and you’re still having problems, your PC may not be connecting to your wireless network. To learn more, see Why can't I get online? For more advanced help, see Fix network connection issues in Windows.
    If you're having trouble connecting to a Bluetooth printer, see Fix Bluetooth problems in Windows 10: FAQ.
    Note
    If you use wireless access points, extenders, or multiple wireless routers with separate SSIDs, make sure you're connected to the same network as the printer for your PC.

    If your printer still doesn’t work, continue to step 3.

    Step 3. Uninstall and reinstall your printer
    Try removing and reinstalling the printer.

    Remove your printer
    Select the Start button, then select Settings > Devices > Printers & scanners .
    Open Printers & scanners settings
    Under Printers & scanners, find the printer, select it, and then select Remove device.
    Reinstall your printer
    You'll need to follow different steps to reinstall or add a wireless or local printer. Here's how.

    Reinstall a wireless printer
    Select the Start button, then select Settings > Devices > Printers & scanners .
    Open Printers & scanners settings
    Select Add a printer or scanner. Wait for your device to find nearby printers, choose the one you want, and then select Add device.
    If your printer is turned on and connected to the network, Windows should find it easily. Available printers can include all printers on a network, such as Bluetooth and wireless printers, or printers that are plugged into another computer and shared on the network. You might need permission to install some printers.

    Notes
    If you use wireless access points, extenders, or multiple wireless routers with separate SSIDs, make sure you're connected to the same network as the printer for your PC to find and install it.
    If you have a new wireless printer that hasn’t been added to your home network, read the instructions that came with the printer and check the printer manufacturer’s website to learn more and to get up-to-date software for your printer.

    Tip
    You can print a test page to make sure the printer is working correctly. If you've installed the printer but it doesn't work, check the manufacturer's website for troubleshooting information or driver updates.

    Reinstall a local printer
    If you want to reinstall or add a local printer, plug the USB cable from your printer into an available USB port on your PC, and then turn on the printer.

    Select the Start button, then select Settings > Devices > Printers & scanners .
    Open Printers & scanners settings
    Under Printers & scanners, look for your printer.
    If you see your printer listed, you'll know it's installed.
    If you don't see your printer listed, select Add a printer or scanner. Wait for your device to find available printers, choose the one you want, and then select Add device.
    Tip
    You can confirm the printer is working by printing a test page. If you've installed the printer but it doesn't work, check the manufacturer's website for troubleshooting information or driver updates.

    If your printer still doesn’t work, continue to step 4.

    Step 4. Install the latest driver for your printer
    Most printers require the latest driver to work well. To learn more, read How to install the latest driver for your printer.

    If your printer still doesn’t work after you install the latest driver for your printer, continue to step 5.

    Step 5. Run the printing troubleshooter
    Download and run the printing troubleshooter. It can fix problems with installing and connecting to a printer. (This link should open a browser page and download dialog. Select Open, and follow the steps provided in the troubleshooter.)

    If the printing troubleshooter link doesn't open the troubleshooter, in the search box on the taskbar, enter Printing problem in, select Printing problem in in the list of results, and then select Troubleshooter to download it. Select Open, and follow the steps provided in the troubleshooter.

    If your printer still doesn’t work, continue to step 6.

    Step 6. Clear and reset the print spooler
    If the previous troubleshooting step is not successful, you may need to clear spooler files and restart the spooler service. The print spooler is a file that manages the printing process. To clear and reset the print spooler:

    In the search box on the taskbar, type services, and then select Services in the list of results.
    Select the Standards tab, and then double-click Print Spooler in the list of services.
    Select Stop, and then select OK.
    In the search box on the taskbar, enter %WINDIR%\system32\spool\printers, select %WINDIR%\system32\spool\PRINTERS in the list of results, and then delete all files in the folder.
    In the search box on the taskbar, search for services, and then select Services in the list of results.
    Select the Standards tab, and the double-click Print Spooler in the list of services.
    Select Start, select Automatic in the Startup Type box, and then select OK.
    If your printer still doesn’t work, continue on to step 7.

    Step 7. Fix printer problems after updating Windows 10
    If you're having problems printing after upgrading or updating to the latest version of Windows 10, see Fix printer problems after upgrading or updating Windows 10.

    If your printer still doesn’t work, continue to step 8.

    Step 8. Change a printer's status to "online"
    If your printer displays an "offline" status, check out Troubleshooting offline printer problems.

    0 comments No comments

  3. Eleven Yu (Shanghai Wicresoft Co,.Ltd.) 10,756 Reputation points Microsoft Vendor
    2020-08-06T03:23:06.18+00:00

    Hi,

    Are all 12 printers Kyocera ECOSYS P3055dn KX with the newest V4 universal print driver. 5.3.729.0? Or only the 2 not shared printers?

    For narrowing down the issue, please do the following steps.

    1. Run gpresult /h c:\gp.html in CMD on the printer server to check the print group policy.
    2. You can check below event logs to see if there is any clue

    event viewer\windows logs\
    application
    system
    event viewer\windows logs\applications and services logs\microsoft\windows\printservice
    event viewer\windows logs\applications and services logs\microsoft\windows\smb server

    Thanks,
    Eleven


Your answer

Answers can be marked as Accepted Answers by the question author, which helps users to know the answer solved the author's problem.