Azure IoT Hub
An Azure service that enables bidirectional communication between internet of things (IoT) devices and applications.
1,189 questions
This browser is no longer supported.
Upgrade to Microsoft Edge to take advantage of the latest features, security updates, and technical support.
' cx='32' cy='32' r='32' /%3E%3Ctext x='50%25' y='55%25' dominant-baseline='middle' text-anchor='middle' fill='%23FFF' %3EAJ%3C/text%3E%3C/svg%3E)
Hey there,
I'm trying to test the Azure IoT Hub. MQTTBox is used for testing. I have generated a certificate.pem and key.pem from OpenSSL. Command used is
openssl req -newkey rsa:2048 -nodes -keyout key.pem -x509 -days 365 -out certificate.pem – to generate a new private key and public certificate
I have used certificate.pem on client certificate section and key.pem on client key file.
MQTT client id = TESTUSER
protocol = mqtt/tls
HOST is iothubhostname.azure-devices.net:8883
ssl/tls certificate type=self signed certificate.
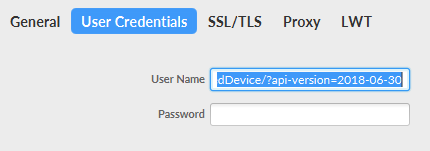
username=iothubhostname.azure-devices.net/TESTUSER/api-version=2016-11-14
passowrd= none
but the connection error occurring.
I have created the device on Azure web portal using the fingerprint of the certificate.pem
is the command for generating certificate and key is correct?
no need to add any file on the CA file option?
is a need to fill the user name option?
is the procedure for doing is correct or is there any steps missing?
PS: please don't refer to any site because I already checked that.

@Akhil joy can you confirm this is the same situation as reported on the other thread? https://video2.skills-academy.com/en-us/answers/questions/63711/index.html
Thanks
@António Sérgio Azevedo thanks for the reply. Both question regarding IoT Hub.but the authorization is different on both. In here CA certificate used for authorization.
' cx='32' cy='32' r='32' /%3E%3Ctext x='50%25' y='55%25' dominant-baseline='middle' text-anchor='middle' fill='%23FFF' %3EQ%3C/text%3E%3C/svg%3E)
Hello @Akhil joy , Just checking back, could you please let us know if you need further help in this matter. Please accept helpful responses as 'Answer', which will be helpful to others as well with a similar question.
Hello @Akhil joy ,
Below is the Self-Signed Process for MQTT Box. and MQTT.fx client
Pre-requisites on Windows Machine: Assuming you have already installed the below tools for this scenario.
**
Let's see MQTT Box with Self-Signed Certificate:
STEP 1: Generate the IoT device's x509 Certificate and the Private Key Certificate by using the below OpenSSL command from a Powershell window.
Open Powershell & navigate to your desired working directory and run the following command.
openssl req -newkey rsa:2048 -nodes -keyout mydevkitkey.pem -x509 -days 365 -out mydevkitcertificate.pem
Sample code is shown below:
PS C:\Users\sabodd> cd C:\Users\sabodd\Documents\AAA\X509SelfSignedCert
PS C:\Users\sabodd\Documents\AAA\X509SelfSignedCert> openssl req -newkey rsa:2048 -nodes -keyout mydevkitkey.pem -x509 -days 365 -out mydevkitcertificate.pem
Generating a 2048 bit RSA private key
.............................+++
writing new private key to 'mydevkitkey.pem'
-----
-----
Country Name (2 letter code) [AU]:US
State or Province Name (full name) [Some-State]:WA
Locality Name (eg, city) []:Redmond
Organization Name (eg, company) [Internet Widgits Pty Ltd]:OTravels
Organizational Unit Name (eg, section) []:.
Common Name (e.g. server FQDN or YOUR name) []:x509SelfSigned
Email Address []:satish@outlook.com
Validate your generated x509 mydevkitcertificate.pem by using the below command. [This step is optional, just to validate our work].
Continue...
STEP 2: Capture the x509 certificate's Fingerprint either SHA1 or SHA256 type.[your choice]
SHA1: Command
openssl x509 -in mydevkitcertificate.pem -fingerprint -noout.
SHA256 : Command
openssl x509 -in mydevkitcertificate.pem -fingerprint -noout -sha256
Copy the fingerprint hexadecimal number with 40 length [we used SHA1 type].
Remove the ':' from the fingerprint and it will look as shown below.
3989467851D9C76811C3B1DF939AE0A103E838CA
STEP 3: Create the new IoT Device from Azure Portal-IoTHub.

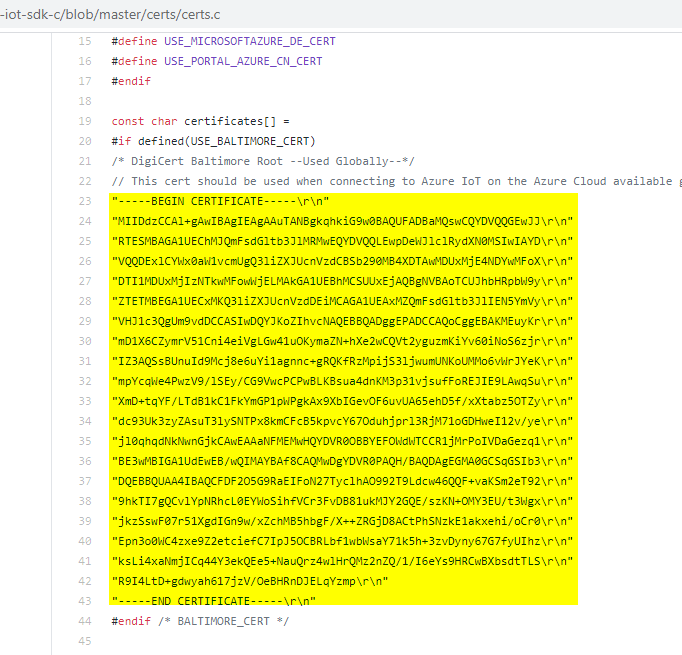
STEP4: Copy the Microsoft DigiCert Baltimore Root cert as MS.pem file--Used Globally. make sure to remove the double quotes and the line feeds.
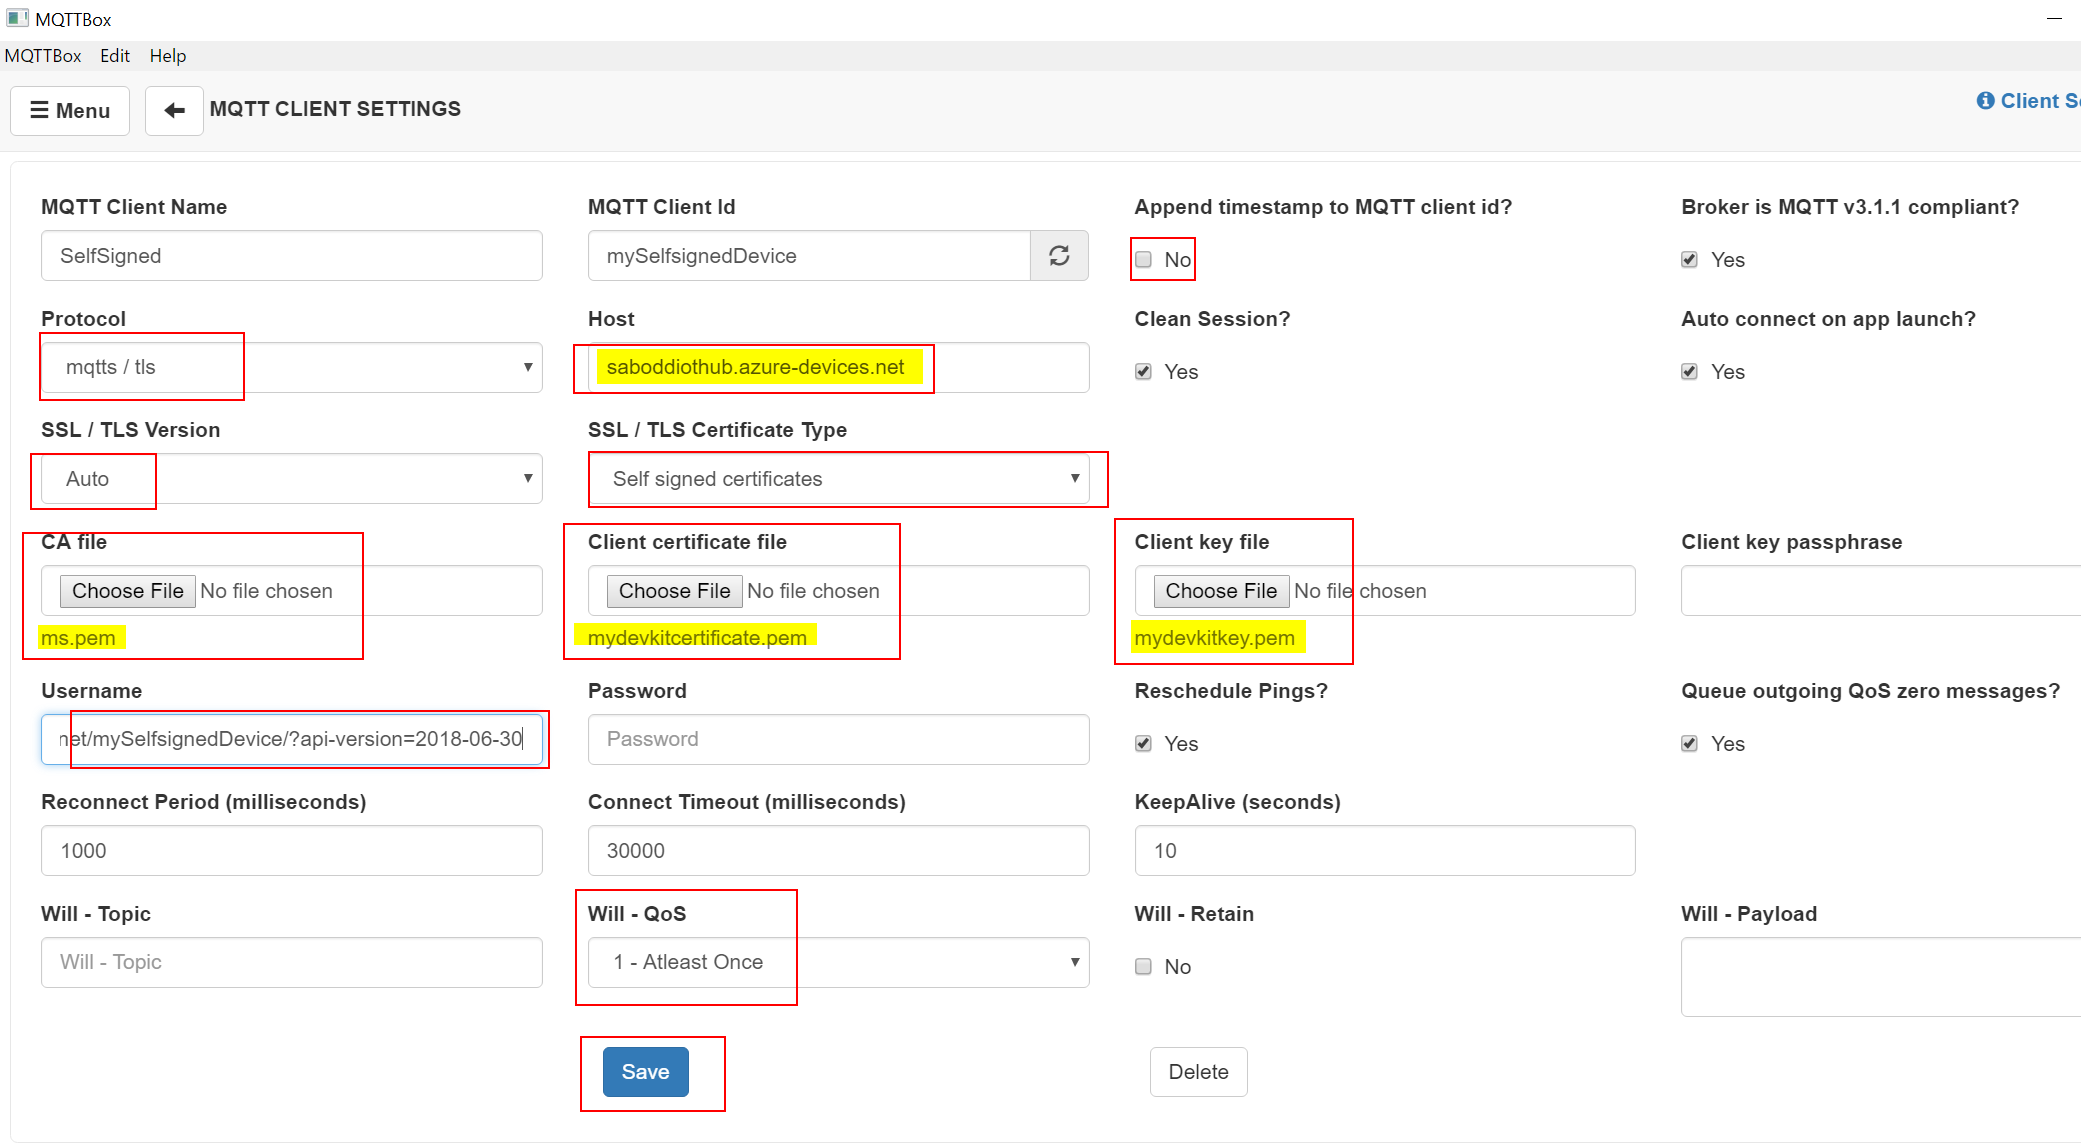
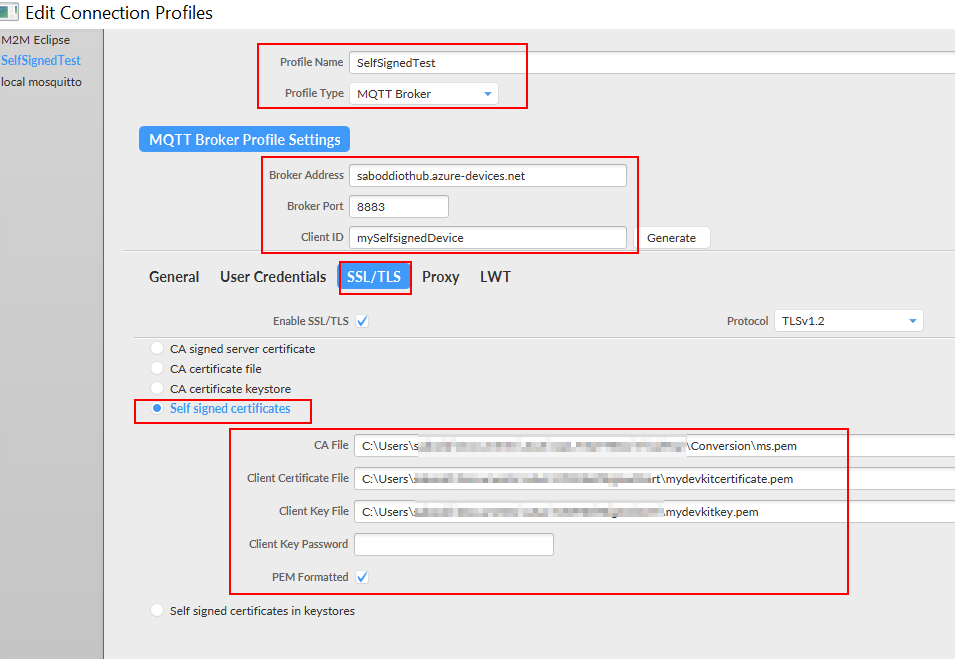
STEP 5: Open MQTT Box and configure the values.
----------
Let's now connect MQTT.fx to IoT HUB. [Please disconnect the MQTTBox before we proceed with MQTT.fx, since only one client can connect]
Hello Akhiljoy-2999 , Thanks for reaching out to us!
Here are the complete E2E steps which we need to follow for Authenticating Client [MQQTbox & MQTT.fx] to Azure IoTHUB via x509 Authentication.
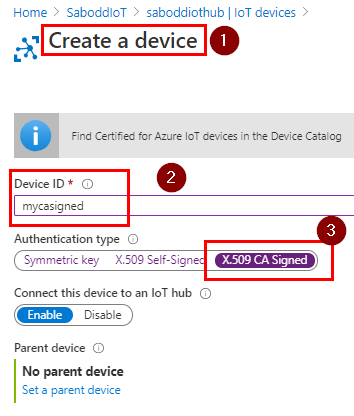
Step 1: Create the IoT Device with x509 CA signed Authentication Type:
Step 2: Go to this URL-azure-iot-sdk-c and clone the repository to the local desktop and extract it, open the PowerShell ISE, and navigate to the folder [tools\CACertificates] where we see readily available scripts to generate our certs.

Readymade helper scripts:
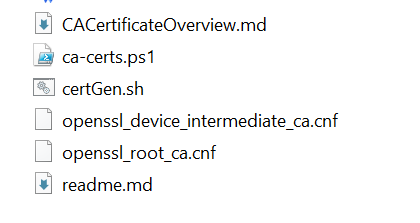
Powershell ISE, change directory to the extracted folder' CACertificates'.

Step 3: Follow the Initial Setup, if you find already existing certificates on your machine, then please delete/remove them.
Step 4: Follow instructions on Create the certificate chain.
For Non-Edge device use below command
New-CACertsCertChain ecc
For Edge devices use below command:
New-CACertsCertChain rsa
The above command will create and install the CA Root cert in your machine cert store, good to verify that.

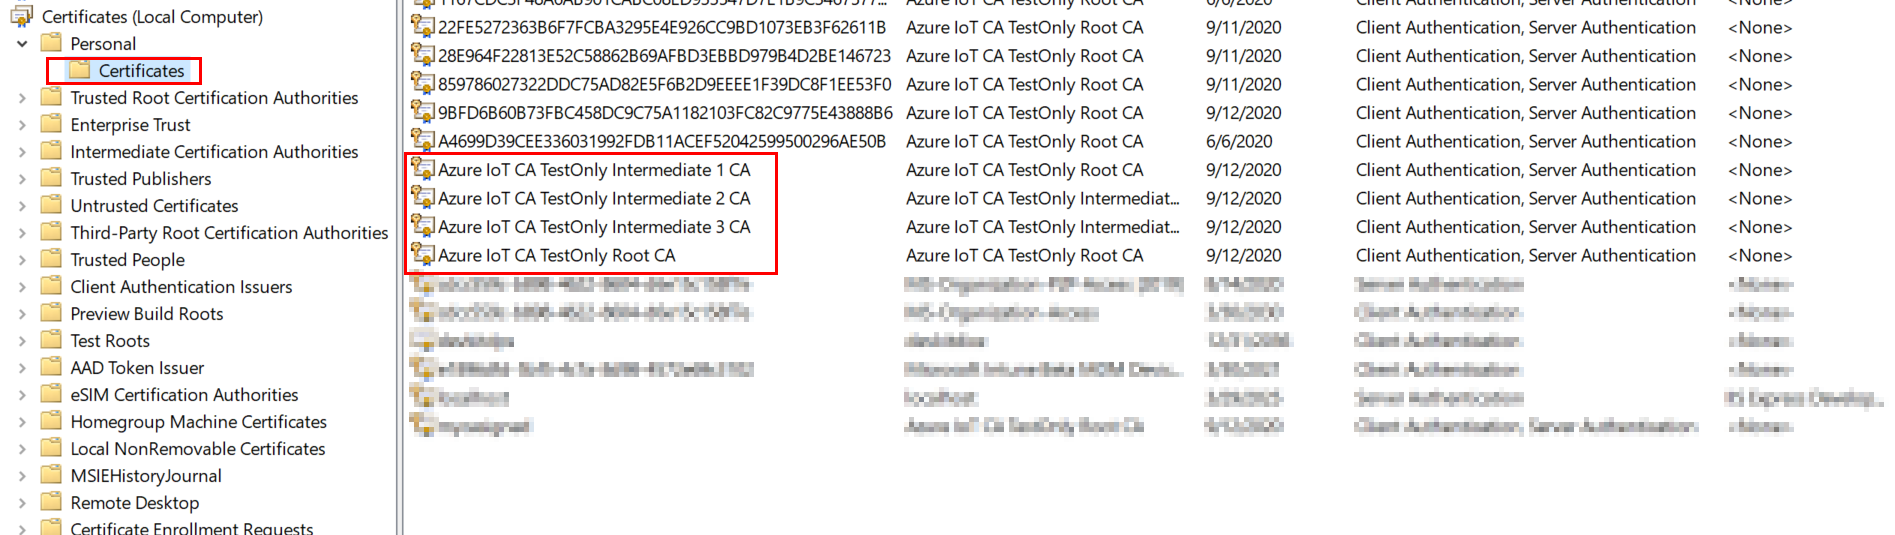
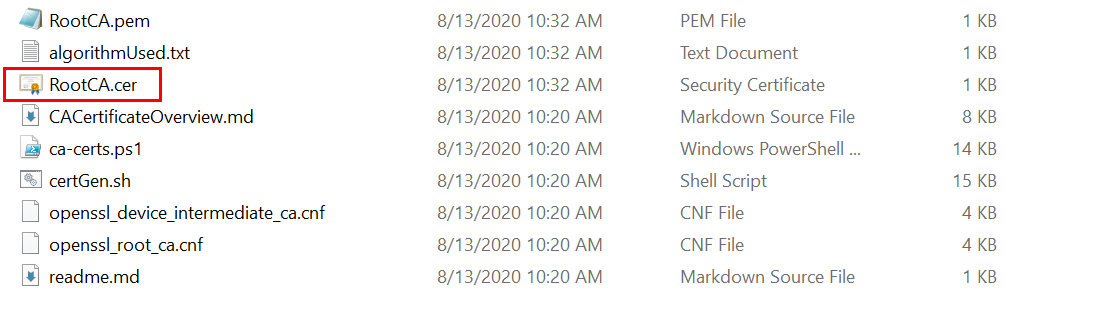
The above script also generates the RootCA cert in our working folder, please verify.
Step 5: Follow instructions on Proof of Possession
After we complete the proof of possession, we see something like this on the Azure portal,
Generate verification code from portal-->run PS command to generate verify cert locally -->upload verify cert to portal
Step 6: Follow the instructions on Create a new device with a password, do remember this password as we need it in the next steps.
Below is my sample IoT Leaf Device PS command, Follow the same device device name/id which we gave in the Azure portal IoTHub. Step 1.
New-CACertsDevice "mycasigned"
Now check your machine local cert store.

The below image shows the device certificate .pfx is created on the local folder as well.

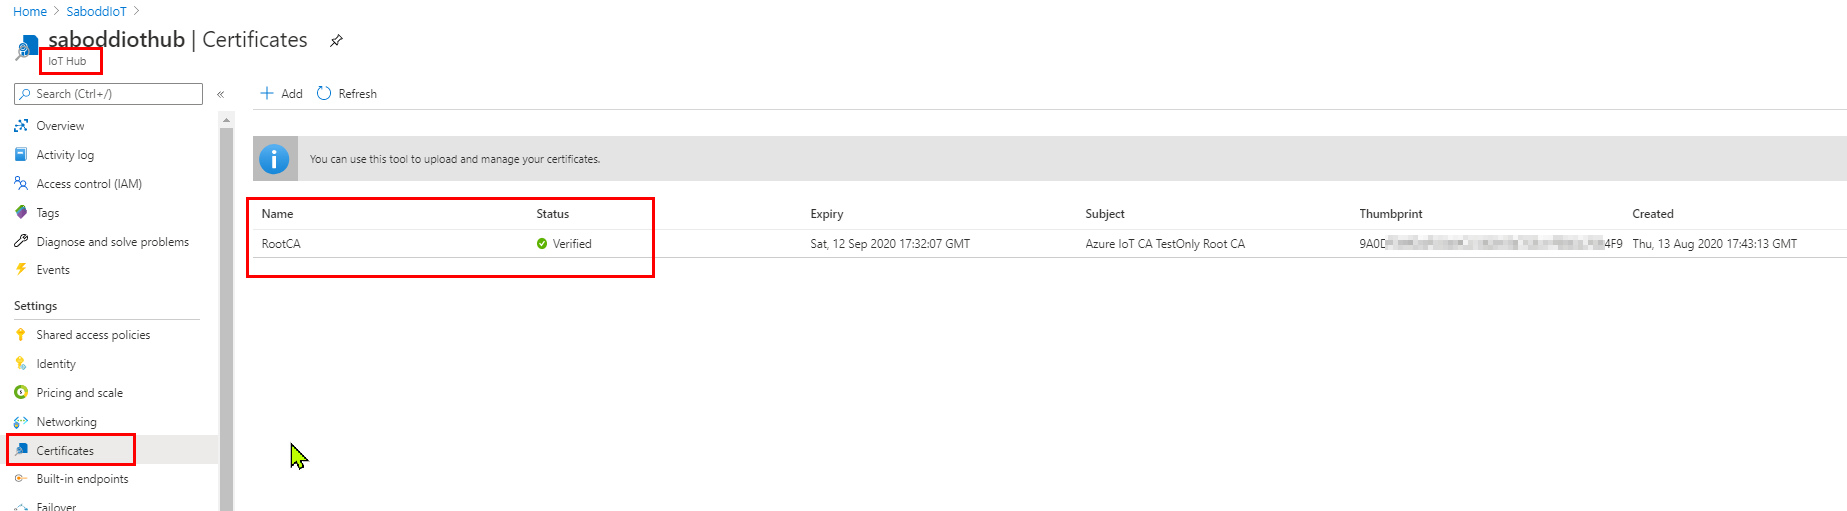
Step 7: Now go to this URL to copy the Azure IoT hub Authentication CA file content. This will be used as your CA file.
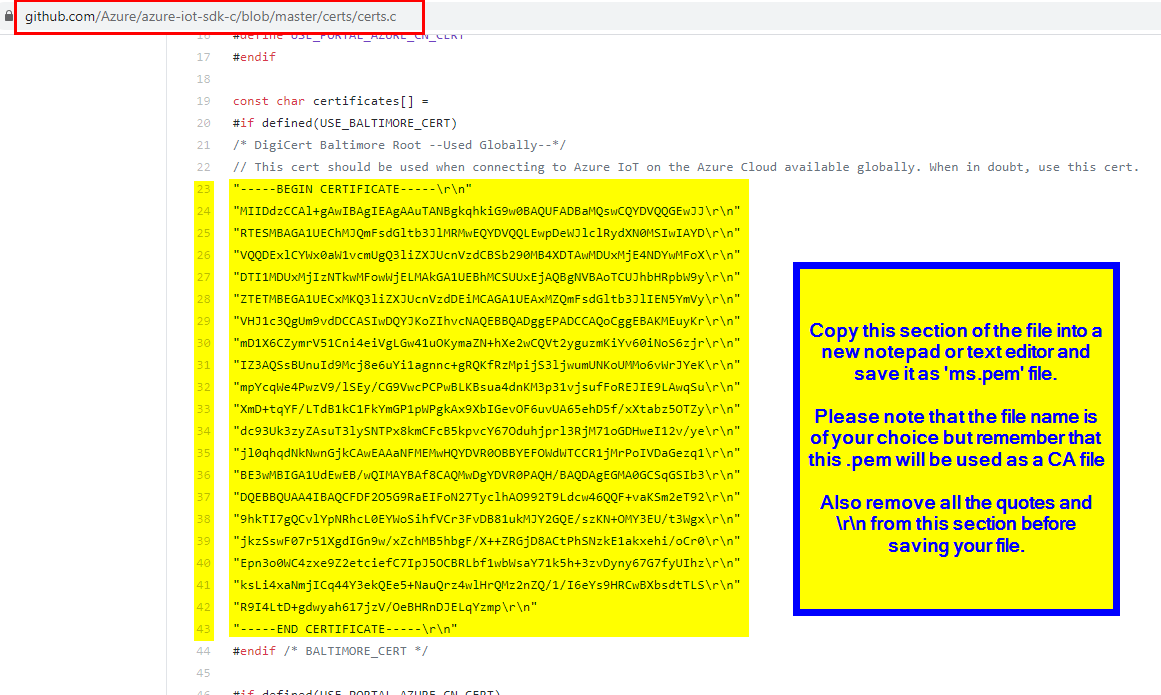
Below image shows the file saved to my local machine as .pem file [Save this CA file aside, as we need this]

Step 8: Convert the device .pfx to .pem format to capture the public & private parts.
Using OpenSSL conversion: Below is the command where I iniput the .pfx file location and also gave the output location in .pem format.
openssl pkcs12 -in C:\Users\sabodd\Documents\Conversion\mycasigned.pfx -out C:\Users\sabodd\Documents\Conversion\mycasigned.pem -nodes
After the above command completes, I see the output file mycasigned.pem file got created in the local device folder.

Now open the mycasigned.pem in any editor and
Copy the private part into key.pem file.
Copy the public part into cert.pem file [Name of the files is of your choice, but remember your file content]
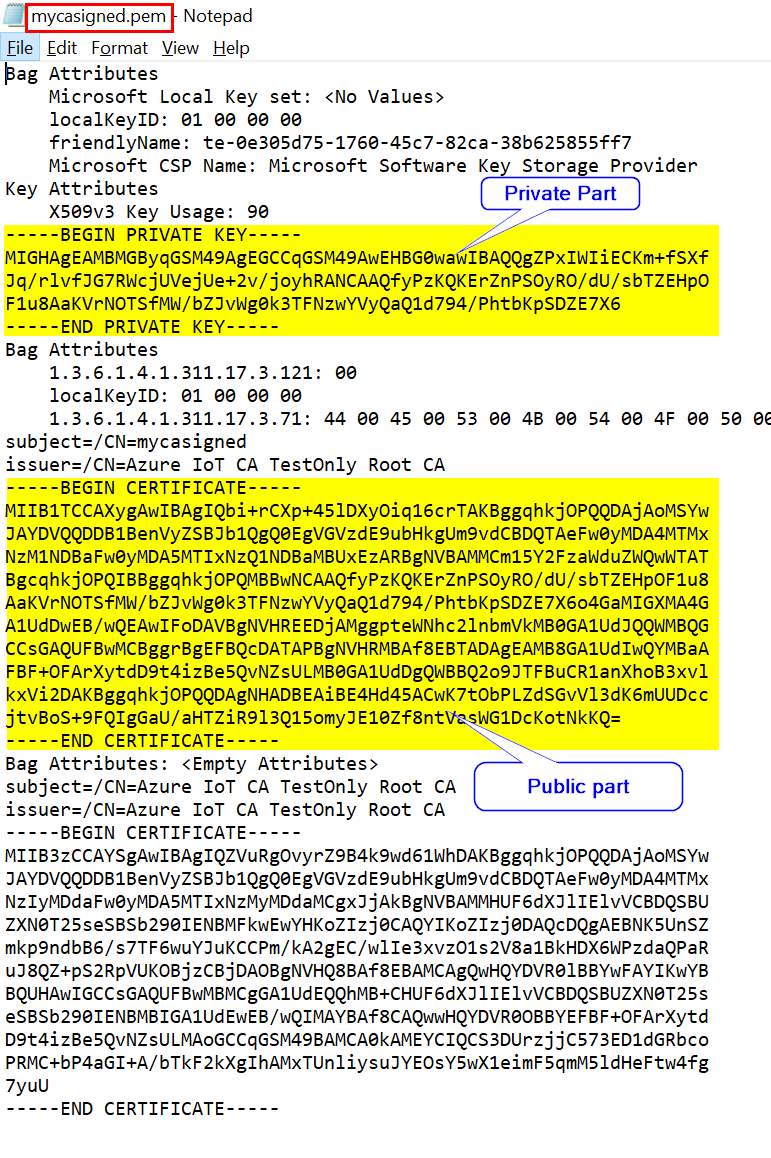
Save the below two newly created files aside [We need these 2 files]

Summary of certs we need:
Step 7: final CA file, ms.pem file
and
Step 8: 2 files, cert.pem & key.pem files
One thing to be noted here, the RootCA cert is already installed on your machine.
----------
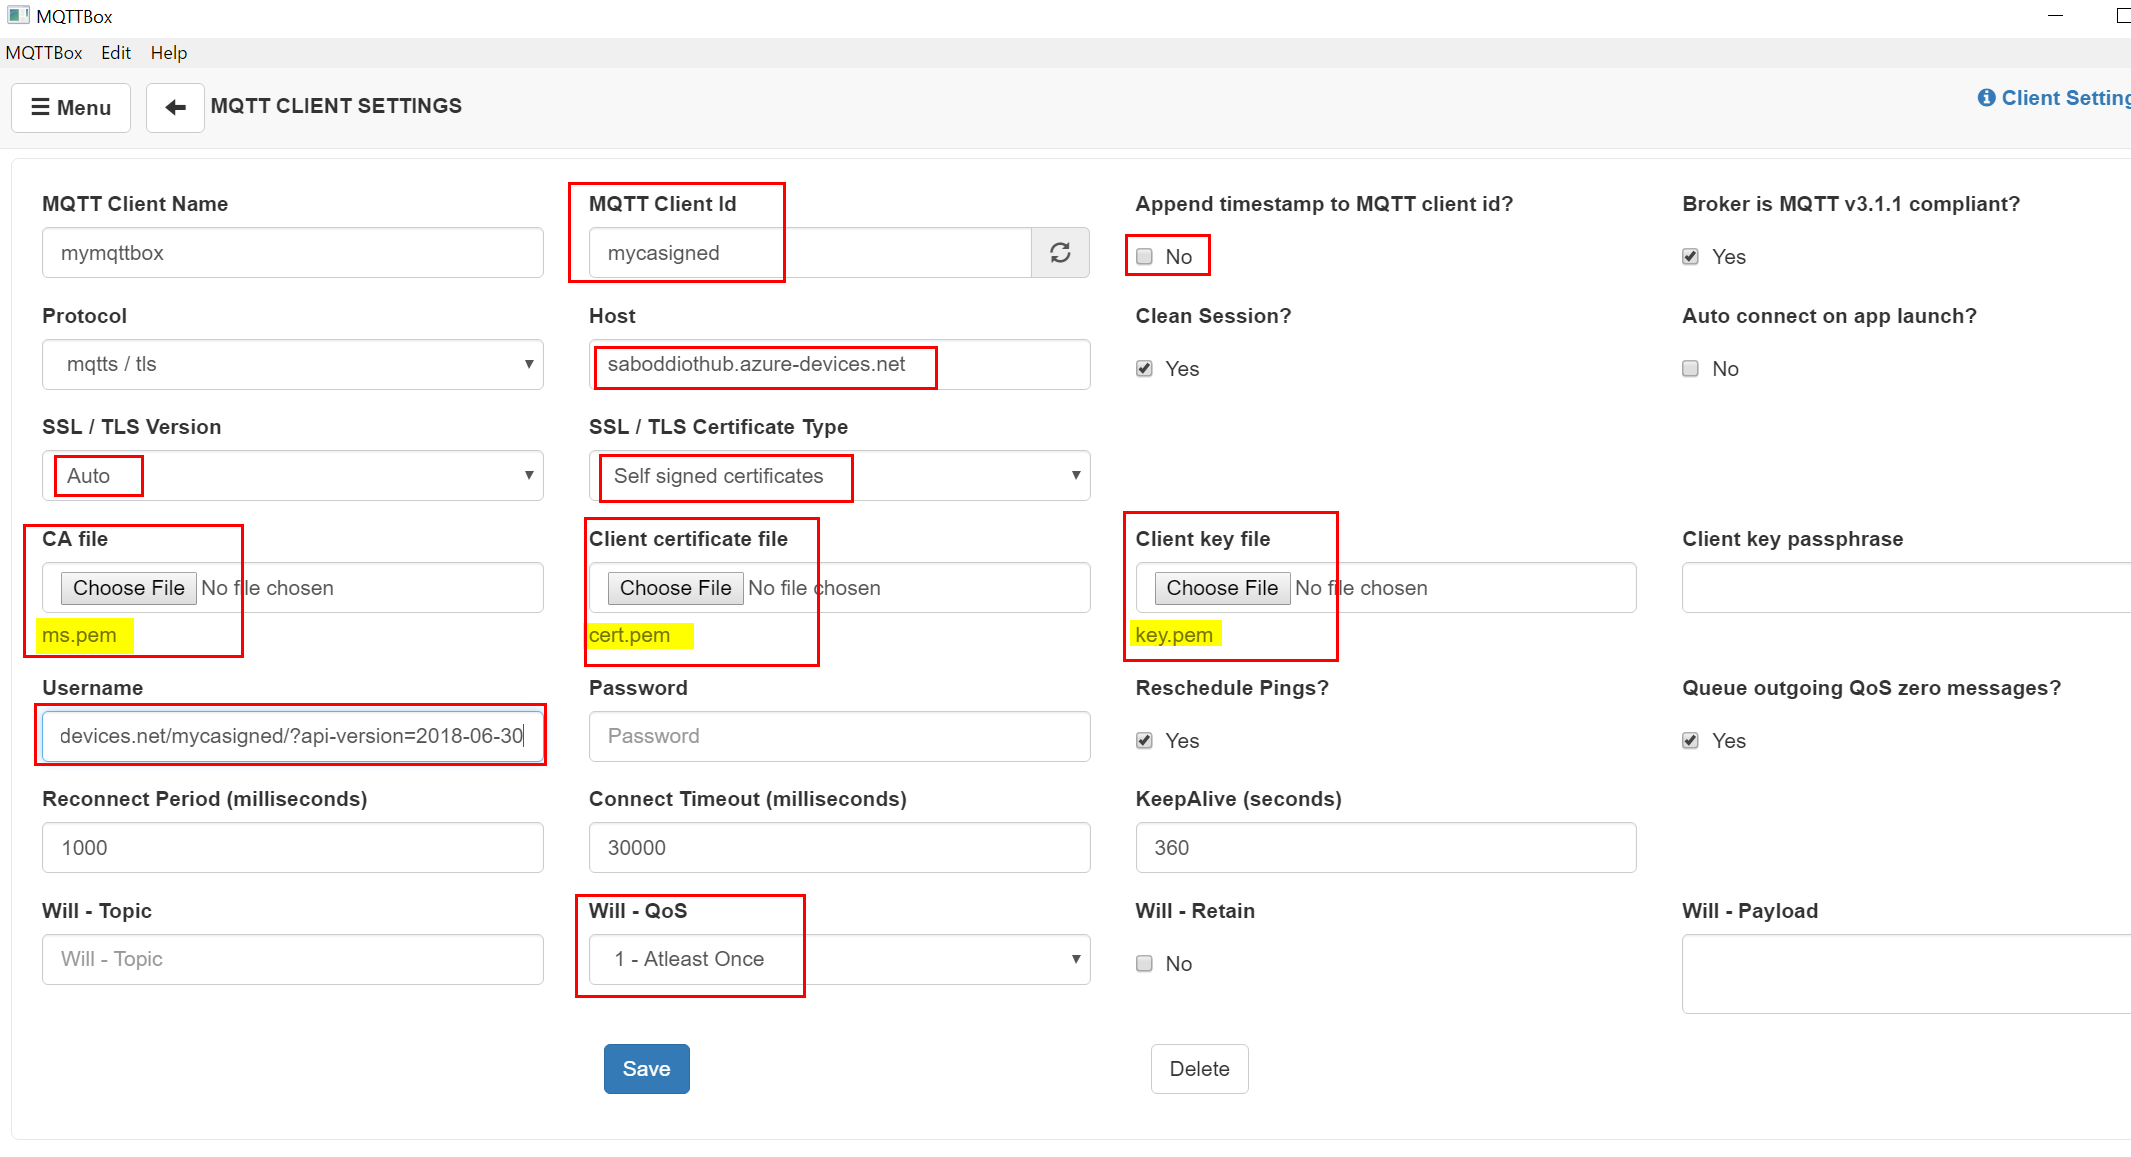
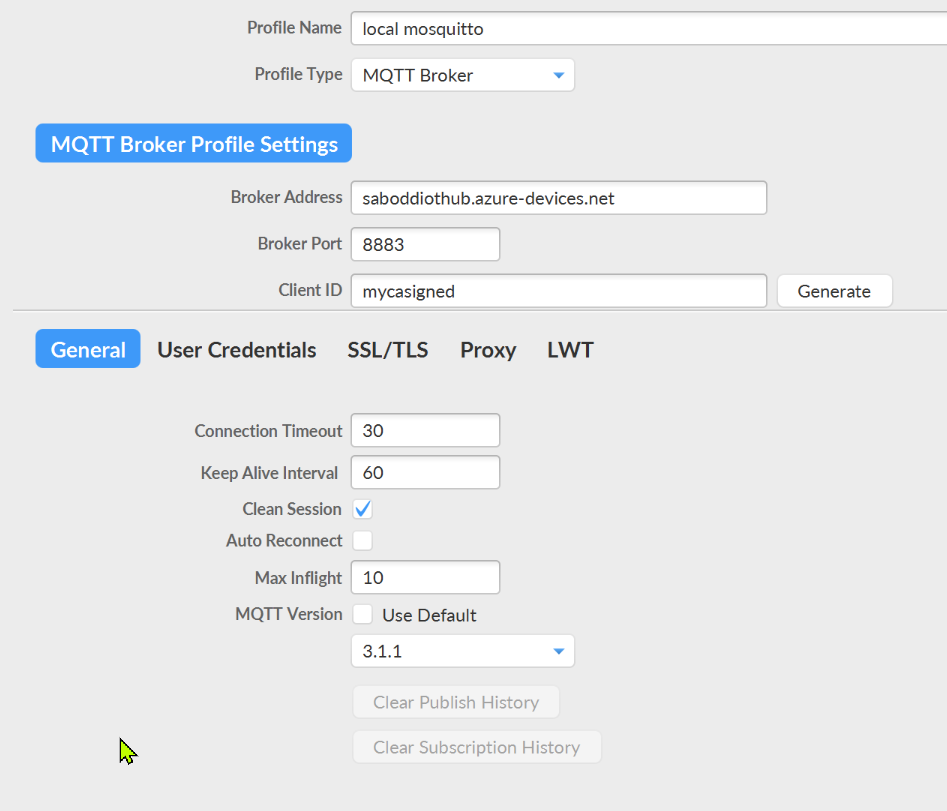
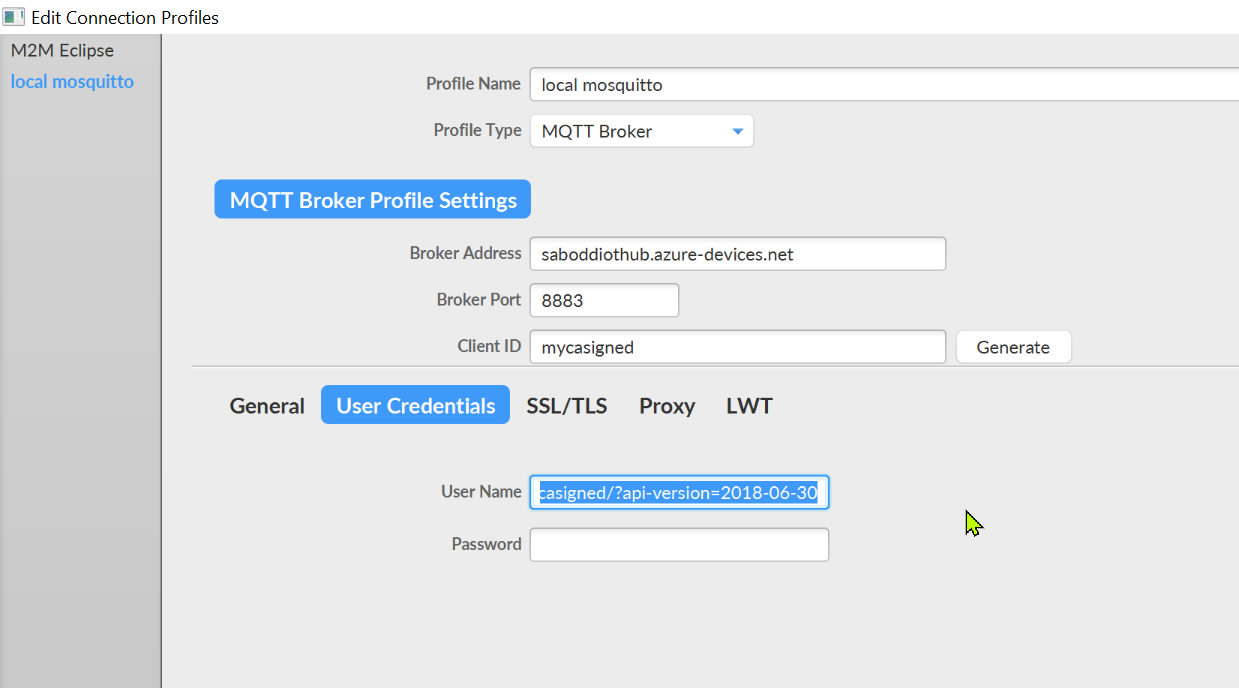
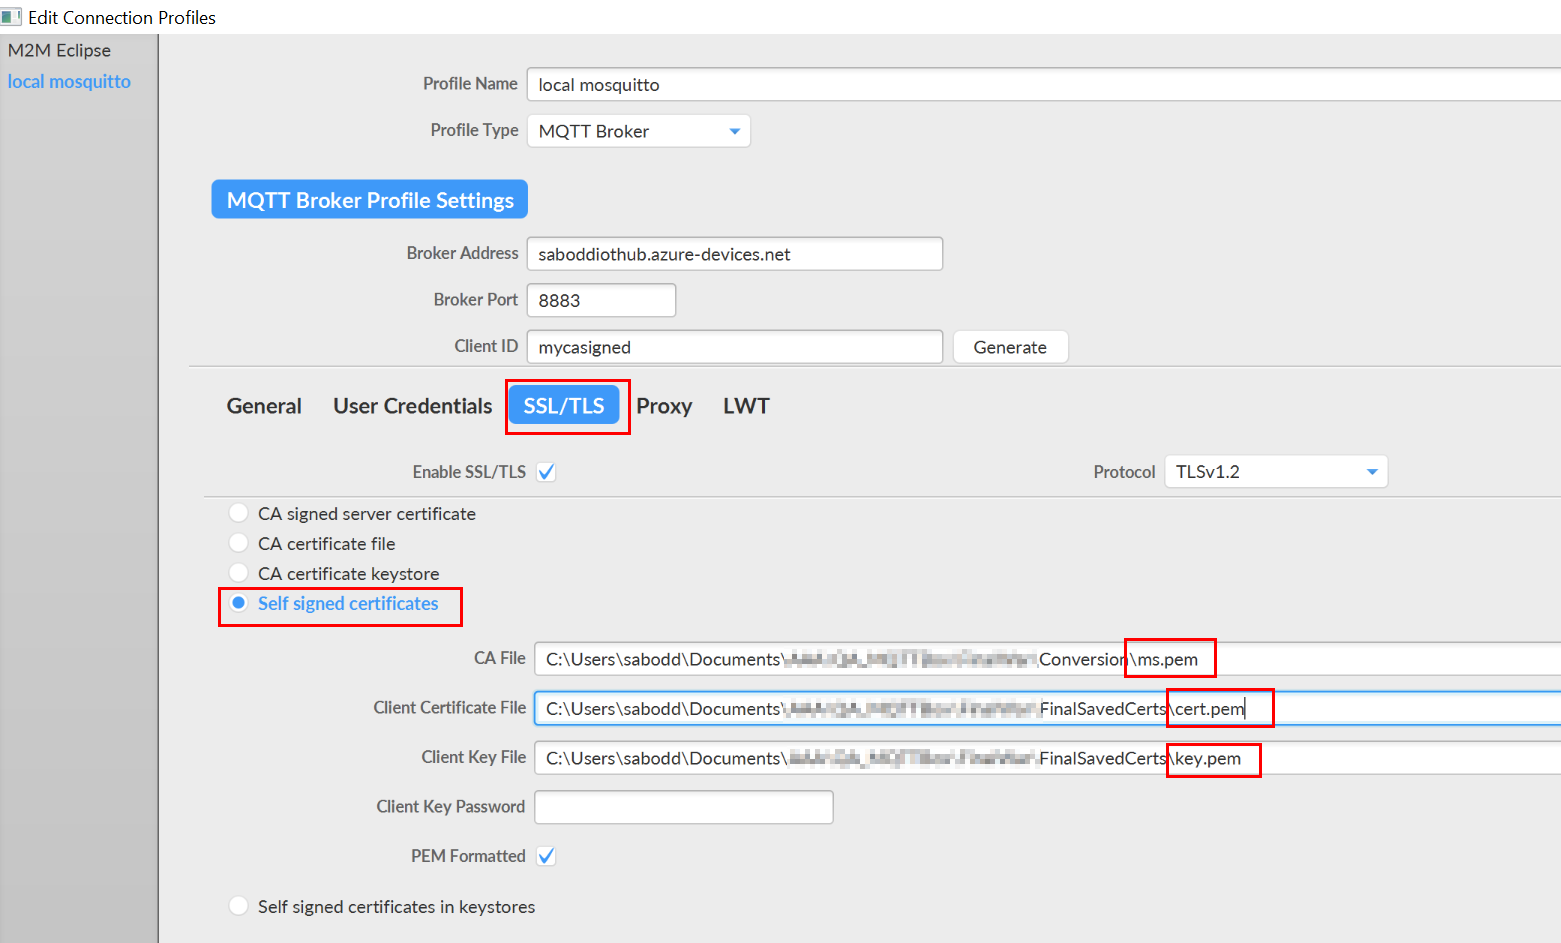
Now let's go to MQTTbox first and configure it as per the below images.
Follow these settings,
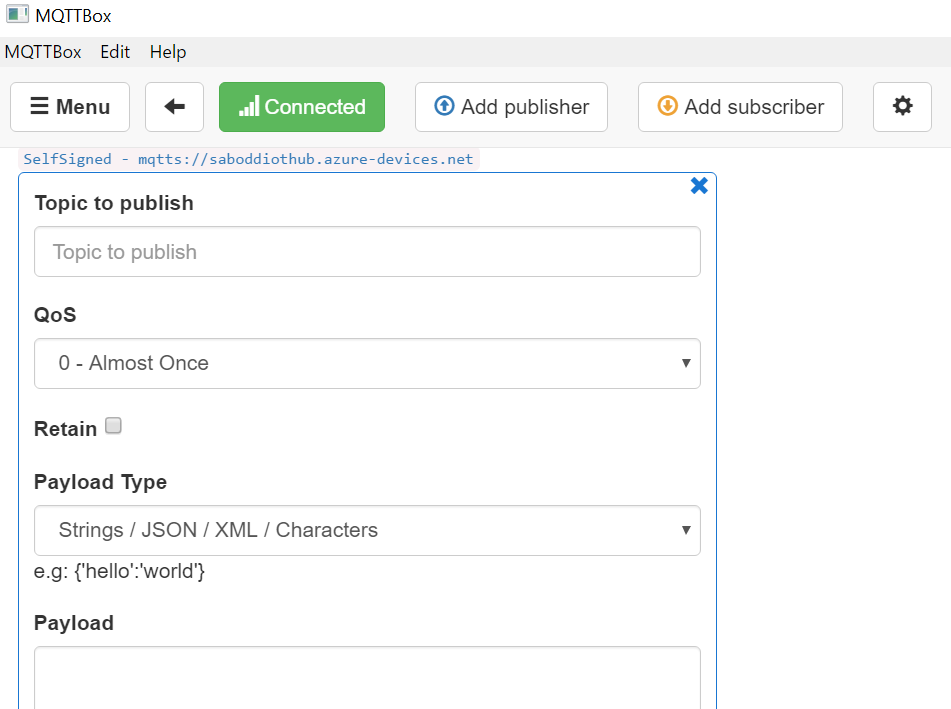
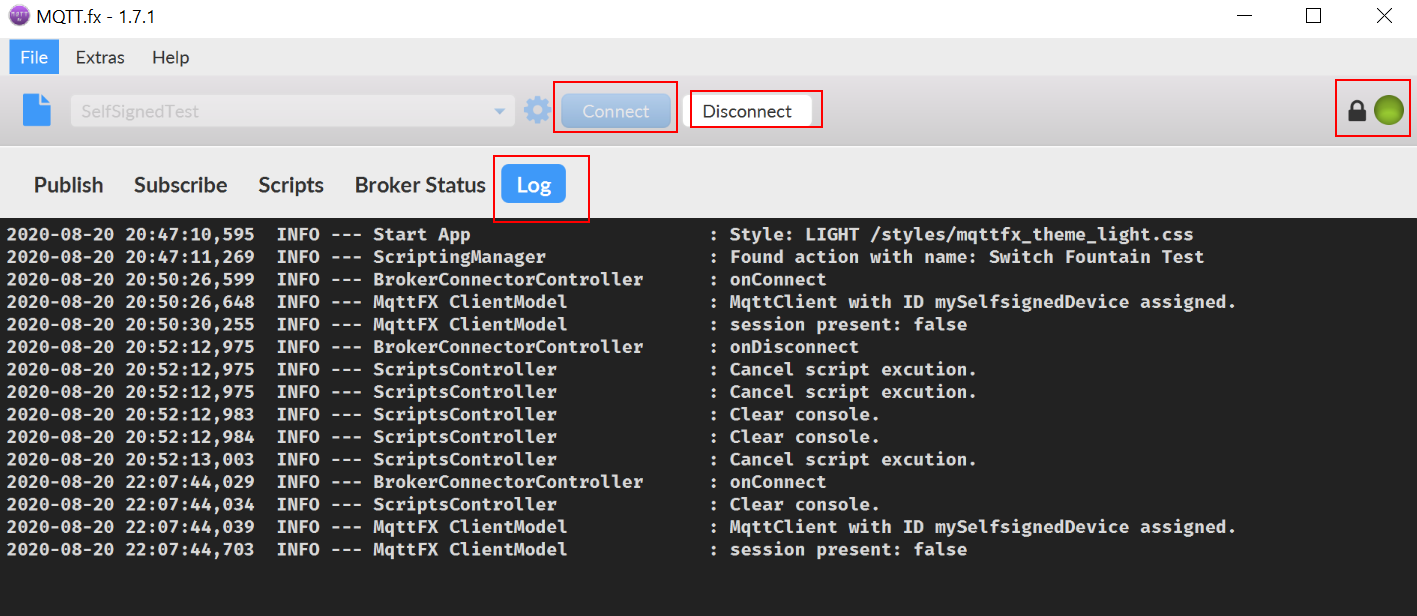
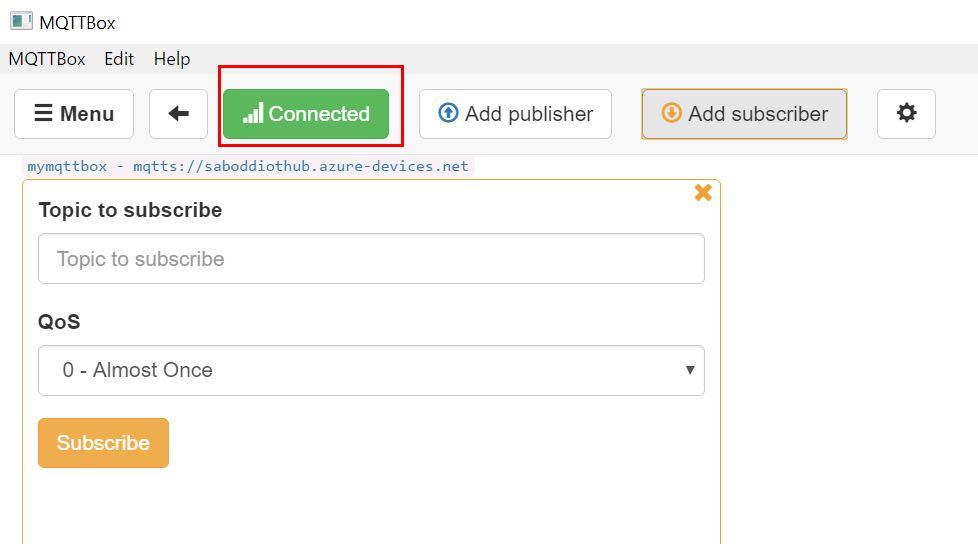
Finally, it's connected.
----------
Now let's go to MQTT.fx and configure it as per the below images.
Finally connected!

Hello @Akhil joy , We tried our best to give E2E steps [CA signed] and avoided including redirection pages, keeping in mind that this question would be helpful to others as well. Only one Page is referenced which is the main tutorial for this walkthrough. We hope you will find this E2E steps helpful. Please let us know if you need further help in this matter.
Hello @Akhil joy ,Just checking back, could you please let us know if you need further help in this matter.
Hello @Akhil joy , Just checking back, could you please let us know if you need further help in this matter.