Azure Content Delivery Network
An Azure service that provides global content delivery and acceleration.
323 questions
This browser is no longer supported.
Upgrade to Microsoft Edge to take advantage of the latest features, security updates, and technical support.
' cx='32' cy='32' r='32' /%3E%3Ctext x='50%25' y='55%25' dominant-baseline='middle' text-anchor='middle' fill='%23FFF' %3EM%3C/text%3E%3C/svg%3E)
Hi,
I'm looking to add a CDN behind a website www.foobar.com, which DNS is not hosted at Azure. I've already set up the CDN, and I have a wwwcdn.foobar.com (and of course the related www-foobar-com.azureedge.net) that already works just fine.
Now, the process to add the www.foobar.com "custom domain" to the CDN configurazion involves first switching the CNAME to it, then clicking on the azure portal, then wait for deployment, etc. That takes at least a few minutes of downtime of the website (and assumes everything will work great).
Is there a way to configure the CDN to accept connection from a new domain (www.foobar.com in this case) without switching the CNAME of it first?

Hello @MattiaRizzolo-4346 ,
Welcome to Microsoft Q&A Platform. Thank you for reaching out & hope you are doing well.
I understand that you would like to add a custom domain "www.foobar.com" (whose DNS is not hosted at Azure) to Azure CDN without any downtime and want to know if there is way to achieve this.
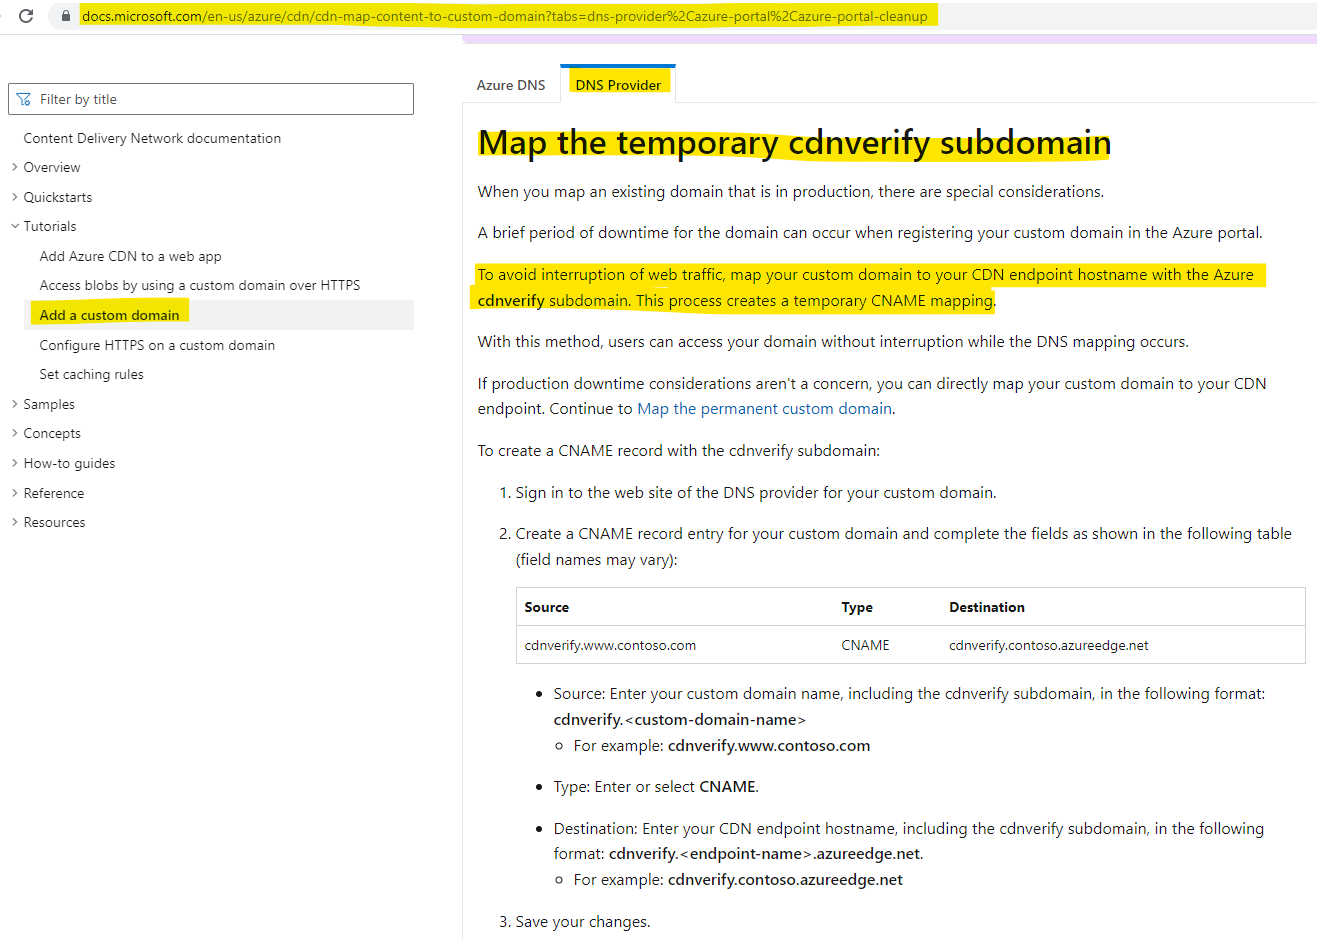
Yes, you can achieve this by mapping your custom domain to your CDN endpoint hostname with the Azure cdnverify subdomain. This process creates a temporary CNAME mapping. cdnverify subdomain in Azure is used to provide an intermediate registration step so that users will be able to access your domain while the DNS mapping takes place and you want to avoid interruption of web traffic.
Register a custom domain for an Azure CDN endpoint using the intermediary cdnverify subdomain to avoid downtime:
Kindly let us know if the above helps or you need further assistance on this issue.
----------------------------------------------------------------------------------------------------------------
Please "Accept the answer" if the information helped you. This will help us and others in the community as well.
Thank you!! This worked flawlessly!
I wonder why https://video2.skills-academy.com/en-us/azure/cdn/cdn-map-content-to-custom-domain doesn't document this cdnverify feature. The word is only mentioned once just saying to not write it in the "add custom domain" blade...
Hello @MattiaRizzolo-4346 ,
Thank you for the update. Glad to hear that it worked.
It is mentioned in the doc https://video2.skills-academy.com/en-us/azure/cdn/cdn-map-content-to-custom-domain under DNS provider tab as below:
Regards,
Gita
Oh... honestly I didn't even notice there was a "tab" there....
apologize for asking something that was documented.
Thank you again!
' cx='32' cy='32' r='32' /%3E%3Ctext x='50%25' y='55%25' dominant-baseline='middle' text-anchor='middle' fill='%23FFF' %3EMP%3C/text%3E%3C/svg%3E)
What about how to handle the SSL Certificates? How should you do that to ensure the website remains active until the final cutover?

Greetings.
This actually depends on what you are planning to configure.
If you have already created custom Domain and enabled HTTPS,
1.With Managed Certificate:
2.With BYOC:
If you are newly enabling HTTPS on a custom Domain
1.With Managed Certificate:
2.With BYOC:
P.S :
Cheers,
Kapil