Azure Functions 2.0: Create Function App from Docker Image (Functions triggered by Cosmos DB, Blob storage, Event Hub and SignalR service bindings)
This is second part of the series on developing and deploying Azure Functions 2.0 where I will
- Create a function triggered by Azure Cosmos DB
- Create Azure SignalR Service bindings for Azure Functions 2.0
- Publish Docker Image to Docker Hub
- Create Function App from Docker Image in Azure Portal
- Deploy functions to Azure Kubernetes Service from VS Code
The first part of the series provides details on creating functions triggered by Azure Blob storage and Event hub in Visual Studio Code along with deploying Azure Functions to Azure Kubernetes Service (AKS).
Dev tools used to develop these components are Visual Studio Code for macOS and Docker. The complete source code for this article can be downloaded from GitHub.
Create a function triggered by Azure Cosmos DB
The next steps will explain how to create a function triggered by data insert/change in Cosmos DB.
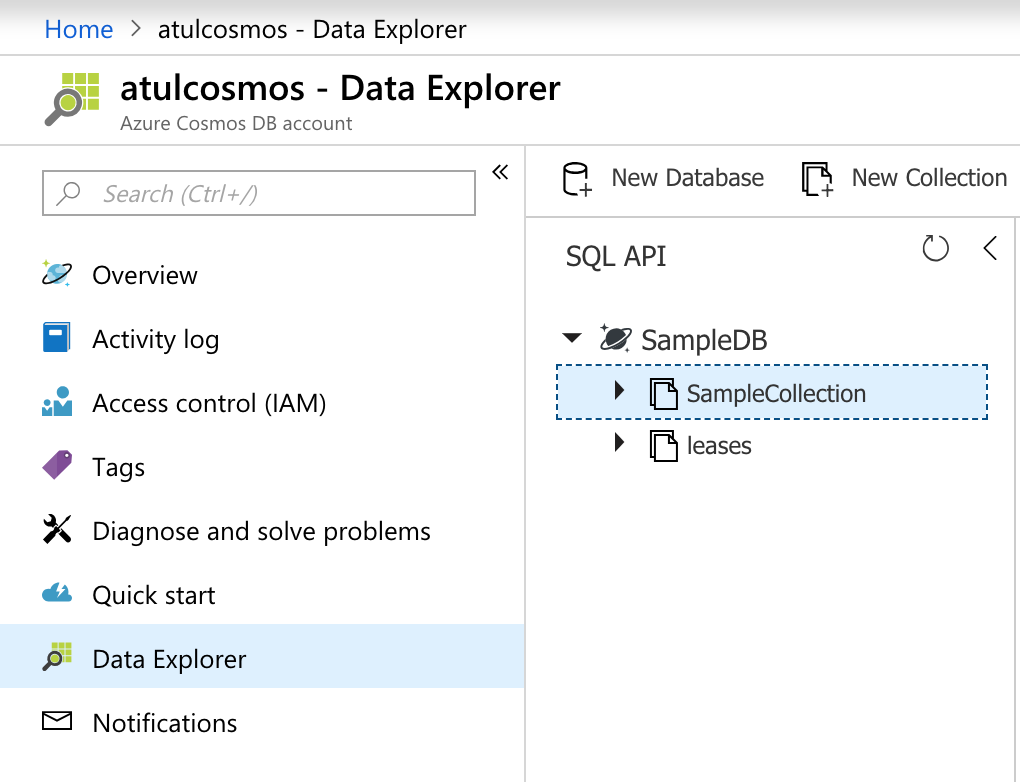
Create Azure Cosmos DB
I have specified following values for function
- Name of database with the collection to be monitored as 'SampleDB'
- Name of collection to be monitored as 'SampleCollection'
- Name of collection used to store leases as 'leases'
Keep a note of the connection string as this needs to be specified in function.
Create Azure Cosmos DB trigger
Run command func new to create a new function and select CosmosDBTrigger option and specify function name. I have specified databaseName: "SampleDB", collectionName: "SampleCollection" and LeaseCollectionName = "leases" based on values I had specified in previous step. [FunctionName("TestCosmosDBTrigger")]public static void Run([CosmosDBTrigger( databaseName: "SampleDB", collectionName: "SampleCollection", ConnectionStringSetting = "TestCosmonDBConnection", LeaseCollectionName = "leases")]IReadOnlyList<Document> input, ILogger log){ if (input != null && input.Count > 0) { log.LogInformation("Documents modified " + input.Count); log.LogInformation("First document Id " + input[0].Id); }}
Update 'local.settings.json' and specify value for "TestCosmonDBConnection":"{COSMOS_DB_CONNECTION_STRING}" as this is needed to run host locally. You can start host by running command func start --build --debug VSCode --cors "*"
On mojave macOS, VS Code was not loading this function and the error message was 'Error reading Darwin Kernel Version. System.Private.CoreLib: The given key 'osx.10.14-x64' was not present in the dictionary'. Adding "DOTNET_RUNTIME_ID" : "osx-x64" in 'local.settings.json' fixed that error for me.
Create Azure SignalR Service bindings for Azure Functions
The next steps will explain how to authenticate and send real-time messages to clients connected to Azure SignalR Service by using SignalR Service bindings in Azure Functions. The SignalR Service bindings are provided in the Microsoft.Azure.WebJobs.Extensions.SignalRService NuGet package. The command to install package in VS Code is func extensions install -p Microsoft.Azure.WebJobs.Extensions.SignalRService -v 1.0.0-preview1-10002
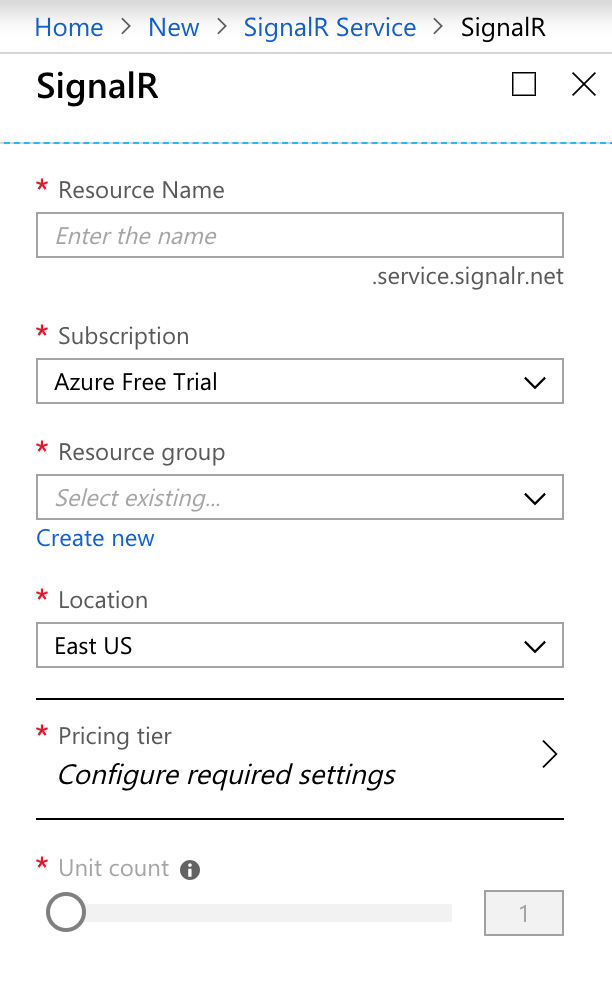
Create Azure SignalR Service
Specify the resource name and resource group and keep a note of the connection string since this is needed in HTTP triggers which will invoke a function with a HTTP request.
Create HttpTrigger to retrieve the service endpoint URL and valid access token of Azure SignalR Service
Before a client can connect to Azure SignalR Service, it must retrieve the service endpoint URL and a valid access token. The SignalRConnectionInfo input binding produces the SignalR Service endpoint URL and a valid token that are used to connect to the service. I have specified HubName = "testazuresignalrhub" as hub name. The client app is going to send http post request to 'https://{FUNCTION_URL}/api/negotiate'.
[FunctionName("negotiate")]public static IActionResult GetSignalRInfo( [HttpTrigger(AuthorizationLevel.Anonymous, "post", "options")]HttpRequest req, [SignalRConnectionInfo(HubName = "testazuresignalrhub")]SignalRConnectionInfo connectionInfo, ILogger log){ try { if (!req.HttpContext.Response.Headers.ContainsKey("Access-Control-Allow-Credentials")) { req.HttpContext.Response.Headers.Add("Access-Control-Allow-Credentials", "true"); } if (req.Headers.ContainsKey("Origin") && !req.HttpContext.Response.Headers.ContainsKey("Access-Control-Allow-Origin")) { req.HttpContext.Response.Headers.Add("Access-Control-Allow-Origin", req.Headers["Origin"][0]); } if (req.Headers.ContainsKey("Access-Control-Request-Headers")) { req.HttpContext.Response.Headers.Add("Access-Control-Allow-Headers", req.Headers["access-control-request-headers"][0]); } log.LogInformation("negotiate API succeeded."); if (connectionInfo == null) { return new NotFoundObjectResult("Azure SignalR not found."); } return new OkObjectResult(connectionInfo); } catch { return new BadRequestResult(); }}
Create HttpTrigger to send message using Azure SignalR Service
The client will use URL and access token from SignalRConnectionInfo retrieved in previous step to establish SignalR connection. It will then use SignalR output binding to send one or more messages using Azure SignalR Service. The client app is going to send http 'post' request to 'https://{FUNCTION_URL}/api/sendmessage' and provide string payload. This API sends message to all clients who have subscribed to sendMessage. [FunctionName("sendmessage")]public static async Task<IActionResult> SendMessage( [HttpTrigger(AuthorizationLevel.Anonymous, "post", "options")]HttpRequest req, [SignalR(HubName = "testazuresignalrhub")]IAsyncCollector<SignalRMessage> signalRMessages, ILogger log){ try { if (!req.HttpContext.Response.Headers.ContainsKey("Access-Control-Allow-Credentials")) { req.HttpContext.Response.Headers.Add("Access-Control-Allow-Credentials", "true"); } if (req.Headers.ContainsKey("Origin") && !req.HttpContext.Response.Headers.ContainsKey("Access-Control-Allow-Origin")) { req.HttpContext.Response.Headers.Add("Access-Control-Allow-Origin", req.Headers["Origin"][0]); } if (req.Headers.ContainsKey("Access-Control-Request-Headers")) { req.HttpContext.Response.Headers.Add("Access-Control-Allow-Headers", req.Headers["access-control-request-headers"][0]); } // Commenting since not passing json payload. If passing json payload uncomment this line // var message = new JsonSerializer().Deserialize(new JsonTextReader(new StreamReader(req.Body))); var message = new StreamReader(req.Body).ReadToEnd(); await signalRMessages.AddAsync( new SignalRMessage { Target = "sendMessage", Arguments = new[] { message } }); log.LogInformation("sendMessage API succeeded."); return new OkResult(); } catch { return new BadRequestResult(); }}
Now that Azure SignalR Service bindings are defined, update 'local.settings.json' and specify value for "AzureSignalRConnectionString":"{AZURE_SIGNALR_CONNECTION_STRING}" as this is needed to run host locally. You can start host by running command func start --build --debug VSCode --cors "*".
Publish Docker Image to DockerHub
The next step is to create a Docker Hub repository. Update 'Dockerfile' environment variables based on your connection strings
ENV AzureWebJobsStorage="{BLOB_STORAGE_CONNECTION_STRING}" ENV AzureBlobStorage="{BLOB_STORAGE_CONNECTION_STRING_OF_CONTAINER_HAVING_TRIGGER}" ENV AzureEventHubConnectionString="{EVENT_HUB_CONNECTION_STRING}" ENV TestCosmonDBConnection="{COSMOS_DB_CONNECTION_STRING}" ENV AzureSignalRConnectionString="{AZURE_SIGNALR_CONNECTION_STRING}"
The commands to build Docker Image are listed below
- Build Docker Image:
docker build -t samplefunc . - Tag Docker Image:
docker tag samplefunc {YOUR_DOCKER_REPO} - Publish Image to Docker Hub:
docker push {YOUR_DOCKER_REPO}
Create Function App from Docker Image in Azure Portal
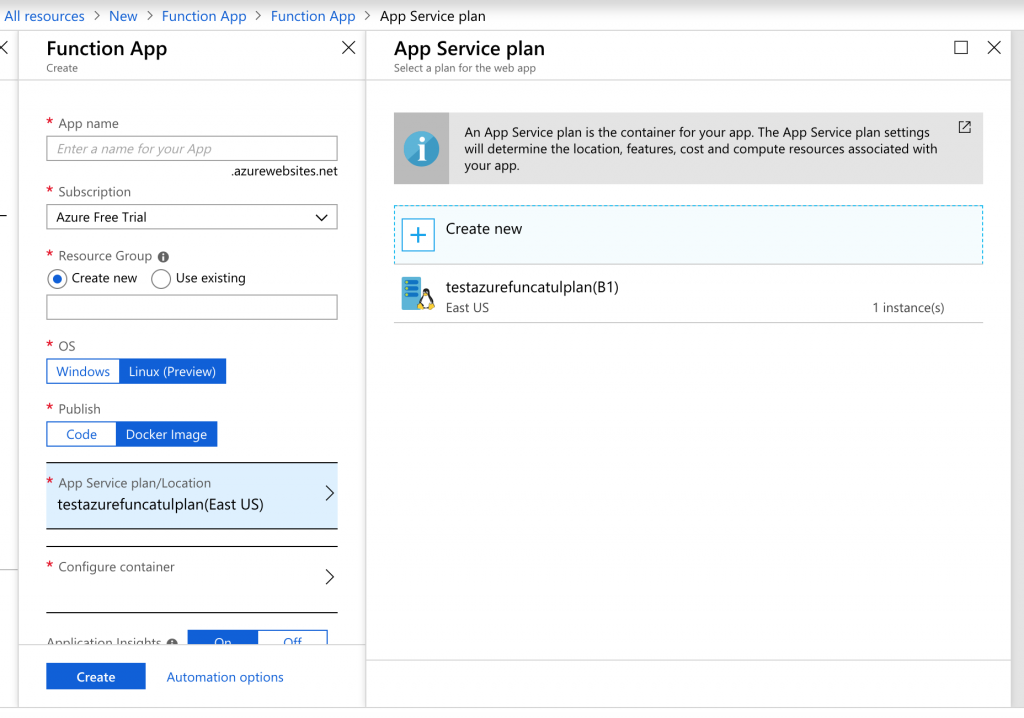
Create a new Function App in Azure Portal and specify
- App name
- Resource group
- Select OS as 'Linux (Preview)'
- Select Publish as 'Docker Image'
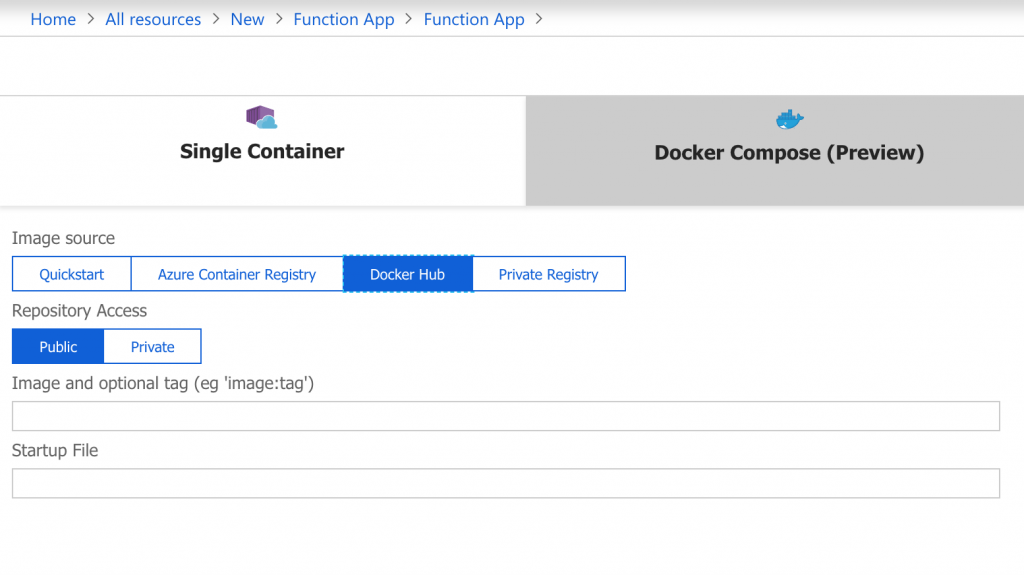
Docker image published to Docker Hub in previous step will be used to configure container. Open 'Configure container' and select 'Docker Hub' tab and specify values for image and option tag along with repository access.
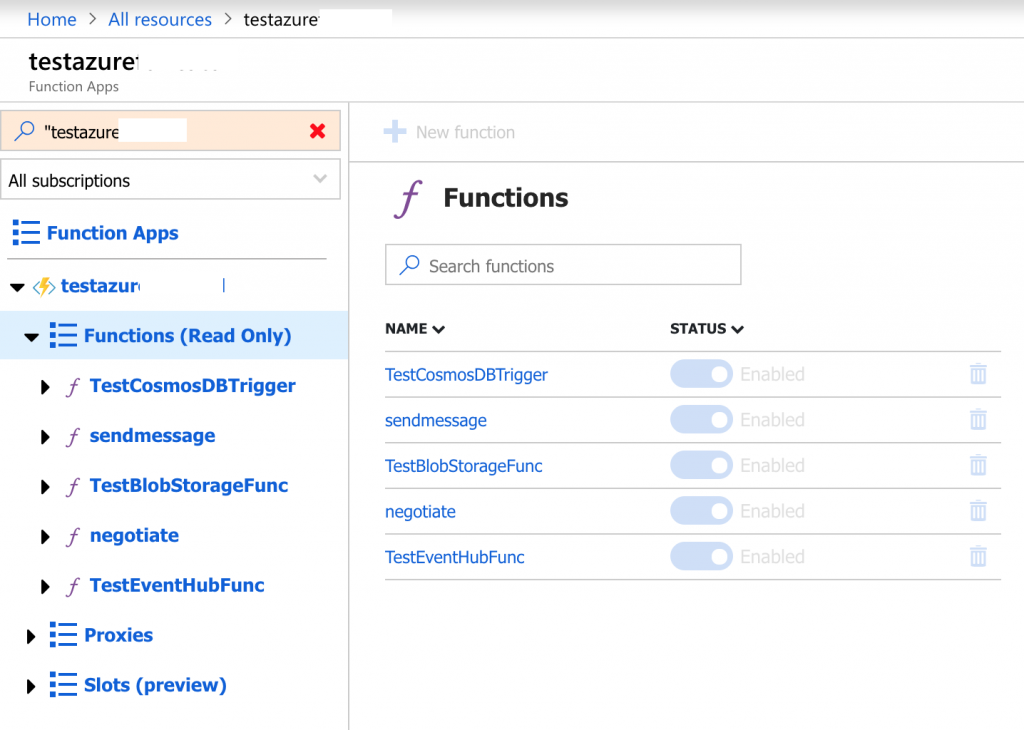
After function App is created, you will see list of Functions. Navigate to the Overview tab and keep a note of the URL.
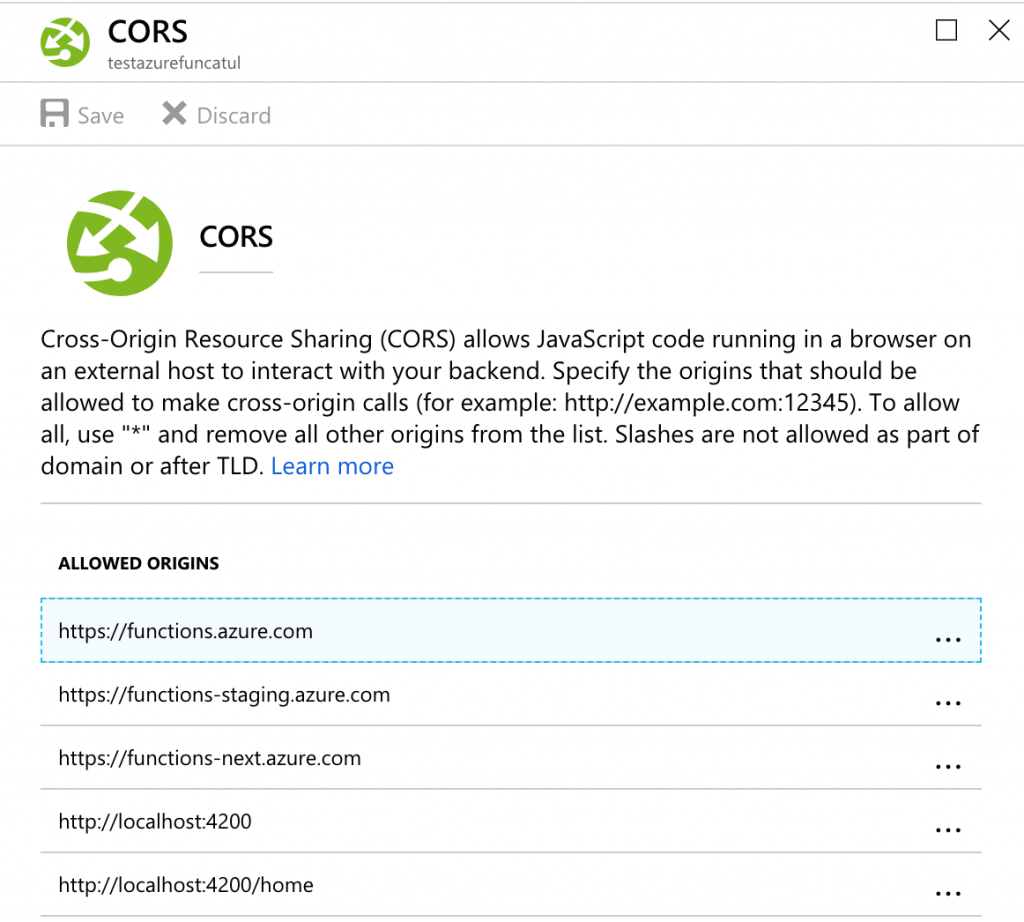
The function URL will be used by SignalR client to connect and send/receive events. If you want to connect to this function app from a browser based client, you will need to allow the origin to make cross-origin calls in Platform Features > API > CORS e.g. I have allowed 'https://localhost:4200' and 'https://localhost:4200/home' origins.
Deploy functions to Azure Kubernetes Service from VS Code
You can also deploy Azure functions 2.0 to AKS and command is func deploy --platform kubernetes --name {DockerHubRepositoryName} --registry {DockerHubRegistry}. You need to update placeholders with your Docker hub repository name and account. Once deployment is complete, you can open the endpoint to verify the deployment. You can also open AKS dashboard to view deployed resources under namespace 'azure-functions'.
Summary
In the next article of this series I will create a few client apps (Console/Angular) to integrate with Azure SignalR Service, ASP.NET SignalR and Azure SignalR Service bindings for Azure functions. This completes this article and complete source code can be downloaded from GitHub.
