Enforcing security controls right from CI/CD pipeline with AzSK - Deep Dive
Azure Security Kit aka AzSK is a framework that is used internally by Microsoft to control & govern their Azure Subscriptions. While some features are overlapping with Azure Security Center, I find a lot of value in the Kit, mostly in the following areas:
- The attestation module allowing for a full traceability of security controls deviation and justification of why a given control was not respected, which may be very useful in case of internal/external audit
- The CI/CD extensions available on the marketplace. This makes possible to enforce security controls as from CI builds, so very early in the application lifecycle. On top of Azure DevOps extensions, the kit also ships with Visual Studio extensions to provide security guidance as the developer is typing the code.
- An ARM Template Security checker that is available from CI/CD as well as separate cmdlet. This ensures ARM templates conform to security policies defined at organization level.
- A lot of room for customizing control settings, creating organization specific controls, etc.
It is free, the only costs you might have would be incurred by a few resources (Storage Account & Automation) that are required to use the kit but overall, it is very low.
The kit comes with other things such as Continuous Assurance (CA) & integration with OMS but that's where there is a bit of overlapping with Azure Security Center (ASC). The latter being much easier to use but less customizable and does not cover CI/CD. AzSK's documentation is rather good but it still takes a bit of time to get acquainted, especially in the CI/CD domain as this is still a work in progress. I dogged into the source code of AzSK and more particularly into the ARM Library Checker (.NET & .Net core module) in order to understand exactly how it works and that's what I'm going to share here.
That said, you should already know how to create a custom org policy and setup CA, etc. as I'm not going to go through all the details. I guess the official doc all in all is certainly about 50 pages. If you don't know AzSK at all, you may still read this article but it's going to be harder to grasp it correctly.
Step 1 - working with the Azure DevOps tasks
Currently, the extension comes with 2 tasks, the AzSK_ARMTemplateChecker used to inspect and validate ARM template files and AzSK_SVTs, used to validate the overall security of the resource group that is bound to the current release or use a tagname/value pair that identifies resources used and deployed by your application. AzSK_ARMTemplateChecker is meant to be used as a pre-deployment scan while AzSK_SVTs is meant to be used as a post-deployment scan. Even when you use AzSK_ARMTemplateChecker, it is a good idea to also validate the overall solution with AzSK_SVTs as you might have tasks in your release pipeline that could modify some resources not via ARM templates but rather via Powershell, Azure Cli, etc., making a final scan with AzSK_SVTs necessary.
Those two tasks are using cmdlets behind the scenes which can also be used directly by sys admins. The configuration of the tasks is explained in the AzSK doc but I'd like to come with extra details that are not discussed in the official doc. For the time being, the ARM checker task does not work with parameters which means that it expects to have the actual parameter values as part of the template. So, for instance, one of the built-in controls checks how many instances of a given app service plan runs. The control doing this is the following:
[code langage="json"]
{
"id": "AppService270",
"apiVersions": [ "2016-09-01" ],
"controlId": "Azure_AppService_BCDR_Use_Multiple_Instances",
"isEnabled": true,
"description": "App Service must be deplsoyed on a minimum of 1 instance to ensure availability",
"rationale": "App Service deployed on multiple instances ensures that the App Service remains available even if an instance is down.",
"recommendation": "Run command 'Set-AzureRmAppServicePlan -Name '<AppServicePlanName>' -ResourceGroupName '<RGName>' -NumberofWorkers '<NumberofInstances>''. Run 'Get-Help Set-AzureRmAppServicePlan -full' for more help.",
"severity": "High",
"jsonPath": [ "$.sku.capacity" ],
"matchType": "IntegerValue",
"data": {
"type": "GreaterThan",
"value": 1
}
}
as you can see, the jsonPath attribute contains the relative path to the property of the corresponding resource in the controlled ARM template, which is typically something like this:
[code langage="json"]
"resources": [
{
...
"sku": {
"name": "[parameters('skuName')]",
"capacity": "[parameters('skuCapacity')]"
},
...
}
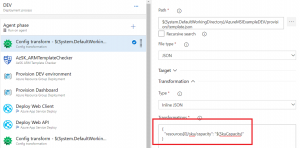
where the value of "capacity" is supposed to come from the "skuCapacity" parameter. However, if you ask the ARM checker task (as well as the cmdlet) to check the template "as is", it will fail because the condition in the control states that the value should be greater than 1, meaning that the library will compare "[parameters('skuCapacity')]" > 1 which will of course fail. Since hardcoding values directly in the template isn't CI/CD friendly, the easiest way to workaround this is to simply make a configuration transformation step as follows:
where you can specify which transformation to apply. In this case, I'm asking the task to take my first resource and replace the value of the sku capacity by the value of my release variable, and that will do the trick. For sake of simplicity, I'm illustrating this with only this parameter but you should of course do that with all the parameters.
Next you can simply use the AzSK_ARMTemplateChecker task that is easy to configure. Now, I had hard times finding how to specify which controls should to be taken into account by the task. Although the official documentation is quite exhaustive, there are still some grey zones and I had hard times making it work because there is currently (MS is working on that) a bug (specific to ARM checker) with this feature and that's why it didn't work for me from the start.
Step 2 - controls being checked by the ARM Checker
By default, if you haven't setup a custom organization policy, the controls that will be checked by AzSK are retrieved from the default online policy store: https://azsdkossep.azureedge.net/1.0.0/ARMControls.json .
The file contains a series of resources which in turn contain a series of controls. The control I showed earlier (AppService270) is part of this file under the AppService resource. So, by default, all controls that are applicable to resources that are part of your ARM template will be executed. If you want to use your own controls, you first need to use the latest version of AzSK (currently 3.9.0), then you have to take a copy of ARMControls.json, modify it as you wish and upload it to your own online policy store. That's what I did but still, I thought it didn't work because of the bug I was referring to earlier: the control's isEnabled attribute is currently ignored by the ARM Checker (but works fine with SVT...) so I thought the system was not picking up my control file. Then I jumped to my self-hosted build agent and started debugging and troubleshooting with Fiddler and I noticed that my file was well retrieved. So, I ended up cloning the AzSK repo and made a step by step debugging of the ARM checker library and realized that this property was just ignored. So, I fixed that in my own local environment and MS should release a fix ASAP.
Once you uploaded your own version of ARMControls.json, you also have to specify how you want to use it in ServerConfigMetadata.json, and this is either like this:
[code langage="json"]
{
"Name" : "ARMControls.json",
"OverrideOffline":true
}
either like this:
[code langage="json"] { "Name" : "ARMControls.json"}
With the first option, you tell AzSK that you want to use only your file. The second option tells AzSK to overlay the out of the box ARMControls with yours which allows you to only specify the delta. Up to you to decide which one you prefer.
Then, you may change existing controls and even add your own. If we come back to the control I showed earlier:
[code langage="json"]
{
"id": "AppService270",
"apiVersions": [ "2016-09-01" ],
"controlId": "Azure_AppService_BCDR_Use_Multiple_Instances",
"isEnabled": true,
"description": "App Service must be deplsoyed on a minimum of 1 instance to ensure availability",
"rationale": "App Service deployed on multiple instances ...",
"recommendation": "Run command 'Set-AzureRmAppServicePlan...",
"severity": "High",
"jsonPath": [ "$.sku.capacity" ],
"matchType": "IntegerValue",
"data": { "type": "GreaterThan",
"value": 1 }
}
we could enable it or disable it (again not working right now), decide that GreaterThan 0 would be more suitable for a development environment as you don't especially want to pay for multiple instances in dev, change the description, severity etc. So, except the JsonPath attribute that you should never change, you can do whatever you want with the rest.
If you want to add your own controls, as for instance enforcing MSI or making sure ARR Affinity is disabled, you could simply add the following JSON body under the AppService resource:
[code langage="json"]
{
"controlID": "Azure_AppService_ClientAffinity_SEY_0001",
"description": "ARR Affinity must be turned off for App Service;",
"id": "AppService_Client_Affinity_SEY_0001",
"severity": "Medium",
"recommendation": "Go to Azure Portal --> your App Service --> Settings --> Application Settings --> ARR Affinity --> Click on 'OFF'.",
"jsonPath": [ "$.properties.clientAffinityEnabled" ],
"matchType": "Boolean",
"data": {
"value": true
},
"isEnabled": false,
"rationale": "ARR Affinity makes it easier to drive DOS/DDOS attacks against the underlying resource"
}
This control is not enforced by AzSK right now but I personally find ARR Affinity may pose a security risk since when turned on, the webapp will return a cookie named ARRAffinity containing the specific backend instance ID to which Azure should target client requests. That makes it easy for attackers to overload always the same instance until it is down and then get a fresh ARRCookie etc. until all the instances are down. In any case, ARR Affinity is often required by poorly written applications that were not correctly designed to run on multiple nodes. So, the earlier such issues are discovered (in the CI pipeline), the better!
Step 3 - controls being checked by the SVT task
As a reminder, the SVT task is to be used in a post-deployment phase so for instance, it could be the last task of a release pipeline. SVT works differently than ARM Checker although the ultimate purpose is the same. For SVT, all the control files live in the [AzSK Module Path]\[AzSK version]\Framework\Configurations\SVT\Services and each resource has its own corresponding JSON file. If we look into AppService.json, we'll find a similar control to the one we worked with so far:
[code langage="json"]
{
"ControlID": "Azure_AppService_BCDR_Use_Multiple_Instances",
"Description": "App Service must be deployed on a minimum of two instances to ensure availability",
"Id": "AppService270",
"ControlSeverity": "Medium",
"Automated": "Yes",
"MethodName": "CheckAppServiceInstanceCount",
"Rationale": "App Service deployed on ....",
"Recommendation": "Run command ...",
"Tags": [
"SDL",
"TCP",
"Automated",
"BCDR",
"AppService"
],
"Enabled": true,
"FixControl": {
"FixMethodName": "SetMultipleInstances",
"FixControlImpact": "Medium"
}
}
but as you might have noticed, there is no JsonPath attribute nor any rule to define the behavior of the control. Instead, there is the MethodName attribute which indicates which PowerShell method should be called when this control is being executed. In this case, the method CheckAppServiceInstanceCount of the resource AppService should be called but where is the code defined? Well, simple: in the AppService.ps1 ([AzSK Module Path]\[AzSK version]\Framework\Core\SVT\Services) script that defines the AppService class and sure enough, if you look for CheckAppServiceInstanceCount into that file, you'll find its implementation.
That said, you should *never* change any of the local files. For SVT controls, you can change some settings in the ControlSettings.json file but if you want to change the behavior or a given control, or add a new control, you'll have to extend the resource. For all the details, you should read the official doc but I'm going to show you how I extended SVT to create the ARR Affinity check in a similar way as for the ARM checker. Since ClientAffinityEnabled (displayed as ARR Affinity in the portal) is a property of an Azure webapp, I extended the AppService feature by adding two new files to my org policy folder:
AppService.ext.json that contains the declarative definition of the control
AppService.ext.ps1 that contains the method to call when the control executes
The contents of AppService.ext.json are:
[code langage="json"]
{
"FeatureName": "AppService",
"Reference": "aka.ms/azsktcp/appservice",
"IsMaintenanceMode": false,
"Controls": [
{
"ControlID": "Azure_AppService_ClientAffinity_SEY_0001",
"Description": "ARR Affinity must be turned off for App Service",
"Id": "AppService_Client_Affinity_SEY_0001",
"ControlSeverity": "Medium",
"Automated": "Yes",
"MethodName": "CheckAppServiceClientAffinityEnabled",
"Rationale": "ARR Affinity makes it easier to drive DOS/DDOS attacks against the underlying resource",
"Recommendation": "Go to Azure Portal ...",
"Tags": [
"SDL",
"TCP",
"Automated",
"Config",
"AppService",
"FunctionApp"
],
"Enabled": true
}
]
}
where the most important part is the method name CheckAppServiceClientAffinityEnabled that is implemented in AppService.ext.ps1:
[code langage="PowerShell"]
#using namespace Microsoft.Azure.Commands.AppService.Models
Set-StrictMode -Version Latest
class AppServiceExt: AppService
{
hidden [PSObject] $ResourceObject;
hidden [PSObject] $WebAppDetails;
hidden [PSObject] $AuthenticationSettings;
hidden [bool] $IsReaderRole;
AppServiceExt([string] $subscriptionId, [string] $resourceGroupName, [string] $resourceName):
Base($subscriptionId, $resourceGroupName, $resourceName)
{
$this.GetResourceObject();
$this.AddResourceMetadata($this.ResourceObject.Properties)
}
AppServiceExt([string] $subscriptionId, [SVTResource] $svtResource):
Base($subscriptionId, $svtResource)
{
$this.GetResourceObject();
$this.AddResourceMetadata($this.ResourceObject.Properties)
}
hidden [ControlResult] CheckAppServiceClientAffinityEnabled([ControlResult] $controlResult)
{
if([Helpers]::CheckMember($this.WebAppDetails,"ClientAffinityEnabled"))
{
if($this.WebAppDetails.ClientAffinityEnabled)
{
$controlResult.AddMessage([VerificationResult]::Failed,
[MessageData]::new("ARR Affinity for resource " + $this.ResourceContext.ResourceName + " is turned on", ($this.WebAppDetails | Select-Object ClientAffinityEnabled)));
}
else
{
$controlResult.AddMessage([VerificationResult]::Passed,
[MessageData]::new("ARR Affinity for resource " + $this.ResourceContext.ResourceName + " is turned off", ($this.WebAppDetails | Select-Object ClientAffinityEnabled)));
}
}
else
{
$controlResult.AddMessage([VerificationResult]::Manual,
[MessageData]::new("Could not validate ARR Affinity settings on the AppService: " + $this.ResourceContext.ResourceName + "."));
}
return $controlResult;
}
}
in which I simply check the value of the ClientAffinityEnabled webapp property and I return the control result (Passed, Failed, Manual) accordingly. Once you've uploaded your extension files to your org policy storage account, you also have to list them in ServerConfigMetadata.json.
Step 4 - different policies for different environments?
Depending on the control baseline (which I'm not covering in this article) you want to define, you might decide to use a single corporate policy for all your subscriptions and environments but you might also want to define different policies per environment. For instance, with the example I talked about so far (multiple instances enforced by the control), you might want the control to behave differently whether you are in dev (where a single instance is enough) or in staging/prod where you should indeed have more than 1 instance to be HA.
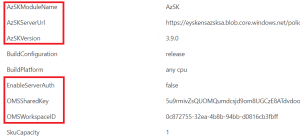
No matter what you decide and independently of AzSK, the way your environments are organised (1 vs multiple subscriptions) will also influence the way you'll tackle your policies. AzSK supports to have either one policy store per subscription, either one global store. However, I noticed that this doesn't matter too much, especially when it comes to CI/CD as the underlying tasks will trigger a fresh PowerShell window for every execution and target a given policy store using the Set-AzSKPolicySettings cmdlet. So, if you decide to work with only one policy store cross-environments (DEV/STAGING/PROD), you might simply define your build/release variables this way:
scoped at release level and then let your different stages use the same settings. However, should you use different policy stores, you may define them like this:
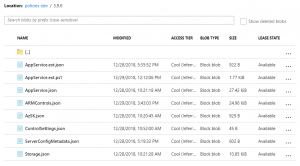
in this case I defined AzSKServerUrl twice with different values and scoped respectively to the DEV & STAGING stages. My org policy storage account looks like this:
So, I simply created one container per environment and each container contains its own control files:
Hope this helps!
Comments
- Anonymous
January 11, 2019
This is a fantastic scenario. We need more direction on CI/CD pipelines. Thanks, Stephane!- Anonymous
January 12, 2019
Thanks Ed, others will follow :)
- Anonymous


