New managed disk storage option for your Azure VMs
Available this week there is a new simplified and optimized storage option for your Azure virtual machine called managed disks.
There are several advantages of managed disks vs. unmanaged disks with storage accounts. Here are a few:
- Elimination of manual Storage Account management for Azure VMs
- Elimination of 20,000 IOPS Storage Account limit
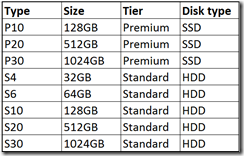
- 8 New disk options – 128GB, 512GB, 1024GB, etc.
- Managed Standard disk (HDD) is lower cost than unmanaged Standard Page Blob storage (HDD) with the current 50% discount promotional offer for 6 months from this week
- Quickly spin up a 1000 managed disks for up to 1000 VMs for large VM scale set cluster scenarios
- Easily convert from Standard (HDD) disk to a Premium (SSD) disk with just a VM reboot
- Point in time backups (snapshots) of your VM
- Bring your own VHD image using managed custom image with no storage account
- Granular delegation of control (RBAC) of the managed disks
- Can mix Premium and Standard managed disks without having to create separate storage accounts
For more on Managed Disks pricing and features see here and FAQ here.
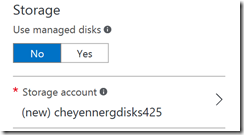
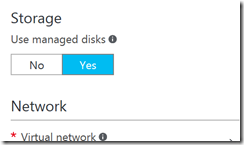
When you create a new Azure VM you get a new option called ‘managed disks’ . See below for screenshots during VM creation:
When prompted for VM storage, if you select No you are going to use an ‘unmanaged disk’ option and it will ask you create a Storage account. This is the legacy VM disk storage method and not recommended going forward.
To use managed disk, select Yes a ‘use managed disk’ option and this removes the Storage Account need for the VM:
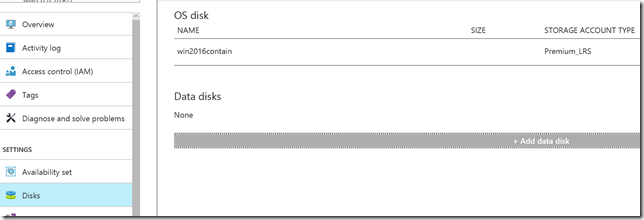
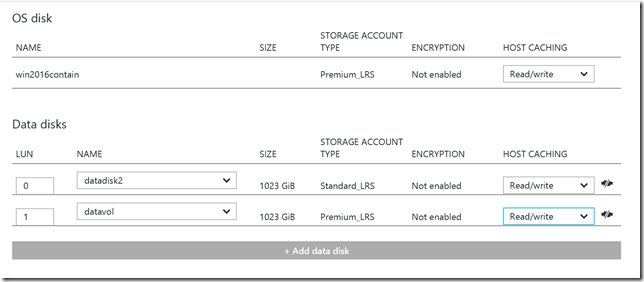
Now you can add in additional SSD or HDD managed disks under the ‘Disks’ blade
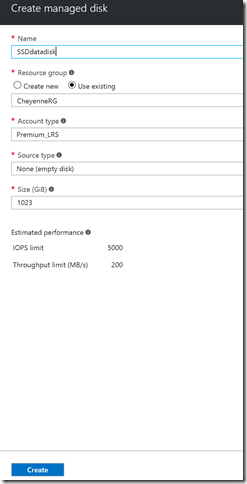
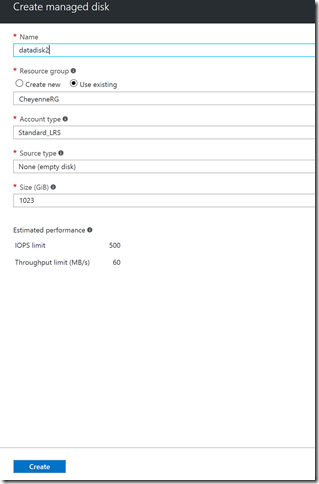
When adding in another managed disk you can add in Premium (SSD) or Standard (HDD) and size:
Best practice here – I recommend when filling out the Size (GiB) field you should map directly to one of the 8 available managed disk sizes to maximize your storage e.g. rather than put 750GB Standard I recommend using 1023GB (1GB less than full size) Standard for size.
You can add in managed disk JSON to your JSON template to have a pick list of these disk sizes such as this:
In the parameters section add in:
"parameters": {
"sizeOfEachDataDiskInGB": {
"type": "string",
"metadata": {
"description": "Size of each data disk in GB"
}
}
In the properties section add in:
"properties": {
"dataDisks": [
{
"diskSizeGB": "[parameters('sizeOfEachDataDiskInGB')]",
"lun": 0,
"createOption": "Empty"
},
}
Premium (SSD) managed disk
Standard (HDD) managed disk
Opening the VM via RDP and initializing the disk you can now see the additional 1TB managed disk:
I
If you would rather create a VM using managed disks via PowerShell see here.
To add in attached managed disks to an existing VM via PowerShell you can use New-AzureRmDiskConfig cmdlet:
note: you need to install Azure PowerShell 3.5 or higher to run these new cmdlets
$rgName = 'EngineeringDeptRG'
$vmName = 'server05'
$location = 'West Central US'
$storageType = 'PremiumLRS'
$dataDiskName = ($virtualMachineName + '_datadisk1')
$diskConfig = New-AzureRmDiskConfig -AccountType $storageType -Location $location -CreateOption Empty -DiskSizeGB 128
$dataDisk1 = New-AzureRmDisk -DiskName $dataDiskName -Disk $diskConfig -ResourceGroupName $rgName
$vm = Get-AzureRmVM -Name $vmName -ResourceGroupName $rgName
$vm = Add-AzureRmVMDataDisk $vm -Name $dataDiskName -CreateOption Attach -ManagedDiskId $dataDisk1.Id -Lun 1
Update-AzureRmVM -VM $vm -ResourceGroupName $rgName
Next you need to initialize the managed disk either using the disk management tools of the OS or using PowerShell like this Windows OS example:
$disks = Get-Disk | Where partitionstyle -eq 'raw' | sort number
$letters = 70..89 | ForEach-Object { ([char]$_) }
$count = 0
$labels = @("data1","data2")
foreach($d in $disks) {
$driveLetter = $letters[$count].ToString()
$d |
Initialize-Disk -PartitionStyle MBR -PassThru |
New-Partition -UseMaximumSize -DriveLetter $driveLetter |
Format-Volume -FileSystem NTFS -NewFileSystemLabel $labels[$count] `
-Confirm:$false -Force
$count++
}
JSON template sample for managed disks would look like this in yellow:
{
"$schema": " https://schema.management.azure.com/schemas/2015-01-01/deploymentTemplate.json#" ,
"contentVersion": "1.0.0.0",
"parameters": {
"dnsLabelPrefix": {
"type": "string",
"metadata": {
"description": "Unique DNS Name for the Storage Account where the Virtual Machine's disks will be placed."
}
},
"adminUsername": {
"type": "string",
"metadata": {
"description": "Username for the Virtual Machine."
}
},
"adminPassword": {
"type": "securestring",
"metadata": {
"description": "Password for the Virtual Machine."
}
},
"vmSize": {
"type": "string",
"metadata": {
"description": "Size of VM"
}
},
"sizeOfEachDataDiskInGB": {
"type": "string",
"metadata": {
"description": "Size of each data disk in GB"
}
}
},
"variables": {
"storageAccountName": "[concat(uniquestring(resourceGroup().id), 'saddiskvm')]",
"addressPrefix": "10.0.0.0/16",
"subnet1Name": "Subnet-1",
"subnet1Prefix": "10.0.0.0/24",
"vmStorageAccountContainerName": "vhds",
"imagePublisher": "MicrosoftWindowsServer",
"imageOffer": "WindowsServer",
"imageSKU": "2012-Datacenter",
"imageVersion": "latest",
"publicIPAddressName": "myPublicIP",
"publicIPAddressType": "Dynamic",
"storageAccountType": "Standard_LRS",
"virtualNetworkName": "myVNET",
"vmName": "myVM",
"vnetID": "[resourceId('Microsoft.Network/virtualNetworks',variables('virtualNetworkName'))]",
"nicName": "myNIC",
"subnet1Ref": "[concat(variables('vnetID'),'/subnets/',variables('subnet1Name'))]",
"apiVersion": "2015-06-15"
},
"resources": [
{
"type": "Microsoft.Storage/storageAccounts",
"name": "[variables('storageAccountName')]",
"apiVersion": "[variables('apiVersion')]",
"location": "[resourceGroup().location]",
"properties": {
"accountType": "[variables('storageAccountType')]"
}
},
{
"apiVersion": "[variables('apiVersion')]",
"type": "Microsoft.Network/publicIPAddresses",
"name": "[variables('publicIPAddressName')]",
"location": "[resourceGroup().location]",
"properties": {
"publicIPAllocationMethod": "[variables('publicIPAddressType')]",
"dnsSettings": {
"domainNameLabel": "[parameters('dnsLabelPrefix')]"
}
}
},
{
"apiVersion": "[variables('apiVersion')]",
"type": "Microsoft.Network/virtualNetworks",
"name": "[variables('virtualNetworkName')]",
"location": "[resourceGroup().location]",
"properties": {
"addressSpace": {
"addressPrefixes": [
"[variables('addressPrefix')]"
]
},
"subnets": [
{
"name": "[variables('subnet1Name')]",
"properties": {
"addressPrefix": "[variables('subnet1Prefix')]"
}
}
]
}
},
{
"apiVersion": "[variables('apiVersion')]",
"type": "Microsoft.Network/networkInterfaces",
"name": "[variables('nicName')]",
"location": "[resourceGroup().location]",
"dependsOn": [
"[concat('Microsoft.Network/publicIPAddresses/', variables('publicIPAddressName'))]",
"[concat('Microsoft.Network/virtualNetworks/', variables('virtualNetworkName'))]"
],
"properties": {
"ipConfigurations": [
{
"name": "ipconfig1",
"properties": {
"privateIPAllocationMethod": "Dynamic",
"publicIPAddress": {
"id": "[resourceId('Microsoft.Network/publicIPAddresses',variables('publicIPAddressName'))]"
},
"subnet": {
"id": "[variables('subnet1Ref')]"
}
}
}
]
}
},
{
"apiVersion": "2016-04-30-preview",
"type": "Microsoft.Compute/virtualMachines",
"name": "[variables('vmName')]",
"location": "[resourceGroup().location]",
"dependsOn": [
"[concat('Microsoft.Storage/storageAccounts/', variables('storageAccountName'))]",
"[concat('Microsoft.Network/networkInterfaces/', variables('nicName'))]"
],
"properties": {
"hardwareProfile": {
"vmSize": "[parameters('vmSize')]"
},
"osProfile": {
"computerName": "[variables('vmName')]",
"adminUsername": "[parameters('adminUsername')]",
"adminPassword": "[parameters('adminPassword')]"
},
"storageProfile": {
"imageReference": {
"publisher": "[variables('imagePublisher')]",
"offer": "[variables('imageOffer')]",
"sku": "[variables('imageSKU')]",
"version": "[variables('imageVersion')]"
},
"dataDisks": [
{
"diskSizeGB": "[parameters('sizeOfEachDataDiskInGB')]",
"lun": 0,
"createOption": "Empty"
},
{
"diskSizeGB": "[parameters('sizeOfEachDataDiskInGB')]",
"lun": 1,
"createOption": "Empty"
},
{
"diskSizeGB": "[parameters('sizeOfEachDataDiskInGB')]",
"lun": 2,
"createOption": "Empty"
},
{
"diskSizeGB": "[parameters('sizeOfEachDataDiskInGB')]",
"lun": 3,
"createOption": "Empty"
}
],
"osDisk": {
"createOption": "FromImage"
}
},
"networkProfile": {
"networkInterfaces": [
{
"id": "[resourceId('Microsoft.Network/networkInterfaces',variables('nicName'))]"
}
]
},
"diagnosticsProfile": {
"bootDiagnostics": {
"enabled": "true",
"storageUri": "[concat(reference(concat('Microsoft.Storage/storageAccounts/', variables('storageAccountName')), variables('apiVersion')).primaryEndpoints.blob)]"
}
}
}
}
]
}
See other full JSON templates with managed disks example here and here for Linux
To attach a managed disk to a Linux VM using Azure CLI see this example:
az vm disk attach –g myResourceGroup –-vm-name myVM –-disk myDataDisk –-new
For more on creating managed disks with VMs see here and here.
How do I use the new Snapshot feature with managed disks?
Snapshots are a new feature that can be used with Managed disks to snap a point in time backup of a single managed disk. See below for examples:
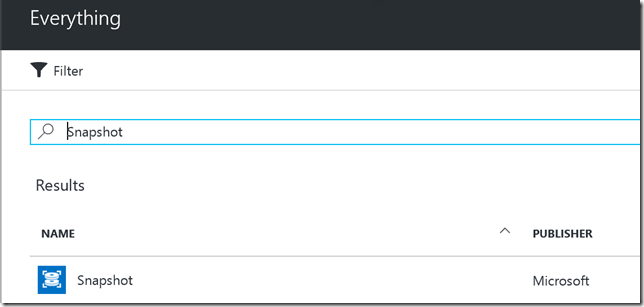
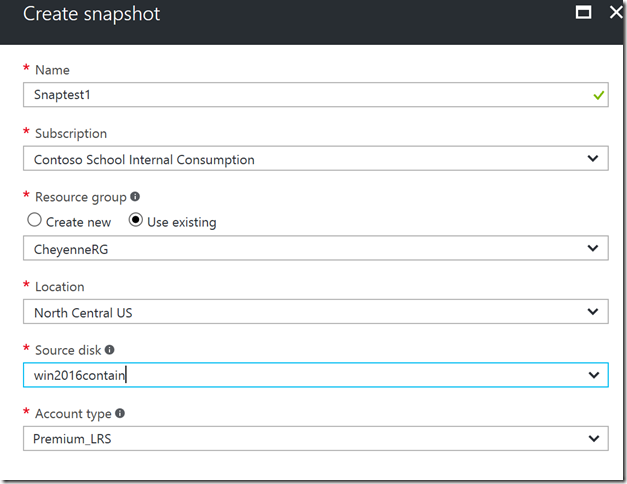
Click on Add and search for Snapshot in the Azure portal:
Select the managed disk you want take a snapshot of:
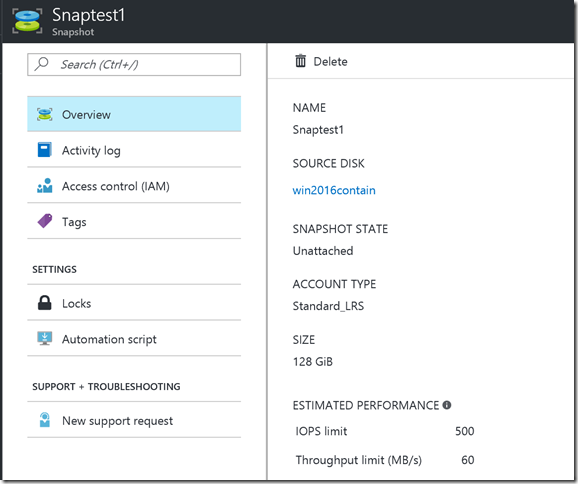
Now you have a snapshot of the managed disk created:
From here you can use this snapshoted OS managed disk to create dev/test VM or use it for a point in time/state backup. Note: Snapshots only snap a single managed disk not a whole VM and all the attached managed disks.
To snap a Linux VM using Azure CLI:
# take the disk id with which to create a snapshot
osDiskId=$(az vm show -g myResourceGroup -n myVM --query "storageProfile.osDisk.managedDisk.id" -o tsv)
az snapshot create -g myResourceGroup --source-disk "$osDiskId" --name osDisk-backup
How do I convert my current VM disks (unmanaged disks) to managed disks?
The good news is you can convert your unmanaged Standard (HDD) and Premium (SSD) OS and attached data disks to managed disks using a deallocation of the VM and a conversion using Azure PowerShell.
You can convert from HDD unmanaged to HDD managed or SSD unmanaged to SSD managed or from HDD unmanaged to SSD managed. Here are some examples:
note: you need to install Azure PowerShell 3.5 or higher to run these new cmdlets.
For example if you wanted to convert unmanaged Standard (HDD) disk to Premium (SSD) managed disk you would run the following:
1. Before you attempt to convert from unmanaged to managed disks backup all the VMs/disks.
2. You must use Azure CLI or Azure PowerShell to covert the disks.
In the example below I converted unmanaged Standard (HDD) to managed Premium (SSD) disk using Azure PowerShell:
Set the variables:
$resourceGroupName = 'DataScienceRG'
$vmName = 'Datasciencevm1'
$size = 'Standard_DS2_v2'
$vm = Get-AzureRmVM -Name $vmName -ResourceGroupName $resourceGroupName
Stop the VM for conversion:
Stop-AzureRmVM -ResourceGroupName $resourceGroupName -Name $vmName -Force
Convert from unmanaged to managed disks:
$vm.HardwareProfile.VmSize = $size
Update-AzureRmVM -VM $vm -ResourceGroupName $resourceGroupName
ConvertTo-AzureRmVMManagedDisk -ResourceGroupName $resourceGroupName –VMName
To convert all the disks in a VM:
$vmDisks = Get-AzureRmDisk -ResourceGroupName $resourceGroupName
foreach ($disk in $vmDisks)
{
if($disk.OwnerId -eq $vm.Id)
{
$diskUpdateConfig = New-AzureRmDiskUpdateConfig –AccountType PremiumLRS
Update-AzureRmDisk -DiskUpdate $diskUpdateConfig -ResourceGroupName $resourceGroupName `
-DiskName $disk.Name
}
}
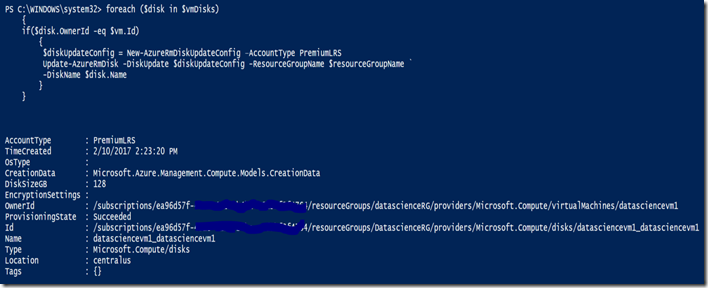
If it converted to managed disks successfully you will see “Provisioning state: succeeded”
To see more on converting from unmanaged disks to managed disks visit here for PowerShell and here CLI.
Comments
- Anonymous
February 23, 2017
Hi, Markga , how can I get the VHD file of the OS disk except use portal "export"?- Anonymous
March 07, 2017
Jason - what is your objective with needing the VHD? If you want to build additional VMs from a managed OS disk, you can create a VM using the specialized managed OS disk or you can create a new managed disk by using 'copy' option for the existing managed disk. See here: https://docs.microsoft.com/en-us/rest/api/manageddisks/disks/disks-create-or-update. You can create images from managed disk see here: https://docs.microsoft.com/en-us/rest/api/manageddisks/images/images-create - Anonymous
March 07, 2017
Hi Jason,What is your objective to get the VHD? If it is to create a VM from the OS managed disk then you have a new managed disk 'copy' option which then can be used to create a VM so the VHD is no longer necessary to have. Please see here under 'Create a managed disk from an existing managed disk in the same or different subscription' section here: https://docs.microsoft.com/en-us/rest/api/manageddisks/disks/disks-create-or-update To create images from a specialized managed disk, see here: https://docs.microsoft.com/en-us/rest/api/manageddisks/images/images-create
- Anonymous
- Anonymous
April 16, 2017
How do you convert a Standard disk to a Premium disk? Can you also easily convert a Premium disk to a Standard disk?- Anonymous
April 17, 2017
Walter, in the context of unmanaged standard disk to managed premium disk you can do that here: https://docs.microsoft.com/en-us/azure/virtual-machines/windows/convert-unmanaged-to-managed-disks If you meant managed standard to managed premium or premium to standard you can just switch the managed disk type (provided the VM you are hosted on supports SSD) and I believe it will convert between standard and premium. See PowerShell examples in the post above.
- Anonymous
- Anonymous
May 11, 2017
Why do we need to create storage account?- Anonymous
May 16, 2017
It auto-creates a storage account behind the scenes but you shouldn't have to create one manually.
- Anonymous
- Anonymous
May 16, 2017
HelloConsidering unmanaged disks only, considering a standard D4 VM I typically create 16 data disks striped into a storage pool for 16x500 IOPS. The only cost is storage (not greatly more than a single disk as the data is striped) and transaction. Each disk can be 1023 GB too.If I move to managed disks, I have to choose a disk size and then if I want similar performance I will have to pay a base cost per disk which ultimately starts to get more expensive.I am happy using multiple storage groups and a snapshot of an individual disk does not attract as I want to snapshot an entire VM with all disks at the same time. For now I am still attracted to unmanaged disks to get better performance at a cheaper price.- Anonymous
May 16, 2017
For pricing, looking at the Microsoft website,Managed - 64GB, 500 IOPS £1.25/mth + transactionUnmanaged - 16 disks, striped in a 64GB storage pool, 8000 IOPS £3.008/mth + transactionThis cost will only occur if the entire 64GB storage pool were consumed - Anonymous
May 16, 2017
Steve - I think use whatever VM storage works for your needs. In my opinion, the only long term risk with using unmanaged disks for your VMs is there may not be a lot of innovation going forward as the focus will likely be managed disks.
- Anonymous
