A Sample SharePoint App That Calls A Custom Web API
This post will show how to create a Web API that calls other services on behalf of the current user.
Background
This post is part of a series on building a SharePoint app that communicate with services protected by Azure AD.
- Part 1 - An Architecture for SharePoint Apps That Call Other Services
- Part 2 - Using OpenID Connect with SharePoint Apps
- Part 3 – Call O365 Exchange Online API from a SharePoint App
- Part 4 – A Sample SharePoint App That Calls A Custom Web API (this post)
- Part 5 – The API Economy: Consuming Our Web API from a Single Page App
This post will show how to create a Web API that calls other services, such as the O365 Exchange Online API, on behalf of the current user. I wrote about an implementation of this previously in the post Calling O365 APIs from your Web API on behalf of a user. That post is outdated a bit, and showed the context of a Windows desktop app. I am going to start with the code that was described in the post Call O365 Exchange Online API from a SharePoint App, and we’ll use the code from that post (https://github.com/kaevans/spapp-exchange/tree/v1.0) as a starting point.
The final solution for this post is available on GitHub - https://github.com/kaevans/spapp-webapi-exchange.
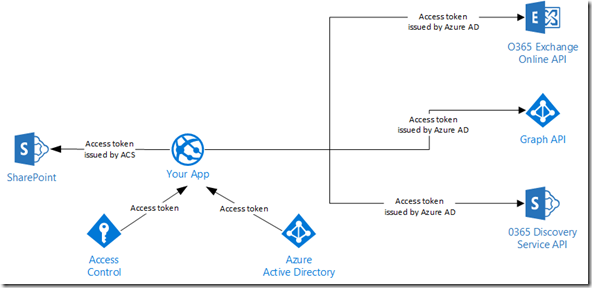
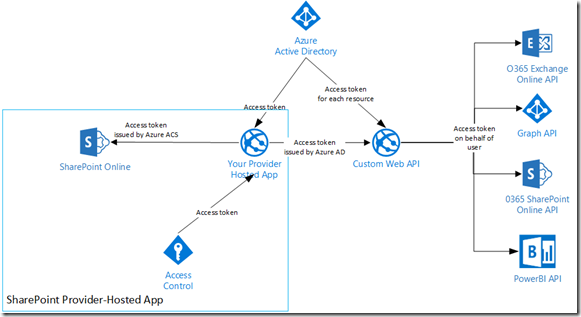
As a reminder, our starting point looks like this:
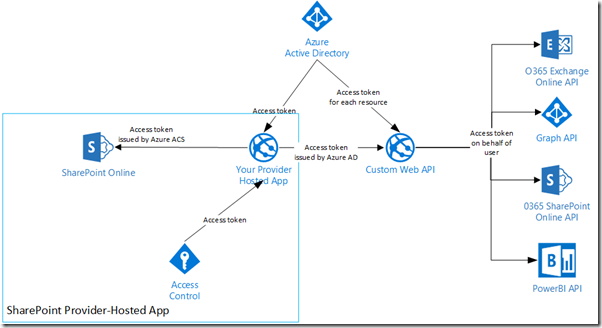
The solution we will build will create a single Web API, making it easy for multiple types of clients to consume it. Our SharePoint app will request a token to call the Web API, and the Web API will request multiple tokens to call downstream services on behalf of the current user.
Think about how cool this is. If we tried to do this all on-premises, we’d likely be looking at implementing Kerberos constrained delegation and fighting with the directory team in our company to add SPNs for the service endpoints. Instead, we are able to achieve this simply by registering applications with Azure AD and using OAuth2 and Open ID Connect.
Create the Web API Project
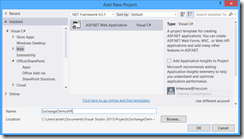
Right-click the solution in Visual Studio and add a new project. Choose “ASP.NET Web Application” and name it “ExchangeDemoAPI”.
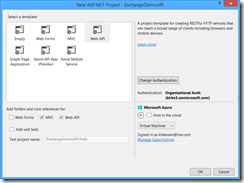
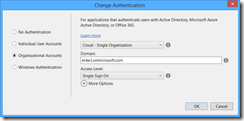
Choose the Web API template, and change the authentication type to “Organizational Account”. Provide the name of your Azure AD tenant, such as “kirke3.onmicrosoft.com”.
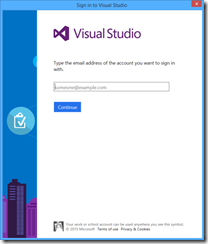
You are prompted to sign in as an administrator in order to register the application in Azure AD.
Note: If you are not an administrator and your tenant administrator has enabled it for your tenant, you can register the app manually as I showed in the post Using OpenID Connect with SharePoint Apps.
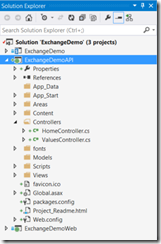
You now have three projects: The SharePoint app, the ASP.NET MVC web project, and a Web API project.
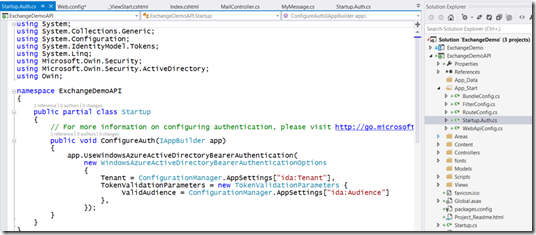
Even better, the tooling took care of the OWIN middleware stuff for us that we had to do by hand for the previous posts.
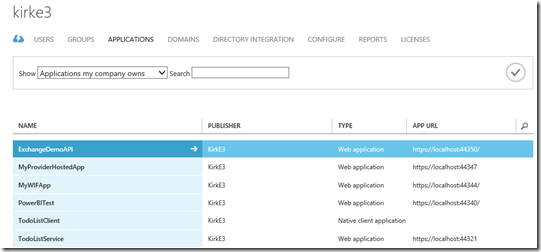
Go to the Azure Management Portal (https://manage.windowsazure.com) and see that a new application was created.
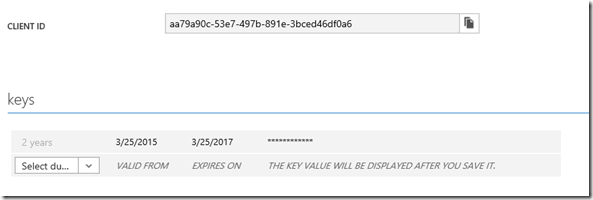
Go to the Configure tab and copy the client ID and create a new key for the application.
Copy those to web.config, providing your own values:
- ida:Tenant – The Azure AD tenant
- ida:Audience – The APP ID URI for your Web API application in Azure AD
- ida:ClientID – The Client ID for your Web API application in Azure AD
- ida:AppKey – The key created above
For example:
Manage Permissions for the Web API
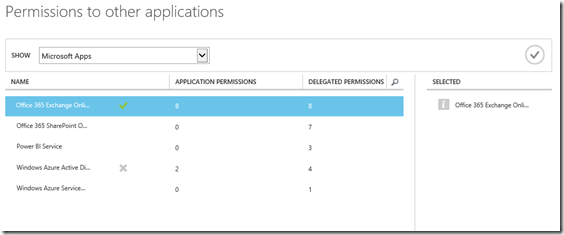
Our Web API is going to call multiple services including the O365 Exchange Online API and the Azure AD Graph API and will do so on behalf of the current user. Go to the Configure tab for the Web API project and scroll to the bottom to see the permissions. Choose Add Application, and in the selection window choose the Office 365 Exchange Online application.
We then go into Delegated Permissions and allow the app to read a user’s email and have full control of a user’s calendar.
Notice that the app already had permission to enable sign-on and read users’ profiles from Azure Active Directory, that permission is granted by default.
Make sure to click Save.
Manage Permission for the Web Application
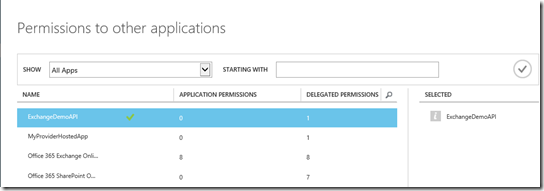
Now that we’ve created the Web API, we need to grant permissions for the ASP.NET MVC web application to call it. In the post Using OpenID Connect with SharePoint Apps, I registered an application named “MyProviderHostedApp”, which is the ASP.NET MVC web application for our solution. We will adjust its permissions, removing the ability to call the O365 Exchange Online API directly, and adding the ability to call our custom Web API.
The application is granted permission to delegate credentials by default without additional configuration. Note that it is possible to add additional permissions for your Web API. You can find documentation for the changes to make to the manifest in the post Adding, Updating, and Removing an Application.
A bit of transparency here: for some reason, the web API was not visible in the “Permission to other applications” dialog. I simply copied the values for the application, deleted it, and created a new application using the same values and then it worked. Maybe a glitch in the matrix…
Now our web application has permission to call the Web API on behalf of the current user, and the Web API has permission to call additional services on behalf of the current user.
Update the Web Application
In our previous post, we made a call to the Graph API in order to obtain an access token. Our web application now only needs permission to the Web API. You can see this around line 61 below.
Startup.Auth.cs
- using ExchangeDemoWeb.Models;
- using ExchangeDemoWeb.Utils;
- using Microsoft.IdentityModel.Clients.ActiveDirectory;
- using Microsoft.Owin.Security;
- using Microsoft.Owin.Security.Cookies;
- using Microsoft.Owin.Security.OpenIdConnect;
- using Owin;
- using System;
- using System.Configuration;
- using System.Globalization;
- using System.IdentityModel.Claims;
- using System.Threading.Tasks;
- using System.Web;
- namespace ExchangeDemoWeb
- {
- public partial class Startup
- {
- public void ConfigureAuth(IAppBuilder app)
- {
- app.SetDefaultSignInAsAuthenticationType(CookieAuthenticationDefaults.AuthenticationType);
- app.UseCookieAuthentication(new CookieAuthenticationOptions
- {
- //Implement our own cookie manager to work around the infinite
- //redirect loop issue
- CookieManager = new SystemWebCookieManager()
- });
- string clientID = ConfigurationManager.AppSettings["ida:ClientID"];
- string aadInstance = ConfigurationManager.AppSettings["ida:AADInstance"];
- string tenant = ConfigurationManager.AppSettings["ida:Tenant"];
- string clientSecret = ConfigurationManager.AppSettings["ida:AppKey"];
- string webAPIResourceID = "https://kirke3.onmicrosoft.com/ExchangeDemoAPI";
- string authority = string.Format(CultureInfo.InvariantCulture, aadInstance, tenant);
- app.UseOpenIdConnectAuthentication(
- new OpenIdConnectAuthenticationOptions
- {
- ClientId = clientID,
- Authority = authority,
- Notifications = new OpenIdConnectAuthenticationNotifications()
- {
- // when an auth code is received...
- AuthorizationCodeReceived = (context) =>
- {
- // get the OpenID Connect code passed from Azure AD on successful auth
- string code = context.Code;
- // create the app credentials & get reference to the user
- ClientCredential creds = new ClientCredential(clientID, clientSecret);
- string signInUserId = context.AuthenticationTicket.Identity.FindFirst(ClaimTypes.NameIdentifier).Value;
- // use the OpenID Connect code to obtain access token & refresh token...
- // save those in a persistent store...
- AuthenticationContext authContext = new AuthenticationContext(authority, new ADALTokenCache(signInUserId));
- // obtain access token for the Web API
- Uri redirectUri = new Uri(HttpContext.Current.Request.Url.GetLeftPart(UriPartial.Path));
- AuthenticationResult authResult = authContext.AcquireTokenByAuthorizationCode(code, redirectUri, creds, webAPIResourceID);
- // successful auth
- return Task.FromResult(0);
- },
- AuthenticationFailed = (context) =>
- {
- context.HandleResponse();
- return Task.FromResult(0);
- }
- }
- });
- }
- }
- }
I added a new entry to point to the URL for our Web API implementation.
The next step is to change the MailController class for the web application to call our Web API, adding the Authorization header.
MailController.cs
- using ExchangeDemoWeb.Models;
- using Microsoft.IdentityModel.Clients.ActiveDirectory;
- using Newtonsoft.Json;
- using System;
- using System.Collections.Generic;
- using System.Configuration;
- using System.Globalization;
- using System.Net.Http;
- using System.Security.Claims;
- using System.Threading.Tasks;
- using System.Web.Mvc;
- namespace ExchangeDemoWeb.Controllers
- {
- [Authorize]
- public class MailController : Controller
- {
- // GET: Mail
- public async Task<ActionResult> Index()
- {
- var myMessages = new List<MyMessage>();
- string clientID = ConfigurationManager.AppSettings["ida:ClientID"];
- string aadInstance = ConfigurationManager.AppSettings["ida:AADInstance"];
- string tenant = ConfigurationManager.AppSettings["ida:Tenant"];
- string clientSecret = ConfigurationManager.AppSettings["ida:AppKey"];
- string webAPIResourceID = "https://kirke3.onmicrosoft.com/ExchangeDemoAPI";
- string webAPIEndpoint = ConfigurationManager.AppSettings["webAPIEndpoint"];
- string authority = string.Format(CultureInfo.InvariantCulture, aadInstance, tenant);
- var signInUserId = ClaimsPrincipal.Current.FindFirst(ClaimTypes.NameIdentifier).Value;
- var userObjectId = ClaimsPrincipal.Current.FindFirst("https://schemas.microsoft.com/identity/claims/objectidentifier").Value;
- try
- {
- var clientCredential = new ClientCredential(clientID, clientSecret);
- AuthenticationContext authContext = new AuthenticationContext(authority, new ADALTokenCache(signInUserId));
- var authResult = await authContext.AcquireTokenAsync(
- webAPIResourceID,
- clientCredential,
- new UserAssertion(userObjectId, UserIdentifierType.UniqueId.ToString()));
- var client = new HttpClient();
- var request = new HttpRequestMessage(HttpMethod.Get, webAPIEndpoint);
- request.Headers.TryAddWithoutValidation("Authorization", authResult.CreateAuthorizationHeader());
- var response = await client.SendAsync(request);
- var responseString = await response.Content.ReadAsStringAsync();
- var responseMessages = JsonConvert.DeserializeObject<IEnumerable<MyMessage>>(responseString);
- myMessages = new List<MyMessage>(responseMessages);
- }
- catch(Exception oops)
- {
- throw oops;
- }
- return View(myMessages);
- }
- }
- }
Update the Web API Project
Add the following NuGet packages to the Web API project:
- Microsoft.IdentityModel.Clients.ActiveDirectory
- EntityFramework
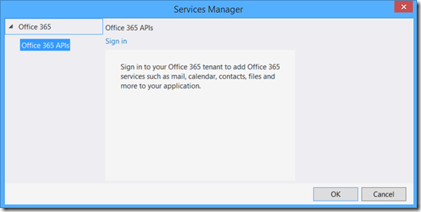
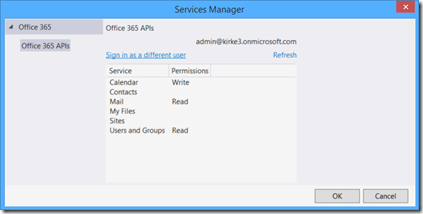
Right-click the Web API project and choose “Add Connected Service”. Log in.
You can verify the permissions that we assigned previously.
When you click OK, the NuGet packages should be added to the project. If not, deselect the permissions, then select them again and the tool will pick up the change.
Just like we did previously, copy the code for the ADALTokenCache and ApplicationDbContext to your Models directory. Add a connection string to your Web.config.
connectionStrings
- <connectionStrings>
- <add name="DefaultConnection"
- connectionString="Data Source=(LocalDB)\v11.0;AttachDbFilename=|DataDirectory|\APIADALTokenCacheDb.mdf;Integrated Security=true"
- providerName="System.Data.SqlClient" />
- </connectionStrings>
Add a new class, “MyMessages”, to the Models folder.
MyMessages
- namespace ExchangeDemoAPI.Models
- {
- public class MyMessage
- {
- public string Subject { get; set; }
- public string From { get; set; }
- }
- }
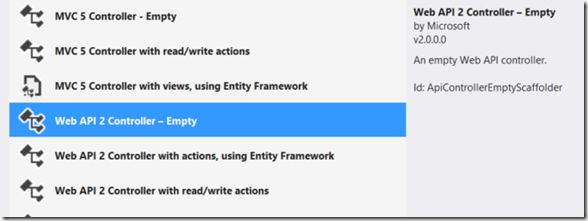
Right-click the Controllers folder and add a new Web API 2.1 Empty controller named MailController.
Replace the code for MailController.cs with the following.
MailController.cs
- using ExchangeDemoAPI.Models;
- using Microsoft.IdentityModel.Clients.ActiveDirectory;
- using Microsoft.Office365.Discovery;
- using Microsoft.Office365.OutlookServices;
- using System;
- using System.Collections.Generic;
- using System.Configuration;
- using System.Globalization;
- using System.Linq;
- using System.Net;
- using System.Net.Http;
- using System.Security.Claims;
- using System.Threading.Tasks;
- using System.Web;
- using System.Web.Http;
- namespace ExchangeDemoAPI.Controllers
- {
- [Authorize]
- public class MailController : ApiController
- {
- public async Task<IHttpActionResult> GetMessages()
- {
- string clientID = ConfigurationManager.AppSettings["ida:ClientID"];
- string aadInstance = ConfigurationManager.AppSettings["ida:AADInstance"];
- string tenant = ConfigurationManager.AppSettings["ida:Tenant"];
- string clientSecret = ConfigurationManager.AppSettings["ida:AppKey"];
- //string graphResourceID = "https://graph.windows.net";
- string discoveryResourceID = "https://api.office.com/discovery/";
- string discoveryServiceEndpointUri = "https://api.office.com/discovery/v1.0/me/";
- string authority = string.Format(CultureInfo.InvariantCulture, aadInstance, tenant);
- List<MyMessage> myMessages = new List<MyMessage>();
- var signInUserId = ClaimsPrincipal.Current.FindFirst(ClaimTypes.NameIdentifier).Value;
- //Get the access token from the request and form a new user assertion
- string authHeader = HttpContext.Current.Request.Headers["Authorization"];
- string userAccessToken = authHeader.Substring(authHeader.LastIndexOf(' ')).Trim();
- UserAssertion userAssertion = new UserAssertion(userAccessToken);
- //Create an authentication context from cache
- AuthenticationContext authContext = new AuthenticationContext(
- authority,
- new ADALTokenCache(signInUserId));
- try
- {
- DiscoveryClient discClient = new DiscoveryClient(new Uri(discoveryServiceEndpointUri),
- async () =>
- {
- //Get an access token to the discovery service asserting the
- //credentials of the caller... this is how we achieve "on behalf of"
- var authResult = await authContext.AcquireTokenAsync(
- discoveryResourceID,
- new ClientCredential(clientID, clientSecret),
- userAssertion);
- return authResult.AccessToken;
- });
- var dcr = await discClient.DiscoverCapabilityAsync("Mail");
- OutlookServicesClient exClient = new OutlookServicesClient(dcr.ServiceEndpointUri,
- async () =>
- {
- //Get an access token to the Messages asserting the
- //credentials of the caller... this is how we achieve "on behalf of"
- var authResult = await authContext.AcquireTokenAsync(
- dcr.ServiceResourceId,
- new ClientCredential(clientID, clientSecret),
- userAssertion);
- return authResult.AccessToken;
- });
- var messagesResult = await exClient.Me.Messages.ExecuteAsync();
- do
- {
- var messages = messagesResult.CurrentPage;
- foreach (var message in messages)
- {
- myMessages.Add(new MyMessage
- {
- Subject = message.Subject,
- From = message.Sender.EmailAddress.Address
- });
- }
- messagesResult = await messagesResult.GetNextPageAsync();
- } while (messagesResult != null);
- }
- catch (AdalException exception)
- {
- throw exception;
- }
- return Ok(myMessages);
- }
- }
- }
Lines 40-42 is the location where we obtain the access token that is sent to the Web API and form a new user assertion. We then pass that user assertion when we request an access token. This is how we call a service on behalf of the calling user. The rest of the code is very straightforward: we call the Discovery Service to discover the Mail capabilities, then call the O365 Exchange Online API endpoint that corresponds to the user’s tenancy to obtain their email messages.
Summary
Now that we have changed the architecture to use a Web API instead of calling the backend services directly, we can implement services within our Web API tier such as additional caching, validation, data augmentation, and data transformation.
This gives us the flexibility to implement logic within the service layer without propagating similar logic to all clients that access our Web API. Our Web API is able to be used by other platforms such as PHP, Java, or Node.js, and can even be called from a single-page application once we enable the implicit grant flow. The next step, then is to implement a few client applications.
The final solution for this post is available on GitHub - https://github.com/kaevans/spapp-webapi-exchange.
For More Information
Using OpenID Connect with SharePoint Apps – authenticating the web application using OpenID Connect
Call O365 Exchange Online API from a SharePoint App – similar to this post, but does not use an interim Web API
Adding, Updating, and Removing an Application – shows the additional settings possible for exposing a Web API to other applications in Azure AD.
WebAPI-OnBehalfOf-DotNet – sample from the Azure AD team showing how to call the Azure AD Graph API from a custom Web API on behalf of the calling user.
https://github.com/kaevans/spapp-webapi-exchange – source code for this post
Comments
Anonymous
March 25, 2015
What is the use of custom API? Why do you make complex code to achieve something silly?Anonymous
March 25, 2015
See blogs.msdn.com/.../an-architecture-for-sharepoint-apps-that-call-other-services.aspx. The use of O365 Exchange Online API was but one example. Your Web API can act as a gateway to integrate securely with many different systems. The point is that you are able to do this on behalf of the current user, and can now expose that same Web API to many different types of clients. Hardly "silly".Anonymous
April 22, 2015
The comment has been removedAnonymous
June 09, 2015
Obvious troll is obvious. NEVER FALL PREY TO THE TROLL. Good article. We have a custom web api too that gets data from a backend SQL database and also makes csom calls into SharePoint (App principal only). We use javascript to make calls into the web api and display info in SharePoint. The same API is also used by our mobile application. We were looking for a way to secure the Web API and this seems like what we need. Thanks.Anonymous
June 29, 2015
Love it. Really cool articles. I like the way you think about architecture on these solutions. Considering the multiple end points one may need to hit, and they not always being Microsoft endpoints in an enterprise, the method of delegating this to a custom api makes a lot of sense. Thanks again.Anonymous
July 27, 2015
Hi Kirk, Good series of posts. I've followed to the letter, the one wrinkle being the WebApI controller are hosted in the same web app - I've setup a dummy application (will look at moving to seperate web app...). Also, I'm using the new Unified API (for Unified Group access/creation) Now, when I call var clientCredential = new ClientCredential(clientID, clientSecret); AuthenticationContext authContext = new AuthenticationContext(authority, new ADALTokenCache(signInUserId)); var authResult = authContext.AcquireToken( <API EndPoint>, clientCredential, new UserAssertion(userObjectId, UserIdentifierType.UniqueId.ToString())); I get the user token back fine. I pass this through to my API which when this code is called, seems to hang (assume some kind of Auth loop going on?) UserAssertion userAssertion = new UserAssertion(TokenForUser); var authResult = await authenticationContext.AcquireTokenAsync( ResourceUrl + "/beta", new ClientCredential(ClientID, ClientSecret), userAssertion); Any troubleshooting advice, burning precious cycles trying to get something which I had assumed would be straight forward working.
