SHA-256 Self Signed Certificate for Windows Server 2012 R2
Recently, I came across this situation where one of my customer wants to use the Self Signed Certificate to secure his intranet websites. But he wants to use the Self Signed Cert with the sha256 Signature Hash algorithm on Windows Server 2012 R2 as sha1 is retired.
By Default, in Windows 2012 R2 (IIS 8.5) if you generate the Self-Signed Certificate from the IIS Manager Console it will provide a Self-Signed Certificate with the Signature hash algorithm as sha1 .
The SHA-1 hashing algorithm for the Microsoft Root Certificate Program is being decommissioned.
https://blogs.msdn.microsoft.com/spses/2014/10/21/sha-1-decommissioning/
If you want your self-signed certificate should use the sha256 Signature hash algorithm, we have to generate the certificate from the mmc console
You can follow below steps to create and use a Self-Signed Certificate with the Signature hash algorithm as sha256.
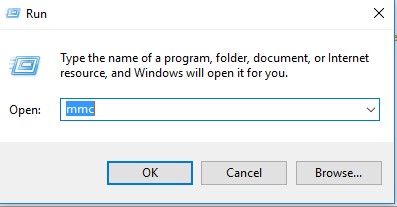
1.Open the mmc console >> go to Run >>>type mmc >>>OK
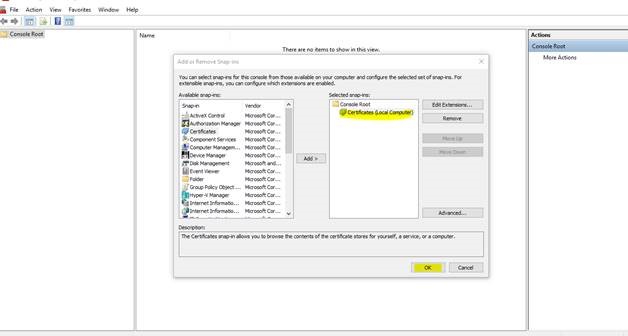
2. You will get the below Window (mmc console). Click on Add/Remove Snap-in 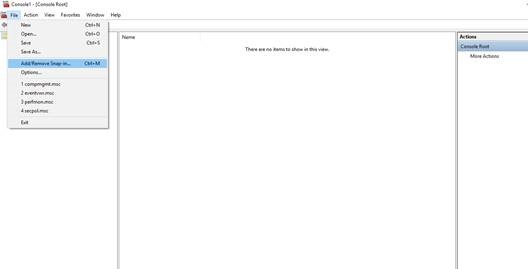
3. Select Certificates >> Add 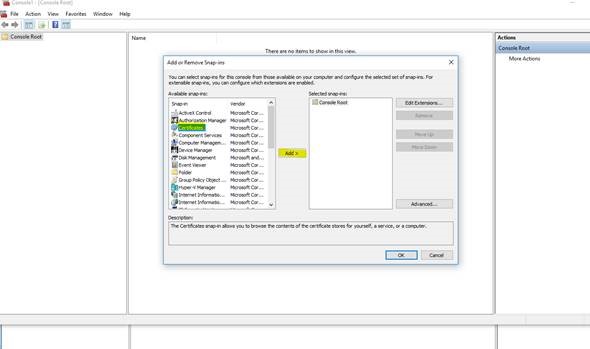
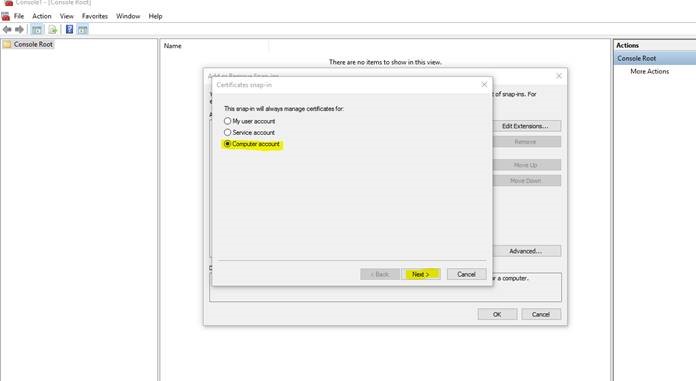
4. Select Computer Account and Click on Next
5.Click on Finish 
6. The Certificates will be added in your snap-in
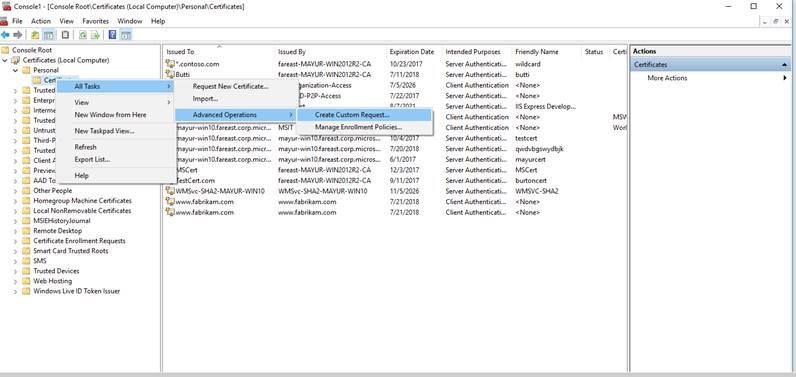
7. Expand Certificates (Local Computer) >>>Personal >>>>>Certificates >>>>>All Tasks>>>>>Advanced Operations>>>>>Create Custom Request
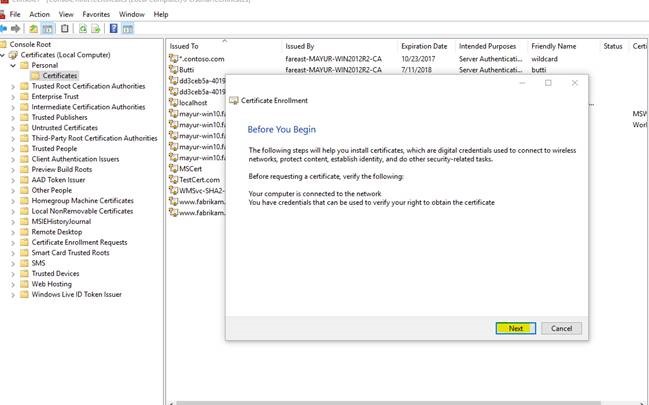
8. Click on Next
9.Select Proceed without enrollment policy>>>>>>>Next 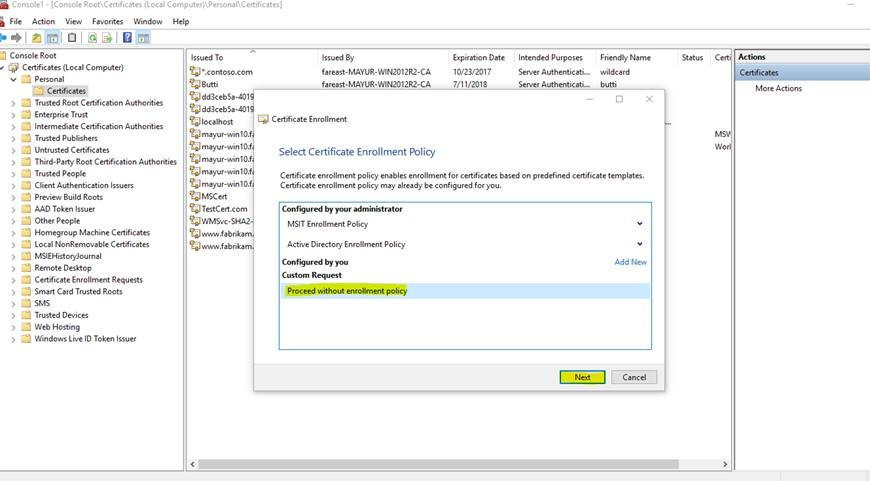
10. Click on Next
11.Click on Details >>>>>Properties >>>>Next
12.Add the Friendly for your certificate as per your choice
13 . Click on Subject >>>>>>Subject Name >>>>Type >>>>>>>Select Common Name ( Common Name should be your host name with which you are browsing your site ) >>>Add Alternative Name >>>>Type >>>>DNS>>>>>Add your DNS (domain name here)>>>>Add
14. Click on Extensions tab>>>>>>>>>>>>>>Extended Key Usage (application policies)
15.Click Basic Constraints >>>>>>>Select Enable this extension
16. Go to Private Key tab>>>>>>>>>>>>>>>>Key Options >>>>>>>>>>>>>Select Make private key exportable
17. Go to Private Key tab>>>>>>>>Select Hash Algorithm >>>>>>>>>>>Hash Algorithm >>>>>>>>>>>>>>>>>sha256(Here you will select the Signature hash algorithm )
18. Click on Apply >>>Ok
19. Click Next
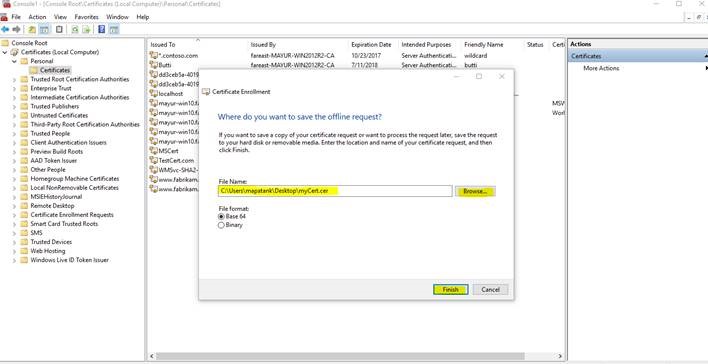
20. Click on Browse and give the certificate with CertName.cer and click on Finish
21. Click on Certificate Enrollment Requests >>>>>>>Right click on Certificates >>>>>>>>>>All Tasks >>>>>>>>>>Import 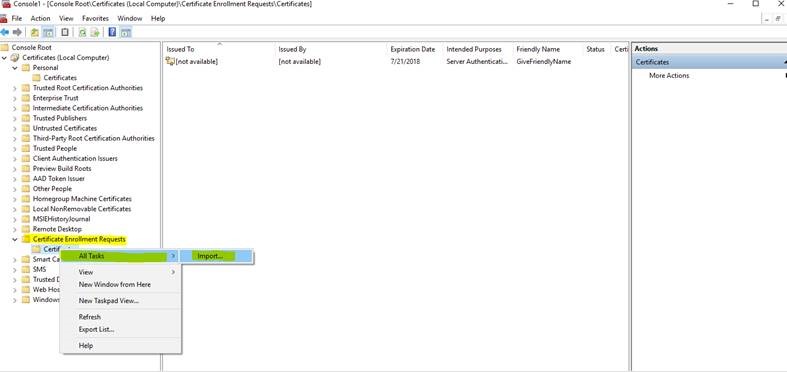
22. Click on Next 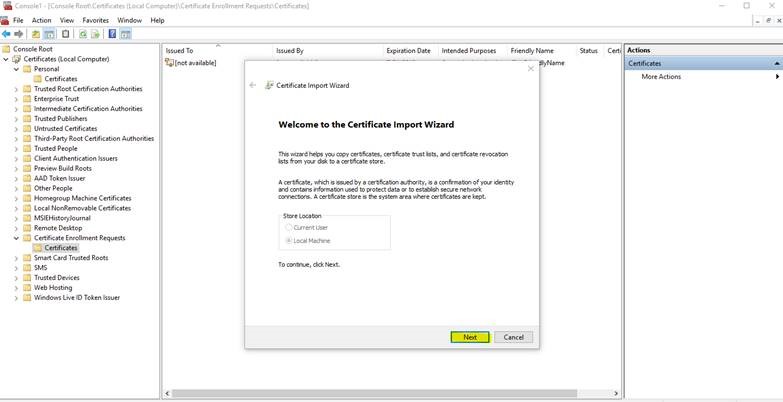
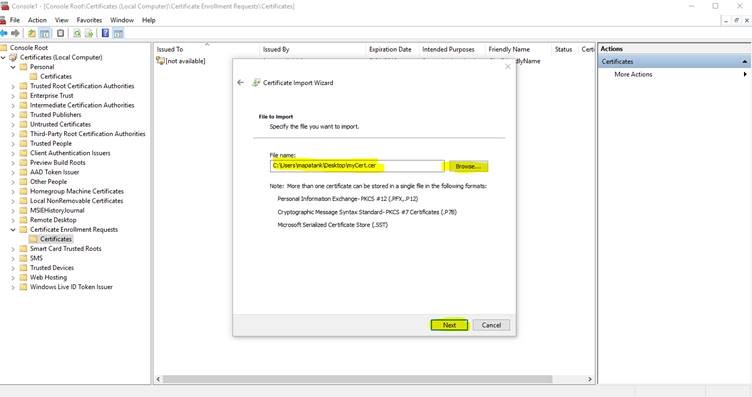
23. Specify the file name and the location
24. Click on Next
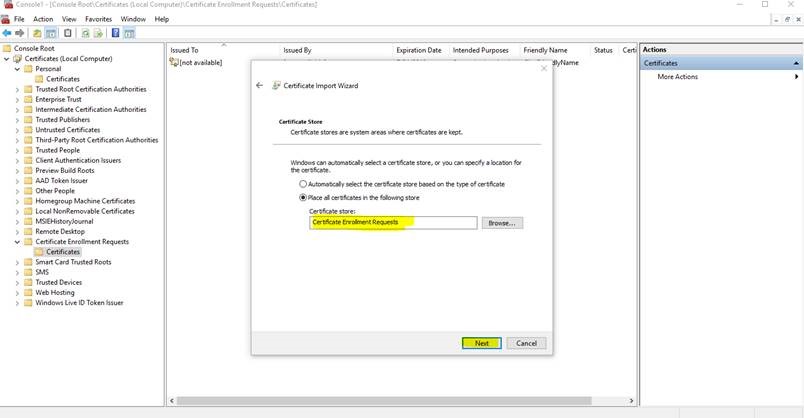
25. Click on Finish 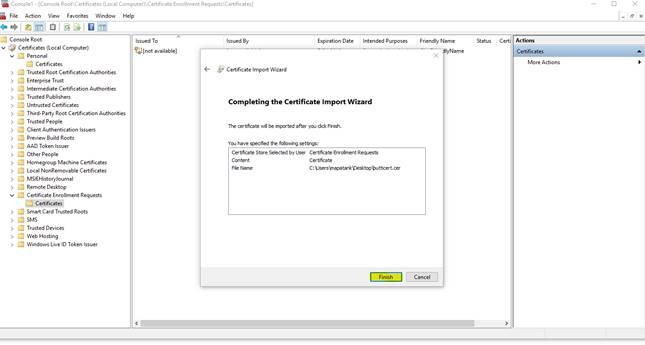
26. Click on OK 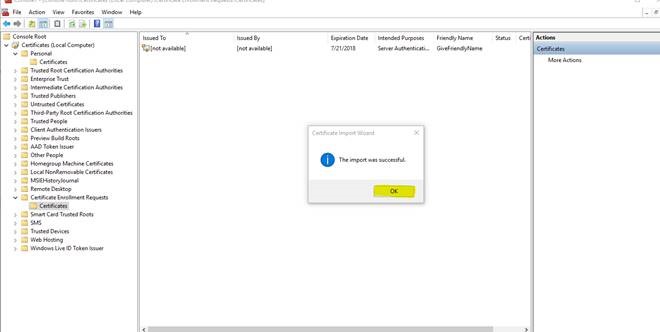
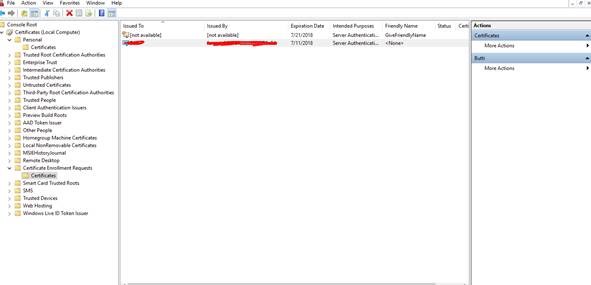
27. You will see your certificate here under Certificate Enrollment Requests >>>>>>> Certificates
28. Double click on the certificate >>go to Details >>>>Click on Copy to File >>>>>>>Next >>>>>>>>Select the Format you want to use >>>give the file name and the import it to the desktop>>>>>>Finish
29. Import the certificate in Personal Store
Now, check the Certificate go to Details tab check for the Signature hash algorithm >>>>it will be sha256
Import the Certificate to the IIS and add the http binding for the site select the cert.
You have to add this certificate on every client machine from where you want to access the site.
On the Client Machines:
Run >>>>>mmc >>>>>file>>>>>>Add/Remove Snap in >>> add the Certificates >>>>>select Computer Account >>>>import the certificate under Trusted Root Certification Authorities
Hope this helps !!!!!..
Comments
- Anonymous
September 01, 2017
Nice Article !- Anonymous
December 24, 2017
Thanks :)
- Anonymous
- Anonymous
September 02, 2017
Very good article!. I have been looking for such article for over an year. Thanks much. Keep writing Mayur!!- Anonymous
December 24, 2017
Thank you !!
- Anonymous
- Anonymous
September 23, 2017
Nice Blog Mayur !! Helped me to resolve similar issue.- Anonymous
December 24, 2017
Thanks !!
- Anonymous
- Anonymous
December 21, 2017
Nice Article Mayur. With the help of your blog we successfully created the certificate. But we could not import it. It is failing at step-23 and getting an error "The file type is not recognizable. select another file"- Anonymous
December 24, 2017
Hey Kiran, could you please refresh the Certificate Enrollment Request Section once you will see your certificate though you are getting that error.please let me know if you are not able to see the cert.
- Anonymous
- Anonymous
December 21, 2017
Nice explanation!! I was able to create the certificate but couldn't import it the way it was mentioned in the steps. I am getting an error while importing it and it says "File Type Not Supported".- Anonymous
December 24, 2017
Hey Sunil, could you please refresh the Certificate Enrollment Request Section once you will see your certificate though you are getting that error.please let me know if you are not able to see the cert.
- Anonymous
- Anonymous
March 26, 2018
I'm trying to follow your steps but I am missing the Certificate Enrollement Request section in my MMC. How do I get that feature?- Anonymous
June 01, 2018
Did you follow step 4, and select "Computer Account", or did you choose the default selection?
- Anonymous
- Anonymous
March 27, 2018
I know this is going to be a pretty basic question but I can't find the answer. If I don't have Certificate Enrollment Requests in the right pane how do I add it? Since I'm missing that I can't proceed further. - Anonymous
April 08, 2018
thank you very much I was getting the error during import but after reading comments section I refreshed it and mashallah it is done. please update the article by adding in the import section (in case of error just refresh it) - Anonymous
June 21, 2018
In Step #20 you say to save it as a ".CER" file. However, the wizard wants to make a ".REQ" (Request) file.Between the REQ step and the CER step, there is a LOT missing.Please assist.- Anonymous
December 06, 2018
Hello Jim,You can either save it as .cer or req
- Anonymous