Creating a WordPress website with Azure
WordPress is a powerful and widely used tool for building and managing websites and blogs. It’s both free and open source, with a huge community of users worldwide. And with Microsoft Azure, you can deploy and configure your own WordPress website in minutes at no cost for students!
Before you get started, have you already activated your free Azure student subscription? There’s no credit card required for students to get this great offer.
Okay, let’s get started!
Log in to Azure
Go to the Azure preview portal:
and sign in with your Microsoft Account.
Create a new website on Azure
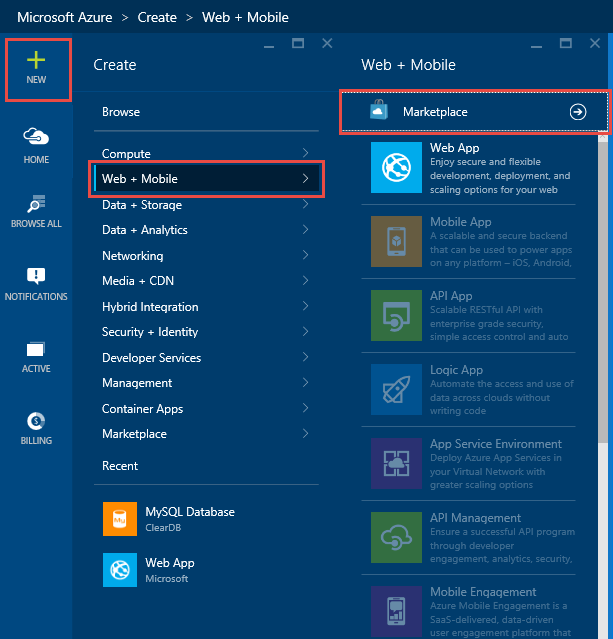
Select +NEW > Web + Mobile > Marketplace from the menu on the left. This allows us to create a new website based on an existing template. We are going to select the WordPress template from the marketplace:
There are multiple WordPress templates, but we want to use the basic one that works with your free Azure subscription. So type WordPress into the search filter to find all the WordPress templates in the MarketPlace, and then select WordPress from the results:
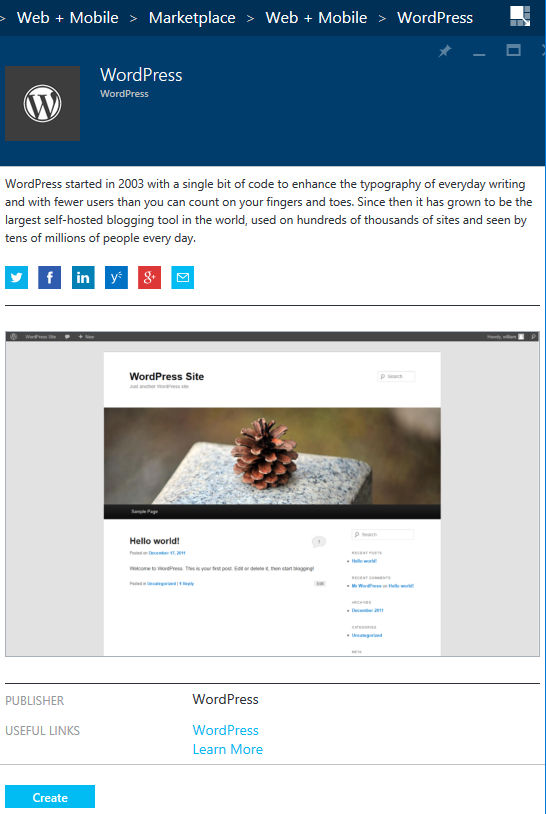
When you select WordPress you will see a description of the website created using this template. Select Create at the bottom of the page to start creating your website:
Enter configuration settings for your website
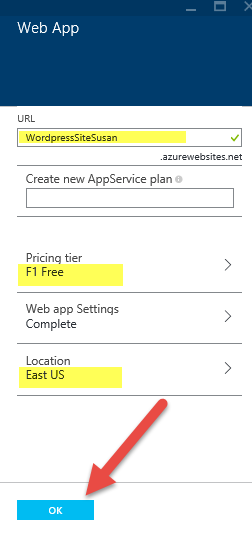
A WordPress blade will open up with several options including Web App, Database, etc. Start by selecting Web app and on the Web App blade enter:
- Web app – specify a URL for your website (ensure you see a green checkbox in the textbox; this indicates you have entered a valid URL that is not already in use by another user. YOU WILL NEED TO REMEMBER THIS URL; this is the address of your new website! The website URL will be yourURL.azurewebsites.net
- AppService Plan – Enter a name for the AppService plan that will be associated with your website
- Pricing Tier – this determines the CPU, memory, availability, features and price of your web app. For now, select a Free tier. You can change it later if you decide you want to switch to a paid version.
- Web app Settings – you can leave these at the default settings
- Location – This is the physical data center where your web site will be hosted. Select a location that is geographically close to you for the best performance.
Select OK when you are finished entering the Web App settings
After you click OK, you’ll be back on the WordPress blade. Now select Database and select New MySQL Database. On the MySQL Database blade enter the following:
- Database – Select the option ‘Create a new MySQL database’ and give your database a name
- Pricing Tier – This determines the maximum size, availability and price of your database. Select a free tier for now. You can change it later if you need more storage
- Location – This is the physical data center where your database will be created. Select the same location as your website for the best performance
- Legal Terms – Open the legal terms and select OK to select the conditions
Select Ok to save your database settings
Now back on the WordPress blade, specify the remaining settings:
- Resource Group – when you create a service on Azure, it may require one or more components, for example when you create your WordPress site you create it with a database. The Resource group is a way of grouping related resources together
- Subscription – This is the subscription to associate with the website. Select DreamSpark, which is the free student Azure subscription
- Pin to Startboard – this creates a tile on your Azure home page that allows you to quickly access your new website
Then click Create to finish this blade:
You will automatically be returned to the Azure home page, where you will see a tile with the message “Creating WordPress”.
After a few minutes, your website will be created and you will see the results summarized:
From the left navbar, select BROWSE ALL and then click Web Apps to see a list of all your web apps.
Select your WordPress web app:
Then click on the URL for your new WordPress site to navigate to your new WordPress website:
Configuring your WordPress website
Because this is your first time visiting your WordPress website, you will now be prompted by WordPress to install WordPress and get it configured.
Select your installation language.
Specify a Site title, username and password to use in WordPress, then select the option to install WordPress.
When you get the message saying WordPress is installed, select Log In.
Use the username and password you just created to log into your new WordPress website so you can start editing the site.
You are now on the WordPress home page where you can start using the WordPress tools to create your website – hosted in Microsoft Azure!
Want to learn more about configuring your first WordPress site? Check out this great guide at WordPress.org.
Posted by Susan Ibach
Technical Evangelist, Microsoft Canada
Comments
Anonymous
August 12, 2015
I will Try that soonAnonymous
August 19, 2015
Great post. Love the step-by-step instructions.Anonymous
August 23, 2015
Is there a tutorial that explains how to edit files of my Wordpress blog hosted by Azure in Visual Studio 2015 Community? i'd like to write a plugin for wordpress and do that with VS 2015CAnonymous
September 02, 2015
It was a lovely post. We would like to see more posts on Azure from you. Yeah I am following your tutorial to make a wordpress site. Thanks to you.Anonymous
September 03, 2015
Thanx for this easy tutorial. The WP version seems to be 3.9, which is a bit outdated. Actual is 4.3. The update runs without any problems. Otherwise a good start for installing wordpress on azure.Anonymous
October 25, 2015
Great guide. Thank you! PS. GUI in Azure which is presented in pictures in this article is out of date. GUI at Azure is changed a little. Whould be great if you could update pictures with right GUI.Anonymous
October 27, 2015
Hello. please I have tried this several times and its saying deployment failed. I did not get any option to choose dreamspark as my subscription plan. I was just on Visual studio Can someone help me outAnonymous
October 31, 2015
It's asking me to sign up even though I've got a dreamspark subscription.Anonymous
November 10, 2015
Deployment failed, what should I do?Anonymous
December 01, 2015
Deployment failed! Could post the log. Tried more than thrice.


