How to use WDS to PxE Boot a Nano Server VHD
If you haven’t already, please refer to the “Getting Started with Nano Server” guide for information on preparing your Nano Server image.
In this blog, I want to share with you how I set up WDS Server on a machine in my office, and was able to PxE-boot (F12 network boot) into Nano Server from a bare metal machine.
Before you start
Before you start, make sure that the machine is *disconnected* from your corporate network (many IT departments will at least frown at you if you set up your own domain & Active Directory – some will completely cut off your network connection J).
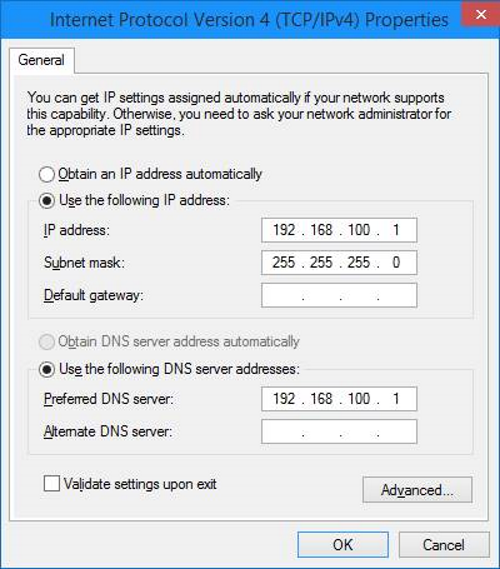
Now, give your machine a static IP v4 address. If you use the network GUI, do something like this:
You may also want to browse through this WDS Getting Started Guide.
Install the Roles
I am running Windows Server 2016 Preview build 10074 (from Microsoft Ignite). Go ahead and install the following roles (I used Server Manager):
Active Directory Domain Services (AD DS)
Go through the wizard and when you’re done, you’ll notice a notification “flag” in Server Manager’s notification menu and choose “Promote this Server to Domain Controller”
Add a new forest and specify a root domain name, such as nanoserver.com
Specify a DSRM password
Go through the wizard and finally press “Install”. This will cause a reboot after a few moments
Install DHCP Server
Add role "DHCP Server" - when done, close the wizard
From Server Manager's notifications (notice the flag), configure DHCP
Use alternate credentials -> NanoServer\Administrator and "Commit" (remember that I chose “NanoServer.com” as my domain)
Configure DHCP (from Server Manager | Tools)
Right-click on the root node “DHCP” and select “Manage Authorized servers” – Authorize this server (if it hasn’t already been authorized)
Right-click on ipv4 - new scope: add an IP address range (192.168.100.11 - 192.168.100.99) for example.
Click Next, choose "No, I will configure these options later", click Next and close the wizard
Right-click on the scope and select "Activate"
Install WDS from Server Manager: Add role Windows Deployment Services
Configure WDS (from the Tools menu in Server Manager):
Using Active Directory
PxE response: Respond to all client computers (known and unknown)
Right-click on “Boot Images” and select “Add Boot Image”. Select boot.wim from the “Sources” folder on your media disk or ISO file. The “Source” folder is on the same root level as the NanoServer folder.
Right-click on “Install Images” and select “Add Install Image”. Select the Nano Server VHD you’ve prepared. Make sure that you’ve added all the packages you need (OEM drivers, … etc.). Also, in your unattend file, use * (star) for your Computer Name, so that the machine gets an automatic computer name. Finally, make sure to use SetupComplete.cmd if you want to display ipconfig on first boot. For more information on Computer Name using *, check out this page on TechNet. For more tricks on SetupComplete.cmd, check out this blog.
Make sure that the WDS service is started in the GUI (as indicated by a “Play” icon next to the server name). If the WDS Service doesn't start from the GUI (the icon shows "Stopped" next to the sever name), use PowerShell's Start-Service WDSServer from an elevated prompt.
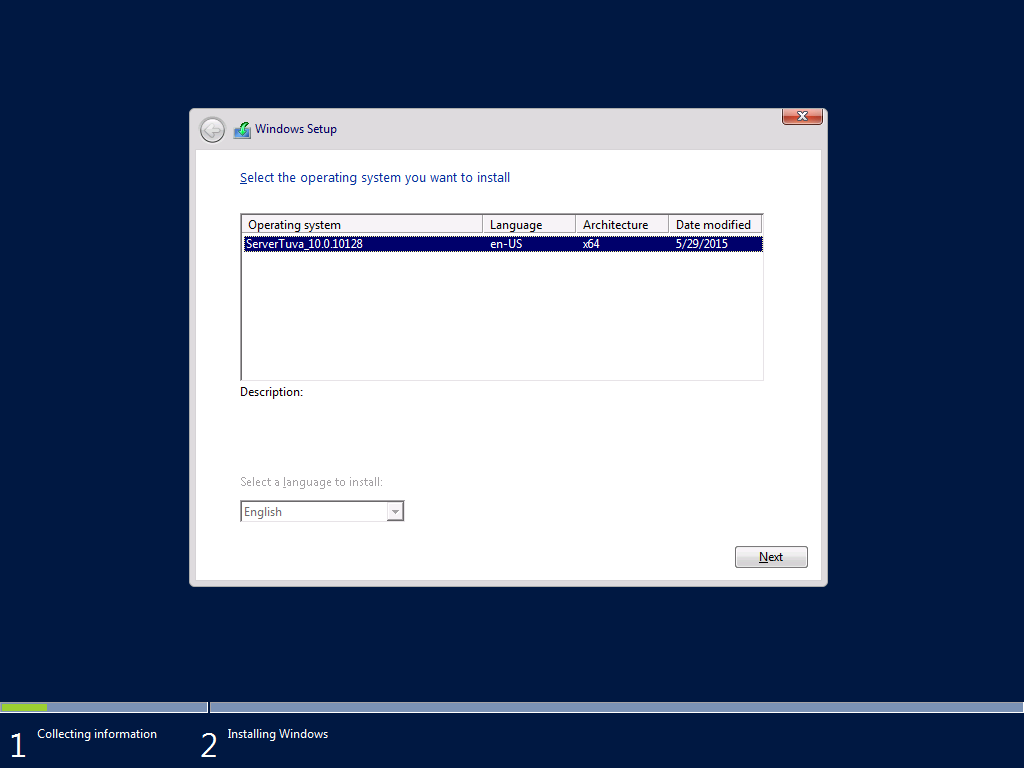
That’s pretty much it. Connect another machine to the same switch, turn it on and press F12 when prompted. Windows PE will install first and then you’ll see the language dialog. Press Next. Then you’ll see the install images: only one in our case, because that’s the only image we added. Once you press Next, you get to choose which partition to install Nano Server to. Then, the image installs in a few seconds.
Of course, instead of uploading just one Nano Server image, you can upload many Nano Server images to have several “flavors” of Nano Server ready to install.
I look forward to your comments and questions.
ref@
Comments
- Anonymous
June 24, 2015
Can this be used to deploy nano server to a VM running on ESXi or a physical server. Have Nano running on hyper-v but struggling to install on a physical or ESXi vm? - Anonymous
June 30, 2015
Still think Nano should be bootable from .Wim/vhd over PXE rather than to WinPE and then install from that... - Anonymous
November 06, 2015
Aujourd'hui j'ai le plaisir d'accueillir Philippe Joubert, développeur sur le noyau commun - Anonymous
November 17, 2015
I will try Physical server 2012 with WDS and VM machine install any windows but Physical -Physical doesn't work WDS. What is my problem? - Anonymous
December 01, 2015
There are several ways to deploy Nano Server to a physical machine:
Dual-boot a Nano Server - Anonymous
January 07, 2016
The comment has been removed - Anonymous
May 12, 2016
would be good to have a PowerShell script to setup a NanoServer (virtual server) as a deployment service for other NanoServer (bare metal or virtual) running infrastructure such as DHCP, BOOTP and WDS- Anonymous
May 13, 2016
Thanks for the feedback, Grahame
- Anonymous