Developing applications for Windows Phone 7 – Hello World in Silverlight
In this article we are going to create a simple “Hello World!” program using Silverlight.
.
Step # 1:
Run “Microsoft Visual Studio 2010 Express for Windows Phone” by clicking its icon from the Start menu (follow: Start > All Programs > Microsoft Visual Studio 2010 Express). Wait for the IDE to load.
.
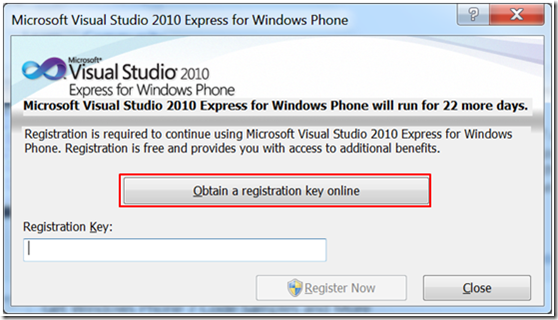
Step # 2: When prompted for a registration key click on the “Obtain a registration key online” button and follow instructions (recommended), alternatively click on the “Close” button to continue using an evaluation version of the IDE.
.
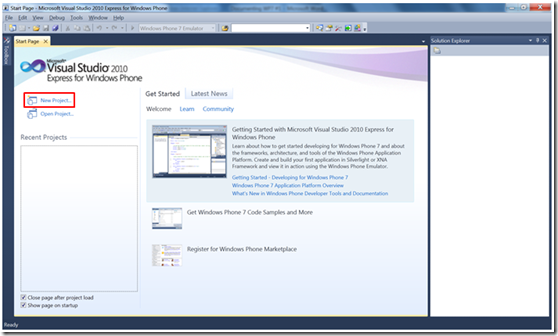
Step # 3: You are now on the Start Page of the IDE.
.
Step # 4: Let’s start by creating a new project, click on the “New Project…” link.
.
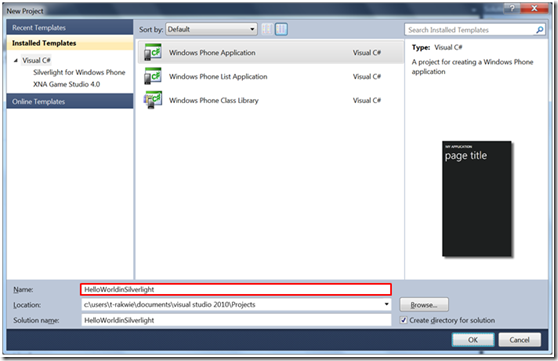
Step # 5: In the next window, make sure the “Visual C#” option in the left-side menu is selected and then choose the “Windows Phone Application” from the list of available project templates.
.
Step # 6: Set the name of the project to be: “HelloWorldinSilverlight” by editing the “Name” textbox. Next, click on the “OK” button.
.
Step # 7: The new project is created and you are presented with the main view of the IDE. By default the screen is divided into three parts: the leftmost is the Design pane (allows you to use the visual editor to generate XAML code for designing the UI), the middle one is the XAML pane (allows you to manually edit the markup code), and the rightmost is the Solution Explorer (which allows you to easily navigate through the project’s files).
.
Step # 8: You are now only one step from trying out your first app for Windows Phone 7 in action – but first let’s change the title under which your application will be displayed in the list of available applications. To do this, locate and double-click the “WMAppManifest. xml” file from the Solution Explorer.
.
Step # 9: In the displayed file contents, locate and edit the shaded part of the code. Change the title of the application to be: “Hello World! :-)”.
.
Step # 10: You are now ready to run your application! Press the F5 button on the keyboard to get started and launch the Windows Phone Emulator; alternatively you can select: “Debug > Start Debugging” from the IDE’s main menu. Wait for the emulator to load up, then you will be presented with the virtual WP7 device’s desktop, followed by your application in action.
.
Did you notice a small floating menu in the upper right corner of the emulator? You can use it to perform the following actions (from the top): exit the emulator, minimise the emulator, change the orientation of the emulator (rotate) to the left, change the orientation of the emulator (rotate) to the right, resume the original size of the emulator, change the settings for the zoom level of the emulator.
.
Step # 11: Now, check how your application is displayed in the list of available applications. To do this you will need to click on the back/exit button in the form of a left arrow. What you will see should correspond to the image shown below.
.
Step # 12: Now it’s time to make some changes to the UI of your application (after all – we are heading towards the goal of this article: displaying a string of text on the screen). We are going to change the default application title & page title of your application. To do this you could either use the visual editor (please refer to the image shown below) by right-clicking the required text block and selecting “Properties” – or edit the XAML markup code manually.
.
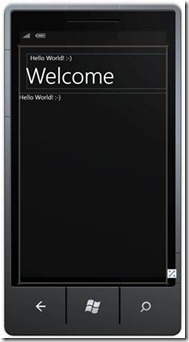
Step # 13: In the XAML pane locate and edit the shaded parts of the code. Change the “ApplicationTitle” to be: “Hello World! :-)” and the “PageTitle” to be “Welcome”.
.
Step # 14: Run the emulator to see the results of the changes.
.
Did you notice that all the changes made to the XAML pane are automatically reflected in the Design pane? Hence you can either use the visual editor or edit the XAML markup code manually to design the UI (please refer to the images shown below). The Toolbox provides an extensive number of Windows Phone Controls to choose from.
For your convenience, at any time – you can easily switch between the Design and XAML panes or swap them in place by using the following toolbar: (usually located in the upper-right area of the Design pane’s scrollbar).
You can also use another toolbar: (usually located in the lower-left area of the Design pane’s scrollbar) to split the view in one of the following modes – Vertical Split, Horizontal Split, or even Collapse Pane.
Consider using the following combination to switch to the Full Screen mode: Shift + Alt + Enter.
.
Step # 15: Let’s now display a string of text on the screen! Having the contents of the “MainPage.xaml” file displayed in the XAML pane, locate the following part of the source code and add the shaded markup. As you can see you can effectively use the “Text” parameter to specify the contents of TextBlocks on the screen.
.
At all times, you can watch the changes as they are being made by using the Design pane (shown below).
.
Step # 16: Run the emulator to see the results of the changes.
.
Step # 17: Now, let’s think about applying some text formatting and producing the result shown below.
.
Step # 18: To do this – in the XAML pane locate the following part of the source code and add the shaded markup. As you can see you can effectively use the “HorizontalAlignment” & “VerticalAlignment” parameters to specify the position of TextBlocks on the screen.
.
Again, you can watch the changes as they are being made by using the Design pane (shown below).
.
Step # 19: It’s time now to use the newly acquired knowledge to display a single, formatted string of text on the screen.
.
Step # 20: In this final step – in the XAML pane locate the following part of the source code and edit it to contain only the shaded markup. As you can see you can effectively use the “FontFamily”, “FontSize”, “FontWeight” & “Foreground” parameters to specify the formatting of TextBlocks on the screen.
.
Congratulations! You have now completed all the activities related to this article.
.
What have we done?
In this tutorial, you have been introduced to creating a simple “Hello World!” program using Silverlight. In the next one – you’ll learn to create the same application but this time using XNA. Please stay tuned! ![]()


