How to - Set up High Trust Apps for SharePoint 2013 & Troubleshooting Tips
SharePointers, I am back !!
This time with my experiences with the ever engrossing SharePoint 2013. Last week I was setting up High Trust Apps that uses the server-to-server (S2S) protocol. This is a Provider Hosted App deployed in a private network which eliminates the need to involve ACS for creating Authentication tokens. In essence an S2S trust represents a trusted connection between a client app running on a local app server and the web servers in the SharePoint farm.
We need to set up the S2S Security token issuer service (STS) to provide access tokens for authentication. The S2S STS creates temporary access tokens signed with your own certificate.
So, lets go ahead and see the steps needed to set up your High Trust Apps. But at the outset, please ensure that you have the below mentioned steps in place to avoid any issues.
Prerequisite Step:
- App Isolation set up : utilize either Configure an environment for apps for SharePoint or Setting up your App domain for SharePoint 2013 via PowerShell to set it up.
- Use non Farm Account (SHAREPOINT\SYSTEM) : instead use a separate Developer Account that will used for App development. Ensure this user has right set of privileges (part of local administrators group on the Developer box, right permissions set on the relevant databases etc.).
- User Profile Service Application set up : shouldn’t be difficult for most folks; anyways you can refer to SharePoint 2013 - User Profile Service Application & Create, edit, or delete User Profile service applications in SharePoint Server 2013 for additional info.
Step 1: Create a Certificate
1. In the development environment you can use a self-signed certificate, but you would need a commercial certificate when you publish your Apps to store. So we will create a self signed one. In the IIS manager, click on Server Certificates.

2. Click on Create Self Signed Certificate

3. Enter some meaningful name like HighTrustCert and Click on Ok.

4. Now we need to export the personal exchange format (.pfx) file. Right Click on the Certificate in IIS click on Export and provide an accessible location. Also enter the password that you want to use and Click on Ok

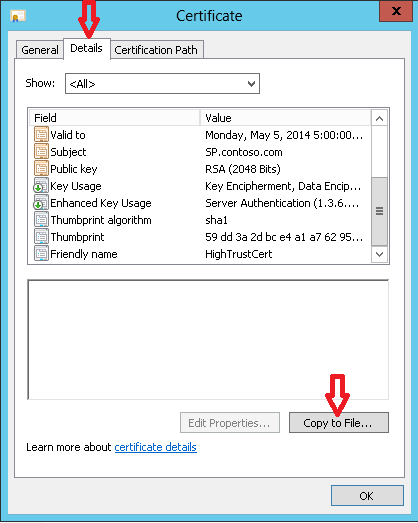
5. Next, double click on the Certificate in IIS. Click on Details tab and click on Copy to File.
6. Now you should see the Certificate Export Wizard (remember earlier we exported the .pfx file). The first screen elucidate the significance of what we are doing. Keep Clicking Next across the three screens. Below screenshots demonstrate the same. I keep all the default options. Just one thing to mark that now we are now exporting the .cer file. I choose the same location. Click on Save.
and finally, click on Finish. You should see you the message “The export was successful”.
7. To verify, go to your Trusted Root Certification Authorities Store and you should see your Certificate there. If you can’t locate it, follow the first 7 steps (only) described at Adding certificates to the Trusted Root Certification Authorities store for a local computer. Remember we just need to confirm our certificate is available or not. If you are here, the battle is half won.


Step 2 : Run Windows PowerShell cmdlets to set up trusted security token service
1. Run SharePoint 2013 Management Shell as administrator. First thing first, you need an Issuer ID. Use the below PowerShell cmdlets to get one. Remember to make note of this, as we will use it later. An important point, it has to be Lowercase only.
[System.Guid]::NewGuid()
2. Run the below PowerShell cmdlets to create trusted security token service.
$issuerID = "29b0ebdd-791b-41c3-b1f7-a4152a1b7a8d"
$publicCertPath = "C:\HighTrustCert.cer"
$certificate = Get-PfxCertificate $publicCertPath
$web = Get-SPWeb "https://sp/sites/DevCenter"
$realm = Get-SPAuthenticationRealm -ServiceContext $web.Site
$fullAppIdentifier = $issuerId + '@' + $realm
New-SPTrustedSecurityTokenIssuer -Name "High Trust App" -Certificate $certificate -RegisteredIssuerName $fullAppIdentifier -IsTrustBroker
iisresetSignificance/additional info of the cmdlets
- issuerID : assigning the GUID generated in the previous step
- publicCertPath : path where I saved my .cer file.
- web : your Developer site URL
- realm : should be the same as your farm ID
- New-SPTrustedSecurityTokenIssuer : Just a tip, when you use the Name parameter it can be helpful to include a readable name, such as “High Trust App” or “Contoso S2S apps” instead of the issuer ID.
- -IsTrustBroker: this flag ensures that you can use the same certificate for other apps as well. If you don’t include this, you might receive “The issuer of the token is not a trusted issuer" error. So we have two possible approaches each having their own pros and cons .i.e. use the same certificate shared by multiple apps Or use a separate certificate for each app. Read additional details at Guidelines for using certificates in high-trust apps for SharePoint 2013
- iisreset : to ensure the Issuer becomes valid, else it takes 24 hours.
3. Additionally you can turn off the https requirements using below PowerShell cmdlets. But ensure to turn it on by changing $true to $false in the second cmdlet below.
$serviceConfig = Get-SPSecurityTokenServiceConfig
$serviceConfig.AllowOAuthOverHttp = $true
$serviceConfig.Update()4. Refer to the screenshot below of for the complete steps:
If you are here, you are almost done

Step 3 : Create a Simple “High Trust” Provider Hosted App using Visual Studio 2012
1. Open Visual Studio 2012, under Office/SharePoint section select App for SharePoint 2013. Enter a name and click OK
2. Select Provider-hosted and don’t forget to Click Next (and not Finish)


3. Then select Use a Certificate and provide the location of your certificate .pfx file. Provide the same password as provided in sub-step 4 under Step 1. The Issuer ID should be same as created above, under sub-step 1 of Step 2. Then Click Finish.

4. The App Solution should be set up with its two projects. Since we don’t intend to do anything extravagant, if you go ahead and Hit F5. After a few seconds you should see the below screen asking whether you ‘Trust’ this App. Click Trust it.
5. And we are done!! You should see the title of your Developer site displayed as shown below. Yay
6. Note that the App is right now hosted on the IIS Express.
Important troubleshooting tips & tricks
Each step above should not take more than 5 minutes each, if there are no issues with your environment. In case you face any issues. then follow the important tips & tricks that I have collated below which I learnt along the way. Big thanks to Kirk Evans[MSFT] for helping me with this.
- Make sure all the Prerequisite Steps listed at the start of the article are in place.
- If you run into 401 unauthorized error when running a high-trust app. Try the steps below:
- Use the PowerShell cmdlet to get the List of all TrustedSecurityTokenIssuer in your Farm
Get-SPTrustedSecurityTokenIssuer | select Name,RegisteredIssuerName | fl
This shows the Name, Registered Issuer Name for all registered security token issuers. I had five of them.
The first one 00000005-0000-0000-c000-000000000000 is for Workflows.
Observe rest of the list, the correct token issuer should be of the format issuerID@Realm if you have a registration in there that’s missing the issuerID or Realm portion of the RegisteredIssuerName, you can see the 401 error.
For us it is 29b0ebdd-791b-41c3-b1f7-a4152a1b7a8d@8165b002-8510-4d2d-b0f7-67b0a716a3f6. The portion before ‘@’ is our ‘issuerID’ and after is the ‘Realm’ (ref to the above screenshot).
The realm should be the same for any issuers that you registered manually, and it should be the same as your farm ID (use the below cmdlet to find that):
Get-SPFarm | select Id
And you can verify the Realm using the below cmdlet
$spurl ="https://sp/sites/DevCenter"
$spsite = Get-SPSite $spurl
$realm = Get-SPAuthenticationRealm -ServiceContext $spsite
Write $realmIf you see a token issuers that is not in correct format, that’s the killer and you must remove that (but don’t dare to remove the one for the workflows
). You can use the below PS to remove any SPTrustedSecurityTokenIssuer. Make sure to supply correct RegisteredIssuerName found above.
Get-SPTrustedSecurityTokenIssuer | ?{$_.RegisteredIssuerName -eq "29b0ebdd-791b-41c3-b1f7-a4152a1b7a8d@8165b002-8510-4d2d-b0f7- 67b0a716a3f6"} | Remove-SPTrustedSecurityTokenIssuer
- You should also double-check that you are using the correct public key portion (the .CER file) for the private key (the .PFX file) that is on your app’s IIS server. It is always worth verifying this step again.
- Then make sure that the issuerID that’s in the RegisteredIssuerName (before the “@” symbol) matches the value that you have in web.config. Open the web.config file of your App’s web project.

- Also navigate to the ‘Site App Permissions’ page and you will see all the App Identifier listed. Notice that your App Identifier is of the structure ClientID@Realm. Verify the clientId in the web.config (above step).;
- Next, use Get-SPTrustedSecurityTokenIssuer and look at the certificate thumbprint for your issuer and compare it with the thumbprint of the certificate you used in PowerShell.
3. I would recommend reviewing these blogs as well:


That was a lot of info, I'm gonna call it a day!
Cheers!
Comments
Anonymous
May 08, 2013
The comment has been removedAnonymous
May 08, 2013
Very informative post. Really helps for those who are extensively working on SP 2013.Anonymous
October 31, 2013
The comment has been removedAnonymous
November 26, 2013
I think this is the best reference for this particular topic.Anonymous
December 01, 2013
Thanks so much Shariq, this really did save me on an environment where it didn't register TrustedSecurityTokenIssuer properly as it didn't have the realm (farm id) after the @ symbol. I thought the trailing @ was weird, but didn't know how to remove and re-add. thanks for the powershell to do this!Anonymous
December 15, 2013
I am getting a 401 error when deploying the application. What's interesting is that when I run the Get-SPTrustedIdentityTokenIssuer, nothing is returned.Anonymous
December 16, 2013
@jp - where I have my IIS ApplicationAnonymous
December 16, 2013
@Tao & Saved my bacon: Thanks guys. Kirk Evans helped me with the PS scriptAnonymous
December 16, 2013
@Hayden Hancock - Are you sure that SPTrustedSecurityTokenIssuer is set up? Loos like you don't have it.Anonymous
January 05, 2014
Really great post, saved a lot of time & effort to get the Provider-hosted app running. Thanks.Anonymous
January 06, 2014
@John - Thanks!!Anonymous
January 09, 2014
Hi Shariq, thanks for such an informative post. Would you recommend something similar for SharePoint 2013 - SharePoint hosted app model.Anonymous
January 31, 2014
I have done the above and can see a site with just text, but if I try to create an app that actually queries the SharePoint web and return the lists in it, I get a 401 error.Anonymous
February 04, 2014
@Craig: looks like you haven't provided relevant permissions in the App Manifest. If you are able to get Title of the Site by default code, then there is no reason why it shouldn't work. Check this msdn.microsoft.com/.../fp142383.aspxAnonymous
April 29, 2014
@Shariq..... Troubleshoot part of this article is priceless..... thank you so much for putting this info out there.Anonymous
September 11, 2014
Nice Article! I have an MVC SharePoint provider hosted app. I can successfully access the Host Web but I get an Unauthorized exception when I access the App Web. Any tips?Anonymous
September 14, 2014
@Amir - Can you share more details around the scenario and error? What are you looking to do in App Web and any associated error messages?Anonymous
October 06, 2014
The comment has been removedAnonymous
November 05, 2014
Hi Friend, I have done same like here. but work only one time. i got error like this : CorrelationId: ec623efd-cbf4-4924-b477-7127017795d5 3> ErrorDetail: The content database on the server is temporarily unavailable. 3> ErrorType: Transient 3> ErrorTypeName: Intermittent 3> ExceptionMessage: Settings or services required to complete this request are not currently available. Try this operation again later. If the problem persists, contact your administrator. 3> Source: AppWeb 3> SourceName: App Web Deployment 3>Error occurred in deployment step 'Install app for SharePoint': Failed to install app for SharePoint. Please see the output window for details. ========== Build: 2 succeeded, 0 failed, 0 up-to-date, 0 skipped ========== ========== Deploy: 0 succeeded, 1 failed, 0 skipped ========== Can you please help me to solve this. Any help will be appreciated.Anonymous
November 08, 2014
The comment has been removedAnonymous
November 12, 2014
@Hayat: Looks like its an issue with App development environment set up itself. Can you check if you are able to debug other apps?Anonymous
November 12, 2014
@DanTheManXX: Thanks man!Anonymous
November 12, 2014
The comment has been removedAnonymous
February 24, 2015
Would you like a help to do the same for the online sharepoint 2013 ? If anyone has any ideas I thank! Email: dursulino@practicar.com.br Skype: denis.ursulinoAnonymous
March 17, 2015
Great Article!!! I really liked the troubleshooting section.Anonymous
March 19, 2015
@Priyank - Thanks a ton :)Anonymous
April 21, 2015
Why we go for CAML in SharePoint Development? <a href="staygreenacademy.com/.../">SharePoint Certification Training</a>Anonymous
November 07, 2015
I am able to get to the "Trust it", clicking it throws "This page can’t be displayed" "Make sure the web address https://localhost:44302 is correct". Do you have any ideas?Anonymous
January 07, 2016
I need your help and I can paid for you to troubleshoot the same issueAnonymous
April 11, 2016
The comment has been removed