Send Welcome Email to New Mailbox / New Users.
*** Updated to include Enable-Mailbox and use PrimarySMTPAddress ***
Take Away:
- There are many ways to send welcome emails in Exchange 2010/2013.
- Using Cmdlet Extension is one of the ways to send welcome email.
- The blog explains how to setup Welcome email thru Cmdlet Extension.
Let’s understand how to configure Exchange Server to send welcome email:
What is Cmdlet Extension Agents?
Cmdlet extension agents are components in Microsoft Exchange Server 2013/Exchange Server 2010 invoked by Exchange 2013/2010 cmdlets when the cmdlets run. Every time an Exchange cmdlet is run, the cmdlet calls the Scripting Agent cmdlet extension agent. When this agent is called, the cmdlet checks whether any scripts are configured to be called by the cmdlet. If a script should be run for a cmdlet, the cmdlet tries to call any APIs defined in the script. Cmdlet extension agents are available on any server role.
For more information on this please refer the link : https://technet.microsoft.com/en-us/library/dd335054.aspx
Caution : |
When you enable the Scripting Agent cmdlet extension agent, the agent is called every time a cmdlet is run on a server running Exchange 2010. This includes not only cmdlets run directly by you in the Exchange Management Shell, but also cmdlets run by Exchange services, the Exchange Management Console (EMC), and the Exchange Control Panel (ECP). We strongly recommend that you test your scripts and any changes you make to the configuration file, before you copy your updated configuration file to your Exchange 2010 servers and enable the Scripting Agent cmdlet extension agent. |
Implementation:
As you got an idea on the Cmdlet Extension Agent, I will go ahead and explain how we can use the feature to generate welcome email for the new mailboxes that we create.
When we create new mailbox in Exchange 2010/2013, new-mailbox command is used (whether it is Exchange Management Shell or Exchange Management Console). You can enhance the behavior of the command by using Cmdlet Extension. It is like triggering a script whenever new-mailbox command is used.
In order to use the feature, we need to,
- Deploy XML file on all the exchange servers.
- Enable “Scripting Agent”.
How to deploy XML files?
On all the exchange servers, the exchange setup copies the file "ScriptingAgentConfig.xml.sample" to <installation path>\Bin\CmdletExtensionAgents\. The file is a kind of sample/template. We can modify the file to meet our requirement or we can make our own XML file. I have detailed the steps to modify the sample file to send welcome email.
Note: The sample XML contains other feature blocks. If you are appending the below steps as it is without making changes to other feature blocks, you may receive unexpected warning while create new mailbox. If you are not using cmdlet-extension sample file for any other purpose/tasks, I would suggest you keep only the Welcome Email Feature block as it is in XML file provided in the attached zip file.
Step #1:
Create a welcome email template in html format that will be sent as welcome email or use the exiting template attached to the blog to suit your requirement. Easiest way to create welcome email template would be, open new message in Outlook, compose the email and save it as HTML.
Step #2:
Make a copy of the existing XML file and rename it to ScriptingAgentConfig.xml. Keep the file in <installation path>\Bin\CmdletExtensionAgents\.
Step #3:
Copy and paste the below script into appropriate location inside the XML file and Save it. It can be inserted between </feature> …. <Feature Name ….> or at the beginning of the XML file (after <Configuration Version=”1.0”>).
# Script to send new email starts here
<Feature Name="Welcome Email" Cmdlets="New-Mailbox,Enable-Mailbox">
<ApiCall Name="OnComplete">
if($succeeded) {
if ($provisioningHandler.TaskName -eq "New-Mailbox") {
# Replace place holder.
$USRdname=$provisioningHandler.UserSpecifiedParameters["Name"]
$tempmsg= [string] (get-content ("c:\welcome\WelcomeMSG.htm"))
$tempmsg = $tempmsg -replace "NewUser00",$USRdname
# Picking Primary SMTP address,saving to $pSMTP to send email.
$Ualias=$provisioningHandler.UserSpecifiedParameters["Alias"]
$pSMTP = (get-mailbox $Ualias | select-object PrimarySMTPAddress | Format-Wide | Out-String ).trim()
}
elseif ($provisioningHandler.TaskName -eq "Enable-Mailbox") {
# Picking Primary SMTP address,saving to $pSMTP to send email.
$eUalias=$provisioningHandler.UserSpecifiedParameters["Alias"]
$dName = (get-mailbox $eUalias | select-object Name | Format-Wide | Out-String ).trim()
$pSMTP = (get-mailbox $eUalias | select-object PrimarySMTPAddress | Format-Wide | Out-String ).trim()
# Replace place holder.
$tempmsg= [string] (get-content ("c:\welcome\WelcomeMSG.htm"))
$tempmsg = $tempmsg -replace "NewUser00",$dName
}
# Please give the correct HUB serve IP address in the following line.
$HUBServer="20.1.1.2"
$EMail =new-object net.mail.mailmessage
$HUBTask = new-object net.mail.smtpclient($HUBServer)
# Email with attachment will be sent from the address given in the following line.
$EMail.From="administrator@exchange2010.com"
# Email with attachment will be sent TO the address given in the following line.
$EMail.To.add($pSMTP)
# Email Subject and Body details are specified in following lines
$EMail.Subject="Welcome to Contoso IT !!!"
$EMail.Body= $tempmsg
$Email.IsBodyHtml = $true
$HUBTask.send($EMail)
}
</ApiCall>
</Feature>
# Script to send new email ends here
Step #4:
Make the necessary changes in the script to suite your environment.
**** Give the path of the template file you created in Step #1. ****
$tempmsg= [string] (get-content ("c:\welcome\WelcomeMSG.htm"))
**** Give your HUB server IP address and Make sure that the HUB server accept connection ****
$HUBServer="10.1.1.2"
**** Give email address from which you want to send welcome message ****
$WelcomeEMail.From=administrator@e2k10.com
**** Change the subject of the welcome message, if you wish ****
$WelcomeEMail.Subject="Welcome to Contoso IT !!!"
What the script does?
When a new mailbox is created either with new-mailbox or enable-mailbox, on its successful completion, the script will be called. The script works along with email template available in "c:\welcome\WelcomeMSG.htm". It can be modified to meet your requirement.
To start with,
It checks whether new-mailbox or enable-mailbox command is used. If new-mailbox is used, Name parameter value will be stored in variable $USRDname.In addition, we also store the primaySMTPAddress to the variable $pSMTP. When enable-mailbox is used, Alias value will be stored in $eUalias instead of Name. As we need to send email, we use get-mailbox command to retrieve name,primarySMTPAddress and store those in $dName,$pSMTP variables.
Then it reads the content of template "c:\welcome\WelcomeMSG.htm" and stores in the variable $tempmsg. As the template is set with place holder "NewUser00", the script uses “-replace” to update the place holder “NewUser00” with the display name.
Later we create new message object and SMTP client object to send out email. Before we send the email, we compose the email with From address, To address, Subject and Body.
Welcome Email Template with Place Holder:
I have created template as shown in the Picture #1. The template is with place holder “NewUser00”. This will be replaced with display name when the email is sent (as shown in Picture #2).
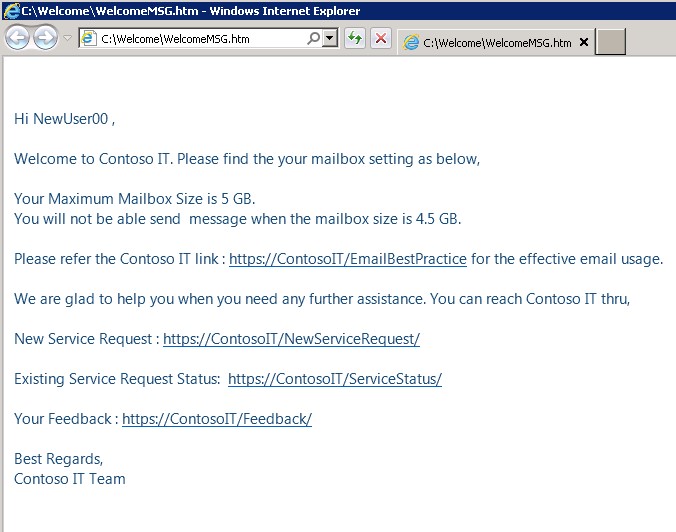
Picture 1
Welcome Email after place holder replacement:
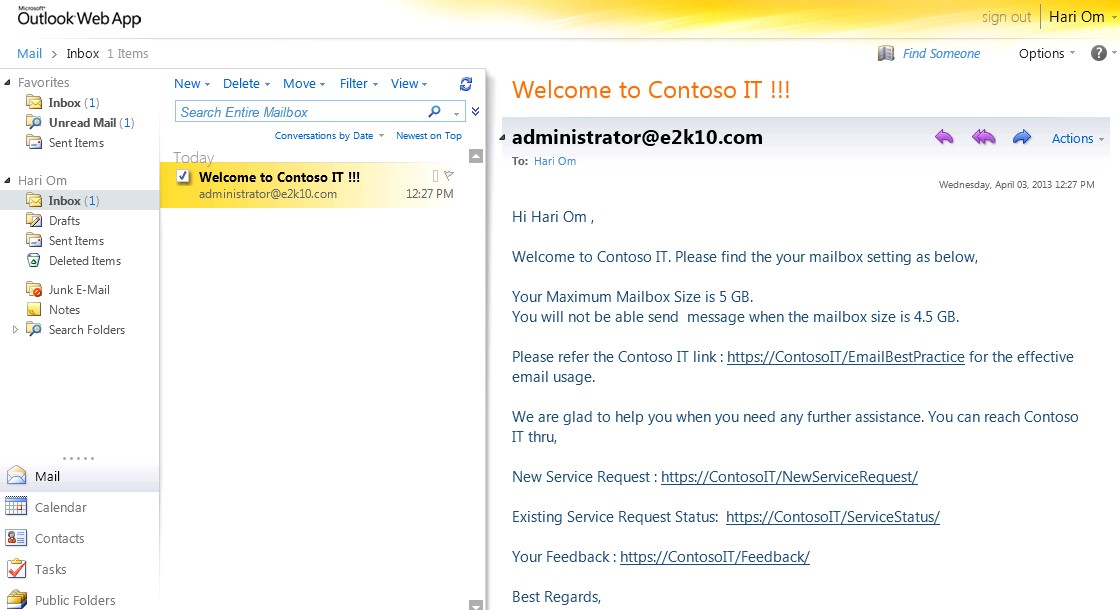
Picture 2
How to manage/enable Cmdlet Extension Agent?
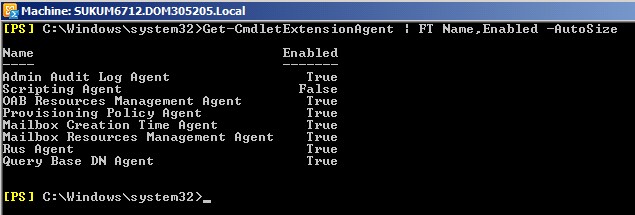
After the XML file updated with script, you need to enable the agent to call the XML file and the script whenever new-mailbox used. You can view the agent status by running the command: Get-CmdletExtensionAgent | FT Name,Enabled
By default,“Scripting Agent” is disabled. You can enable it using the command,
Enable-CmdletExtensionAgent "Scripting Agent"

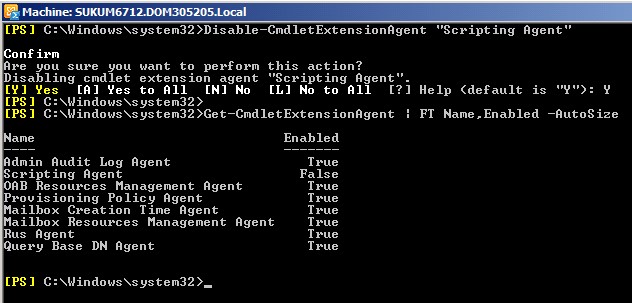
When you wanted to disable the “Scripting Agent” , run the command ,
Disable-CmdletExtensionAgent "Scripting Agent"
Enabling or disabling CmdletExtension does not require restart of the server or exchange services in a normal scenario. It is a global command and applicable to all the exchange servers in the organization. So you have to update the XML file on all the exchange servers. If the XML files is not updated on any of the exchange server and you run any non-Get cmdlets, the cmdlet will fail.
For More Information on managing Cmdlet Extension, please refer the link : https://technet.microsoft.com/en-us/library/dd298143.aspx
Test:
As both script and agent are in place, you can create new mailbox using EMC or EMS and check how it works. You may notice that the mailbox creation is taking little bit longer than it used to. That’s because the additional activities are done along with new-mailbox.
Related articles :
https://technet.microsoft.com/en-in/library/dd297951(v=exchg.141).aspx
https://technet.microsoft.com/en-in/library/dd335067(v=exchg.141).aspx
https://technet.microsoft.com/en-us/library/dd298143(v=exchg.141).aspx
Comments
Anonymous
January 01, 2003
The html file can be any where on the exchange server, but make sure that the location his updated in $tempmsg= [string] (get-content ("c:welcomeWelcomeMSG.htm")). If the files are in place and still is not working, please check, whether you have enabled Scripting Agent agent by running the command : Get-CmdletExtensionAgent | FT Name,Enabled.Anonymous
January 01, 2003
SUKUM-MSFT. Hi Sen, Yes. You can use cmdlet extension to email when you use set/add commands including the command that you will run in your example. The Scripting agent cmdlet extension agent isn't invoked when cmdlets with the Get verb are run. Refer the link for details - technet.microsoft.com/.../dd335054(v=exchg.150).aspx.Anonymous
January 01, 2003
How could i put in Username and email adress in the welcome mail. ??Anonymous
January 01, 2003
You can use all the variables that you are giving/entering at the time of mailbox creation to identify the new mailbox. The email id formation should be based on the format that you use. I hope I could answer your query, Variables.Anonymous
April 16, 2013
What the list of all "variables" to use, for example: SamAccountNameAnonymous
April 16, 2013
I can't get this to work on my exchange 2010 server. Do all the files in the WelcomeMSG.zip go into the c:welcome folder ? Is there away to test after making all the changes?Anonymous
June 18, 2013
Do I need to make this change on all Exchange Servers to get this work?Anonymous
July 14, 2013
I'm sorry for the delayed response. Yes. You have to make the change on all the exchange 2010 servers as the agent enabling is global settings. I hope I could answer your questionsAnonymous
July 17, 2013
Is there any way, it could be customized to send a welcome email to a user, when he/she is granted with Full access permission over a shared mailbox? To clarify, when user A is granted with full access permission over SharedMBX1, an acknowledgement/welcome email has to be sent to UserA summarizing the permission. Like how it happens when a user is granted with delegate permissions in outlook. Hope I was able to spread my idea! Any comment would be appreciated.Anonymous
July 30, 2013
The comment has been removedAnonymous
August 06, 2013
I've got the same thing like alex said. Did you solved you problem? One more question, I'm creating users in AD UC, after that I'm enabling-mailbox over EMC. I was trying to modify this script, make another one: <Feature Name="WelcomeEmail_new" Cmdlets="enable-mailbox"> <ApiCall Name="OnComplete"> if($succeeded) { blah blah blah.. } But it won't work. What did I wrong?Anonymous
August 07, 2013
The comment has been removedAnonymous
August 08, 2013
Hi! Your second script works for me. Thank you. That's what i need.Anonymous
August 09, 2013
Hi, alex. It's working only when user created from EMC (new-mailbox command), if you create user in AD UC and then enable mailbox for it, this script will give you an error ;(( can't make it work!Anonymous
September 03, 2013
I think I solved the problem with "Enable-Mailbox" in my article. Try this: itnuts.wordpress.com/.../exchange-2010-automatic-welcome-message-for-a-new-userAnonymous
September 04, 2013
Thanks Andrey, worked for me! Just made some changes in the script and enable-mailbox started to work like it should be!Anonymous
October 18, 2013
Hi Albert What changes have you made? I tried the script, but no luckAnonymous
November 21, 2013
This is absolutely brilliant. Well-written, to the point. Worked in first go. Thank you!Anonymous
December 10, 2013
Hi Team, Can anyone provide us script where we have created user through AD UC mode. Thanks in Adv.Anonymous
February 10, 2014
The comment has been removedAnonymous
February 11, 2014
Also...Pls let me know how to use this script for MailEnabled users...