Using Smart Cards in Windows Virtual PC
Smart cards are routinely used in many organizations for login, digital signing, encrypting data or even accessing some applications. A key reason why you may need to use a smartcard reader in a Virtual Machine (VM) on Windows® 7 is application compatibility. For example, if you have a web-based application which requires Internet Explorer® 6, you may use it in Windows XP Mode and login to that application using a smartcard reader. You can use smartcards in any VM created using Windows Virtual PC (WVPC) on Windows 7, just as you use smartcards on Windows 7. There are many types of USB smartcards in use, made by different vendors. Each such device comes with its own device driver software, which needs to be installed in the OS on which the smartcard reader is being used. Smart Cards can be shared between the host OS (Windows 7) and the VM, or can be assigned exclusively to VMs. In this article, we will go over the use of smartcards in WVPC.
Assigning Smart Cards to the VM
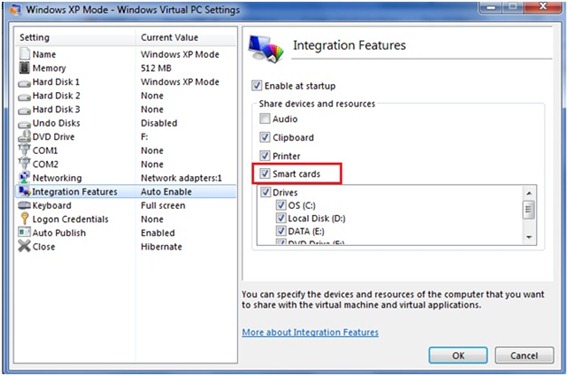
Smart cards are shared between the host and the VM by default when Integration Features (IFs) are installed in the VM. You can disable this setting by unchecking the ‘Smartcards’ check-box in the Settings of the VM under ‘Integration features’ as below (Figure 1). Then, the smartcard cannot be used in the VM until the setting is enabled again.
Figure 1: Settings for Smart Card Sharing
In Integration Features enabled mode of WVPC, Microsoft’s Remote desktops Protocol (RDP) is used to share the devices between the VM and Windows 7 host, as explained in an earlier article. RDP does not allow the use of a smart card when explicitly assigned to the Virtual Machine. Further details about this can be found in https://www.microsoft.com/downloads/details.aspx?FamilyID=ac201438-3317-44d3-9638-07625fe397b9&displaylang=en. Accordingly, the option to assign a smart card is disabled in USB Toolbar or Manage USB Devices as shown below (Fig. 2).
Figure 2: Smart Card Sharing is disabled in Integration Features enabled mode
USB Smart card readers can be exclusively assigned to a Virtual machine in IF disabled mode only. Smart cards drivers need to be installed in Windows 7 as well as the Virtual machine to get smart cards working in shared mode. To install smart card drivers or to assign a smartcard exclusively to the VM, user needs to follow the below steps:
- Disable Integration Features (IF) by going to Virtual Machine Toolbar and then selecting Disable Integration features under Tools option as shown below (Fig. 3):
Figure 3: Disabling Integration Features
2. Assign the smart card to the VM using USB menu present in the VM toolbar (Fig. 4):
Figure 4: Assigning USB Smart Card Reader in Integration Features Disabled Mode
3. Install the required drivers in the VM. For example, go to Device Manager, select the device and use “Update Driver Software” and then provide the required drivers.
4. Release the device using USB menu same as above in Step 2.
5. Enable IFs again using the toolbar and then use the smart card.
Smart Card Scenarios:
Two common scenarios requiring the use of a smart card in an organization are login to a VM and connecting to an office network from a VM.
Using Smart card for login to a VM
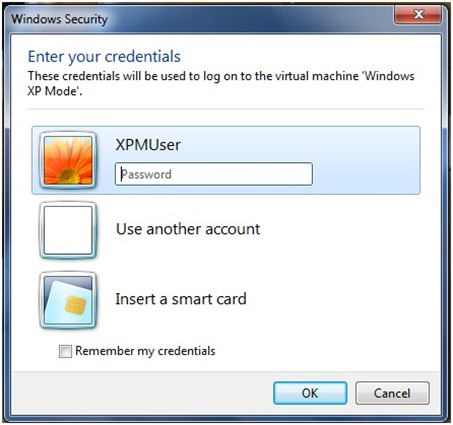
In an organization where users are required to login to a VM, they can join the VM to the domain and use smart cards to login. During the VM startup, when the user is prompted to enter user credentials, they can enter smart card credentials (Figure 5).
Figure 5: Credential UI prompt
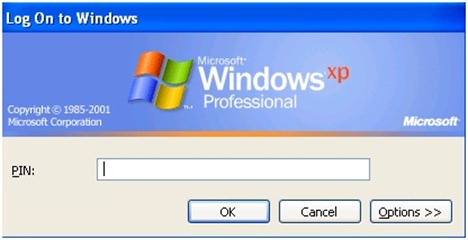
On providing their credentials, user needs to re-enter the same in Windows XP Mode VM as below (Figure 6).
Figure 6: Re-Enter PIN in the Virtual Machine
When the user is logging in to Windows XP Mode, s/he is actually establishing a ‘remote’ session between the Windows 7 ‘client’ and the ‘Windows XP Mode’ RDP ‘server’, as explained in an earlier blog. The second prompt is required to authenticate the RDP session. Smart card credentials are secure and hence cannot be saved for subsequent logins. As such, the user needs to provide smart card credentials each time he/she logs on to the VM.
Logging in to a virtual application running in Windows XP Mode works the same way as above, when you launch a virtual application which requires authentication using a smartcard.
Secure Mode Login
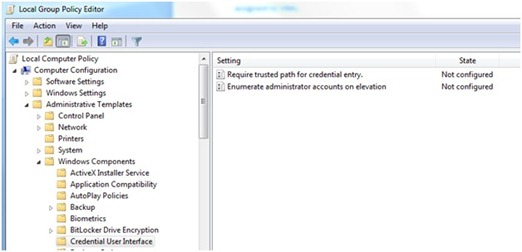
Windows 7 provides an option to enable secure mode login for the machines. The advantage of this policy setting is that it requires the user to enter Microsoft Windows credentials using a trusted path, to prevent a Trojan horse or other types of malicious code from stealing the user’s Windows credentials. WVPC uses this setting to honor the same when the users log on to a VM as well. The Credential UI prompt (shown in Fig. 1) is not shown when this setting is enabled. To enable this setting, open ‘Group Policy editor’ in Windows 7. The setting (Figure 7) is called “Require trusted path for credential entry” present in the Local Group Policy editor under Computer Configuration -> Administrative Templates -> Windows Components -> Credential User Interface.
Figure 7: Group Policy option for Secure Mode Login
Enabling this setting will ask for the Credentials inside the VM login screen only. Also, the setting is applied across all the VMs on the machine and the remote desktop connection to any other machine as well.
Login in Offline Scenario
Please note that this section is relevant only if you create your own VM with your own copy of an Operating System other than Windows XP®.
In offline scenarios, such as working from home or a remote location without network connectivity, a domain controller (server) to authenticate the credentials is not available because the user cannot access the Corpnet. In such cases, smart card credentials are stored in local cache of Windows Vista or Windows 7, if the machine was used at least once prior to the offline (remote) use. If not, the user cannot login using a smart card. To login to a Windows Vista or Windows 7 VM in such scenarios, either the secure mode needs to be enabled (as above) or the user needs to enable a VMC setting tag (Do_Not_Prompt_Creds) for the VM as shown below. Enabling this setting will bypass Credentials UI prompt and directly take the user to the VM login screen.
The setting is present under the ui_options within the virtual machine configuration file (.vmc file, which can be found under %LocalAppData%l\Microsoft\Windows Virtual PC\Virtual Machines\), as a boolean value. Setting it to ‘true’ will enable the setting, as below:
 <ui_options>
        <do_not_prompt_creds type="boolean">true</do_not_prompt_creds>
</ui_options>
This setting is not created by default and there is no direct User Interface to set it. The user needs to make a COM call to enable/disable this setting, as below. This is a per VM setting, which means it needs to be set in every VM separately. Please note that a VM running Windows XP as the guest OS, such as the Windows XP Mode, does not have this issue, by design.
An example script to enable this setting is shown below:
 ' Get the VPC Object
Set objVPC = CreateObject("VirtualPC.Application")

' Get the Virtual Machine Object
' Change the Name as appropriate
Set objVM = objVPC.FindVirtualMachine("VMNAME")

' Enable the setting
objVM.SetConfigurationValue "ui_options/do_not_prompt_creds", true
Similarly, another example script to disable this setting is shown below:
 ' Get the VPC Object
Set objVPC = CreateObject("VirtualPC.Application")

' Get the Virtual Machine Object
' Change the Name as appropriate
Set objVM = objVPC.FindVirtualMachine("VMNAME")

' Disable the setting
objVM.SetConfigurationValue "ui_options/do_not_prompt_creds", false
While connecting to the Corpnet from home, Virtual Private Network (VPN) typically is used, to access the corp resources. In this case, if you need to exclusively assign the smartcard to the VM, it is recommended that you use the Bridged mode of networking only. Using NAT (shared networking) configuration for VPN access would not work in WVPC.
Hot fixes for Using Smart Card in a VM
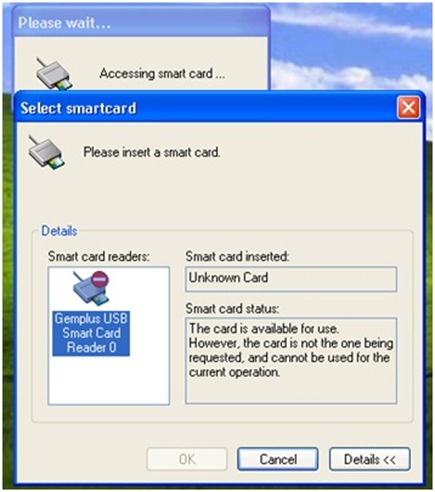
Base Smart Card Cryptographic Service Provider (Base CSP) allows smart card vendors to more easily enable their smart cards on Windows with a lightweight proprietary card module instead of a full proprietary CSP. The user sees a warning message if it is not installed in some scenarios as shown below (Figure 8):
Figure 8: Smart Card Error
To overcome this, install the base CSP applicable for Windows XP from https://www.microsoft.com/downloads/details.aspx?FamilyID=e8095fd5-c7e5-4bee-9577-2ea6b45b41c6&displaylang=en
Conclusion
Using smart cards with VMs can be done by just making sure that appropriate drivers-hotfixes are installed in the Virtual Machine. Smartcards can be used for login to the VM or virtual applications in Windows XP Mode, and VPN access to the corporate network. We hope this information is useful to you. Check out Windows XP Mode RTM Build today, and let us know what you think, either via the comments section here, or sharing your feedback on the WVPC and Windows XP Mode Forum on Technet here.
Technorati Tags: Windows 7,Windows Virtual PC,Windows XP Mode,Application Compatibility,Windows Upgrade,VPC,VHD,VM,Virtual Machine,Virtualization,Smartcard
Rahul Rajwanshi
SDET
Microsoft Virtualization Team
Comments
Anonymous
January 01, 2003
Thanks, this is really useful info. I was wondering why my USB smart card reader wasn't showing up in XPM! I'm trying to get some old e-banking software running. It uses a special card that isn't support on Win7 so hopefully I'll have some luck in XPMAnonymous
May 11, 2010
Thanks for the great article. Do you happen to know if there is a way to keep the Smart Card reader connected to XPM when focus is taken off of XPM? I am using VPN software in XPM that needs the smart card reader present at all times; however when I go back to my host machine it disconnects the Smart Card reader from XPM and gives it back to Windows 7(the host)Anonymous
June 07, 2011
Thanks for the help - I am a bit further along now: at least I can select the device. But when I select it I get an error: "Could not attach the USB device. You can attach the USB device to a different USB port or restart the virtual machine and try again" I have tried these things and they don't work. The reader I have is Gemalto PC USB-TR My host is Win 7, guest is XP. Any help would be greatly appreciated.Anonymous
January 24, 2012
I have the same exact issue as TScott. I found this article and had hoped it would resolve my issue, but I cannot get the card reader to attach when I.F. are disabled, same error message TScott gets. Reader is OMNIKEY 3021, device manager in the host OS says "Gemalto Minidriver for .NET Smart Card" for the smart-card itself. Host is Windows 7 Ultimate x64, guest is Windows 7 Enterprise x86 I am hoping now that this article, contrary to all appearances, has not in fact been abandoned.Anonymous
January 25, 2012
Update: After several tries, with a variety of unknown intervening steps over most of a workday (i.e. I continued to use the host OS for a variety of other purposes, with unknown effect on the VM guest), the guest OS eventually did allow the USB card reader to be attached. I have no idea what changed to allow that to happen rather than getting the "Could not attach..." error message. But it seems that in at least one case, the error can in fact be resolved. Maybe there's a minimum number of restarts of the guest OS, or perhaps some precise sequence of restart/enable/disable/attach/etc. that must be followed (not that I'm aware of any difference in the way I followed those steps, but that doesn't mean there wasn't one).Anonymous
January 25, 2012
Update: I have been directed to another blog article that provides, in addition to the solution suggested above, an alternate solution to download and install the necessary drivers in the guest OS directly: blogs.msdn.com/.../connecting-a-smart-card-to-a-windows-7-virtual-machine.aspx I don't have any first-hand experience with it, since in my own case the technique described in this article spontaneously worked after all the failures. But I offer it here in case it helps someone else.Anonymous
July 14, 2015
Military Millionaire Review: Military Millionaire software was created by famous forex guru Stan and it was established to make the task of binary options trading easier. Stan has been improving the software so that it can provide the highest success rate for inbound pupils of the software program. Baseding on Stan "the software application is boasting a success proportion that is unmatched in comparison to any other tool on the market, and it's all thanks to the exclusive formula behind my advanced software application
Read our full Military Millionaire Review:
http://eriecdp.org/military-millionaire-review-does-the-software-work/
