WCF, IIS, and SSL
Overview
It’s become apparent to me of late that the concept of using SSL with WCF in IIS can be confusing even to some of the most experienced WCF programmers. The motivation behind this article is to try and clear the air around SSL and provide an implementation that can be applied by a novice or expert. We will start by creating a certificate for SSL and then attach that certificate to our website. We will then create a WCF service using one of the HTTP Bindings that uses SSL for transport security. Also, I will walk you through the process of exposing metadata over SSL which can be used by clients to generate a proxy to consume our WCF service using a client certificate for authentication.
What is SSL?
The definition for SSL is Secure Socket Layer. This means that IIS can facilitate a secure channel for communication over the internet/intranet between two parties. When SSL is required, the two parties will become involved in a negotiation process which will result in a secure channel being established for communication. It is not the purpose of this article to delve into SSL negotiation. For more information, go here. When related to WCF, this is known as transport security and can be applied to most bindings. Today, we will use wsHttpBinding as an example.
Why use Transport Security rather than Message Security?
The best mode of security for your service will depend on the environment your service lives in. If for example you have intermediaries between your service and client that route messages around your network, you may consider implementing message security. Message security ensures end to end encryption of your messages and is not affected by nodes in between the service and client. On the other hand, if your service is in an environment where messages are not molested by intermediaries, then transport security may be for you. Read this article for clarification; Transport and Message Security and this article regarding WCF intermediaries.
Creating the Certificates
There are many examples kicking around the internet that show how to generate certificates for your website. In fact, IIS Manager provides a facility through which you can create self-signed certificates. Upon applying this certificate and navigating to the https address on your site, you will be presented with the following screen in Figure 1.
**
Figure 1:**Certificate Error page displayed when a certificate cannot be verified
The issue here is that your browser cannot confirm that the certificate was issued by a Trusted Certificate Authority and therefore it tells you not to trust the site. In the real world you would purchase a certificate from a Trusted Certificate Authority such as Verisign, Thwart or Go Daddy (Just to name a few) for chain trust validation.
Today we will take a couple of extra steps to avoid this error being displayed. Remember, we are creating certificates to be used on our development machines and not production environments.
So what are these extra steps that I speak of? Firstly we will create a certificate that asserts itself as a certificate authority. We will then send that certificate to our Trusted Root Certification Authorities store. From there we will generate a certificate for SSL that will be stored in our Personal certificate store in Local Machine and reference it from IIS for SSL.
Let’s do this in point form.
*Note: If you don’t run the command prompt as Administrator the commands will not work
*
- Open Visual Studio Command Prompt (2010) (Run as Administrator). You can find this in Start->Microsoft Visual Studio 2010->Visual Studio Tools
- Navigate to the C Drive and create a folder called Certificates. Then set Certificates as the current folder.
- To create a certificate for the Certificate Authority type the following in the command prompt. Replace the word intadec with the name of your computer
- makecert -n "CN=intadecCA" -r -sv intadecCA.pvk intadecCA.cer -sky exchange
- Add the certificate to the Trusted Root Certification Authorities store by doing the following. Again, replace the word Intadec with the name of your computer
- certmgr -add intadecCA.cer -s -r localmachine root
- Lastly, we will create the certificate that will be used by IIS for SSL. And again, replace the word intadec with the name of your computer
- makecert -sky exchange -sk intadec -iv intadecCA.pvk -n "CN=intadec" -ic intadecCA.cer intadec.cer -sr localmachine -ss My
Perfect. Now let’s have a look at what has been created here and where it has been stored. First of all let’s have a look in our Certificates folder that we created on the C Drive.

Figure 2: The certificates and private key file
As we can see above, the commands we executed earlier have generated a couple of certificates and a private key file. The certificates were also added to the correct certificate stores on our machine.

Figure 3: MMC showing our intadecCA certificate that we created earlier

Figure 4: MMC showing our intadec certificate that will be used by IIS for SSL
At this point we are in really good shape. We have created our certificates and are ready to configure IIS to support SSL. Long after we have added our certificate to IIS and we make a request over SSL, the certificate will be validated against our Trusted Root Certification Authorities and will be verified through chain trust. We can anticipate this by reviewing our intadec certificate.

Figure 5: Showing the trust chain of our intadec certificate used for SSL
That concludes the certificate section of this article and from here we will progress to IIS.
Configuring IIS with SSL
Now it’s time for us to fire up IIS Manager and create a binding that supports SSL. We will create this binding on the Default Web Site. Run IIS as Administrator, you will be presented with the screen in Figure 6.
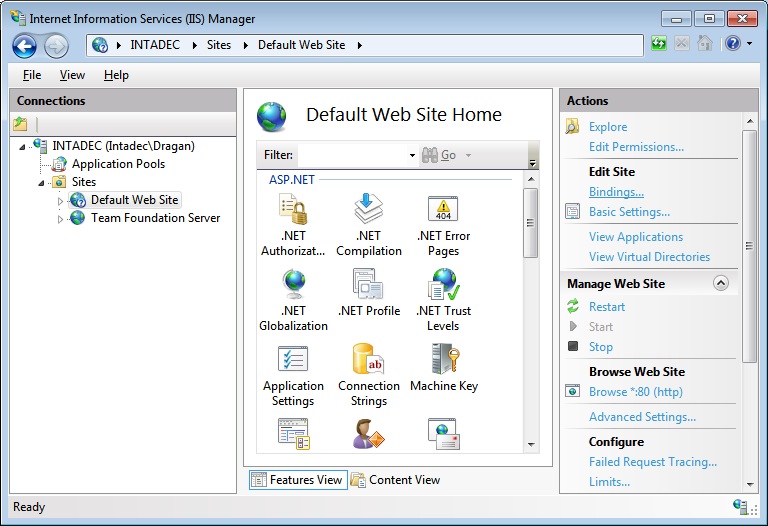
Figure 6: IIS Manager
Note that we have the Default Web Site selected on the left. On the right in the Actions Panel, click on Bindings which is located directly under Edit Site. The Bindings window will appear.

Figure 7: Site Binding in IIS
As you can probably see, https is currently not configured. To do so, click Add. The window in Figure 8 will appear.
**

Figure 8:** Adding the https binding in IIS
The Add Site Binding Dialog shown above is pretty much, self-explanatory. What is important here is our SSL certificate. We select the one that we created earlier in this article. Just as a side note, Port 443 is the default https port for IIS. You can navigate to your site (in this instance - https://intadec) without using a port number. For any other port number that you assign, you need to add that port number to the url when requesting anything over https. For example – https://intadec:6567
Well that was easy. IIS is now configured to support SSL. Let’s test this by navigating to our site in Internet Explorer.

Figure 9: Our website on SSL.
Notice above how there are no nasty red colors in our address bar. This is because our certificate can be verified by a Trusted Root Authority as explained previously.
Creating a WCF service that uses SSL
Now that we have SSL configured, it’s time to create the WCF service. We will go all the way today and create a WCF service that uses certificate authentication on the transport. This means that the client will need to supply a certificate to the WCF service for authentication. I’ve selected this type of service as it is the most difficult to implement for novices, even experts have problems sometimes.
Before we get cracking I’ll need you to create another certificate. This certificate will be the one we use for authentication and in essence is the same certificate that we created for SSL. The only difference is that this certificate will support only the Client Authentication Extended Key Usage (eku).
Go back to the certificates folder that we created at the start of this article using Visual Studio Command Prompt (Run As Administrator). Enter the following command:
makecert -sky exchange -sk intadecIdentity -iv intadecCA.pvk -n "CN=intadecIdentity" -ic intadecCA.cer intadecIdentity.cer -sr currentuser -ss My -eku 1.3.6.1.5.5.7.3.2
Remember, just like before, change the word intadec to the name of your computer but leave the word Identity in the command. Below is the certificate that you will end up with. The certificate will be located in the CurrentUser store unlike our first certificate which is stored in LocalMachine.

Figure 10: The certificate that we will use for client authentication
Ok, now we have everything we need. Let’s create the service
- Open Visual Studio 2010 and from the menu choose New Website
- Select the WCF Service Template. I’ve called my WCF Service https://intadec/SSLCertService. You can call your WCF service what you like but ensure you use https and not just http

Figure 11: Creating the WCF service project in Visual Studio 2010
Visual Studio will open with a bunch of boilerplate code. This will do as we are only testing how SSL works for our WCF Service. Now navigate to the Web.Config file and configure the WCF service as shown below:
<system.serviceModel>
  <services>
    <service name="Service">
      <endpoint address="" binding="wsHttpBinding"
                contract="IService" bindingConfiguration="wsHttpCert"/>
    </service>
  </services>
  <bindings>
    <wsHttpBinding>
      <binding name="wsHttpCert">
        <security mode="Transport">
          <transport clientCredentialType="Certificate"/>
        </security>
      </binding>
    </wsHttpBinding>
  </bindings>
  <behaviors>
    <serviceBehaviors>
      <behavior>
        <serviceMetadata httpsGetEnabled="true" httpsGetUrl=""/>
        <serviceDebug includeExceptionDetailInFaults="false"/>
      </behavior>
    </serviceBehaviors>
  </behaviors>
  <serviceHostingEnvironment multipleSiteBindingsEnabled="true"/>
</system.serviceModel>
Great!!! Our WCF service is configured and ready to use with transport security. We also require that our WCF service provides a certificate for client authentication as we can see in our binding configuration. Now, because we have forced client authentication here we must configure IIS to require a client certificate. If we do not configure IIS in this way, WCF will throw an exception like the one shown below.
The SSL settings for the service 'SslRequireCert' does not match those of the IIS 'None'.
So let’s go into IIS Manager and select our WCF Service. Double click the SSL Settings in the Features View and make sure that it looks like the screenshot below.

Figure 12: Configure IIS to require a client certificate for authentication
If we now go back into our project and try to fire up the WCF service in debug the following exception will be raised.

Figure 13: Visual Studio Exception when trying to debug WCF service with client certificate authentication
Believe it or not, this is exactly what we want to see. To truly test whether or not our WCF service is reachable, we need to try and access it through the browser. So fire up a session of Internet Explorer and navigate to your WCF service. In my case; http://intadec/SSLCertService/Service.svc
Upon doing so, the following dialog will be displayed asking you to verify that the certificate we are about to provide to the WCF service is the correct certificate for client authentication.
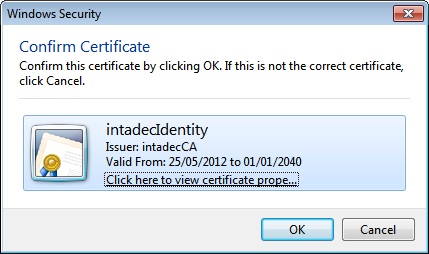
Figure 14: Certificate confirmation for our WCF service
Notice how the dialog above has presented us with the correct certificate from our CurrentUser store. This is because Internet Explorer checks the CurrentUser store for certificates that need to be presented to sites that require certificates.
Click OK on the dialog above and you should see your service page as follows.

Figure 15: Reaching our WCF service in the browser
By now you should be feeling proud of yourself as you have created a WCF service that uses transport security with certificate authentication. Now the true test, we will go into Visual Studio 2010 and generate a proxy from our WCF service WSDL.
Open Visual Studio 2010 and create a Console Application. Right click on the Console Application project and select Add Service Reference. Type the URL of your WCF service (In my case, https://intadec/SSLCertService/Service.svc/Service.svc) and click Go.
OH NO!!! Visual Studio Add Service Reference dialog has an exception and upon closer inspection we find that the exception states the following.

Figure 16: Exception details for our failed attempt to Add Service Reference
What’s going on? That’s right, our service requires a client certificate for authentication and Add Service Reference dialog does not provide a facility whereby we can attach a certificate to generate a proxy. So what are we going to do? Sure we could go to our browser, navigate to the WSDL and copy the WSDL and paste it to our file system. From there we could generate a proxy using SvcUtil.exe. Pftt, that’s for losers with no skills and I know for a fact that you’re not a loser. In fact, you’re a WCF champion who knows all the tricks and radiates in a way that all WCF experts should.
To generate a proxy directly from the WCF service there are a few things we need to do. First, we need to add a MEX endpoint to our service that will allow us to provide a certificate for client authentication. The standard mexHttpsBinding will not do here as it does not allow for security to be configured. Instead we will use wsHttpBinding with the IMetadataExchange contract. The endpoint will look like the following. Make sure you add this to the Web.Config.
<endpoint address="mex" binding="wsHttpBinding" contract="IMetadataExchange"
bindingConfiguration="wsHttpCert"/>
Note: The code above reflects our first endpoint, bindingConfiguration and all.
Next, we need to locate SvcUtil.exe and copy it some place that is easy to get to. I found my SvcUtil.exe here; C:\Program Files (x86)\Microsoft SDKs\Windows\v7.0A\Bin\x64. I created a folder on the C Drive called SvcUtil and copied SvcUtil.exe there. Last, we create a text file and name it SvcUtil.exe.config and ensure that it is located in the SvcUtil folder alongside SvcUtil.exe.

Figure 17: SvcUtil.exe and SvcUtil.exe.config
Edit the SvcUtil.exe.config file and add the following XML. Remember to change intadecIdentity in the FindValue for the clientCertificate in clientCredentials to the name of your certificate in the CurrentUser Personal store.
<?xml version="1.0" encoding="utf-8"?>
<configuration>
  <system.serviceModel>
    <client>
      <endpoint behaviorConfiguration="wsHttpBehavior"
         binding="wsHttpBinding" bindingConfiguration="wsHttpMex"
         contract="IMetadataExchange" name="https"/>
    </client>
    <bindings>
      <wsHttpBinding>
        <binding name="wsHttpMex">
          <security mode="Transport">
            <transport clientCredentialType="Certificate" />
          </security>
        </binding>
      </wsHttpBinding>
    </bindings>
    <behaviors>
      <endpointBehaviors>
        <behavior name="wsHttpBehavior">
          <clientCredentials>
            <clientCertificate findValue="intadecIdentity"
                                storeLocation="CurrentUser"
                                storeName="My"
                                x509FindType="FindBySubjectName" />
          </clientCredentials>
        </behavior>
      </endpointBehaviors>
    </behaviors>
  </system.serviceModel>
</configuration>
So what have we just done here? I’m guessing that you are starting to understand that SvcUtil.exe is just a WCF client with a bit of muscle. That muscle is the ability to take the WSDL it finds on a WCF service and generate a proxy. Save the SvcUtil.exe.config file with the content we just added and fire up a Visual Studio Command prompt. Navigate to your SvcUtil folder and type the following command.
SvcUtil https://intadec/SSLCertService/Service.svc/mex /config:app.config
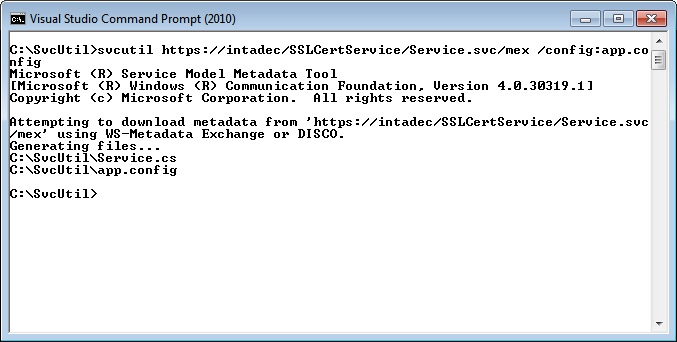
Figure 18: Service.cs and app.config generated by SvcUtil.exe
After SvcUtil.exe has finished it would have generated two files; Service.cs and app.config. We simply go back to our Console Application and right click on our project. We select Add Existing Item from the context menu and select these two files from our SvcUtil folder. We also need to add some references. Right click on the project and select Add Reference from the context menu. In the Reference dialog select System.ServiceModel and System.Runtime.Serialization. Navigate back to the Program.cs file and ensure that the code in this file is the same as below.
using System;
using System.Collections.Generic;
using System.Linq;
using System.Text;

namespace ConsoleApplication1
{
    class Program
    {
        static void  Main(string[] args)
        {
            ServiceClient proxy = new  ServiceClient();
            string returnValue = proxy.GetData(10);
        }
    }
}
We also need to configure the app.config file that was generated for us by SvcUtil.exe. I’ve removed any unnecessary configuration for clarity. In the end you will end up with an app.config file that looks like the following.
<?xml version="1.0" encoding="utf-8"?>
<configuration>
    <system.serviceModel>
      <bindings>
          <wsHttpBinding>
              <binding name="wsHttpCert">
                  <security mode="Transport">
                      <transport clientCredentialType="Certificate"/>
                  </security>
              </binding>
          </wsHttpBinding>
      </bindings>
      <client>
          <endpoint address="https://intadec/SSLCertService/Service.svc"
              binding="wsHttpBinding" bindingConfiguration="wsHttpCert"
              behaviorConfiguration="wsHttpBehavior" contract="IService"/>
      </client>
      <behaviors>
        <endpointBehaviors>
          <behavior name="wsHttpBehavior">
            <clientCredentials>
              <clientCertificate findValue="intadecIdentity"
                                   storeLocation="CurrentUser"
                                   storeName="My"
                                   x509FindType="FindBySubjectName" />
            </clientCredentials>
          </behavior>
        </endpointBehaviors>
      </behaviors>
    </system.serviceModel>
</configuration>
That’s it! Our client is now configured to use our WCF service. Run the Console Application and you will find that everything works as planned.
Conclusion
Today we learnt how to create certificates that are validated by a Trusted Certificate Authority, configure IIS for SSL and generate a proxy from a WCF service that requires client certificate authentication.** **