Integrating Exchange 2013 OWA and Lync Server 2013
Overview
In this article I will show the steps for integrating *Exchange Server 2013 OWA * and Lync Server 2013 to enable Instant Messaging and presence in *Outlook Web Access.
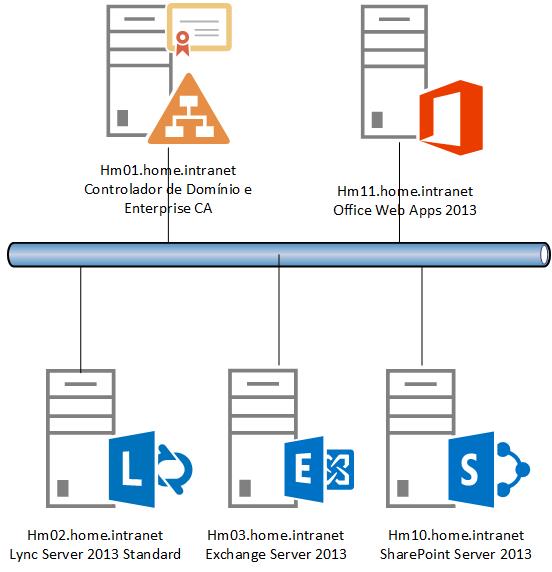
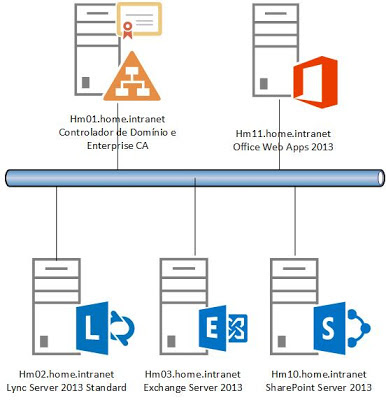
*I have a structure of five virtual machines, all servers are part of the same *Active Directory Domain Services *and are installed with Windows Server 2012 RTM. In the figure below lists the names and functions of virtual machines.
http://1.bp.blogspot.com/-CKmDDcUXPDU/URzTykUcaoI/AAAAAAAAE70/F6QCjxGdD78/s400/Office2013.jpg
Active Directory Domain was created with the DNS name home.intranet * and a sip domain home.com.br that is also a authoritative domain on Exchange. *
*
*Three users: user01, user02 and user03 were created and enabled in Exchange and Lync.
Active Directory Domain Service
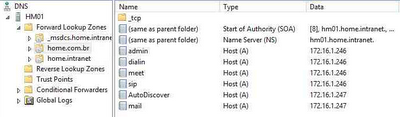
DNS zone home.intranet support secure updates,
| FQDN | IP | Role |
| Hm01.home.intranet | 172.16.1.245 |
Domain Controller |
| Hm02.home.intranet | 172.16.1.246 | Lync Server |
| Hm03.home.intranet | 172.16.1.247 | Exchange Server |
| Hm10.home.intranet | 172.16.1.248 | SharePoint Server |
| Hm11.home.intranet | 172.16.1.251 | Office Web Apps 2013 |
http://4.bp.blogspot.com/-LBE-j_plvW0/UBvxQvCg-_I/AAAAAAAAEQ0/NELx1q9SgJc/s400/int12.png
The DNS zone home.com.br does not support dynamic updates, the following records were manually created:
| Civil Registry | FQDN | IP |
| Address Exchange AutoDiscover | AutoDiscover.home.com.br | 172.16.1.247 |
| WebMail | mail.home.com.br | 172.16.1.247 |
| SIP Address |
sip.home.com.br | 172.16.1.246 |
| URL Dial-In | dialin.home.com.br | 172.16.1.246 |
| URL Meeting | meet.home.com.br | 172.16.1.246 |
| Console URL Silverlight | admin.home.com.br | 172.16.1.246 |
| SRV | sip.home.com.br | Name: _sipinternaltls Port Number: 5061 Protocol: _tcp Host FQDN: sip.home.com.br |
http://3.bp.blogspot.com/-OGo6HCaK5Ig/UBvxRb9cGeI/AAAAAAAAEQ8/--7lYYCh7D4/s400/int14.png
Configuring Exchange Server
Digital Certificate
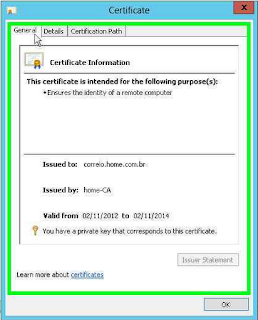
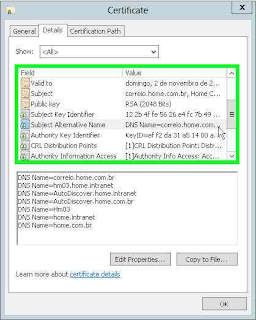
All traffic between Exchange and Lync is encrypted using SSL. Therefore configuring the connection between the two servers depends on information in digital certificates installed on both servers. The self-signed certificate must be replace with a new certificate emitted for trusted certification authority.
The certificate installed on *Exchange Server 2013 BackEnd *is configured with the following FQDNs
| http://4.bp.blogspot.com/-ZnHQL7ndpI8/UJ2poN8HUaI/AAAAAAAAE24/Ea2ZA22Kypk/s320/LyExc01.png | http://4.bp.blogspot.com/-FrxYzUBJ_tg/UJ2pppVpJyI/AAAAAAAAE3A/aQjsTfdqM4U/s320/LyExc02.png |
Creating a Connection in Outlook Web Access
To configure the connection between the servers you need to select a digital certificate for encrypting the traffic. In this scenario I will use the same certificate configured for OWA. I'll need Thumbprint and *Subject Name * of the certificate. Use the cmdlet to get this information
Get-ExchangeCertificate
http://3.bp.blogspot.com/-iNBCEf6MSwk/UJ2pqUz2MtI/AAAAAAAAE3I/tV2nymHbAGY/s400/LyExc03.png
The Thumbprint will be used to identify which certificate will be used for the connection. The Subject Name will be used to create the Trusted Application in Lync Server, the name of the Trusted Application must be identical to the name of the Subject Name n the certificate from Exchange Server.
To enable instant messaging execute cmdlet
Get-OwaVirtualDirectory | Set-OwaVirtualDirectory -InstantMessagingEnable $True -InstantMessagingType OCS
http://1.bp.blogspot.com/-H48kk-jJM1c/UKASAx5icXI/AAAAAAAAE5o/c38qRVpC-k4/s320/LyExc04.png
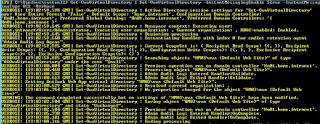
Configure the access policy and enable the OWA IM function for all users
Get-OwaMailboxPolicy | Set-OwaMailboxPolicy -InstantMessagingEnabled $true –InstantMessagingType OCS
http://1.bp.blogspot.com/-jgWIQWf_RKg/UDWVjdfDnFI/AAAAAAAAEj8/8_sO3n5KwjI/s320/LyncExch12.png
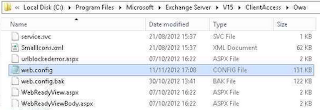
To finalize the configuration the file web.config must be changed on Exchange BackEnd. By default the file is located at C: \Program Files\Microsoft\Exchange Server\V15\ClientAccess\Owa
http://4.bp.blogspot.com/-XhES4HVEXvA/UKAUQBLmgbI/AAAAAAAAE6I/QRHLrwvAzfA/s320/LyExc08.png
Open the file with a text editor, locate the tag <appSettings> and add the two lines in the configuration file
<add key="IMCertificateThumbprint" value="BackEnd Certificate Thumbprint "/>
<add key="IMServerName" value="Lync Server FQDN" />
http://3.bp.blogspot.com/-XBLxKhr7v08/UKASCnSyhRI/AAAAAAAAE54/fVXsrlGjLVQ/s320/LyExc06.png
Run the command to apply the changes in OWA
C:\Windows\System32\Inetsrv\Appcmd.exe recycle apppool /apppool.name:"MSExchangeOWAAppPool"
http://2.bp.blogspot.com/-PUSf1-mHpcA/UKASBvcq_PI/AAAAAAAAE5w/WqAYDbkmXZo/s320/LyExc05.png
**Setup Lync Server **
A Trusted Application is an application based on Microsoft Unified Communications Managed API that is trusted by Lync Server. To configure integration with OWA you must configure a trusted application between Exchange and Lync.
Creating a Trusted Application Pool
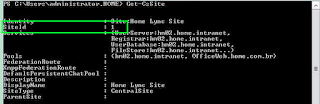
To create an application on Lync Server first identify the site created at installation. Use the cmdlet Get-CsSite .
Get-CsSite
http://3.bp.blogspot.com/-pXYTDXr3heI/UKAE-_zEz_I/AAAAAAAAE4o/aWd6nFRyNoo/s320/LyExc15.png
To create an application pool run the cmdlet
New-CsTrustedApplicationPool -Identity <Certificate Subject Name of Client Access> -Registrar <FQDN do Pool Lync server> -Site <Lync Server SiteID> -RequiresReplication $False
*
http://4.bp.blogspot.com/-GtZmjHO_hec/UKAFBe-RWyI/AAAAAAAAE4w/K5zGvoeQ2LU/s320/LyExc16.png
**Creating a Trusted Application for OWA **
To create the application that represents the OWA in Lync Server run the cmdlet
New-CsTrustedApplication -ApplicationId OutlookWebAccess -TrustedApplicationPoolFqdn <Client Access Certificate Subject Name> -Port < available TCP port number>*
http://2.bp.blogspot.com/-H-rdykl6btY/UKAFDD4yoaI/AAAAAAAAE44/Y1XC2CzW-04/s320/LyExc17.png
Saving the Configuration
Run Enable-CsTopology to apply the changes in the topology of Lync Server
http://4.bp.blogspot.com/-g-hNnBFRioY/UDWVg_XczFI/AAAAAAAAEjk/4LpgjLazCo4/s320/LyncExch08.png
Accessing OWA
To verify that the settings were applied successfully access the Exchange 2013 OWA and verify that the presence has been activated and can be changed.
http://3.bp.blogspot.com/-GtUn9LlMmLU/UKASERqUyVI/AAAAAAAAE6A/_iB_cxxx0D8/s320/LyExc07.png
To start a session just to click on the contact tab or email *People *
http://3.bp.blogspot.com/-XWdeRnYoqX0/UKAVjAMeieI/AAAAAAAAE6Q/2iMGpoK3XYc/s320/LyExc10.png
http://2.bp.blogspot.com/-pDFbW7vfHgE/UKAVkWDL_kI/AAAAAAAAE6Y/rsXpYyXGP-I/s320/LyExc11.png
http://2.bp.blogspot.com/-mLcTa5lq3vI/UKAVlCQF1FI/AAAAAAAAE6g/3xLyZrtbULk/s320/LyExc12.png
If Exchange have few CAS and Mailbox servers
If you have Exchange with different confgiruration than all roles in one server, then following step for configuring integration.
We have 3 CAS servers(names cas01nX) and 3 Mailbox servers(mbx01nX).
- Cmd let prepare CAS servers
Get-OwaVirtualDirectory -Server cas01n1 | Set-OwaVirtualDirectory -InstantMessagingEnable $True -InstantMessagingType OCS
Get-OwaVirtualDirectory -Server cas01n2 | Set-OwaVirtualDirectory -InstantMessagingEnable $True -InstantMessagingType OCS
Get-OwaVirtualDirectory -Server cas01n3 | Set-OwaVirtualDirectory -InstantMessagingEnable $True -InstantMessagingType OCS
Get-OwaMailboxPolicy | Set-OwaMailboxPolicy -InstantMessagingEnabled $true –InstantMessagingType OCS
- Export from CAS server certificate owa.contoso.com, and then import to all mailbox servers in Local computer - Personal Certificate .
Our Cas servers
owa.contoso.com – it is certificate for all services: iis,smtp,oab,owa on all CAS servers.
Our mailbox servers
owa.contoso.com - Same certificate installed.
- Get thumbprint certificate owa.contoso.com at all mailbox servers
Get-ChildItem -path cert:\LocalMachine\My
and add on all mailbox servers to C:\Program Files\Microsoft\Exchange Server\V15\ClientAccess\Owa\web.config
<add key="IMCertificateThumbprint" value="thumbprint_owa.contoso.com"/>
<add key="IMServerName" value="lyncfe.contoso.com-our lync pool" />
Reset application pool MSExchangeOWAAppPool – for all mailbox servers
For Lync server
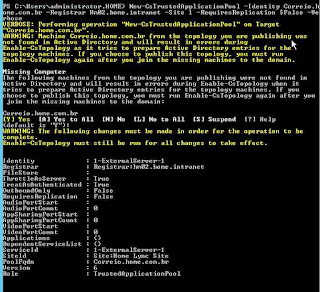
Create apppool, where owa.contoso.com – it is our fqdn CAS servers
New-CsTrustedApplicationPool -Identity owa.contoso.com -Registrar lyncfe.contoso.com -Site 1 -RequiresReplication $False –verbose
Create application
New-CsTrustedApplication -ApplicationId OutlookWebAccess -TrustedApplicationPoolFqdn owa.contoso.com -Port 8081
Enable-CsTopology
You did it :)
Other Languages
This article is also available in the following languages:
Brazilian Portuguese
This article was originally written by:
Fernando Lugão Veltem
blog: http://flugaoveltem.blogspot.com
twitter: @ flugaoveltem