"For Each" behavior - Custom action in SharePoint Designer 2010
Introduction
Working as a design architect is a biggest challenge, especially when you have SharePoint 2010 bigmouth. We were working on a project with a few existing List with Software Product License and its expiry date. The administrator need to have alerts for all those Licenses which is going to be expired on the current date and the within the next 8 days. The best solution I thought is to write a workflow using SharePoint Designer 2010 and apply to the list. This workflow will find all the candidate items and send mail to the administrator.
Background
SharePoint designer 2010 is the best friend of any SharePoint developer. Basically, there are some issues with a few of the actions and variable configuration. In particular when the requirement is to traverse and check for a field in all or multiple rows in the list. Any developer will immediately think of a loop especially a very handy For Each loop. But SharePoint designer 2010 does not support any kind of loop at all. Absence of loop lead me think of the best and quickest solution for this issue.
I quickly jumped into the decision that I should write my custom activity which will track all the items in the list and update a filed. I will try to explain my design for the solution of this issue below.
I have added a field in the list, call it as “Processed”. This field can be helping us to know whether an Email is sent to administrator, if in case the item (License) is getting expired in 8 days. The default value for this field is “No” and we will set this value to “Yes”. This is fairly a simple most logic I am using for this solution as even the requirement is not too complicated!!!.
See the Conclusion and Links section at the end of this article for the code and more descriptions where you can download the solution.
Note We have to understand that we have a list which has records (items) with the License details and its expiry dates. The “Processed” field is the new field, which is hidden and used only for the purpose of our requirement.
The problem
The SharePoint Designer 2010 has no action/condition which can be used to traverse in the list to pick up all the items who are candidate for the condition of expiry.
The solution
Here are the quick steps to follow to write custom action for SharePoint Designer 2010 based workflow:
Step 1 : Working with Visual Studio and creating Solutions :
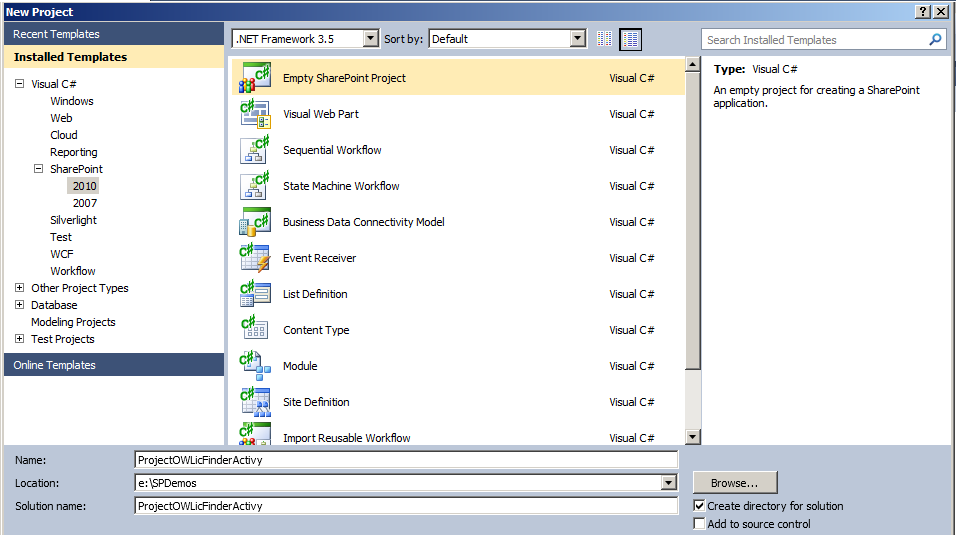
- We need to have Empty SharePoint Project in the first go, this will be used to deploy our activity on the SharePoint system.
Quick steps : Open Visual Studio 2010 à New Project à SharePoint à 2010 à Empty SharePoint Project
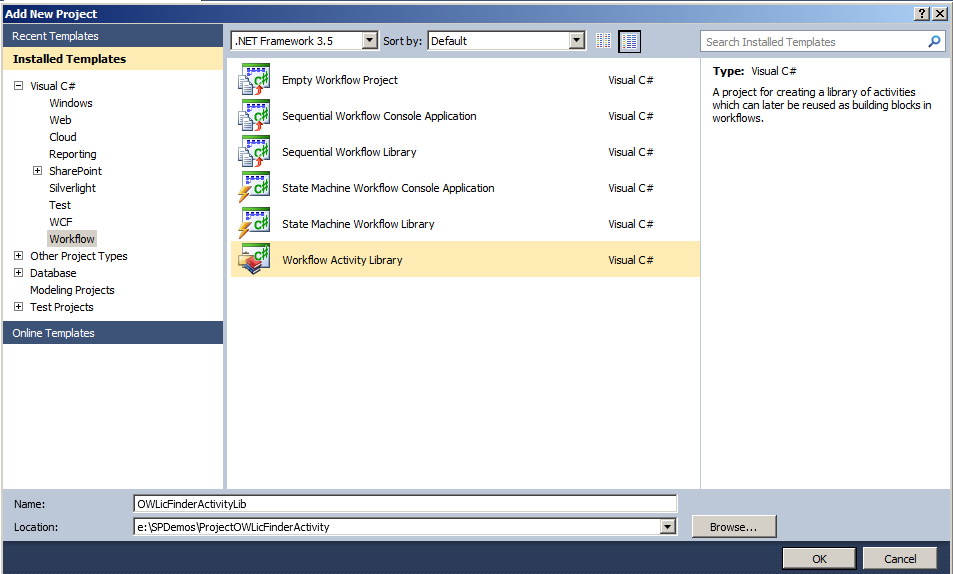
- Second thing we must do is to add the Workflow activity project in our SharePoint solution. Make sure we have “ADD New Project” here !
Quick steps : Right click on Solution à Add New Project à Workflowà Workflow Activity library
- Add Strong Name key to the workflow activity library project.
**Quick steps : Right click on Activity Library Project à Properties à Signingà Check “Sign the assembly” à Select “<New>” à *Give a proper name for SNK key file.
- Add References to Activity Library Project for Microsoft.SharePoint library and Microsoft.SharePoint.WorkflowActions library
**Quick steps : Activity Library Project à Right Click on Referencesà Add Referenceà .NET Tabà *Select “Microsoft.SharePoint” and “Microsoft.SharePoint.WorkflowActions” under “Components”
- Click on the LicFinderActivityLib.cs and press F7. Or right click on the LicFinderActivityLib.cs and select “View Code” . (For your kind information, I have renamed the .cs file to LicFinderActivityLib.cs) Below is the snapshot of how the OWLicFinderActivytLib project looks like :

- Now it’s to do the coding so add the following code in your .CS file:
001.using System;
002.using System.ComponentModel;
003.using System.Workflow.ComponentModel.Compiler;
004.using System.Workflow.ComponentModel;
005.using System.Workflow.Activities;
006.using Microsoft.SharePoint;
007.
008.namespace OWLicFinderActivityLib
009.{
010.public partial  class LicFinderActivity : SequenceActivity
011.{
012.public LicFinderActivity()
013.{
014.InitializeComponent();
015.}
016./// <summary>
017./// Property Name : SiteUrl
018./// Usage : This will be used where you can set the Web URL address.
019./// </summary>
020.public static  DependencyProperty SiteUrlProperty = DependencyProperty.Register("SiteUrl",
021.typeof(string), typeof(LicFinderActivity), new  PropertyMetadata(""));
022.[DescriptionAttribute("Url of site where Licence List is saved")]
023.[BrowsableAttribute(true)]
024.[DesignerSerializationVisibilityAttribute(DesignerSerializationVisibility.Visible)]
025.[ValidationOption(ValidationOption.Optional)]
026.public string  SiteUrl
027.{
028.get { return ((string)(base.GetValue(LicFinderActivity.SiteUrlProperty))); }
029.set { base.SetValue(LicFinderActivity.SiteUrlProperty, value); }
030.}
031./// <summary>
032./// Property Name : LicenceListName
033./// Usage : The License List Name, on this list we are going to travarse.
034./// </summary>
035.public static  DependencyProperty LicenceListNameProperty = DependencyProperty.Register("LicenseListName",
036.typeof(string), typeof(LicFinderActivity), new  PropertyMetadata(""));
037.[DescriptionAttribute("Name for License list")]
038.[BrowsableAttribute(true)]
039.[DesignerSerializationVisibilityAttribute(DesignerSerializationVisibility.Visible)]
040.[ValidationOption(ValidationOption.Optional)]
041.public string  LicenceListName
042.{
043.get
044.{
045.return ((string)(base.GetValue(LicFinderActivity.LicenceListNameProperty)));
046.}
047.set
048.{
049.base.SetValue(LicFinderActivity.LicenceListNameProperty, value);
050.}
051.}
052.
053./// <summary>
054./// This is the method is called within the workflow
055./// which will be calling the FOR EACH loop
056./// Notice on the "fx_FindAndSendMailsIfLicExp" method is
057./// getting called from Execute method.
058./// </summary>
059./// <param name="executionContext"></param>
060./// <returns></returns>
061.protected override  ActivityExecutionStatus Execute(ActivityExecutionContext
062.executionContext)
063.{
064.
065.fx_FindAndSendMailsIfLicExp();
066.return ActivityExecutionStatus.Closed;
067.}
068.
069./// <summary>
070./// Method called from "Execute" method (look the above code)
071./// </summary>
072.private void  fx_FindAndSendMailsIfLicExp()
073.{
074.
075.// Site Url
076.using (SPSite oSPSite = new SPSite(SiteUrl))
077.{
078.// Get connected to the Web Application
079.using (SPWeb oSPWeb = oSPSite.RootWeb)
080.{
081.// Get the list the where we have all the licenses and its expiry dates.
082.// No doubt we have Processed (hidden) field in the same list
083.SPList oSPList = oSPWeb.Lists[this.LicenceListName];
084.// Start the loop on all the items
085.foreach (SPListItem item in oSPList.Items)
086.{
087.// Default value of "Processed"
088.item["Processed"] = "No";
089.
090.// Get the Expire field. This field is a DateTime field
091.DateTime dtExpire = (DateTime)item["Expire"];
092.
093.// Check if the Expire date is today!!
094.if (dtExpire == DateTime.Today)
095.{
096.item["Processed"] = "Yes";  // Set the processed field to YES
097.}
098.item.Update(); // Update the List Item
099.}
100.// Update the List
101.oSPList.Update();
102.// Update the Web
103.oSPWeb.Update();
104.}
105.}
106.}
107.}
108.}
When you complete the code it is important to give a compile. This will reduce our chances of minimizing risk after installation.
Once the compilation is success, get the public key token. Believe me this is the right time we will get the public key token and save it into notepad as it is required in most of the places thorough out the entire deployment preparation stages.
***3. *** To get the public key token, use SN.Exe with “–t” option. You can open Visual Studio Command prompt (preferably by running as Administrator). Go to the folder where you have the DLL file save, typically in Debug / Release folder of your project ****
Quick steps : Start MenuàAll Programs à Microsoft Visual Studio 2010à * Visual Studio Tools à “Visual Studio Command Prompt” ( for running as Administrator, right click and select the option).*
9. Change the directory till debug of your application and enter the command :
SN –T OWLicFinderActivity.dll
When the output gets printed on console select it using the following quick steps :
Quick steps : Click on System Menu of Visual Studio Command Promptà Select Edità Mark
The cursor can be used to select the public key token and after carefully selecting the full token hit Enter key. This will save the selection in clipboard. (Preferably save this token in notepad !)

- Next step is to setup our deployment project,( ProjectOWLicFinderActivity). The first and foremost thing we need is to create an Actions file. To do this we need to add “Workflows” Mapped folder in our project.
*Quick steps : Right Click on ProjectOWLicFinderActivityà Add Mapped Folder à Browse to Templateà * 1033 à *“Workflows”

11. Add a new XML file by right clicking on “Workflow” mapped folder and rename it to “OWLicFinder.Actions”
Copy and paste below content into the .Actions file :
01.<?xml version="1.0" encoding="utf-8" ?>
02.<WorkflowInfo>
03.  <Actions Sequential="then" Parallel="and">
04.    <Action Name="Check Licence List"
05.        ClassName="OWLicFinderActivityLib.LicFinderActivity"
06.            Assembly="OWLicFinderActivityLib, Version=1.0.0.0, Culture=neutral, PublicKeyToken=909ecdedcd7d8844"
07.            AppliesTo="all"
08.            Category="OW Activity">
09.      <RuleDesigner Sentence="Licence List Name %1 to site %2.">
10.        <FieldBind Field="LicenceListName" Text="Licence List Name" DesignerType="TextArea" Id="1"/>
11.        <FieldBind Field="SiteUrl" Text="Url of base site" Id="2" DesignerType="TextArea"/>
12.      </RuleDesigner>
13.      <Parameters>
14.        <Parameter Name="LicenceListName" Type="System.String, mscorlib" Direction="In" />
15.        <Parameter Name="SiteUrl" Type="System.String, mscorlib" Direction="In" />
16.      </Parameters>
17.    </Action>
18.  </Actions>
19.</WorkflowInfo>
Care need to be taken into the .Actions file as there are few important places which are critical. I am trying to list were you must do the changes as per your project and machine generated keys:
ClassName
Assembly string
PublicKeyToken
The other stuff can be modified if required.
13. The overall project looks like this

- Once the .Action file is saved into “Workflow” folder, it is the time to setup the assembly in the Package. Double click on the Package.package and add the assembly as shown :
Quick steps : Double Click on Package.packageà Double click on Advanced à Click on Add à Add Existing Assemblyà select your assembly from the Debug / Release folder.
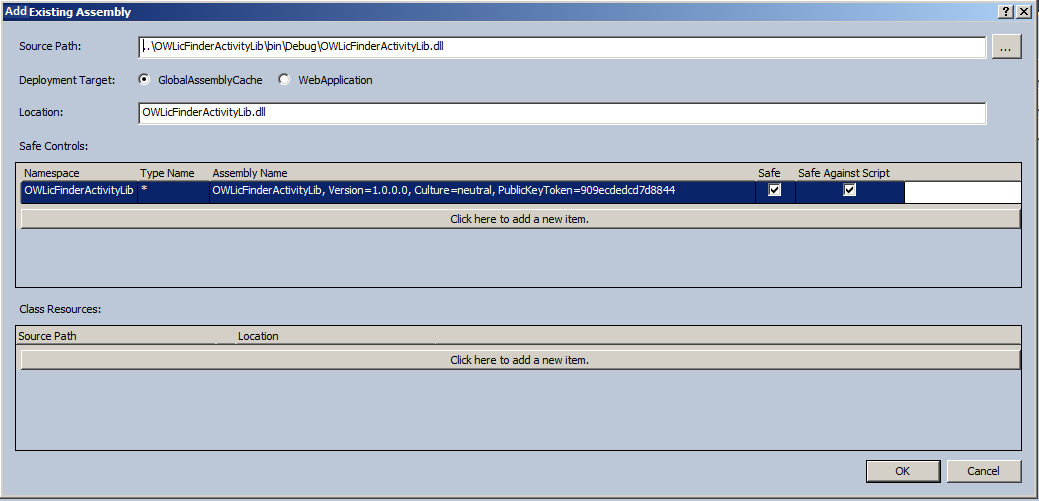
- When you add the assembly it should be looking like this :

- Once the entry is completed just do a compile by press “Ctrl + Alt + B “. If everything goes well there should not be any error.
Step 2 : Updating the WEB.Config :
17. Update Web.Config for your site which is typically under this folder :
C:\inetpub\wwwroot\wss\VirtualDirectories\yourport>\
18. Open Web.config into Visual Studio 2010 and search for “SafeControls” element.
Immediately above the </SafeContorls> add a new line and paste the code listed below.
<SafeControl Assembly="OWLicFinderActivityLib, Version=1.0.0.0, Culture=neutral, PublicKeyToken=909ecdedcd7d8844" Namespace="OWLicFinderActivityLib" TypeName="*" Safe="True" SafeAgainstScript="True" />
- In the Web.config once again find the entry “authorizedTypes” and just above the “</authorizedTypes> add the below line
<authorizedType Assembly="OWLicFinderActivityLib, Version=1.0.0.0, Culture=neutral, PublicKeyToken=909ecdedcd7d8844" Namespace="OWLicFinderActivityLib" TypeName="*" Authorized="True" />
- Now it’s time to deploy our activity. Go to Visual Studio and select the ProjectOWLicFinderActivity. Right click on the project and select Deploy.
Step 2 : Creating a SharePoint Designer 2010 Workflow with our activity
- Start SharePoint Developer 2010 and open your site.
- Goto workflows and add a new either Reusable or List based workflows. In my case I have selected the List based workflow.
3. When the Workflow designer is opened I usually have two starting Log actions. This will help me understand the status of my Workflows, hence I have added 2 Log History actions one for Start and one for END.
- Now go to Actions and you can scroll to find our new Custom Action under OW Activity
- Make sure you are on the proper place to insert this action.

- Click to insert the action in your workflow.
- We must need to provide 2 Parameters to this action : 1) List Name and 2) SiteUrl. So, basing on my List and Site I have updated the parameters :

After finishing the work flow you can try to find any error exists and then can be publish to the LicenseList.
Set this workflow to start Automatically after 00:00 AM. You can do this by using any of the product listed below :
7. When this workflow get executed, you can observer in the LicenseList that if the S/W is getting expired today, the “Processed” field is will be set with the value as “Yes”.
8. This will be triggering the Second workflow (lets call it as wfLicExpInformer)
9. Now we need to create another workflow wfLicExpInformer which will trigger email. This is the simple most workflow as shown :

- The main trick is you need this workflow (wfLicExpInformer) be set to get executed automatically whenever there is a UPDATE happen in the list.
Conclusion
The first workflow will do the job of finding all the items ( Software(s)) which are going to expire today by performing a FOR EACH kind of loop. Update the item if the software is getting expire by updating “Processed” field with the value “Yes”. This updating on item will trigger another workflow to send Email to relevant and concern administrator.