SharePoint 2013 RTM Offline Standalone Installation (Without Internet)
SharePoint Server 2013 RTM Standalone Installation
Step 1: Install Windows Server 2008 R2 with Service Pack 1 – Enterprise Edition
Step 2: Install the hotfixes
Link: http://dotnetmafia.sys-con.com/node/2418859/blog#
Step 3: Install SQL Server 2008 R2
Step 4: Download all the prerequisites (Required for offline installation)
Prerequisite |
Direct Link |
Microsoft .NET Framework 4.5 (Full Stand-alone package) |
http://go.microsoft.com/fwlink/?LinkId=225702 Or Download tFx45_Full_x86_x64.exe from stand-alone section from http://msdn.microsoft.com/en-us/library/5a4x27ek.aspx
|
Windows Management Framework 3.0 |
http://www.microsoft.com/en-us/download/details.aspx?id=34595 |
Microsoft SQL Server 2008 R2 SP1 Native Client |
Go to http://go.microsoft.com/fwlink/p/?LinkId=262370 and manually download and install the Microsoft SQL Server 2008 R2 SP1 Native Client (1033\x64\sqlncli.msi). |
Windows Identity Foundation (KB974405) |
|
Windows Identity Extensions |
|
Microsoft Sync Framework Runtime v1.0 SP1 (x64) |
|
Windows Server AppFabric |
http://go.microsoft.com/fwlink/?LinkId=235496 Download it but don’t install it by yourself since it needs configuration, hence install all other prerequisites in this article (except this one) then let the prerequisite installer to install it and configure it manually for you by running the following command from command prompt: prerequisiteInstaller.exe /appfabric:[Full AppFabric Installer path] D: is the CD drive where SharePoint installer is placed Note: don’t install WindowsServerAppFabricSetup_x64_6.1 this is not the correct version that SharePoint installer seeks
|
Microsoft Information Protection and Control Client |
|
Microsoft WCF Data Services 5.0 |
http://www.microsoft.com/en-us/download/details.aspx?id=29306 |
Cumulative Update Package 1 for Microsoft AppFabric 1.1 for Windows Server (KB2671763 |
Download AppFabric1.1-RTM-KB2671763-x64-ENU.exe from http://www.microsoft.com/en-us/download/details.aspx?id=29241 You need to Install AppFabric from above first then this update.
|
Step 5: Copy all the prerequisites in prerequisitesinstallerfiles folder present in the SharePoint Server 2013 Setup folder location
Step 6: Create arguments file and place it in the same folder where prerequisiteinstaller.exe is present
Steps for creating argument file is as follows
- Using a text editor, create a new text document named PrerequisiteInstaller.Arguments.txt. Save this file to the same location as PrerequisiteInstaller.exe. This file will contain the switches and arguments that are used when you run the Microsoft SharePoint Products Preparation Tool.
- Using a text editor, edit PrerequisiteInstaller.Arguments.txt and provide file paths to the installation source for each prerequisite switch by using the following syntax:
/switch: <path>
Where /switch is a valid switch and <path> is a path of the installation source.
The following example shows a complete arguments file that uses a file share as a common installation point. Do not include carriage returns in your file.
/PowerShell:"<path>\WINDOWS6.1-KB2506143-x64.msu" /NETFX:"<path>\dotNetFx45_Full_x86_x64.exe" /IDFX:"<path>\Windows6.1-KB974405-x64.msu" /sqlncli:"<path>\sqlncli.msi" /Sync:"<path>\Synchronization.msi" /AppFabric:"<path>\setup.exe" /IDFX11:"<path>\Microsoft Identity Extensions.msi" /MSIPCClient:"<path>\msipc.msi" /WCFDataServices:"<path>\WcfDataServices.exe" /KB2671763:"<path>\AppFabric1.1-RTM-KB2671763-x64-ENU.exe
- After you finish editing PrerequisiteInstaller.Arguments.txt, save your edits, and verify that this file is in the same directory as PrerequisiteInstaller.exe.
Use the following procedure to install the prerequisites.
Step 7: To install the prerequisites using an arguments file
- Run PrerequisiteInstaller.exe at the command prompt to install the prerequisites.
Caution: |
If you are prompted to click Finish to restart the system, do not do so. Instead, click Cancel. For more information, see Known issues you continue with the next step. |
- Restart the system manually.
- At the command prompt type the following command and then press Enter:
PrerequisiteInstaller.exe
Step 8: Install SharePoint Server 2013 RTM
Step 9: Select Standalone option
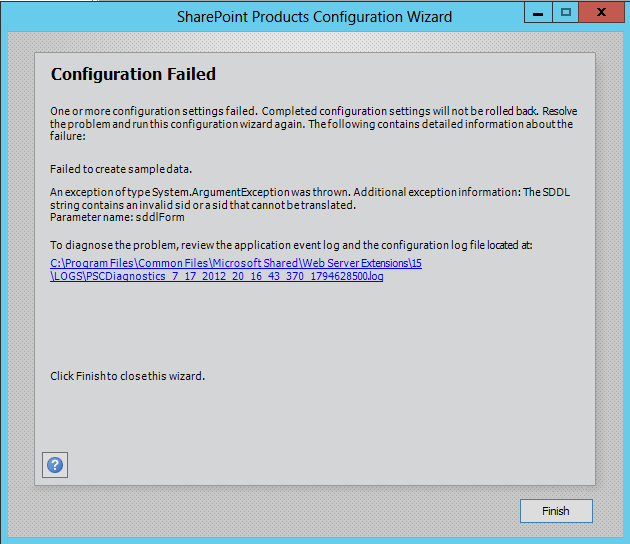
Step 10: Follow the solution to the below errors for completing the installation and configuration
Handling Errors while installing (Stand-Alone) SharePoint 2013
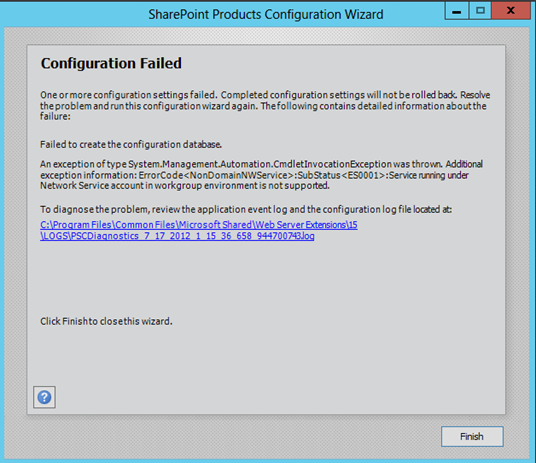
While installing SharePoint 2013 for a Stand-Alone setup on a non-domain based VM you might encounter some issues like the below
- Service running under Network Service Account in workgroup environment is not supported
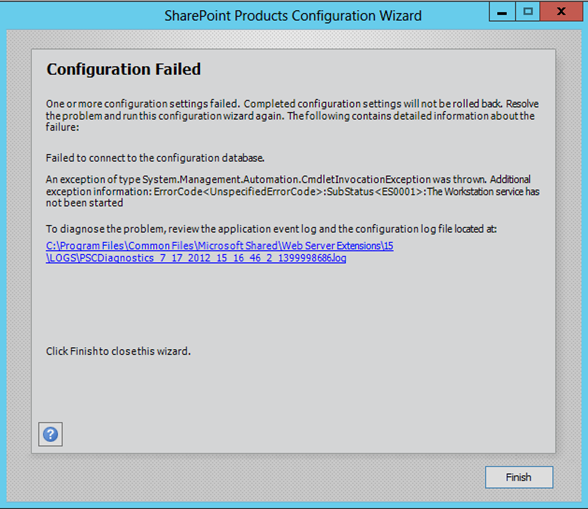
- ErrorCode<UnspecifiedErrorCode>: SubStatus <ES0001>: The Workstation service has not been started
- The SDDL string contains an invalid sid or a sid that cannot be translated. Parameter name: sddlForm
Solution:
- Stand-Alone option will install SQL Server Express Edition on the VM and user installing must have sufficient rights (Setup admin) on the database. In order to give the permissions / rights, install SQL Server 2008 R2 Management Studio and provide access as shown below. Access the below from you SQL Server Management Studio using (.\SharePoint) instance > Security > Logins > {logged in user account} > Server Roles >
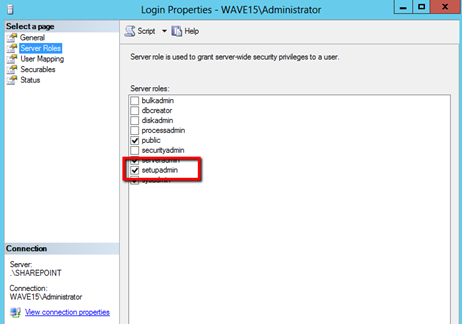
- Services required to run the Configuration Wizard
- AppFabric Caching Service
- SQL Server Agent (SHAREPOINT)
- Workstation - need to be started.
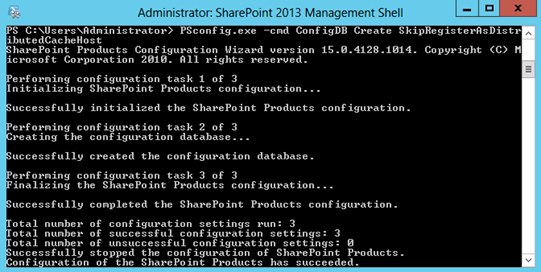
- run the following PSConfig command to create configuration database without registering distributed cache host.
PS: You need to run the Configuration Wizard once again since the below command will not run the configuration fully.
1: psconfig.exe -cmd Configdb Create SkipRegisterAsDistributedCacheHost
- And here are some errors I have encountered for your reference. I have made sure that every time there was an error, I did go to the log file, verified the internals.
**Error at 8th step of create sample data While installing SP2013 in standalone mode with
**psconfig.exe -cmd Configdb create SkipRegisterAsDistributedCacheHost
Solution:
Now if you just read through the error while configuration
1 2 |
Microsoft.SharePoint.Win32.SPNetApi32.CreateFileShare(String name, String description, String path) at Microsoft.Office.Server.Search.Administration.AnalyticsAdministration.CreateAnalyticsUNCShare(String dirParentLocation, String shareName) |
It looks like the error occurred while trying to create analytics UNCShare. So I tried going to
“C:\Program Files\Microsoft Office Servers\15.0\Data\Office Server\
there I found one folder “Analytics_”+ guid. So i tried doing the same i.e. share the folder . Gave permissions to Everyone (best guess is WSS_Admin_WPG and the account which is running the search service should do
After this when I ran the configuration again – no more error – setup was successful
Central Administration returns blank page after installation
Manually enable each of the required Windows Features. You can do this quickly by copying and running the following command in a Command Prompt window
- start /w pkgmgr /iu:IIS-WebServerRole;IIS-WebServer;IIS-CommonHttpFeatures;^
- IIS-StaticContent;IIS-DefaultDocument;IIS-DirectoryBrowsing;IIS-HttpErrors;^
- IIS-ApplicationDevelopment;IIS-ASPNET;IIS-NetFxExtensibility;^
- IIS-ISAPIExtensions;IIS-ISAPIFilter;IIS-HealthAndDiagnostics;^
- IIS-HttpLogging;IIS-LoggingLibraries;IIS-RequestMonitor;IIS-HttpTracing;IIS-CustomLogging;IIS-ManagementScriptingTools;^
- IIS-Security;IIS-BasicAuthentication;IIS-WindowsAuthentication;IIS-DigestAuthentication;^
- IIS-RequestFiltering;IIS-Performance;IIS-HttpCompressionStatic;IIS-HttpCompressionDynamic;^
- IIS-WebServerManagementTools;IIS-ManagementConsole;IIS-IIS6ManagementCompatibility;^
- IIS-Metabase;IIS-WMICompatibility;WAS-WindowsActivationService;WAS-ProcessModel;^
10. WAS-NetFxEnvironment;WAS-ConfigurationAPI;WCF-HTTP-Activation;^
WCF-NonHTTP-Activation
Follow the following steps:
1. Open IIS
2. In the left pane Click on : <MachineName(User)>-> Site->Central Admin website
3. Click on it
4. In the middle pane: doubleclick on IIS-Authentication
5. Enable Basic Authentication
6. Restart IIS