Small Basic: Graduate to C#
This article considers how to Graduate a Small Basic program to C#.
Motivations
There are several motivations to do this:
- There is no Graduate option in Small Basic to create C# code. C# is a very good alternative to VB as a follow on language from Small Basic.
- The Graduate to Visual Basic option in the Small Basic IDE (Integrated Development Environment) works well for simple code, but not so well for some more complex code. For example arrays do no convert well and additional work is often required.
- Once the code is converted, a powerful debugger is available in Visual Studio to help debug your code or understand how other code works.
- Graduated code that you already know is a good way to start to understand the syntax of a new language.
- Because it can be done and is fun.
Prerequisites
You require 2 additional free software packages, these must be installed first.
ILSpy
ILSpy allows any un-obfuscated (deliberately hidden) .Net code to be decompiled and the source code viewed. This is very helpful for understanding SmallBasicLibrary.dll and other extension dlls for which you don't have the source code. In addition, it also allows a full Visual Studio project to be created from a previously compiled .Net exe.
It can be downloaded from the following site, or a short google for "ILSpy download" to get the most recent version.
https://github.com/icsharpcode/ILSpy/releases/download/2.3/ILSpy_Master_2.3.0.1827_Binaries.zip
Simply unzip the contents of the downloaded zip somewhere, no installation is required. To run it you just navigate to the folder where you unzipped it using Windows Explorer and double click ILSpy.exe.
Visual Studio Community
Since the first version of the article, the Visual Studio Express versions no longer exist, they have been replaced by the single version Visual Studio Community. It allows more capabilities, but this article applies in the same way with the Community version.
Visual Studio Community allows VB, C# and C++ applications to be created and run. We will just be using the C# capabilities. It does require a large download and a free registration needs to be completed, but the installation is quite straight forward. This software is also required for creating Small Basic extensions.
It can be downloaded from the following location : Visual Studio Community
Conversion
First we create a Small Basic exe and then convert it to a Visual Studio project.
Create a Small Basic exe
The first thing we need is a compiled Small Basic exe. For this example I use quite a complex one using the LitDev extension; the sample creating a 3D maze game. You can do this with any Small Basic exe, but I chose a large complex one for demonstration and test purposes.
To create the Small Basic exe, simply save and run the program in the Small Basic IDE. Once compiled, there will be an exe created in the same directory as your Small Basic *.sb source code. For this example the exe file is LD3DMazeGame.exe.
Convert to VS project
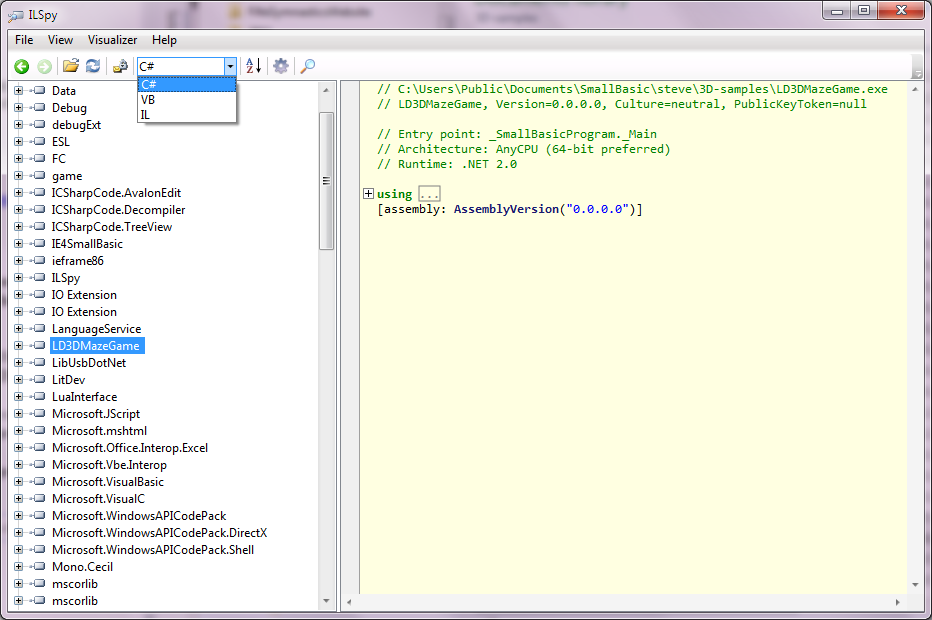
Next start ILSpy and open the generated Small Basic exe using File->Open and navigate to the exe (LD3DMazeGame.exe). You can also just drag the exe into the left pane of ILSpy from Windows Explorer.
The code for the opened .Net file will be available for viewing in ILSpy, but we just want to export the whole thing as a Visual Studio project.
Ensure that the code visualisation is set to C# (the default), select the exe project on the list of .Net assemblies (left pane).
Then click File->Save Code... to save it somewhere. I suggest a new folder somewhere.
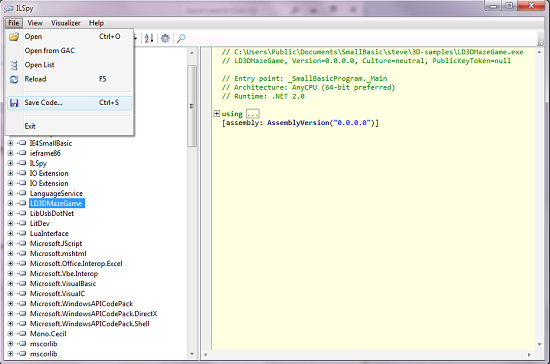
Once saved, ILSpy then gives you the option to open this folder, which you can do, or navigate to it in Explorer. There should be 2 files here:
- _SmallBasicProgram.cs
- LD3DMazeGame.csproj
It is convenient at this stage to also copy all required extension dlls and SmallBasicLibrary.dll to this folder. These dlls can be found in the same folder as your compiled Small Basic exe. In my case this is just 2:
- SmallBasicLibrary.dll
- LitDev.dll
Inside Visual Studio
We open the created project, set the .Net framework to 3.5 (used by Small Basic 1.0) or 4.5 (used by Small Basic 1.1) and add references to the required dlls. We then set the Main entry point and can then run the program as C#.
Initial setup
In the folder with the project created by ILSpy, right click on the csproj file and Open with 'Microsoft Visual Studio'.
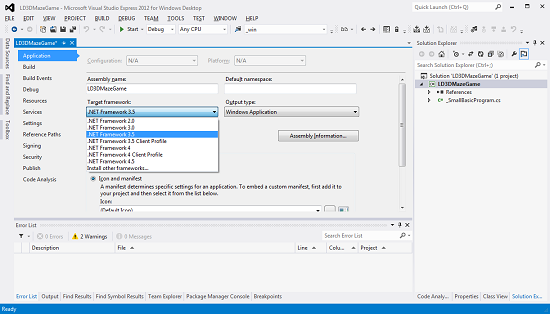
Once Visual Studio has opened the project find the Solution Explorer, right click on the project name (e.g. LD3DMazeGame) and select Properties. Then change the target framework to .Net 3.5 for Small Basic 1.0 (or .Net 4.5 for Small Basic 1.1) on the Application tab and say Yes to the acceptance question.
If the Solution Explorer window pane is not visible (right pane on image below), then it can be opened using View->Solution Explorer.
Save the solution using File->Save All and accept the default name and location, this should be the same location as the csproj project file.
Now open the References in the Solution Explorer, notice that they have a warning.
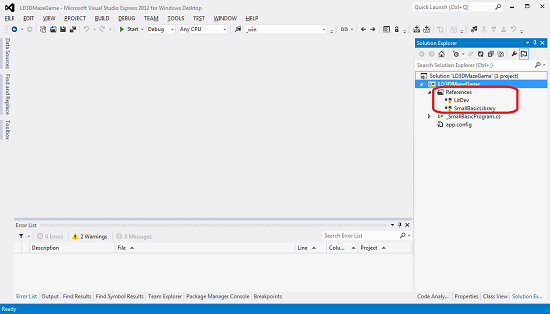
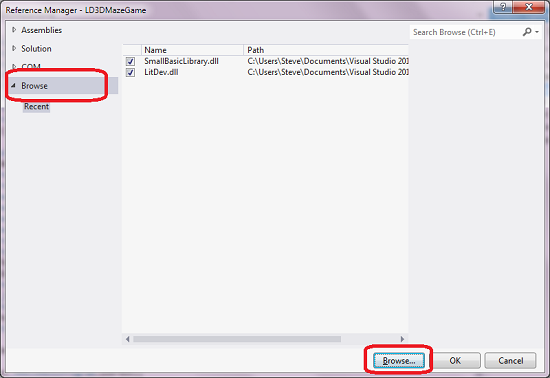
Right click the References tab (just above the yellow warnings in the Solution Explorer) and select Add Reference...
You then get a window to add references. On the Browse tab use the browse button at the bottom to browse to the required dlls (e.g. LitDev.dll + SmallBasicLibrary.dll) you copied to the VS solution folder. Once added, the References warning should disappear.
The source code
We only need to make one change to the source code created by ILSpy. To open the source code, double click on the _SmallBasicProgram.cs file in Solution Explorer.
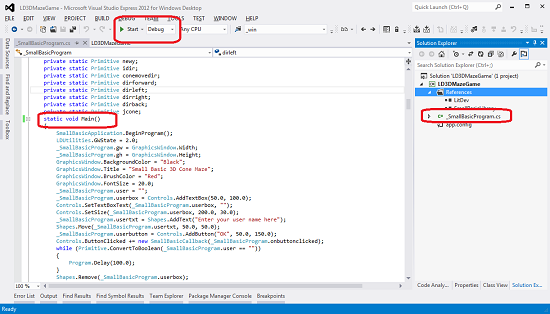
Scroll down to the function _Main, we need to change this to Main or Main(string[] args) if you want to add command line arguments. This is the 'entry point' where the application will start and must be named 'Main', with no leading underscore.
While the ILSpy conversion works, some of the code created may be a bit odd or convoluted. Many of the commands are over long, including unnecessary namespace information, for example all of the '_SmallBasicProgram.' labels before commands are not needed and could be removed with a simple 'Find and Replace'.
Now press the Start (green arrow on the menu bar at the top) and the program should compile and run!
Running the Program
You can run in Debug (allows detailed debugging, but slower) or Release (limited debugging, but faster) mode. Set the Debug or Release option before you run from the option just to the right of the green arrow for start. Debugging allows you to step through the code, create break points to stop the code and see the values of variables as they change.
Also if your program crashes while in Debug mode, it will stop where the crash occurred, often tell you why it crashed and allow you to check the current state of variables which can help determine the cause of the crash.
The generated code will be found in sub folders of the solution folder (lib/Debug and lib/Release). These are the folders where the code is run from and is now the location of the Small Basic property Program.Directory. Therefore any files or resources may need to be copied there too.
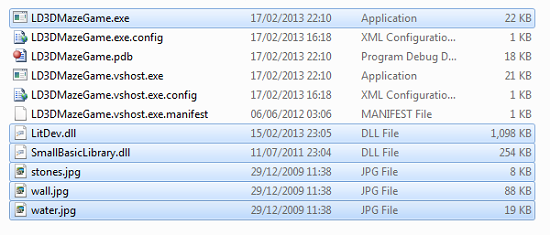
In my case 3 image files for the maze game, stones.jpg, wall.jpg and water.jpg.
All files needed to run the application will be located in this folder and can be copied elsewhere if you wish to run your program outside of Visual Studio. Remember that Release builds will generally be faster so are better for actually using the compiled code, while Debug builds are useful while in the development stage.
In my case the Release folder looks like this, the highlighted items are those actually required to run the program and can be copied elsewhere.
There is lots of help using the Visual Studio IDE and C# on MSDN and elsewhere.
Experiment and have fun!