The Developer’s Reference Guide to Small Basic: Chapter 4: TextWindow Object
Small Basic >Small Basic Books >The Developer’s Reference Guide to Small Basic > 4. TextWindow Object
PreviewIn this chapter, we look at the Small Basic TextWindow object. It is used to work with text input and output. TextWindow ObjectThe TextWindow is an object where we can receive text input and write text output. In Small Basic, text windows are usually used for simple programs with no graphic elements. We used the text window in the examples in Chapter 3. TextWindow Properties: BackgroundColor CursorLeft CursorTop ForegroundColor |
This chapter is adapted from the book The Developer’s Reference Guide To Microsoft Small Basic by Philip Conrod and Lou Tylee. To purchase this book in its entirety, please see the Computer Science For Kids web site. |
Left
Gets or sets the left position of text window on your computer screen.
Title
Gets or sets the title for the text window.
Top
Gets or sets the top position of text window on your computer screen.
TextWindowMethods:
Clear()
Clears the text window.
Hide()
Hides the text window.
Pause()
Waits for user input before returning.
PauseIfVisible()
Waits for user input only when the text window is open.
PauseWithoutMessage()
Waits for user input before returning (but there is no ‘Press Any Key’ message).
Read()
Reads a line of text from the text window. This method will not return until the user presses Enter. Returns entered text.
ReadKey()
Reads a key press from the text window. Returns the pressed key.
ReadNumber()
Reads a number from the text window. This method will not return until the user presses Enter. Returns entered number.
Show()
Shows the text window.
Write(data)
Writes text or number (data) to the text window. Unlike WriteLine, this will not append a new line character, which means, anything written to the text window after this call will be on the same line.
WriteLine(data)
Writes text or number (data) to the text window. A new line character will be appended to the output, so that the next time something is written to the text window, it will go in a new line.
TextWindow Features
By default, the text window displays white text on a black background:

The default window has 25 rows (CursorTop values from 0 to 24) and 80 columns (CursorLeft values from 0 to 79)
To change the background color for the entire window, set the TextWindow.BackgroundColor property followed by a Clear method. The ForegroundColor property sets the text color.
The text window is located on your computer screen as follows:

Example 4-1. TextWindow Properties
Write a program that writes blue text on a yellow background. Write a line of text near the middle of the window.
Small Basic Code:
' Guide to Small Basic, Example 4-1TextWindow.Title = "Example 4-1"TextWindow.BackgroundColor = "Yellow"TextWindow.ForegroundColor = "Blue"TextWindow.Clear()TextWindow.Left = 200TextWindow.Top = 100TextWindow.CursorLeft = 30TextWindow.CursorTop = 10TextWindow.WriteLine("This is Example 4-1")
Saved as Example 4-1 in Guide to Small Basic\Programs\Chapter 4 folder.
This program illustrates use of all the properties of the TextWindow object. The Title property is set as are BackgroundColor and ForegroundColor. We use the WriteLine method (preceded by CursorLeft and CursorTop) to position the text in the window. Left and Top position the window on your screen.
Save and Run the program to see the results:

TextWindow Input
There are three methods used to get user input in the text window. The Read method is used to obtain text information. The <Enter> key is pressed to complete the input. Similarly, the ReadNumber method is used to obtain numeric information. With ReadNumber, non-numeric keystrokes are ignored. Lastly, the ReadKey method obtains individual keystrokes with no need to press <Enter>.
Example 4-2. TextWindow Input
Write a program where the user first inputs a line of text then a numeric value. Lastly, intercept keystrokes typed by the user.
Small Basic Code:
' Guide to Small Basic, Example 4-2TextWindow.Title = "Example 4-2"A = TextWindow.Read()TextWindow.WriteLine(A)B = TextWindow.ReadNumber()TextWindow.WriteLine(B)GetKeystroke:C = TextWindow.ReadKey()TextWindow.WriteLine(C)Goto GetKeystroke
Saved as Example 4-2 in Guide to Small Basic\Programs\Chapter 4 folder.
Save and Run the program. First, you see a flashing cursor waiting for you to type a line of text, then press <Enter>:

Type something in and press <Enter>. Here’s what I see now:

You see the line I input and the line written back out with WriteLine. The program is now waiting for a numeric input. Type such an input and press <Enter>. You will only be able to type numeric characters (0, 1, 2, 3, 4, 5, 6, 7, 8, 9, single decimal point, single negative sign to start input). Try non-numeric characters – they won’t appear. Here’s what I have now (my input and it’s written value):

Now, the program is waiting for individual keystrokes. Type some. Notice there is no need to press <Enter> after the keystrokes. With each keystroke, the program will write out what you typed:

To stop the program, click the X in the upper right corner of the window.
TextWindow Output
There are two methods used to write information in the text window. We have used the WriteLine method. It writes the information to the window and appends a new line character. Any subsequent output methods start on a new line. WriteLine can also be used to write a blank line using:
TextWindow.WriteLine("")
An alternate to WriteLine is the Write method. It writes information to the window, but does not append a new line character. Subsequent output methods start at the end of the information written by the Write method. The Write method is useful for providing prompts prior to a Read, ReadNumber or ReadKey method.
Output using both WriteLine and Write can be positioned anywhere in the text window by setting the CursorLeft and CursorTop properties prior to using the output method. By default, each output method uses a CursorLeft value of 0. CursorTop is incremented by one with each WriteLine method.
Example 4-3. Dice Rolling (TextWindow Output)
Write a program that rolls a dice until an input number of sixes is rolled (we showed this code when discussing While loops in Chapter 2). Once the rolls are complete, write out how many rolls it took to achieve the input value.
Small Basic Code:
' Guide to Small Basic, Example 4-3TextWindow.Title = "Example 4-3"TextWindow.BackgroundColor = "White"TextWindow.ForegroundColor = "Black"TextWindow.Clear()GetNumberSixes:TextWindow.Write("How many sixes must be rolled? ")Number = TextWindow.ReadNumber()Rolls = 0Counter = 0While (Counter < Number) ' Roll a simulated die Rolls = Rolls + 1 If (Math.GetRandomNumber(6) = 6) Then Counter = Counter + 1 EndIfEndWhileTextWindow.WriteLine("It took " + Rolls + " rolls to get " + Number + " sixes.")TextWindow.WriteLine("")Goto GetNumberSixes
Saved as Example 4-3 in Guide to Small Basic\Programs\Chapter 4 folder.
Save and Run the program. The Write statement is used to prompt the user for the needed input (notice no new line is started – the flashing cursor is to the right of the question mark):

I picked 10 and see that it took 53 rolls to achieve 10 sixes:
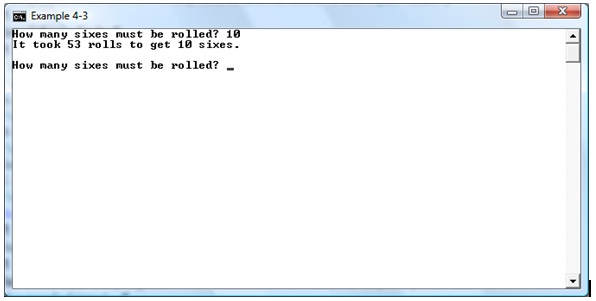
Theoretically, it should take 60 rolls (since each roll has a 1 in 6 chance of rolling a six). At this point, I can type in another value. Try several values. Stop the program when you are done.
Chapter Review
After completing this chapter, you should understand:
- Use of the TextWindow object.
- Setting TextWindow properties.
- Difference between Read, ReadNumber and ReadKey methods.
- Difference between WriteLine and Write methods.
The TextWindow object can only accept and output text information. Next, we look at the GraphicsWindow object which allows graphical elements.
Excerpt © Copyright 2010-2013 By Kidware Software LLC All Rights Reserved. Computer Science For Kids, the Computer Science For Kids logo, and related trade dress are trademarks or registered trademarks of Kidware Software LLC. Philip Conrod & Lou Tylee have co-authored dozens of books and tutorials for beginning Microsoft Basic, Small Basic, Visual Basic, and Visual C# developers of all ages for over 25 years.