Windows Store App with a SQLite Database
In Windows Store Apps there are a variety of ways to store your application's data. Examples of such mechanisms would be Web Storage, IndexedDB etc. and even OneDrive. Let's see how we can use “SQLite” database with Windows Store Apps.
SQLite is a relational database management system contained in a small C programming library. SQLite stores the entire database as a single cross-platform file on a host machine. You can examine this file using tools such as SQLite Database Browser which you can download from here. SQLite does not support all the SQL features. Here is a list of features which are not supported in SQLite.
Now let’s see how we can use SQLite in a Windows Store App. We are creating a blank Windows Store App. Now we need to get SQLite binaries for Windows Runtime. You can download Precompiled Binaries for Windows Runtime from here.
| http://lh4.ggpht.com/-2YUtSEzXpfg/UZHwtzev6FI/AAAAAAAABak/vE4pwvsde1Q/0_thumb%25255B11%25255D.png?imgmax=800 |
| Precompiled Binaries for Win RT |
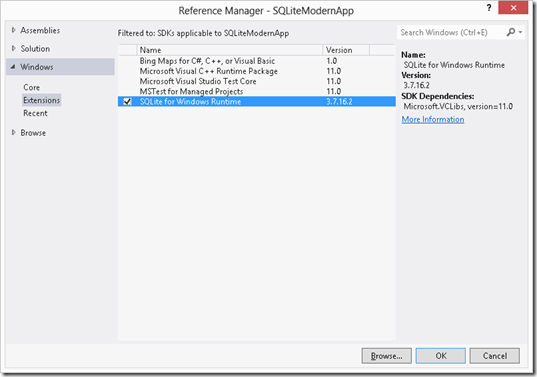
Once the vsix file has completed installing, then you need to add a reference to "SQLite for Windows Runtime" from your project.
| http://lh4.ggpht.com/-Kh1lGgaw198/UZHwvwlHCbI/AAAAAAAABa0/KuVmqoCHcwE/1_thumb%25255B2%25255D.png?imgmax=800 |
| Add Reference |
**
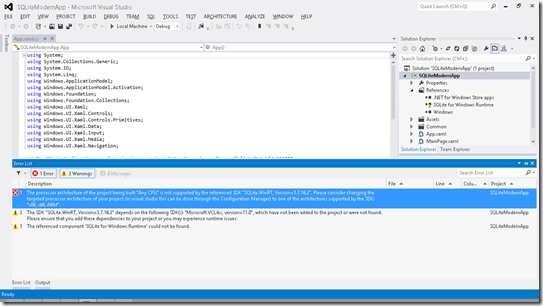
One important thing. If you want to publish a app with SQLite to Windows Store, make sure to add reference to Microsoft Visual C++ Runtime package as well**. Now after adding the reference, when we compile the project, the following error is presented.
| http://lh5.ggpht.com/--5eYfuubCoQ/UZHwzFRH6pI/AAAAAAAABbE/I-CtjkGrH0w/2_thumb%25255B2%25255D.png?imgmax=800 |
| Platform Error |
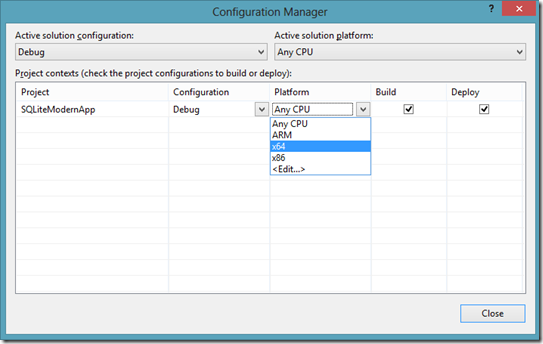
To resolve the error here, let's change the project's target platform to “x64”.
| http://lh5.ggpht.com/-eqkOFX84v-8/UZHw00T4ujI/AAAAAAAABbU/rJKUAMud62g/3_thumb%25255B2%25255D.png?imgmax=800 |
| Changing Target Platform |
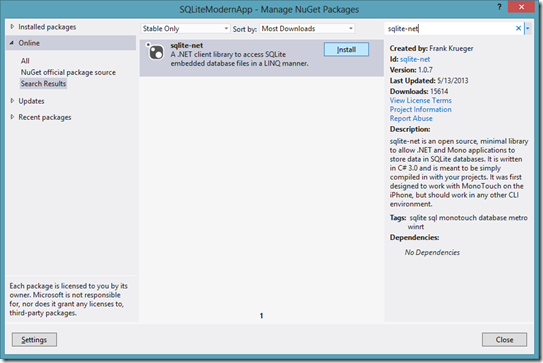
Now let's add a wrapper for SQLite which was written using C#. So we can write my code fairly easily. Let's go to Nuget and search for “sqlite-net” and let's it to our project.
| http://lh3.ggpht.com/-lSRhpuKb1rQ/UZHw3CAlsBI/AAAAAAAABbk/fT9LC-9kbh8/4_thumb%25255B2%25255D.png?imgmax=800 |
| Adding sqlite-net |
Once the package has completed configuring, you can see two new classes (“SQLite.cs” and “SQLiteAsync.cs”) added to your project. Now we are almost done configuring the project for SQLite. Now let's move into writing some codes.
Here we are using the Repository Pattern. Repository Pattern is a software design pattern where the entity classes and the entity functionalities are separated. To our project, let's add the following folders,
- “DataModel” – Stores classes which model tables (entities) inside our SQLite database.
- “Repository” – Stores classes which have CRUD methods of Entity models.
- “DataAccess” – Stores classes for database connection.
First let's add a DbConnection.cs and IDbConnection.cs to “DataAccess” folder.
IDbConnection.cs
using System.Threading.Tasks;
using SQLite;
namespace SQLiteModernApp.DataAccess
{
public interface IDbConnection
{
Task InitializeDatabase();
SQLiteAsyncConnection GetAsyncConnection();
}
}
DbConnection.cs
using System.IO;
using System.Threading.Tasks;
using SQLite;
using SQLiteModernApp.DataModel;
namespace SQLiteModernApp.DataAccess
{
public class DbConnection : IDbConnection
{
string dbPath;
SQLiteAsyncConnection conn;
public DbConnection()
{
dbPath = Path.Combine(Windows.Storage.ApplicationData.Current.LocalFolder.Path, "MyTable.sqlite");
conn = new SQLiteAsyncConnection(dbPath);
}
public async Task InitializeDatabase()
{
await conn.CreateTableAsync<Department>();
await conn.CreateTableAsync<Employee>();
}
public SQLiteAsyncConnection GetAsyncConnection()
{
return conn;
}
}
}
Here the path of the current application is obtained and the SQLite database there. Two classes are added to the “DataModel” folder - “Employee” and “Department”.
Department.cs
using SQLite;
namespace SQLiteModernApp.DataModel
{
[Table("Department")]
public class Department
{
[PrimaryKey]
public int DepartmentId { get; set; }
[MaxLength(30)]
public string DepartmentName { get; set; }
}
}
Employee.cs
using SQLite;
namespace SQLiteModernApp.DataModel
{
[Table("Employee")]
public class Employee
{
[PrimaryKey, AutoIncrement]
public int EmployeeId { get; set; }
[MaxLength(30)]
public string FirstName { get; set; }
public string LastName { get; set; }
public string Email { get; set; }
public int DepartmentId { get; set; }
}
}
In our “Repository”, we are going to have CRUD operations for above two entities. Here the code for Employee entity is presented.
IEmployeeRepository.cs
using System.Collections.Generic;
using System.Threading.Tasks;
using SQLiteModernApp.DataModel;
namespace SQLiteModernApp.Repository
{
interface IEmployeeRepository
{
Task InsertEmployeeAsync(Employee employee);
Task UpdateEmployeeAsync(Employee employee);
Task DeleteEmployeeAsync(Employee employee);
Task<List<Employee>> SelectAllEmployeesAsync();
Task<List<Employee>> SelectEmployeesAsync(string query);
}
}
**
EmployeeRepository.cs**
In our EmployeeRepository class, let's implement the above IEmployeeRepository interface.
using System.Collections.Generic;
using System.Threading.Tasks;
using SQLite;
using SQLiteModernApp.DataAccess;
using SQLiteModernApp.DataModel;
namespace SQLiteModernApp.Repository
{
public class EmployeeRepository : IEmployeeRepository
{
SQLiteAsyncConnection conn;
public EmployeeRepository(IDbConnection oIDbConnection)
{
conn = oIDbConnection.GetAsyncConnection();
}
public async Task InsertEmployeeAsync(Employee employee)
{
await conn.InsertAsync(employee);
}
public async Task UpdateEmployeeAsync(Employee employee)
{
await conn.UpdateAsync(employee);
}
public async Task DeleteEmployeeAsync(Employee employee)
{
await conn.DeleteAsync(employee);
}
public async Task<List<Employee>> SelectAllEmployeesAsync()
{
return await conn.Table<Employee>().ToListAsync();
}
public async Task<List<Employee>> SelectEmployeesAsync(string query)
{
return await conn.QueryAsync<Employee>(query);
}
}
}
Now let's move to the UI. In our MainPage.xaml, we have a stack panel which contains controls for the user to insert data. And then we have a list view to show data stored in the database.
<Grid Background="{StaticResource ApplicationPageBackgroundThemeBrush}">
<StackPanel Name="sPanelEmployee" Orientation="Vertical" Margin="10,11,1040,23">
<TextBlock Text="First Name" Margin="2 2 2 2" FontSize="14"/>
<TextBox Name="txtFirstName" Text="{Binding FirstName, Mode=TwoWay}"/>
<TextBlock Text="Last Name" Margin="2 2 2 2" FontSize="14"/>
<TextBox Name="txtLastName" Text="{Binding LastName, Mode=TwoWay}"/>
<TextBlock Text="Email" Margin="2 2 2 2" FontSize="14"/>
<TextBox Name="txtEmail" Text="{Binding Email, Mode=TwoWay}"/>
<TextBlock Text="Department" Margin="2 2 2 2" FontSize="14" />
<ComboBox Name="cboDepartment" ItemsSource="{Binding Department}" DisplayMemberPath="DepartmentName" SelectedValuePath="DepartmentId" SelectedValue="{Binding DepartmentId, Mode=TwoWay}" />
<StackPanel Orientation="Horizontal" HorizontalAlignment="Right" Margin="0 10 0 0">
<Button x:Name="btnCreate" Content="Create" Click="btnCreate_Click" />
<Button x:Name="btnUpdate" Content="Update" Click="btnUpdate_Click" />
<Button x:Name="btnDelete" Content="Delete" Click="btnDelete_Click" />
</StackPanel>
</StackPanel>
<ListView Name="lstViewEmployees" ItemsSource="{Binding}" Margin="399,11,10,10" SelectionChanged="lstViewEmployees_SelectionChanged" >
<ListView.ItemTemplate>
<DataTemplate>
<StackPanel Orientation="Vertical" Margin="4">
<StackPanel Orientation="Horizontal">
<TextBlock Text="Employee Id" Width="300"></TextBlock>
<TextBlock Text="{Binding EmployeeId}" ></TextBlock>
</StackPanel>
<StackPanel Orientation="Horizontal">
<TextBlock Text="First Name" Width="300"></TextBlock>
<TextBlock Text="{Binding FirstName}" ></TextBlock>
</StackPanel>
<StackPanel Orientation="Horizontal">
<TextBlock Text="Last Name" Width="300"></TextBlock>
<TextBlock Text="{Binding LastName}"></TextBlock>
</StackPanel>
<StackPanel Orientation="Horizontal">
<TextBlock Text="Email" Width="300"></TextBlock>
<TextBlock Text="{Binding Email}" ></TextBlock>
</StackPanel>
<StackPanel Orientation="Horizontal" >
<TextBlock Text="Department" Width="300"></TextBlock>
<TextBlock Text="{Binding DepartmentId}" ></TextBlock>
</StackPanel>
</StackPanel>
</DataTemplate>
</ListView.ItemTemplate>
</ListView>
</Grid>
Now in our code behind, first let's initialize the database.
DepartmentRepository oDepartmentRepository;
EmployeeRepository oEmployeeRepository;
private async Task InitializeDatabase()
{
DbConnection oDbConnection = new DbConnection();
await oDbConnection.InitializeDatabase();
oDepartmentRepository = new DepartmentRepository(oDbConnection);
oEmployeeRepository = new EmployeeRepository(oDbConnection);
}
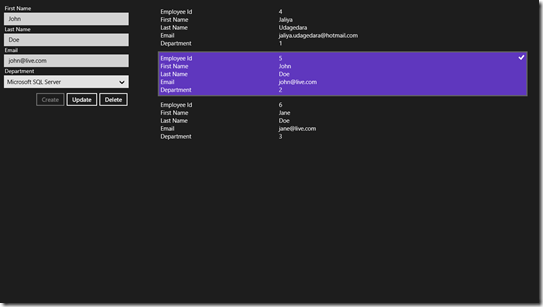
Now we can call methods in my Repository classes, through these objects. Here are some screenshots of the final application.
| http://lh3.ggpht.com/-PclROSI2RGo/UZHw4-ASZmI/AAAAAAAABb0/p1J3H6SjXAM/5_thumb%25255B2%25255D.png?imgmax=800 |
| Add New Employee |
| http://lh4.ggpht.com/-_aXZziLq3iA/UZHw7VepGCI/AAAAAAAABcE/cEBUeHBRnw0/6_thumb%25255B1%25255D.png?imgmax=800 |
| View/Update/Delete Employee |
Complete sample is available in MSDN Code Gallery,
Download Sample
Happy Coding.