BizTalk Server 2013: Provisioning a Virtual Machine in Azure
Introduction
BizTalk Server 2013 offers new features to align with Windows Azure. From application perspective this means you can extend endpoints of your BizTalk Service to cloud using WCF relay bindings, interact with the Services through SB-Messaging Adapter and REST Support. From an infrastructure perspective it means that BizTalk Server can be provisioned as a virtual machine in Windows Azure. Running BizTalk in Azure has the following advantages:
- Reduce procurement time of hardware: you spin up a new virtual machine within an hour (provisioning and configuration).
- Pay as you use: you only pay when machine up and running.
- Management: you manage the virtual machine through the Windows Azure Management Portal.
In this article BizTalk IAAS will be discussed and how you can setup a Virtual Machine with BizTalk Server 2013 Enterprise.
Provisioning a BizTalk Virtual Machine
Running BizTalk in Windows Azure can be time and cost saving. There are several ways you can provision a virtual machine with BizTalk. Either manually through Windows Azure Management Portal, through PowerShell (Scripting) or by uploading an existing virtual machine (vhd).
Windows Azure Management Portal
Provisioning through the Windows Azure Management Portal is pretty straight forward. A new virtual machine can be created by navigating in the management portal to Virtual Machines. Lower left corner (pane) you can click NEW. A pane will pop up and in category Compute you can choose Virtual Machine and then Quick Create or From Gallery.
Quick Create
With Quick create you specify DNS Name, Image, Size, Username, Password and the Region//Affinity Group.

Figure 1. Specifying details for creating a virtual machine through Quick Create (click Image to enlarge).
The information you provide is as follows:
A DNS Name: An unique name between 3 and 15 characters that will be concatenated with a default DNS part .cloudapp.net.
An Image: Operating system for your BizTalk instance. You can choose between multiple images.
The Size of your virtual machine: You choose between extra small to A7. See Azure Virtual Machine Pricing details.
UserName and Password: The password must be at least 8 characters.
The Region or Affinity Group: Region will be location of the Azure data center. Affinity Group allow you to group your Windows Azure services to optimize performance. So in case you have created such a group you can choose that over a region.
After specifying the details you can click the check mark to create the virtual machine. You will see the new virtual machine listed in on the Virtual Machines page.

Figure 2. Provisioning of the Virtual Machine (click Image to enlarge).
After provisioning is done you can connect to the virtual machine, login and configure BizTalk (see Connect to Virtual Machine).
From Gallery
With option From Gallery you have to specify more details than with Quick Create. You navigate in the management portal to Virtual Machines. Lower left corner (pane) you can click NEW. A pane will pop up. In the category Compute you choose Virtual Machine and then From Gallery. A wizard will pop up.
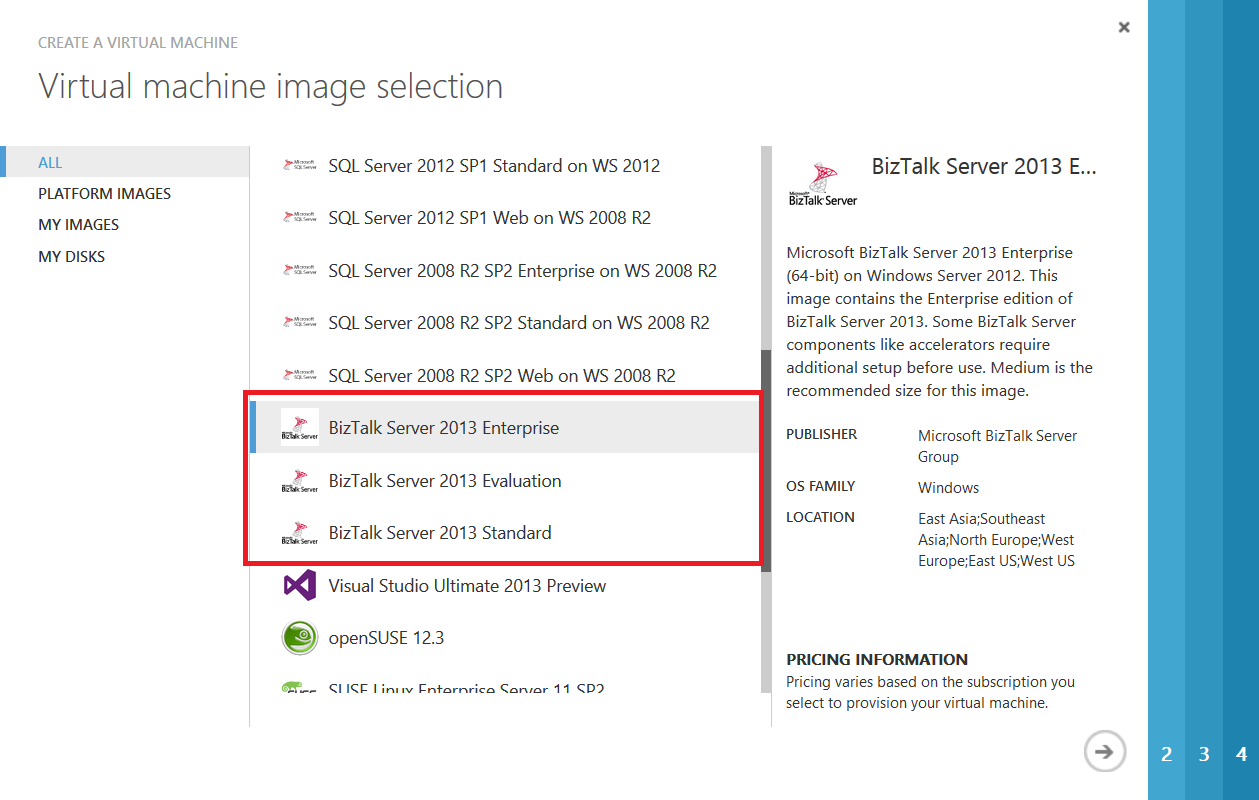
Figure 3. Virtual machine image selection (click Image to enlarge).
In the first page of the wizard you choose, which image you desire for BizTalk (i.e. Enterprise, Evaluation or Standard). Subsequently you click on the arrow to move to next page.

Figure 4. Virtual Machine Configuration (click Image to enlarge).
In second page you specify the name of the virtual machine, determine the size, and provide user name and password. By clicking on either one of the arrows you can navigate back or forward to page 3.

Figure 5. Second page to specify Virtual Machine settings (click Image to enlarge).
In the third page you continue to specify virtual machine settings. You the choose a cloud service. A cloud service is a container for one or more virtual machines you can create. Based on the name of the cloud service the DNS will appear in the box below. This the name of the cloud service plus default DNS .cloudapp.net. Next you can choose between subscriptions in case you have multiple subscriptions. Subsequently you can choose where you want to deploy your virtual machine. You can choose between region, affinity group or virtual network. Next you choose a storage account. You can create a new one or choose an existing one. You need a storage account to use Windows Azure storage. The account will give your virtual machines access to Windows Azure Blob services located in a geographic region. Finally you if you want to make use of an availability set. An availability set is a group of virtual machines that are deployed across fault domains and update domains. An availability set makes sure that your application is not affected by single points of failure, like the network switch or the power unit of a rack of servers. By clicking on either one of the arrows you can navigate back or forward to page 4.

Figure 6. Third and last page to specify Virtual Machine settings (click Image to enlarge).
In this last page you can configure, add, or remove the endpoints that other resources can use to communicate with your virtual machine. After specifying the details you can click the check mark to create the virtual machine. You will see the new virtual machine listed in on the Virtual Machines page (see figure 2 Quick Create).
Connect to Virtual Machine
After the Virtual Machine has been provisioned you can connect. At the bottom pane you can click Connect.

Figure 7. Connect to Virtual Machine (click Image to enlarge).
Information in the bottom pane will appear stating: The portal is retrieving the .rdp file. You will receive a prompt to open or save the file shortly. Then a dialog will appear.
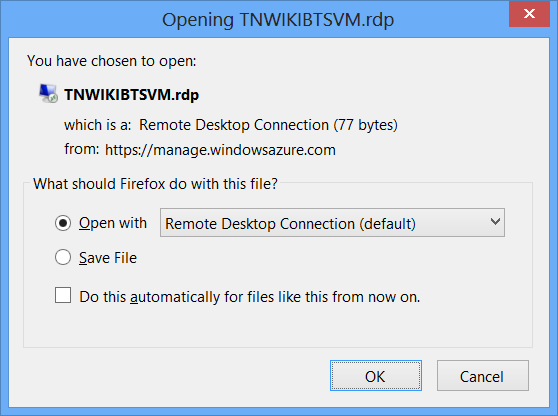
**
Figure 8.** Opening remote desktop session to the Virtual Machine.
By default the endpoint to communicate with a Virtual Machine is through a remote desktop connection unless you want it otherwise like through PowerShell or Secure Shell (SSH), See MSDN How to Set Up Communication with a Virtual Machine. By clicking OK a RDP Session will start.
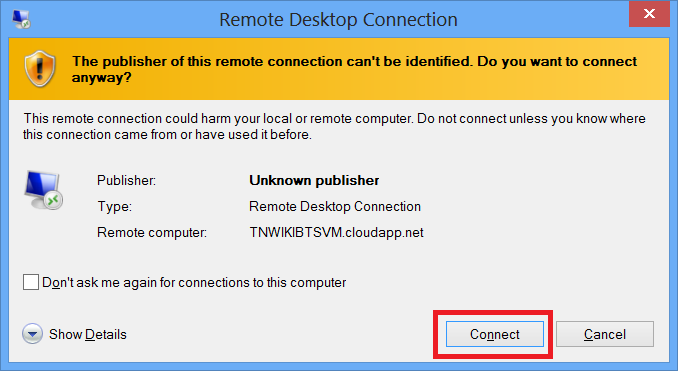
Figure 9. Remote Desk Connection
By clicking connect the login dialog will appear. Here you provide the user name and password you specified during provisioning steps in either Quick Create or From Gallery.

Figure 10. Enter credentials for the Virtual Machine.
After click OK a dialog may appear warning you that the remote computer cannot be verified.

Figure 11. Warning about trust between the Virtual Machine and the remote computer.
The client however doesn't need to install a certificate on their machine. During the provisioning an RDP account will be created, which will automatically configure the endpoints for 3389 on the instance (see figure 5 From Gallery section). After clicking yes the RDP session will start and you will have access to your virtual machine, where you can start configuring BizTalk Server 2013.

Figure 12. Virtual Machine with the Microsoft BizTalk Server Configuration - Start (click Image to enlarge).
PowerShell (Scripting)
Provisioning of a Virtual Machine can be automated through PowerShell script. Using the Windows Azure Management Portal to provision a Virtual Machine can mean a couple of manual steps (see From Gallery section). You can use Windows Azure cmdlets to create a virtual machine in the configuration that you want. MSDN article Create or Delete Virtual Machines Using Windows Azure Cmdlets will multiple ways to create a Virtual Machine with the cmdlets.
To quickly create a BizTalk Server 2013 Virtual Machine you can use the New-AzureQuickVM cmdlet to create a Windows Azure Virtual Machine in a single command. You first will need to download the commandlets before you to be able to perform Windows Azure tasks with PowerShell. Next step is to download publish settings file from this location: https://windows.azure.com/download/publishprofile.aspx. This required as you need to execute the cmdlets to the appropriate Azure subscription.
First step is execute the following commands:
#Initial settings
Set-ExecutionPolicy Unrestricted

#Import publish settings
Import-AzurePublishSettingsFile "C:\SteefJan-Test Drive Azure-8-13-2013-credentials.publishsettings"

# SET AZURE SUBSCRIPTION
Set-AzureSubscription -SubscriptionName 'SteefJan'  -CurrentStorageAccount tnwikivms
Select-AzureSubscription -SubscriptionName 'SteefJan'
Set-AzureSubscription -DefaultSubscription 'SteefJan'
The Set-ExecutePolicy is required to be able to run with no restrictions. Next the Import-AzurePublishSettingsFile command is executed. The Import-AzurePublishSettingsFile cmdlet imports a .publishsettings file that has been downloaded. This file contains settings and an encoded certificate that provides management credentials for the Windows Azure account. This command is followed by commands to set the Azure Subscription. The Set-AzureSubscription cmdlet configures common settings including subscription ID, management certificate, and custom endpoints and the Select-AzureSubscription cmdlet selects or clears the subscription to be designated as the current subscription. A current subscription is the one whose settings are available for use by other Windows Azure PowerShell cmdlets.
When these commands are executed the next step is to find the right image. By executing the command below you can get a list of images.
Get-AzureVMImage | select ImageName
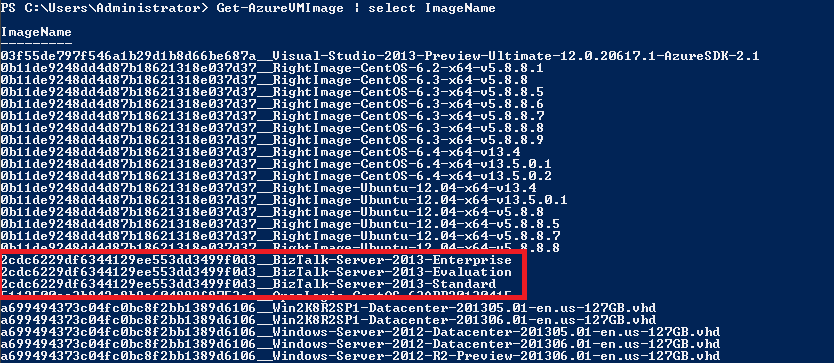
Figure 13. List of Virtual Machine Images Windows Azure (click Image to enlarge).
With knowledge of name of image you need depending on which version of BizTalk you want you can execute the New-AzureQuickVM with the following parameters:
New-AzureQuickVM -ImageName "2cdc6229df6344129ee553dd3499f0d3__BizTalk-Server-2013-Enterprise" -Password "St@ve12q" -AdminUsername "TNWIKI" -ServiceName "TNWIKIBTSVM1" -Windows -Location "North Europe" -name "TNWIKIBTSVM"

Figure 14. Executing New-AzureQuickVM command and results (click Image to enlarge).
After provisioning is done you can connect to the virtual machine, login and configure BizTalk (see Connect to Virtual Machine). This is an easy and straight forward way of quickly creating a Virtual Machine with BizTalk Server 2013 Enterprise using PowerShell. As said there are more and complexer ways of creating a Virtual Machine with PowerShell:
- For instance provisioning of a multi-server BizTalk environment (see blog post One Click BizTalk Multi-Server Environment Azure provisioning and full configuration by Rene Brauwers) or
- automatic provisioning of a virtual BizTalk environment (see blog post by Peter Borremans), and
- Setting up BizTalk360 On Windows Azure (BizTalk IaaS) in One Click by Dhana Krishnasamy.
Uploading an existing VHD
Another option is to upload a VHD with your BizTalk Server 2013 configured on it. To do this you will need to sysprep your image with BizTalk Server 2013. This thoroughly described in another blog post by Rene Brauwers How to: BizTalk Server 2013 Sysprep Development Image. You will need a Storage account in Windows Azure to be able to upload the VHD. In case you have a storage account set up then with PowerShell Cmdlets you can upload the VHD as described in MSDN Creating and Uploading a Virtual Hard Disk that Contains the Windows Server Operating System. Upload of your VHD can take a while depending on bandwidth of your network. After you upload your VHD, you add it as an image to the list of custom images associated with your subscription. You can subsequently create a Virtual Machine by either From Gallery or using PowerShell.
Deleting the Virtual Machine
When you no longer wish to use the virtual machine you can capture the VHD image, download it, and then run the virtual machine on-premise in your virtual machine software or you delete it through the Windows Azure Management Portal or by PowerShell cmdlets. Through the Windows Azure Management Portal you select the Virtual Machine and then in the bottom pane choose Delete.

Figure 15. Delete Virtual Machine (click Image to enlarge).
In case you click YES the machine will be deleted. However the virtual machine the operating system disk is not deleted and you can re-create the virtual machine by using the existing operating system disk.

Figure 16. Delete the Disk of the Virtual Machine (click Image to enlarge).
When deleting the disk you can choose between retaining or deleting the associated VHD. Deleteing the disk does not automatically mean that the VHD file that was used to create the disk is deleted from storage. To do so you need to choose delete the associated VHD option.

Figure 17. Deleting the Disk and associated VHD (click Image to enlarge).
After deleting the disk you only have the storage account and container left that was created during the provisioning of the Virtual Machine in case you choose to create one (see Quick Create or From Gallery). You can also dispose of these if you require to do so. For more information see MSDN Manage Disks and Images.
Wrap up
The quick create of a Virtual Machine is an easy and simple way of provisioning a virtual machine either through the Windows Azure Management Portal or through PowerShell scripting. A more complex and flexible way is to use the From Gallery option in the management portal, combination of PowerShell cmdlets or by uploading an existing VHD with a BizTalk Server 2013 image. This article just scratch the surface of the capabilities IAAS feature offers for BizTalk Server. The emphasis in this article lies on provisioning of a Virtual Machine with BizTalk Server 2013.
Call to action
In case you want a more in depth information on this subject than I recommended the Microsoft BizTalk Server 2013 in Windows Azure IaaS of TechEd North America by Stephen W. Thomas and/or the provided links in this article.
See Also
For documentation on BizTalk Virtual Machine see MSDN Configuring BizTalk Server 2013 on a Windows Azure VM.
Read suggested related topics:
Another important place to find an extensive amount of BizTalk related articles is the TechNet Wiki itself. The best entry point is BizTalk Server Resources on the TechNet Wiki.