Integrating Operations Manager 2012 Views in SharePoint 2013 with Visio Services
A need that many customers request is the possibility of integrating dynamic visualizations of System Center Operations Manager 2012 on TVs or make available publicly by SharePoint data instead of using the console.
Introduction
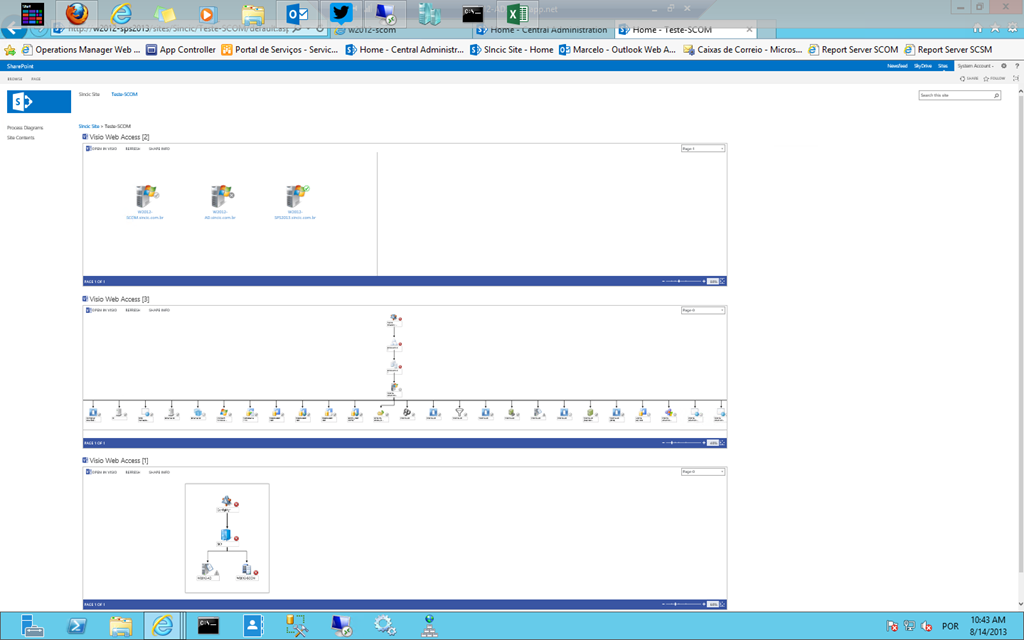
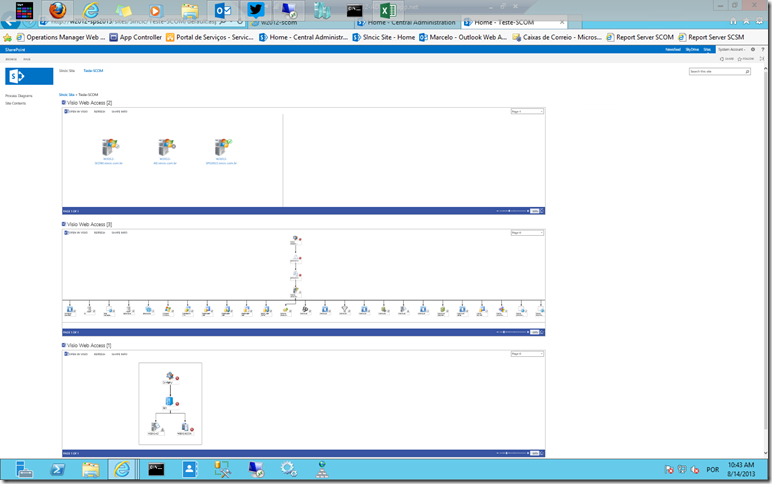
This feature is possible by using Visio Services in SharePoint 2013 Enterprise integrated with data publication service of SCOM, providing a preview as below with the full site with 3 Web parts, or even using the Dashboards:
http://www.marcelosincic.com.br/blog/image.axd?picture=SNAG-0000_thumb.png
Note: Only the first of webparts is dynamic and online. The two Web parts of the diagram are just static representations of a Visio file raised SCOM console.
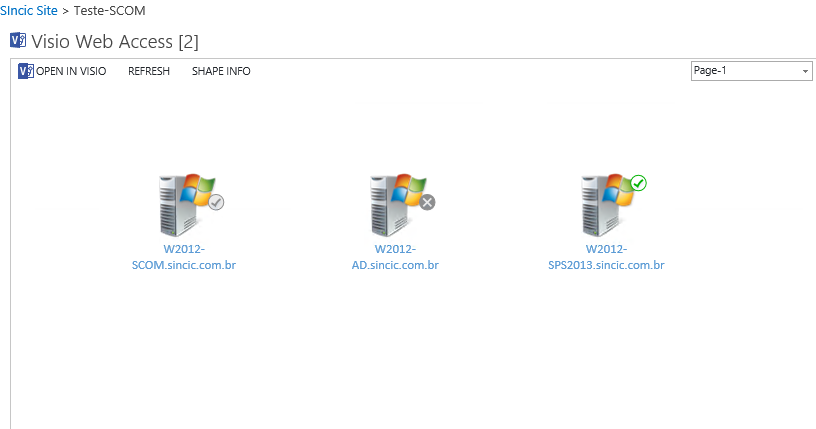
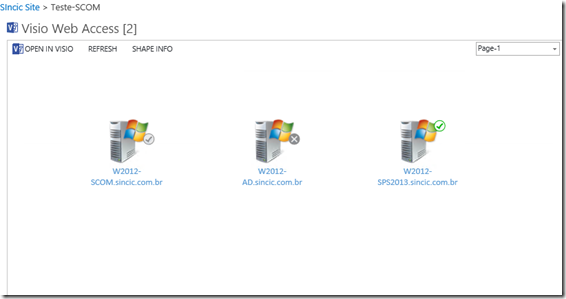
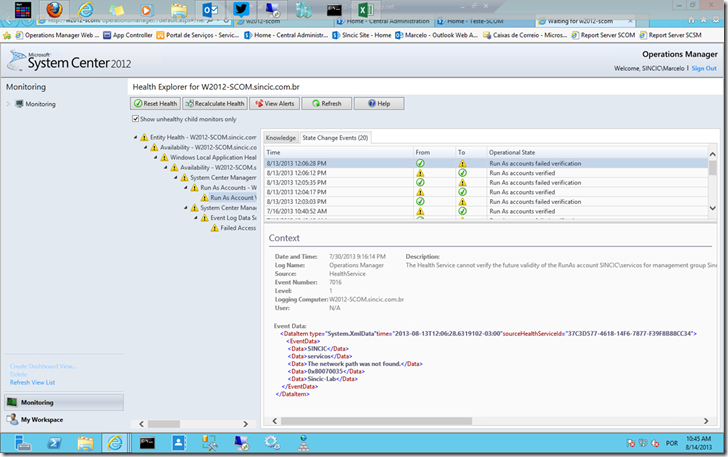
Below details of a webpart, where we have the desired servers for real-time monitoring:
http://www.marcelosincic.com.br/blog/image.axd?picture=SNAG-0001_thumb.png
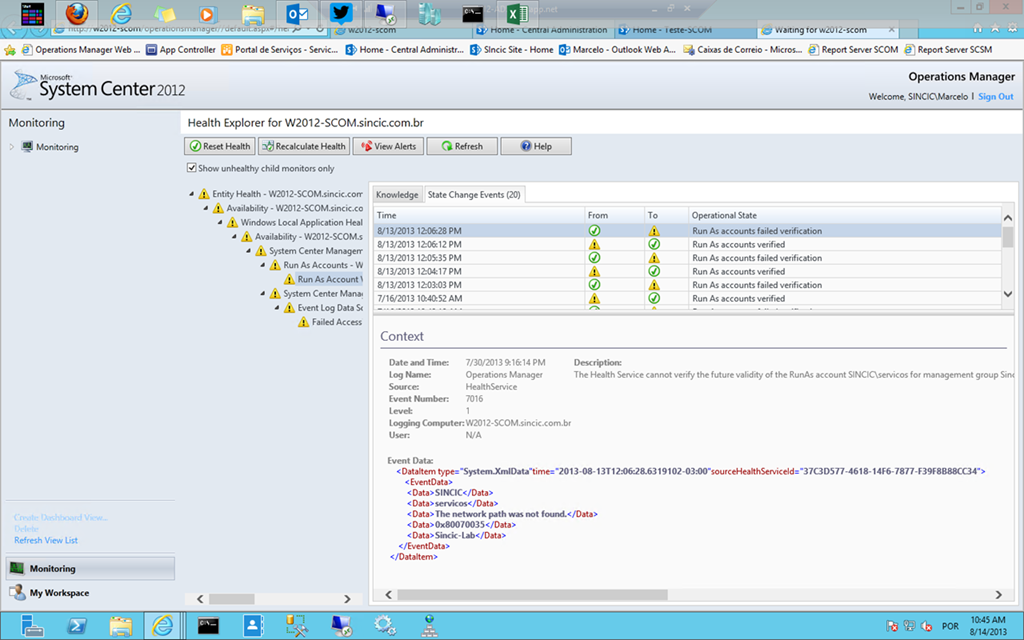
As this feature is interactive, clicking with CTRL on one of the servers will be automatically open the Operations Manager Web Console with the Healthy Check Server:
http://www.marcelosincic.com.br/blog/image.axd?picture=SNAG-0002_thumb.png
Shown the resource and their integration in real time, let’s consider how to assemble.
Configuring the integration of Visio with SCOM
The first step is to download the Microsoft Visio 2010 and SharePoint 2010 Extensions for System Center 2012 in http://www.microsoft.com/en-us/download/details.aspx?id=29268
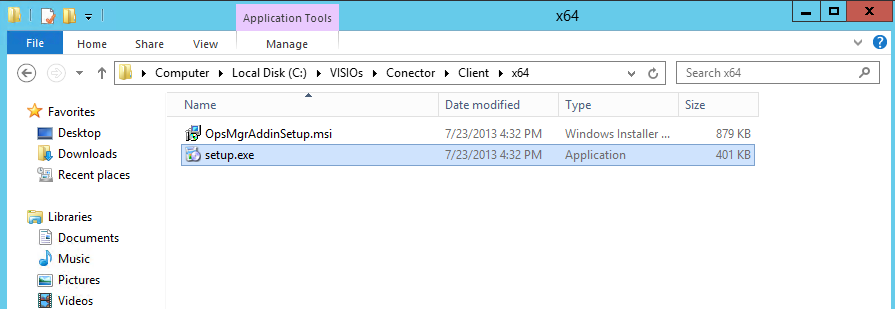
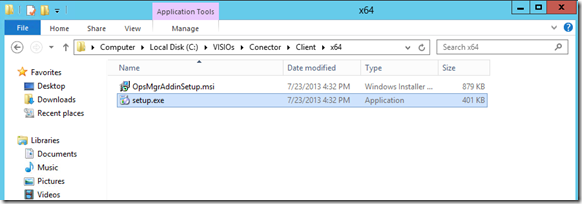
In the Client directory will be possible to install the Visio Connector which enables you to read data from SCOM and generate the Shapes in the diagram and is available in 32 and 64-bit version:
http://www.marcelosincic.com.br/blog/image.axd?picture=SNAG-0015_thumb.png
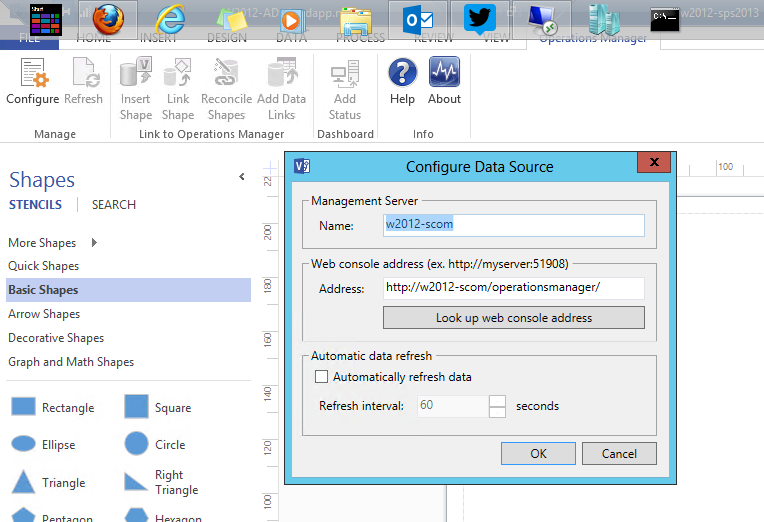
When you open a new document in Visio will now be possible on the toolbar to see the Operations Manager option and clicking Configure have the options to specify the Operations Manager server
http://www.marcelosincic.com.br/blog/image.axd?picture=SNAG-0006_thumb.png
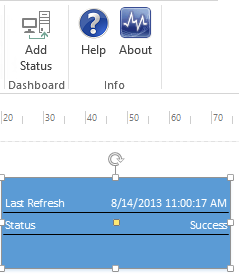
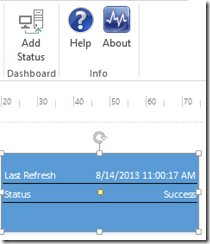
The first of the items that can be used is the Add Status that includes a small table to indicate when data has been updated, which is very useful within SharePoint:
http://www.marcelosincic.com.br/blog/image.axd?picture=SNAG-0007_thumb.png
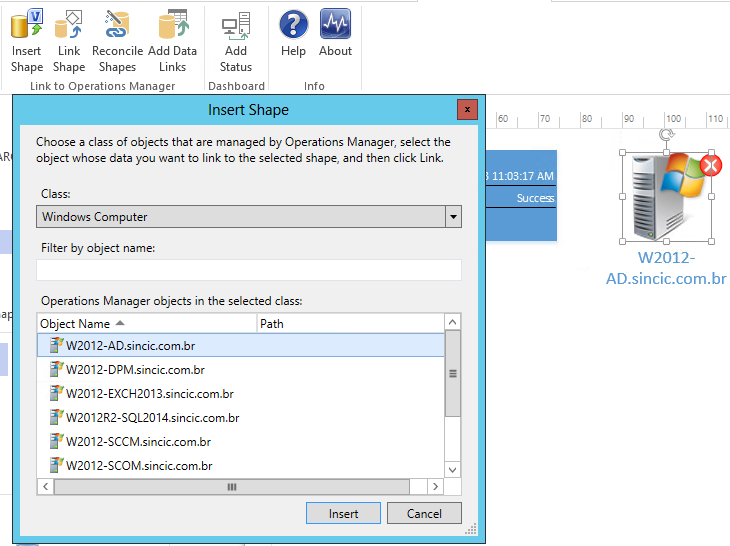
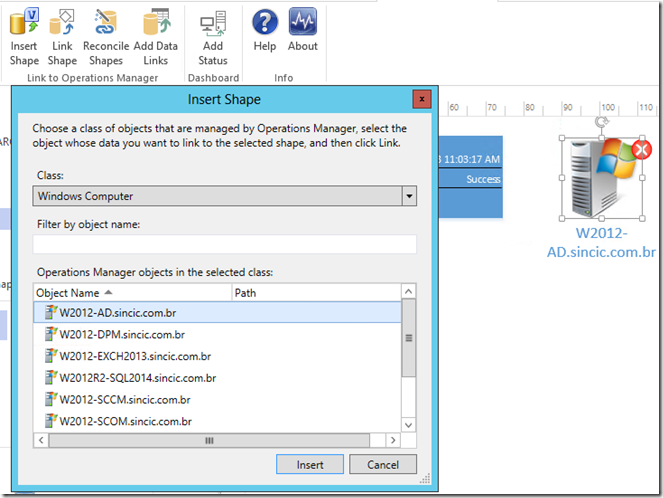
In the sequel we can add the desired shapes with the button Insert Shapes, simply select the desired class and the object that will be monitored, as the example below:
http://www.marcelosincic.com.br/blog/image.axd?picture=SNAG-0009_thumb.png
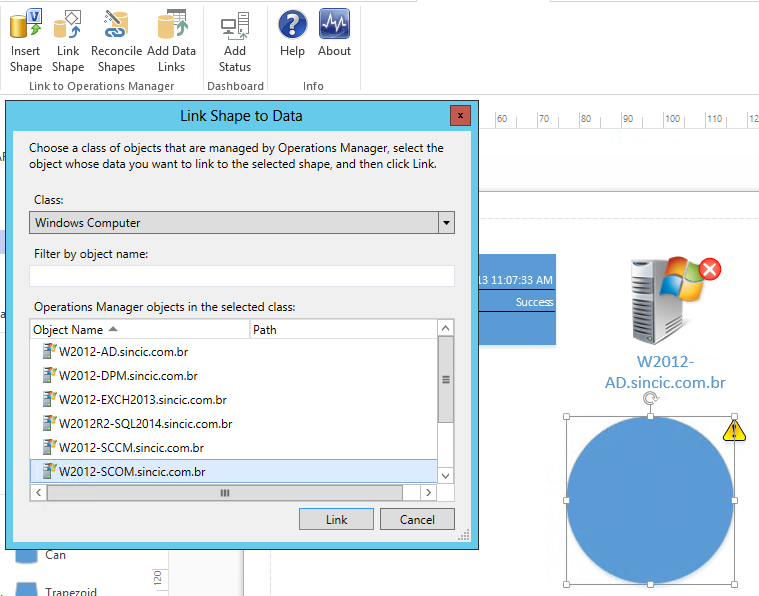
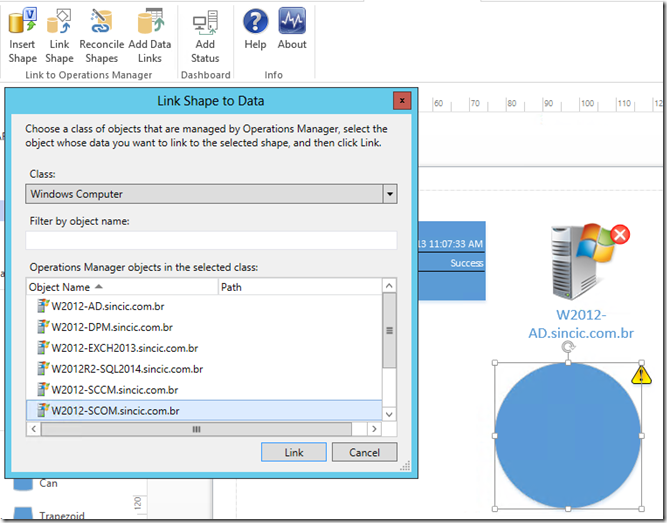
In some cases we can use existing shapes in Visio, for example shapes of real machines or other types of existing library object. This is possible using the button Link Shape and define the SCOM object that this shape represents:
http://www.marcelosincic.com.br/blog/image.axd?picture=SNAG-0010_thumb.png
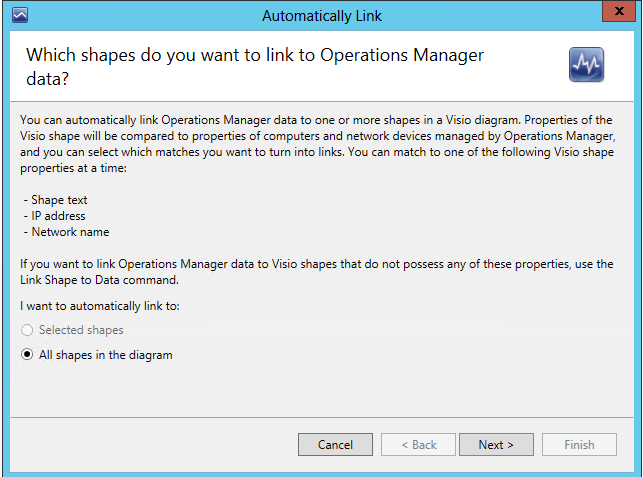
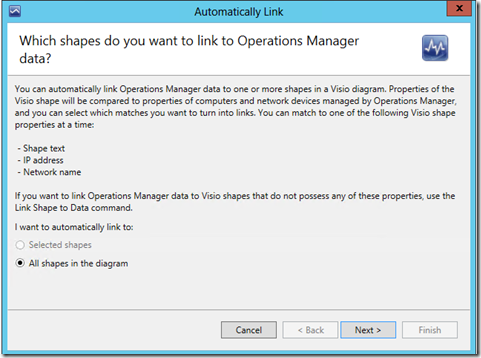
This process can also be used when export a Dashboard for Visio and then link the actual objects to shapes on the file. For this you can use the Reconcile Shapes where the wizard will list all objects and will be faster than the above example:
http://www.marcelosincic.com.br/blog/image.axd?picture=Reconciliate1_thumb.png
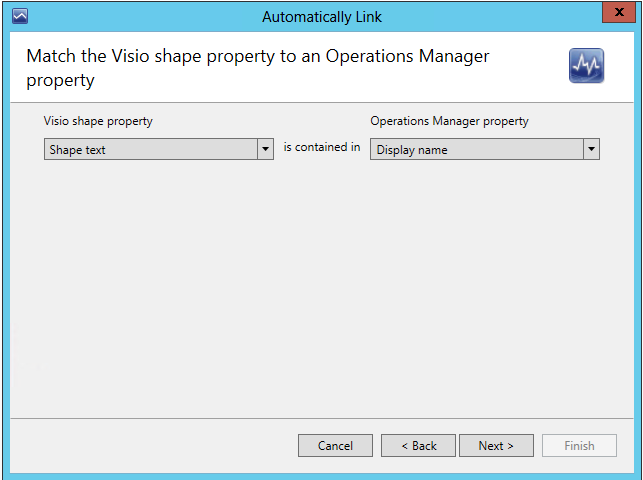
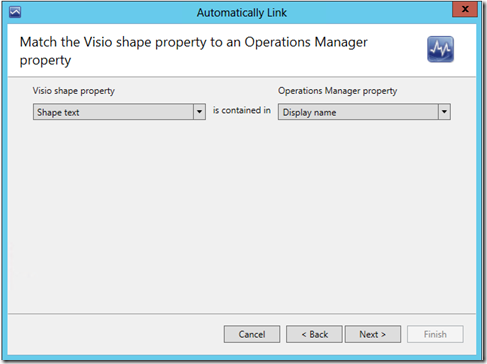
Select the attribute type on the drawing that will be used to map with SCOM objects:
http://www.marcelosincic.com.br/blog/image.axd?picture=Reconciliate2_thumb.png
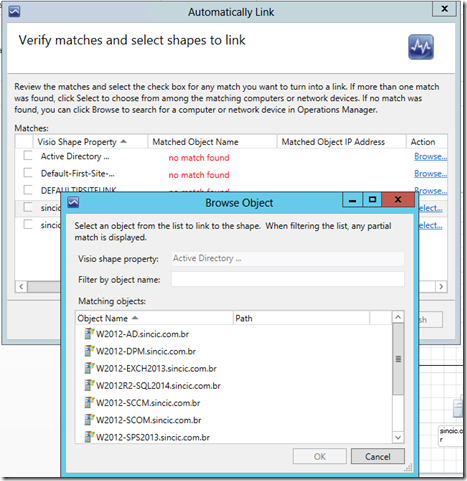
Finally, the wizard will show the objects that were not found and will allow manual connection:
http://www.marcelosincic.com.br/blog/image.axd?picture=Reconciliate3_thumb.png
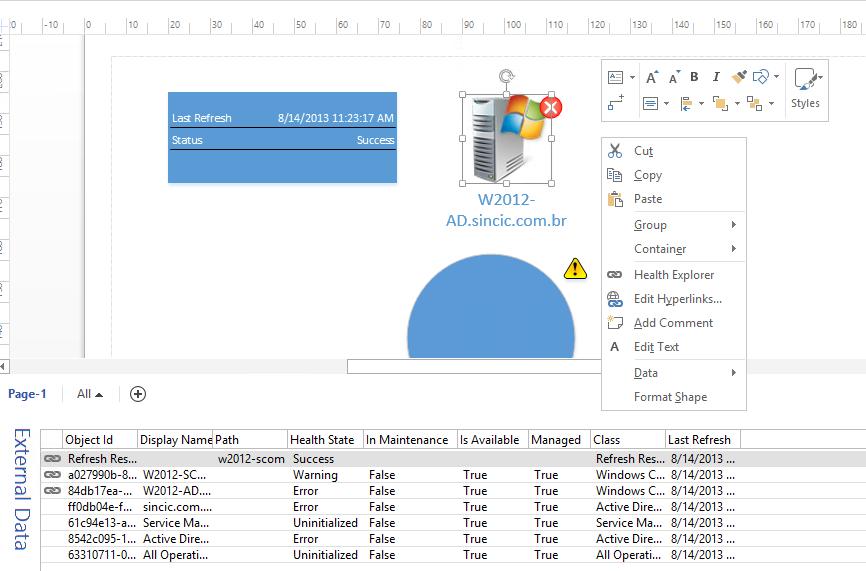
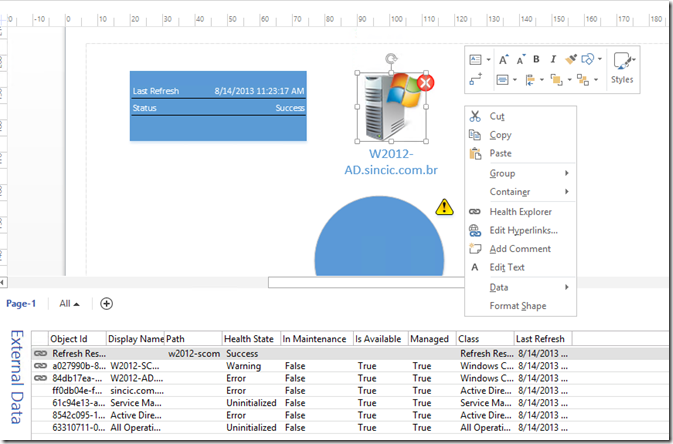
From this moment it is possible to test the integration of Visio with SCOM click with the button in the shapes and checking the Healthy Explorer or External Data list that pops up every object added:
http://www.marcelosincic.com.br/blog/image.axd?picture=SNAG-0014_thumb.png
Configuring the integration between SharePoint and Visio
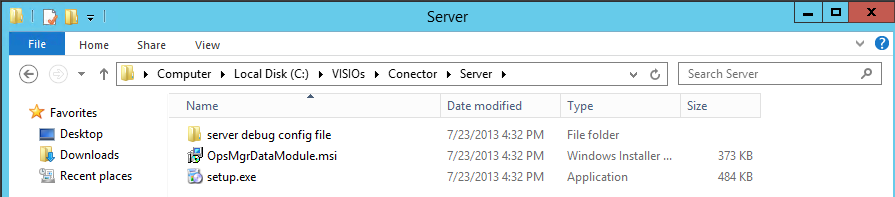
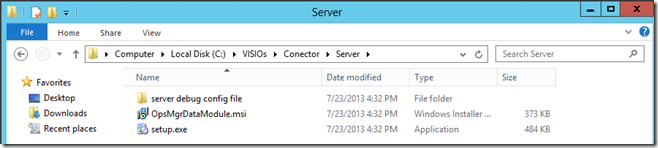
In the same package we have the directory with the application that must run in SharePoint to integrate Visio with SCOM webpart:
http://www.marcelosincic.com.br/blog/image.axd?picture=SNAG-0016_thumb.png
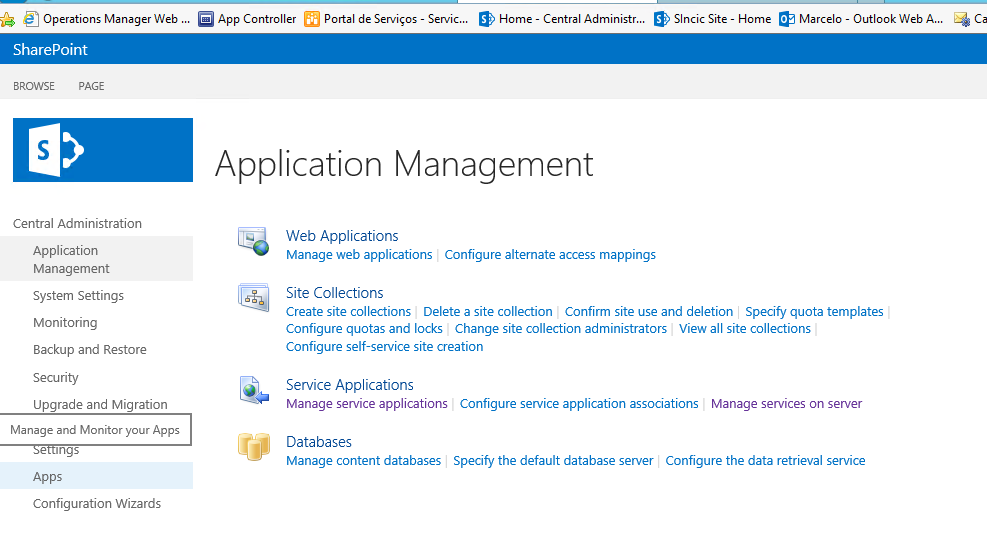
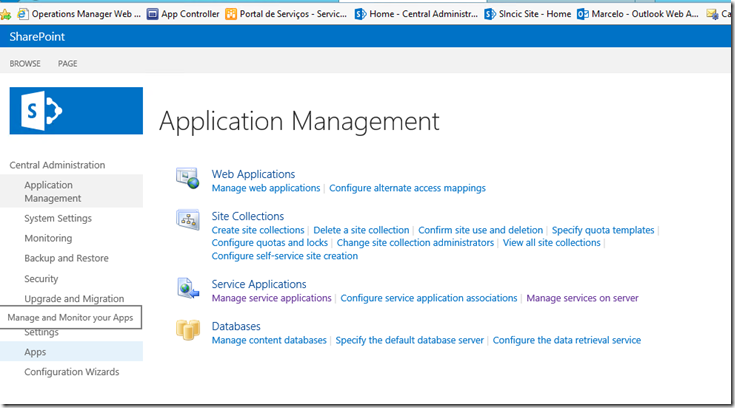
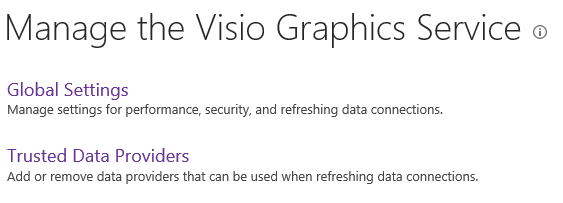
After you run the setup open the SharePoint Administration Portal and Applications Management-> Manage Service Applications-> Visio Graphics Service Trusted Data Provider > verify that Visio Service was included in the SCOM as data source:
http://www.marcelosincic.com.br/blog/image.axd?picture=SNAG-0017_thumb.png
http://www.marcelosincic.com.br/blog/image.axd?picture=SNAG-0018_thumb.png
http://www.marcelosincic.com.br/blog/image.axd?picture=SNAG-0019_thumb.png
http://www.marcelosincic.com.br/blog/image.axd?picture=SNAG-0020_thumb.png
If the link above does not appear automatically, you must create the manual entry, by clicking Add and typing the above line of identification of Assembly . This step is described in the PDF integration package for manual installation of the components of integration.
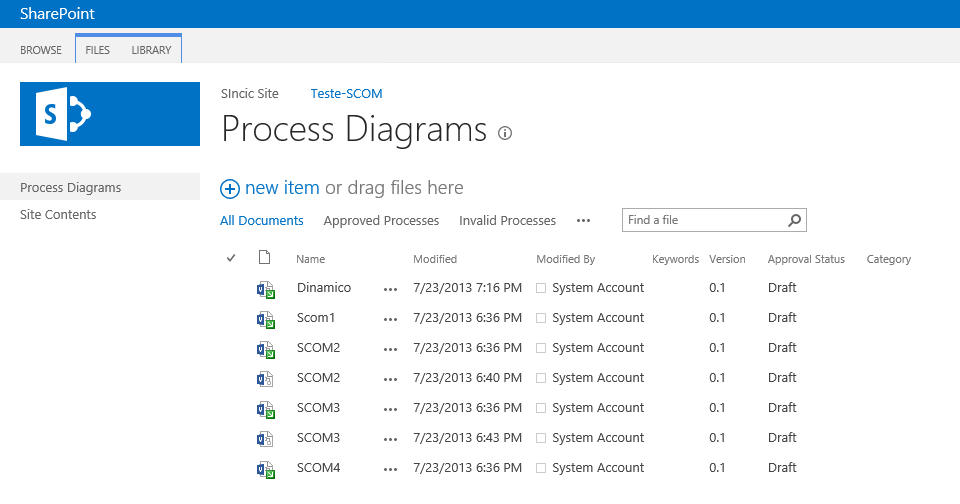
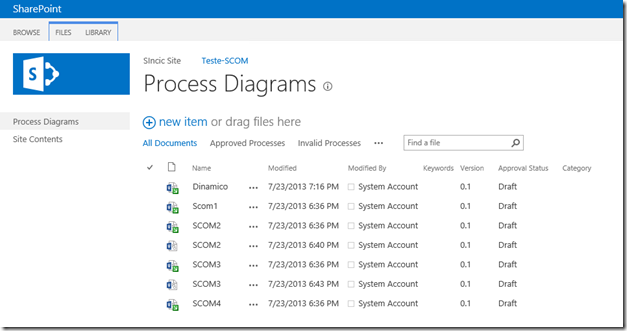
The next step is to create a Document Library to place Visio files created previously. This folder does not need any data or additional configuration, just making the upload of files, such as the example below:
http://www.marcelosincic.com.br/blog/image.axd?picture=SNAG-0005_thumb.png
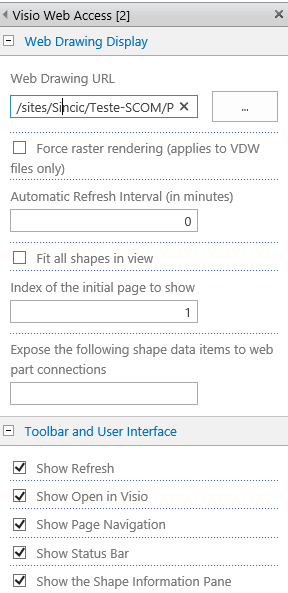
Following edit any existing page a cable-stayed in SharePoint and add a new webpart Visio Web Access and set the properties which will be the file shown on the page. See also that it is possible to configure the update time, the size of the webpart, general appearance and others:
http://www.marcelosincic.com.br/blog/image.axd?picture=SNAG-0004_thumb.png
Integrating SharePoint with SCOM
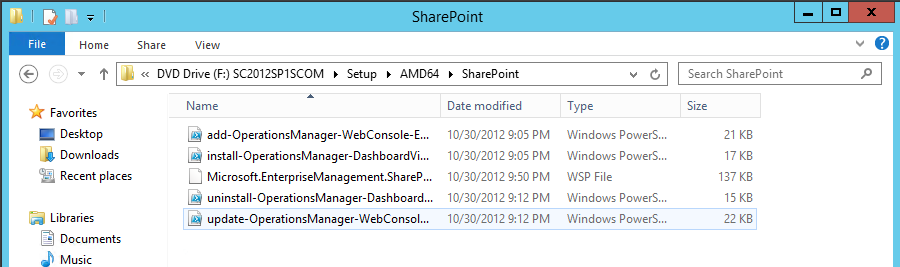
The SCOM Dashboards can be used freely in SharePoint, after installing the components using the DVD of SCOM. The first step is to copy the Setup\xamd4\SharePoint folder from the DVD of SCOM to SharePoint:
http://www.marcelosincic.com.br/blog/image.axd?picture=ComponentSCOM_thumb.png
Open the SharePoint Management Shell , and then run the command to allow execution of script and the script for installing Assemblies:
Set-ExecutionPolicy Unrestricted
solutionPath .\install-OperationsManager-DashboardViewer.ps1 "<< where the files were copied >>"
When ask the site, leaving blank will be installed to all existing.
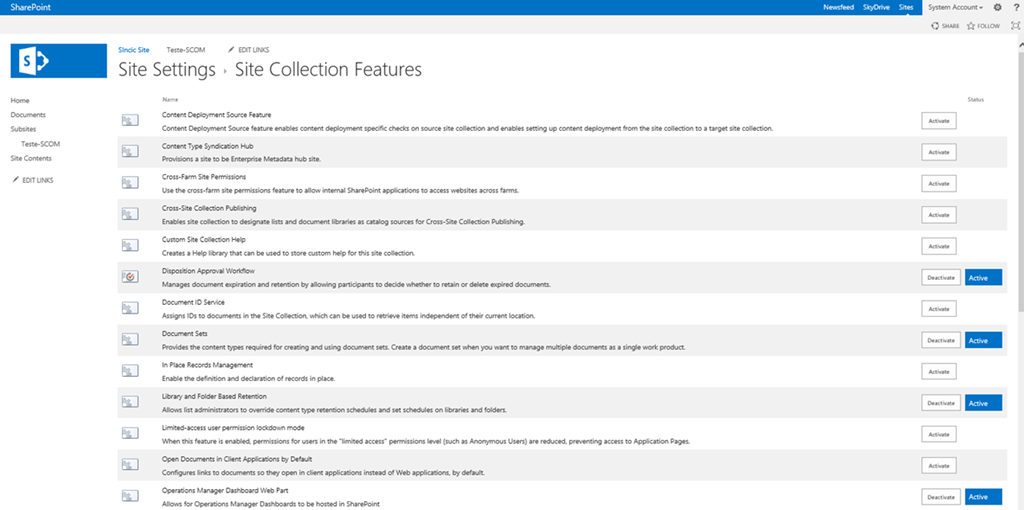
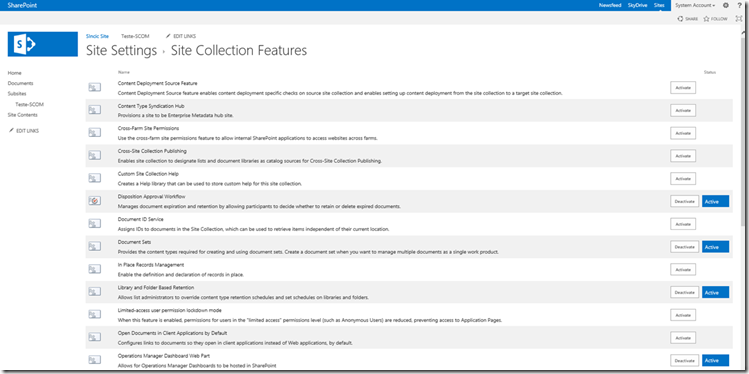
After installation go to a Web site where you want to use the webpart and check in Site Settings-> Site Collection Features if the component Operations Manager Dashboard Web Part is enabled, as the example below:
http://www.marcelosincic.com.br/blog/image.axd?picture=SharePointfeature_thumb_1.png
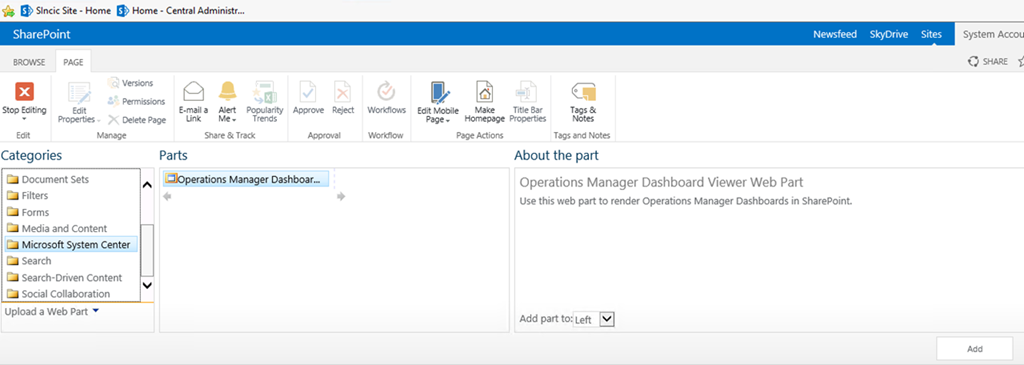
Now is already available, edit a SharePoint page and add the webpart Operations Manager Dashboard:
http://www.marcelosincic.com.br/blog/image.axd?picture=SahrepointView1_thumb_1.png
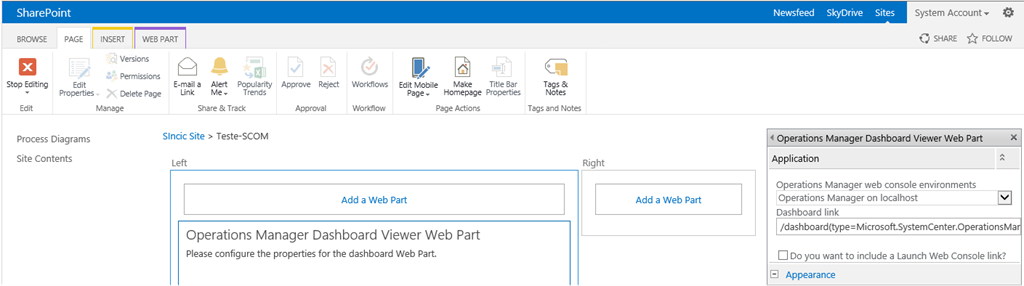
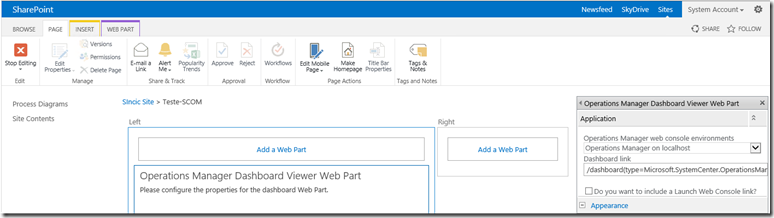
Following set the Dashboard that will be shown using the link from the Operations Manager Web Console, as the example below:
http://www.marcelosincic.com.br/blog/image.axd?picture=SahrepointView2_thumb_1.png
Conclusion
Using the integration package can create pages in SharePoint dynamic allowing any user with permission to a site or page follow environmental monitoring data.