SharePoint 2010: Tips on Implementing the SharePoint Filter List web part
Introduction
SharePoint Server 2010 ships with a handful of filter web parts that you can connect to other web parts in order to implement filtering capabilities in your solutions. These filter web parts facilitate implementing no-code filter solutions and can be easily implemented using just the browser tools available on a SharePoint page. The filter web parts available include:
- ⇨Apply Filters Button
- Choice Filter
- Current User Filter
- Date Filter
- Page Field Filter
- Query String (URL) Filter
- ⇨SharePoint List Filter
- SQL Server Analysis Services Filter
- Text Filter
Having a firm understanding of how each of these filters work can greatly facilitate rapid solution development for your users and possibly avoid more resource intensive coding solutions. This article presents a few tips and tricks when implementing the SharePoint List Filter web part for SharePoint Server 2010 solutions. We'll be using the Northwind Traders database.
Implement the filter web part
Create a new web part page.
Add a list web part to this page. The Orders list will be added here.
Configure the list view as desired.

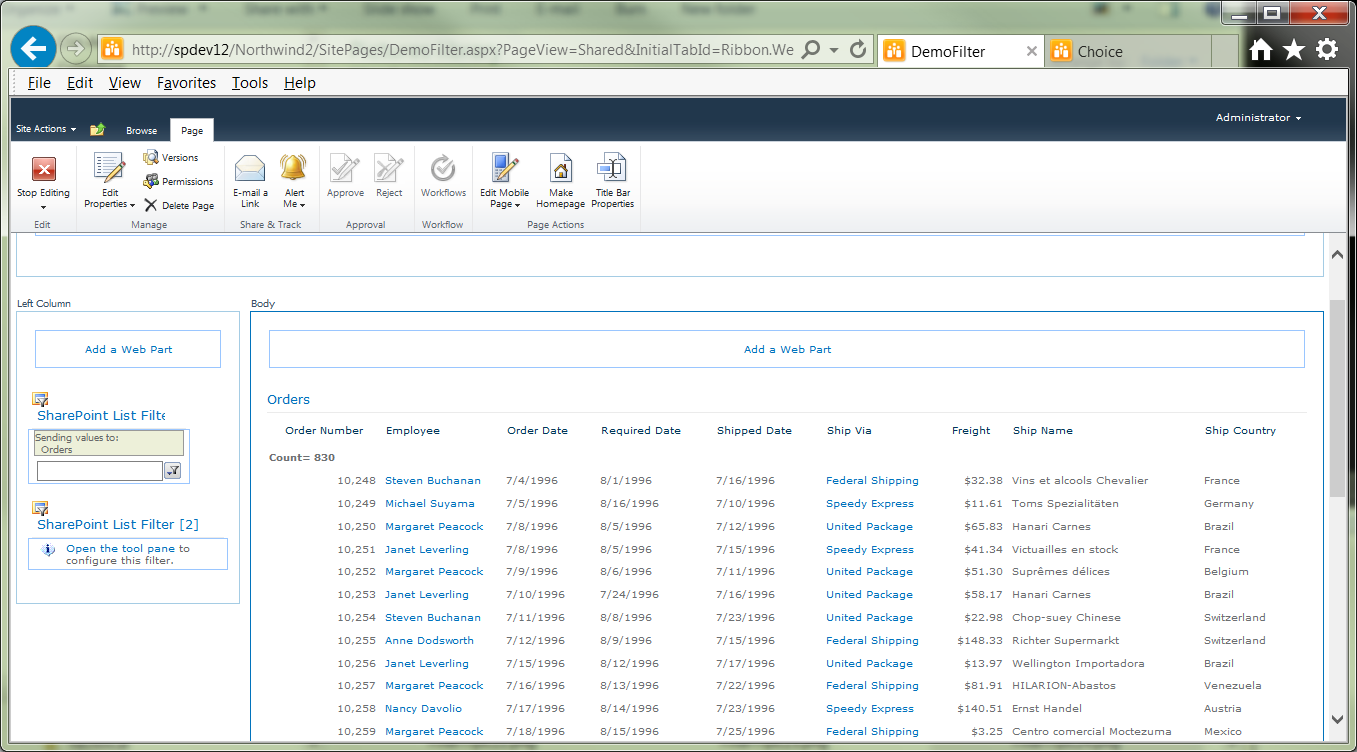
Add a SharePoint List Filter web part to the page.
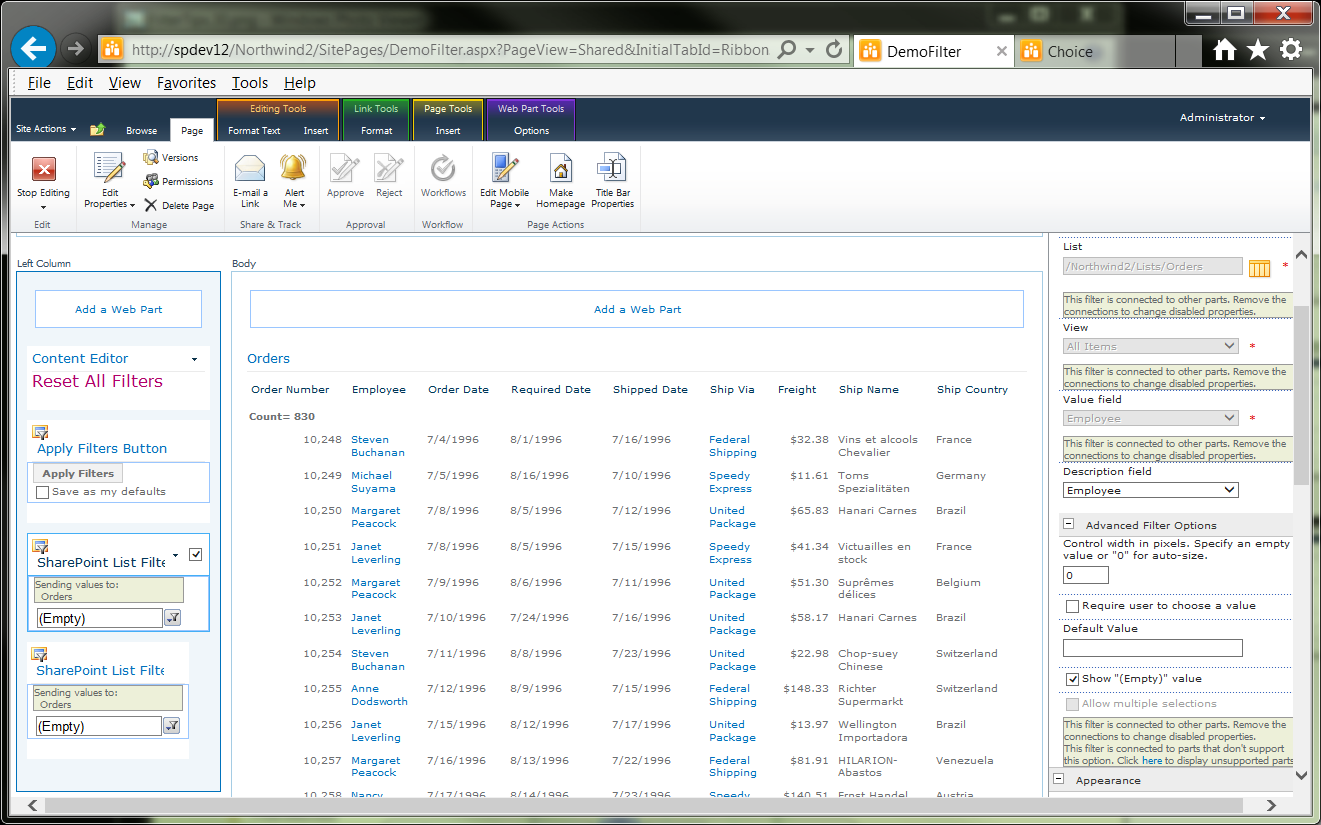
On the web part, click the link Open the tool pane. This opens the SharePoint List Filter tool pane, at right.

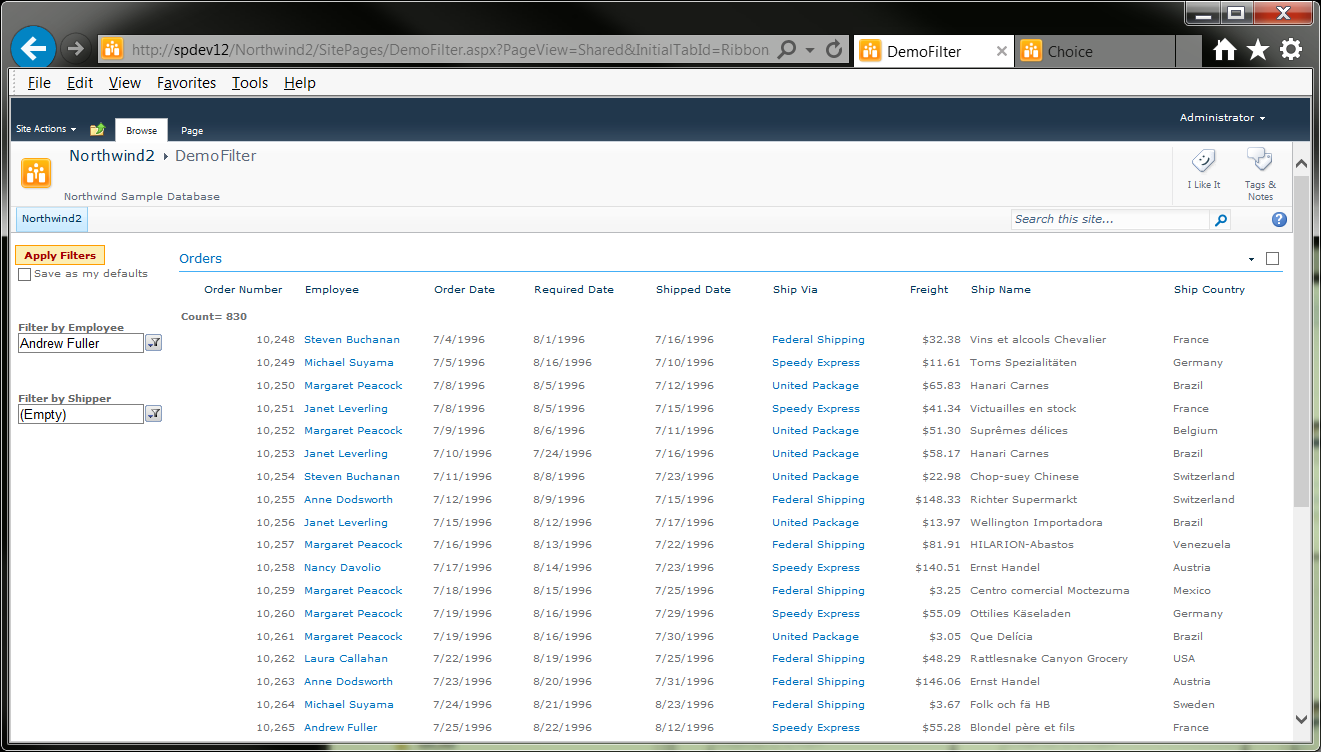
Change the Filter Name as desired. For this article, the filter web part will be used to filter by employee, and thus the name will be Filter by Employee.
Next, click the small orange icon next to the List field. The Select an Asset dialog appears.
In the left navigation pane, open the tree for the desired site, and then select the appropriate list. For this article, the Orders list will be selected. Once selected, the right pane displays a preview of the list.

Click OK. The Select an Asset dialog closes, and the List field box is updated to display the relative path to the list.
From the Value field dropdown, select the desired column from the list. For this article, the Employees column will be selected.

Click OK. Looking back at the filter web part, you'll notice that the Open the tool pane link is no longer displayed and that a new message is presented: This filter is not connected.
From the web part title dropdown, point to Connections, then Send Filter Values To, and then Orders.

Click this item. The Choose Connection dialog popup appears.

Click Configure. The second tab is presented.
From the Consumer Field Name dropdown, select the appropriate column. For this article, the Employees column is selected.
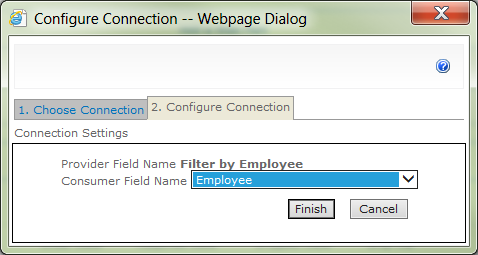
Click Finish. The popup closes, and you are returned to the page displayed in Edit mode. Note that now the filter web part displays a different message.

On the Page ribbon, click Stop Editing. The page returns to normal mode, and your new SharePoint List Filter web part is displayed on the page.

To test, click the little funnel icon on the filter web part. This opens the Select Filter Values popup.

Select any employee name from the list to see the affect, such as Margaret Peacock. Note how a filter icon appears on the Employee list column header after making a filter selection.

Modify its appearance
On the Page ribbon, click Edit Page.
From the SharePoint List Filter web part title menu, select Edit Web Part.

In the web part tool pane, scroll down to the Appearance section.
In the Width group, select Yes, and then enter 150 (pixels) for the width.

Click OK.
On the Page ribbon, click Stop Editing. The page displays in normal mode, and now, when you select an employee name, the name is fully visible.
Select any employee from the filter to view the change in appearance.

Enable filter reset capability
On the Page ribbon, click Edit Page.
From the SharePoint List Filter web part title menu, select Edit Web Part.
In the web part tool pane, scroll down to the Advanced Filter Options section.
Check the Show ("Empty") value option.

Click OK.
On the Page ribbon, click Stop Editing.
Click the filter icon to open the Select Filter Value dialog. A new option, (Empty), now appears.

Select this option to clear the filter value and return the list to its default state.
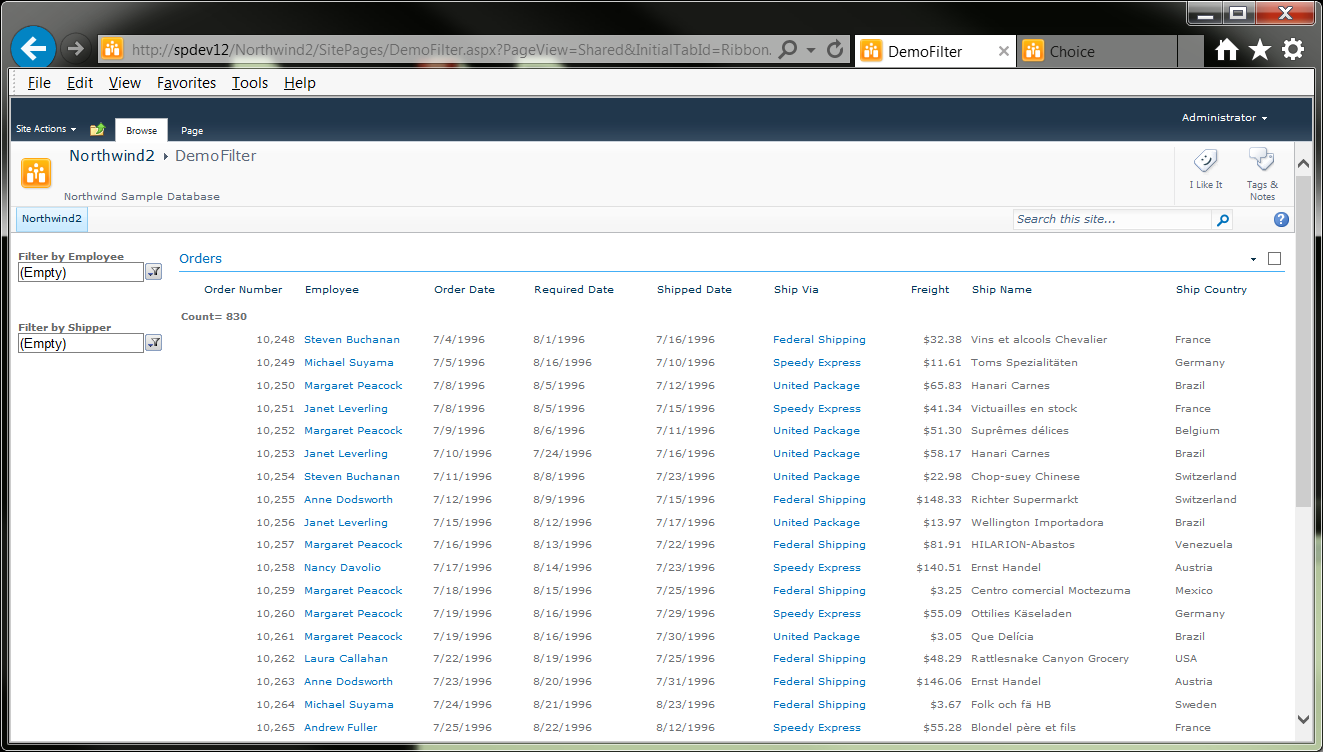
Implement multiple filter web parts
On the Page ribbon, click Edit Page.
Add a SharePoint List Filter web part to the page.
Drag and drop the filter below the first filter web part. Yes, you can actually drag and drop using just the web UI:

Configure the second filter web part to filter on a another field in the list. For this article, this filter will be configured to filter on the Ship Via column.
The page now displays two SharePoint List Filter web parts. Each of these web parts operates independently of the other.
Implement a Filter Panel
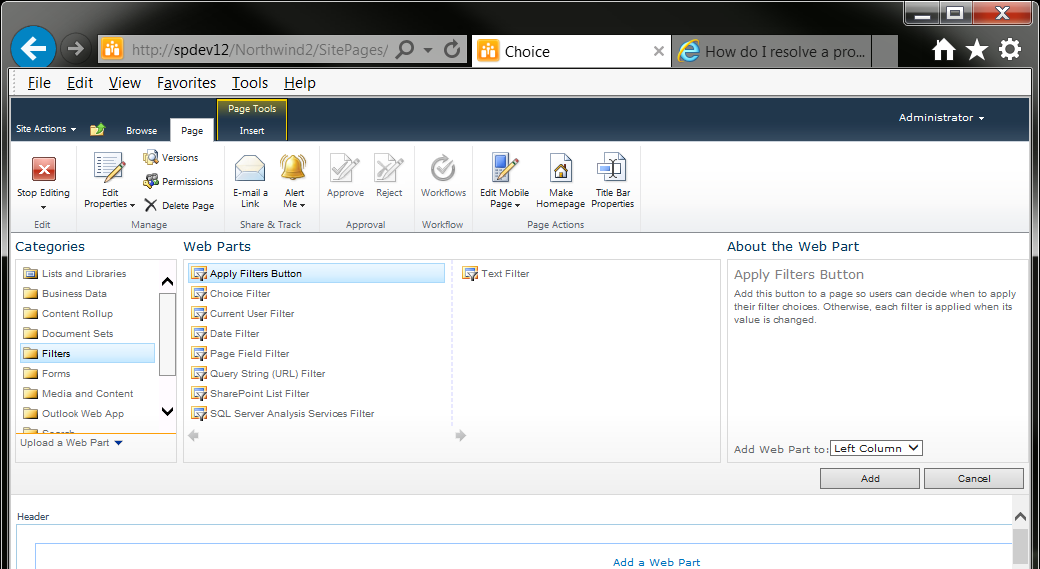
This is what I call it. Its actually called the Apply Filters Button web part. When this web part is on your page, it automatically prevents an filter on that page from automatically submitting user filter selections. Once having set the available filters on the page as desired, the user need only click the Apply Filters Button to then implement all filters at the same time. This web part is useful when you have two or more filter web parts on the page, and you want to implement a smoother and more intuitive user experience. This web part even allows the user to save a suite of filter settings as the user's default filter experience.
On the Page ribbon, click Edit Page.
Add an Apply Filters Button web part to the page.
On the Page ribbon,. click Stop Editing. The page displays in normal mode.

Set the filters as desired. Note that upon setting the first filter, the Apply Filters Button becomes highlighted.
It will remain highlighted, no matter how many filters you set, until you click the Apply Filters button.
Implement a Reset All Filters capability
There is no OOTB "Reset All Filters" web part. However, you can easily implement this: just display a hyperlink to the page itself. When users click this link, their browser will be navigated to the page, and all of the user filter settings will be lost.
On the Page ribbon, click Edit Page.
Add a Content Editor web part (you'll find it in the Media and Content category) to the page.
Click where it states, Click here to add new content.
Enter descriptive text., such as Reset All Filters, and then configure the entire text as a hyperlink. The URL should be the URL to the target page itself, without any querystring data.
Drag and drop the Content Editor web part to below all of the other web parts.
From the Content Editor web part menu bar, select Edit Web Part.
In the tool pane, scroll down to the Appearance section, and then select None from the Chrome Type dropdown.
Click OK. The page is displayed in normal mode.

Test by setting the filters, and then clicking the Reset All Filters link: the browser is navigated to the page and all of the filters no longer have any values set.
Summary
This article has presented steps and tips on implementing the SharePoint Filter List web part. By walking through the steps in this article, you have been exposed to fundamental methods for implementing this web part. You've also learned how to team up this web part with other web parts to create more responsive filtering capabilities and thus enhance the user experience using no-code methods.
References
- Microsoft Office
- Northwind Traders
- Other
Notes
- You'll note, as you play around with the SharePoint List Filter web part, that it appears that you can configure multiselect filtering. However, though you can appear to configure it, it does not actually work in practice. You can select multiple items from the filter list, but only the first selection is actually used.