SQL Data Sync - How to Get Started
![]()
This article is for anyone who wants to begin using SQL Data Sync to keep their SQL Server and SQL Database data in sync. The article walks through the steps necessary to go from someone who has no experience with SQL Data Sync to having a fully functional Sync Group that manages regularly scheduled synchronizations of specified tables in specified databases.
 |
Important! This wiki topic may be obsolete. This wiki topic is no longer updated by Microsoft. We moved the content to the MSDN Library where we keep it current. To find the latest version of this topic on MSDN click here. |
SQL Data Sync Service enables you to:
Create Synchronization Groups (Sync Groups) that define the databases and tables from the "hub" that are shared with "members."
Set the synchronization schedule that defines when synchronization tasks are executed by the service for this Sync Group.
Specify a "hub" database around which the other databases synchronize.
Specify bi-directional, sync-to-hub, or sync-from-hub synchronization directions.
View the status of pending, in-process and completed synchronizations.
Step 1: Sign up for a Windows Live ID
Your Windows Live ID is used to gain access to Windows Azure services, monitor and bill for service usage. To get your free Windows Live ID go to http://windows.live.com/, click the Sign up button, and follow the instructions provided.
Step 2: Create Your Windows Azure Account
To use the SQL Data Sync service, you must first create a Windows Azure platform account. The Windows Azure platform account is used to set up and manage your subscriptions and to bill for consumption of the Azure services.
Your account is created in the process of making your first service purchase.
Go to https://microsoft.azure.com/.
Click Sign up now.
Click Buy for the SQL Database Core service.
You are not committing to purchase until you click Purchase on the final screen.Fill in the Subscription name field with a meaningful name. (Figure 1 #1)
Click the Rate Plan link. (Figure 1 #2)
Read the rate plans and be certain you understand them.
Click the View Agreement link. (Figure 1 #3)
Read the agreement and be certain you understand them.
If you accept both the Rate Plan and Agreement, check the "By checking this box..." checkbox. (Figure 1 #4)
Click Next. (Figure 1 #5)

Figure 1 - Step 1 of 3Fill in the required fields on the form.
The information you enter here is used to create your account.Click Next. (Figure 2 #1)
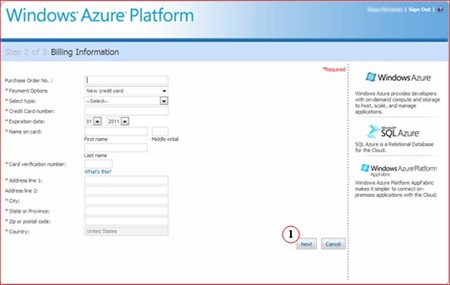
Figure 2 - Step 2 of 3Carefully read the Online Subscription Agreement.
If you accept the Online Subscription Agreement check the "By checking this box..." checkbox. (Figure 3 #1)
Click Purchase. (Figure 3 #2)

Figure 3 - Step 3 of 3
 |
Note: You need a separate SQL Database subscription for each geographical location that hosts one or more databases. |
Step 3: Create a SQL Database Server
Before proceeding it is advisable to read the Where to Locate Your SQL Databases and Database Considerations and Constraints sections of the Best Practices wiki article.
For the CTPs you need at least one SQL Database in your Sync Group. Therefore you need a SQL Database Core subscription and server to host the database. We created the subscription in Step 3. Step 4 walks you through creating a server and adding an empty database to that server.
This step uses the Windows Azure Platform Management Portal (https://windows.azure.com/) to create a SQL Database server.
Navigate to the Windows Auzure Platform Management Portal (https://windows.azure.com/).
Click the Database link in the lower left of the window. (Figure 4 #1)
Expand the Subscriptions column. (Figure 4 #2)
If there are no subscriptions listed under Subscriptions, click New on the Subscriptions tab, and purchase a SQL Core subscription. (Figure 4 #3)
If you did this in step 3 wait a while until it propagates.Select a subscription (Figure 4 #4) and click Create on the Server tab. (Figure 4 #5)
Follow the instructions provided to create a SQL Database server to host your SQL Database.
Note:
SQL Database supports one server per subscription. Each server can support multiple databases.
You need at least one SQL Database for SQL Data Sync. You can create it now. Select the server you created under Subscriptions | <server name> and click Create on the Database tab. Follow the instructions provided to create a SQL Database.

Important:
Be sure that the minimum size you set for you database is greater than the size of your database plus the additional metadata stored by SQL Data Sync.
Important:
On the firewall rules page ensure that the Allow other Windows Azure services to access this server checkbox is checked then click Add.
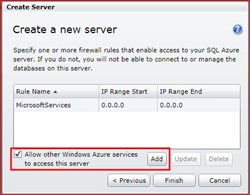

Figure 4 - Create a Server and Database
You are now ready to provision your Data Sync Server and then create your synchronization groups. See the article SQL Data Sync - Create Sync Groups for the next steps.
Feedback
This release was provided in order to gather feedback from our customers. Now that you have previewed what the SQL Data Sync team is doing, please let us know what you think of our direction, and tell us about your experiences.
You can send us your thoughts in any of the following ways:
- Send us a note on http://twitter.com/syncfx.
- Post a comment to our blog at http://blogs.msdn.com/sync.
- Post a thread to our forum at http://social.msdn.microsoft.com/forums/en-US/ssdsgetstarted/threads/
For More Information
- [[SQL Data Sync Overview]]
- [[SQL Data Sync: Glossary of Terms]]
- Windows Azure SQL Database: http://www.microsoft.com/windowsazure/sqlazure/
- Microsoft Sync Framework Dev Center: http://msdn.microsoft.com/sync