SharePoint 2013: Device Channels
Amongst many new features introduced in SharePoint 2013, one of the key features is Device Channel. With the continuous growth in the mobility sector, mostly smartphones are being widely used to surf net. As a result, it is very important to provide a user friendly experience to any user visiting your website on mobile.
Microsoft has come up with the concept of Device Channels in SharePoint 2013. For all those who have not heard about Device Channels, let me explain it briefly.
Device Channels provides a way to make your SharePoint sites viewable on mobile devices, such as smart phones and tablets. Device Channels are available on publishing sites or team sites with the publishing feature activated. They provide you the ability to set different master pages and CSS for different devices like Tablet, Windows Phone, iPhone etc. As a result, you can have a user friendly experience for your website when viewed on mobile device.
The very first thing that needs to be done is to create Device Channel for your site. In order to do the same, you need to go to the Site Settings > Look and Feel section and click Device Channels link.

After clicking this link, you will be directed a gallery that contains the available device channels. Typically you will see the one device channel provided for you already. It is the default channel which will be visible when no other channels are active or when the device's user agent string does not match the device inclusion rules for any active channel.

When you try to create a new device channel for your devices, you need to specify a few important parameters i.e. Alias, Device Inclusion Rules and Active.
Alias is the unique ID that helps in determining the device channel in the code. This comes handy when working with Device Channel Panel (will come on this a little later).
Device Inclusion Rules contains the user agent substring such as Windows Phone OS. This substring will be matched against the browser's user agent string in the device and based on that master page will be applied.
Active checkbox enables the device channel if it is checked.

The next thing that is required to be done is to associate a master page to the newly created device channel. To do this, go back to the site settings Look and Feel section and click on Master Page link.

There you can configure a master page for your newly created Device Channel.

After setting the master page for your device, now if you view the site in the device, you will see the device channel applied.
In case you directly want to test the changes, you can do it by appending the following to the url in the browser.
?DeviceChannel=Alias
e.g. http://somedomain.com?DeviceChannel=mobile
Hope it gives you a brief idea about what device channels are and how they can be configured.
Now I am going to explain a scenario which me and my friend Ali worked on in order to have an understanding on the exact need for these panels.
There are times when you want to target only specific content of a page based on devices. Most of the times you might have noticed that many websites have a whole bunch of features when you have a look at the site in the desktop mode and have filtered set of features when viewed on mobile.
When it comes to SharePoint 2013, then Microsoft has came up with the concept of Mobile Panel and Device Channel Panel to provide a similar feature. These help in targeting specific content of a page layout on mobile and desktop. Mobile Panel allows content authors to target specific content for different devices. For example, mostly you have observed a banner image coming as a feature area on the sites. Now, this looks nice on the desktop version, but on mobiles, this does not seem much relevant. So, the requirement is to show this banner only is the user is in desktop view and not when in mobile view. Device Channel Panel is also a snippet that we can add to master page or to a page layout to control what content is rendered for the channels that we create. So for the above scenario, we want to have a single page layout which should be intelligent enough to show content specific to each of these channels.
Now, the main thing here is to create a page layout which could be shared across all mobile devices as well as the desktop view. In order to do that we need to make it device enabled using Mobile Panel. The normal way of proceeding on this is to have a region where all the common webparts both for mobile and desktop should go and another region where desktop specific should go. But this is not as simple as it seemed. We started with adding device channel for desktop and added a webpart zone there so as to add our banner webpart there which was meant to be visible only in desktop version. Then outside that device channel, we added webpart zones that will hold all the webparts that were common for mobile and desktop version. But to our surprise, this did not work. This logically correct solution was not showing the behavior that we expected from it.
Then we thought of creating two device channels, one for mobile and the other for desktop each having webpart zones and then we added all the mobile specific webpart to the device channel meant for Mobile and all the desktop specific webparts to the Default Channel(which is used for Desktop view). But the results were surprising again. In the desktop view, everything seemed correct but as soon as we switched to mobile view, we observed that the banner webpart, which we had only added in the desktop view and not in the mobile view, was visible in the mobile as well. On editing the page, we saw that in mobile view, edit page is showing the webpart but in wrong zone.
After some analysis, we found that the issue is that when a webpart is added to a webpart zone in one mobile panel and if that webpart zone does not exist in the other mobile panel then that webpart will automatically move to the next available webpart zone.
Therefore, when we added the banner webpart to a zone in the Desktop device channel and when the page is viewed in mobile view, then because the banner webpart zone did not exist in the mobile view, the banner webpart got added to one of the webpart zones of the mobile device channel. So, after some drilling, we came to a solution that since the availability of the webpart zones is causing an issue, what if we design the layout in a way that the desktop device channel will have webpart zones in the mobile panel and the mobile device channel will have Publishing HTML fields instead to add the webpart. Therefore, if there will be no webpart zone in the mobile view, then there will be no zone available for the banner webpart to get added to. We tried this approach and Voila it worked. Below is the code snippet for what we actually did.
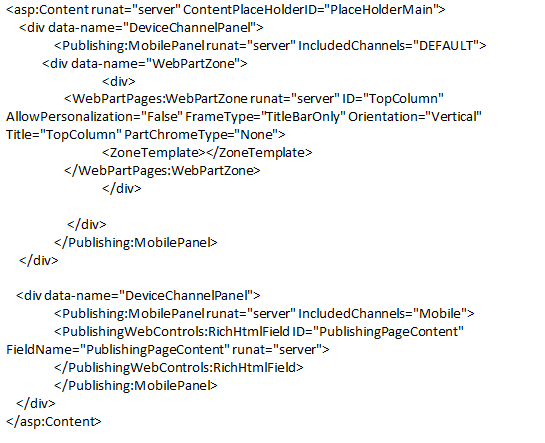
Now in the above code if you see, we have added two MobilePanels, one for the desktop and other for the Mobile. Both the MobilePanels have an attribute named IncludedChannels, which tells the panel which channel to target. "DEFAULT" is used for desktop view and "MOBILE" in our case is used for targeting mobile devices.
The above solution has however the following limitations
- User has to manually add webparts to the mobile device panel. You can however overcome this limitation by automating adding of webparts to the RichHtmlField.
- Two copies of the same webpart will be there on the page for the common webparts. However, for example say we have written a webpart whose business logic is written in a separate js file then this does not mean that the js file will be loaded twice on the page one for the desktop and one for the mobile view. The js file will be loaded only once for each channel. So performance wise, it will not impact.
This is how you can target specific content of the page layout for different channels using MobilePanels.
Please note here that the MobilePanels are now deprecated and instead we should use DeviceChannelPanels. DeviceChannelPanels are used in the same way as we used the MobilePanels above and they offer the same functionality.