SharePoint 2013 Callout
The SharePoint Callout is one of the latest built-in technology in SharePoint 2013 that shown as a dialog box with a complete functional commands to finish several actions on the SharePoint list. The SP Callout used to make a several kinds of commands on the SP List such as adding new item, update and make a site navigation links, in other words it’s a variety of commands in one capsule.
The benefit of SP Callout is to apply many actions and navigations on the SP List, while no need to browse inside the SPList itself, that’s mean, the user can add a new record to the SPList without the need to open the default add new SPList item dialog, this would make the data updating method more faster and flexible. Moreover, it can give the user a quick view to the SPList item details in an eye blink.
The default SP Callout can be appear easily by hover the mouse on any list item in SharePoint list as shown in Fig(1) below.
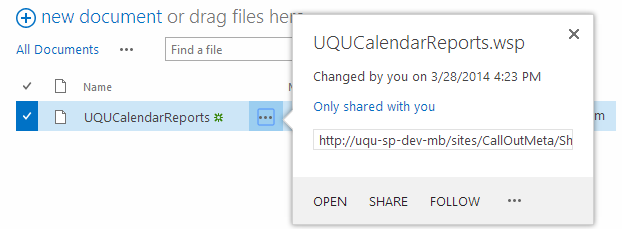
Fig (1) SP Callout view
In Fig (1) the SP Callout consists of two major elements:
- The Title, which store the element title, and it’s the first element shown in the callout.
- The Body which hold all the details about the element such as SP List item and links information.
The buttons at the bottom of the SP Callout called “Actions”, these buttons can apply a variety of actions on the SP List item such as insert, update, share and open, however, the SP Callout actions buttons can be a standalone button or a drop down menu to hold many sub actions of the same title.
The SP Callout appears whether by hover the mouse over it or by a single click on the SPList item, and disappear by hover the mouse away of it or by a click outside the SP Callout. These options and others can be controlled by the JavaScript commands.
**
How the SP Callout edited and work**
The SP Callout is a frontend script, which created and edited using JavaScript and JQuery commands, before start coding the SP Callout it is mandatory to load this script file that is required in all SP Callout developments:
SP.SOD.executeFunc("callout.js", "Callout", function () {
});
SP.SOD execute function must contain the SP Callout script that will written, however, before writing a full SP Callout example, let’s take a look to the SP Callout specifications. One of these specifications is the SP Callout members as shown in table (1):
Member |
Action |
Title |
Show the title in the top |
Content |
Display HTML inside the control whenever there is no value for the contentElement member. |
contentElement |
Display an HTML element inside the control when there is no value for the content member. |
contentWidth |
Control the CallOut width in pixel |
beakOrientation |
Control the beak orientation of the Callout appearance. |
Table (1) Callout content members (MSDN)
All these members above are used to create the SP Callout layout, however, as we said that the two major elements are the Title and the Content. The beakOrientation is used to show how the SP Callout will appears, either TopBottom or LeftRight.
More members are used to build the SP Callout style and behavior, below are the members to set the SP Callout appearance in table (2):
Member |
Action |
{event: "click", closeCalloutOnBlur: true} |
Make the SP Callout appear when the user click on the element itself, and disappear once the curser move away of the Callout. |
{event: "hover", showCloseButton: true} |
Make the SP Callout appear when the user hover over the element, and disappear when the user click on the X button in the upper right corner. |
|
|
Table (2) Callout Mouse action members (MSDN)
SP Callout development allow run a stored action when the Callout start or before/after the Callout close, as shown in table (3) below:
Member |
Action |
onOpeningCallback |
Run an action before start the Callout |
onOpenedCallback |
Run an action after start the Callout |
onClosingCallback |
Run an action before close the Callout |
onClosedCallback |
Run an action after close the Callout |
Table (3) Callout run members (MSDN)
**
**
SP Callout actions
Back to Fig (1), the SP Callout actions is the buttons based at the middle of the Callout body, these buttons can navigate, update or do any action on either SPList item or SPSite. The SP Callout actions can be either a normal button, or a combo box with many commands, however, later in this tutorial we will see a full example about this topic.
**
Important to know**
- SP Callout is only for SP server 2013.
- Callout can be displayed for the following SP Lists:
1. Assert Library.
2. Document Library.
3. Task Lists.
4. Pages Library.
5. Images Library.
- Callout cannot be displayed for the following SP Lists:
1. Custom Lists.
2. Announcements Lists.
3. Calendar List.
4. Discussions List.
- SP.SOD.executFunc must contain all the SP Callout implementation code.
- JavaScript and JQuery skills must be expert in order to deliver a professional SP Callout.
**
How to edit a SP Callout and publish it**
SP Callout can be created or edit in two major ways:
- By going to the SharePoint site:
1. Create a new page named “Callout”.
2. Set the page into edit mode.
3. Browse “Insert” tab.
4. Click onto “Embed Code” which signed with “</>”.
5. Write your script and save it.
6. The result will show immediately after saving and close the “Embed Code”.
- By Visual studio 2013:
1. Start a new VS 2013 Visual WebPart project in C#.
2. Rename the project to “Callout”.
3. Choose your site collection, and deploy it as a farm solution.
4. Write the JavaScript code between <Script></Script> tag.
5. Deploy it from the solution explorer tab.
6. In the Site collection create a new page named “Callout”.
7. Set the page into edit mode.
8. Browse “Insert” tab.
9. Then click onto “Web Part”, and select Custom from the list, then choose the WebPart name “Callout”.
- Click “Add” button.
The first way use when the developer needs to create a standalone SP Callout, such as an information Callout or a store a text into SPList, but the second one is used when the developer required to call an existing SP Callout or create an advanced Callout such as link it to a GridView or a SP App. The second way may require a JQuery code in order to handle some several issues.
**
Start SP Callout simple example:**
It is important to know, that as much as you are a professional in JavaScript and all its techniques and codes, the SP Callout would be a professional way to create a dynamic and functional services hosted by SharePoint.
Let’s start a simple Callout example to send a feedback message to a SP List once the user write the feedback and click on “Submit” button, to create this Callout we will apply the first type of creating the SharePoint Callout, by just using the Embed code in the SP Site.
//The Callout script must be written inside the JavaScript tag
<script type="text/javascript">
//Call the callout.Js file and write the Callout script inside the call tag
SP.SOD.executeFunc("callout.js", "Callout", function () {
//a direct sign to the Div control which will active the Callout, named “ContactusLink”
var _link = document.getElementById("ContactusLink");
//the CalloutManager is an object to store and control all Callout elements
var listCallout = CalloutManager.createNew({ //Create New CalloutManager
launchPoint: _link,
beakOrientation: "leftRight",
ID: "CallOut ID",
title: "Contact Us",
content: "<div class=\ms-soften\ style=\margin-top:2px; \><hr/></div>"
+ "<div id='confirmationBLOCK' style=\margin-top:13px;visibility:hidden;\>Thank you for Contacting Us!</div>"
+ "<div class=\callout-section\ style=\margin-top:2px;width:95%;Height:200px; \><textarea id='CommentsArea' style=\width:100%;height: 100%; -webkit-box-sizing: border-box; -moz-box-sizing: border-box; box-sizing: border-box;\>Add your Comments here...</textarea></div>",
//Callout Body style, can be edited simply by HTML
//all above are Callout elements
//a TextArea has been created to write the feedback
});
//Creating a Submit Custom Action
var customAction = new CalloutActionOptions();
customAction.text = 'Submit';
//This action is to send the feedback to the SP List
customAction.onClickCallback = function(event, action)
//what will happened once the user click on the action button
{
var _contactUsTextarea = document.getElementById('CommentsArea');
//Store what written in the TextArea to the contactUsTextarea
//Adding the new Contact Us Item in the List.
// Pass the value of the TextArea to the AddIteminList function
AddIteminList(_contactUsTextarea.value);
_contactUsTextarea.style.visibility='hidden';
};
var _newCustomAction = new CalloutAction(customAction);
listCallout.addAction(_newCustomAction);
});
//End of Action
function AddIteminList(_contactUsText)
{
//By using the JavasScript, This function will add the Feedback to a SPList named 'TestApp'
//Link to the SPSIte, the SPWeb then access the Required list to add the new SP Item
var context = new SP.ClientContext.get_current();
var web = context.get_web();
var list = web.get_lists().getByTitle('TestApp');
var listItemCreationInfo = new SP.ListItemCreationInformation();
var newItem = list.addItem(listItemCreationInfo);
newItem.set_item('Title', _contactUsText);
newItem.update();
//End of the SPList add new SP Item
context.executeQueryAsync(Function.createDelegate(this, this.success), Function.createDelegate(this, this.failed));
}
//This Function works like Try/Catch
function success() {
//Call the <Div> named 'confirmationBLOCK' if the function works correctly
var _confirmationblock = document.getElementById('confirmationBLOCK');
_confirmationblock.style.visibility='visible';
}
//Show an error alert if something went wrong
function failed(sender, args) { alert('failed to add a List Item:' + args.get_message()); }
</script>
<!—End of the Script-->
<!—Create the HTML Div with id ‘ContactusLink’ to pass it to the beginning of the Callout Script -->
<div id="ContactusLink" style="width:20%;">For More info <u><span class=\ms-commandLink\ style=\text-align: left;font-size: 14px;\>Click Here</span></u></div>
After understand the example above, Copy and paste it to a SP Site using the </> Embed code edit then save it, after saving it the Callout must appear directly, then create a new SPList named 'TestApp' with title column only and make a quick redirect link button in the quick lunch navigation bar.
Once everything done, the Callout must looks like Fig(2) below:
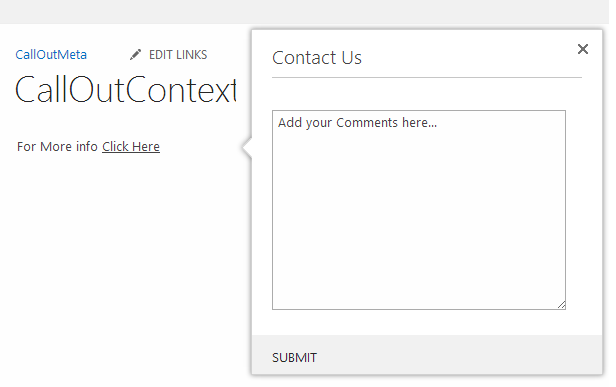
Fig(2) Send a FeedBack to SPList
Once the user fill the FeedBack form and click ‘SUBMIT’, a new SPList item will be created in the target SO List with the FeedBack text info.
Mohammad Masadeh