SharePoint 2013: Build a testing email system
In almost SharePoint workflow deployments, notification via email is one of the essential requirements. This requires a setup of email system in your internal infrastructure to test notification and email functionality. One of the burdens is that the setup requires additional hardware resources to build a separate email system because the IT team doesn’t allow SharePoint farm to be involved in the production email server farm. Next, the deployment team may not have someone who is familiar with any messaging technologies, even Microsoft Exchange to help you. This also happens to independent SharePoint freelancer who doesn’t know about email protocol or so on. At a result, effort spent for studying email principles may impact on progress of your project.
This article saves you time by providing a quick guide to building an internal email system in SharePoint 2013 and steps that need to be configured in Outlook 2013. It splits into three main parts as follows:
Setting up and configuring hMailServer
There are many messaging technologies you can integrate with Windows Server Active Directory (AD) system, i.e. Microsoft Exchange commonly. To build an evaluation production, you would have to have at least 6 GB ram. It’s going to be more complicated on modification of AD schema. Going with Google mail is an option but not flexible since your can’t administer Google mail system. Finding a good product for a quick setup on an existing Windows environment is difficult. Fortunately, hMailServer developed by Martin Knafve saves your time very much. It’s a free e-mail server for Microsoft Windows and does support the common email protocol (IMAP, SMTP and POP3). See hMailServer functionality here.
The very first step is to download and install hMailServer on SharePoint server. You can deploy hMailServer on a separate server or on domain controller server.
On the Welcome to the hMailServer Setup Wizard page, click Next. On the License Agreement page, read the software license agreement and select I accept the agreement. Click Next. On the Select Destination Location page, select folder to store hMailServer source. Click Next.
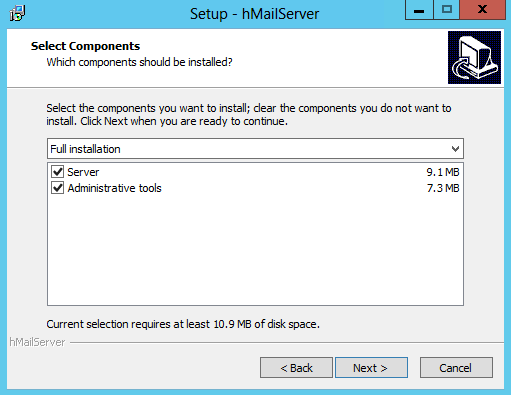
On the Select Components page, select Full installation and stick on Server at least.
http://i1235.photobucket.com/albums/ff428/thuansoldier/hmail-installation-4_zpsdb27e073.png
On the Select database server type page, select Use built-in database engine (Microsoft SQL Compact). The benefit of using this option is a small memory and it doesn’t require any external software to run on your server. It’s however limited to 4GB. For testing purpose, this is good enough. One consideration is that Microsoft SQL Server Compact Edition may not be used with commercial hosting services. The latter option is much more flexible if you want to scale out the email system to handle thousands of mailboxes.
http://i1235.photobucket.com/albums/ff428/thuansoldier/hmail-installation-3_zps3c36e305.png
On the Select Start Menu Folder page, type the folder name of your hMailServer that will display on Start Menu. On the hMailServer Security page, enter administration password. It will be asked every time you want to connect to hMailServer administrator application.
On the Ready to Install page, review the destination location and Start Menu folder and click Install. Wait a few minutes until the installation completes. On the final page, select Run hMailServer Administrator to start configuring hMailServer.
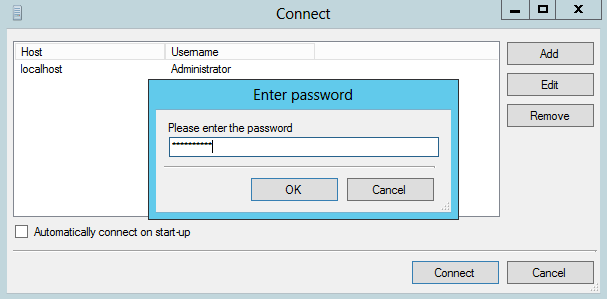
On the Connect window, select host and appropriate username, click Connect. A prompt opens asking you the credential to log in to hMailServer Administrator.
http://i1235.photobucket.com/albums/ff428/thuansoldier/hmail-configuration-1_zps362b05db.png
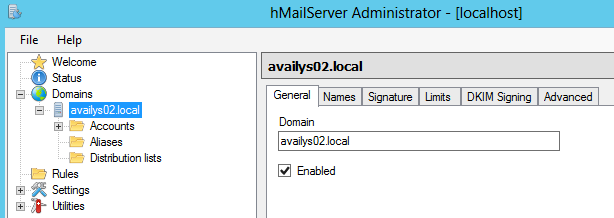
You will see the Welcome page with the Add domain button. Click it to add your AD to be integrated with hMailServer. Make sure you enter FQDN (full qualified domain name). In this case, mine is avalys02.local. hMailServer will automatically recognize your domain in case the server where hMailServer is installed has already joined to the domain controller.
http://i1235.photobucket.com/albums/ff428/thuansoldier/hmail-configuration-2_zps5b9a6b8a.png
To create an email for an AD account, right-click your domain and select Add AD account.
http://i1235.photobucket.com/albums/ff428/thuansoldier/hmail-configuration3_zpsa564238a.png
On the Active Directory accounts windows, select the newly added domain under Domain. hMailServer will automatically query in AD repository and then a list of AD accounts. Select an account then click OK.
http://i1235.photobucket.com/albums/ff428/thuansoldier/hmail-configuration-4_zps213cbd44.png
Expand the Account node to edit account information, i.e. address. Click Active Directory tab to check if the account is added from your AD.
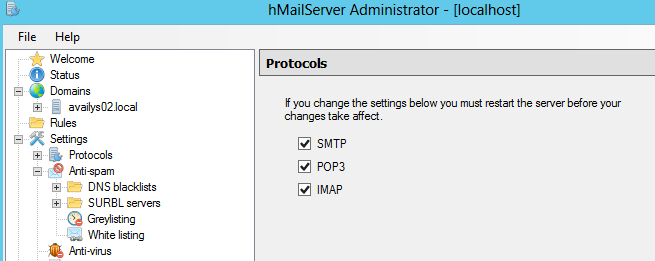
Under Settings node, depending on email protocol you are going to use, make sure at least two protocols SMTP and POP3/IMAP are running on Protocol node.
http://i1235.photobucket.com/albums/ff428/thuansoldier/hmail-configuration-5_zps13d4fb06.png
Under Anti-spam node, click Logging setting and select Enabled and log types Application, SMTP, POP3, IMAP, TCP/IP to track log if you have issues with sending/receiving process.
Under Advanced node, right-click IP Ranges node in order to create a new range that accepts incoming/outgoing package from your computer. Type the name of the new range; it may be LAN (Local Area Network). Enter priority value of the range. It is from 0 to 1000. “0” means the range is very less prioritized and “1000” means the priority of the range is highest. In the list of defined ranges, hMailServer will check to use the IP range with higher priority value. Because hMailServer has two ranges with priority value 10 by default, so the priority value of the new range need to be greater than 10.
Before entering IP range, check your SharePoint server and the client computer (where Outlook is configured to test). If your server is configured a static IP, it needs to be included in the range. If not, the easiest way is to start with 192.168.1.1 (Lower IP) and end with 192.168.1.255 (Upper IP). In my case, the IP address of the SharePoint server is 198.105.209.18 so I just need to include it, i.e. 198.105.209.1 – 198.105.209.218 or 198.105.209.1 – 198.105.209.255.
Under Allow connections, select STMP, POP3/IMAP. If you don’t want to run into any problem in protection, just uncheck Anti-spam, Anti-virus option.
Next, select all options under Allow deliveries from. Under Require STMP authentication, just skip all to avoid STMP authentication issues. Click Save to complete configuration
http://i1235.photobucket.com/albums/ff428/thuansoldier/hmail-configuration-6_zpscbcb332b.png
Configuring Microsoft Outlook 2013
After configuring hMailServer, you now need to setup Outlook client to test email functionality. The article uses Microsoft Outlook 2013 but the steps needed for earlier version are the same. If you haven’t had any accounts configured in Outlook, it opens to ask you to add a new account when opened at the first time. Unless, go to File > Info > Add Account.
http://i1235.photobucket.com/albums/ff428/thuansoldier/outlook2013-configuration_zps1b72b4ac.png
On the Auto Account Setup page, select Manual setup or additional server types. On the Choose Service page, select POP or IMAP because you are going to use POP for the testing.
On the POP and IMAP Account Settings page, enter information of the account, server mail information. Select POP3 and enter the computer name of the server hMailServer is installed. In my case, SharePoint and hMailServer are hosted on the same server. I just simply need to type the FQDN of this server. Under Logon Information, enter AD password for the account.
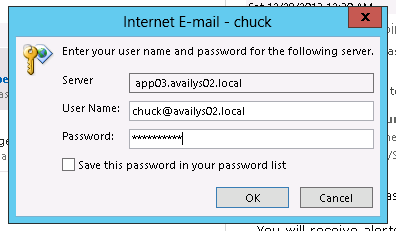
Click Test Account Settings to begin testing email. When trying to login to the incoming server to check the account, Outlook asks your account credential. On the Internet E-mail windows, type email address and password then click OK.
http://i1235.photobucket.com/albums/ff428/thuansoldier/outlook2013-configuration-1_zps28efb41b.png
If Outlook results in any errors related to the server response, you may need to check if Outlook can’t connect to hMailServer locally. In this case, the workaround is to edit hosts file in C:\Windows\System32\drivers\etc folder. Just simply adding localhost entry 127.0.0.1 app03.availys02.local
Click Next then Outlook will ask to check the account again. If you see the error message “503 STMP Authentication required”, click More Settings. On the Internet –Email Settings windows, select Outgoing Server tab and check My outgoing server (SMTP) requires authentication and Use same settings as my incoming mail server. On the Advanced tab, make sure you use the right port for hMailServer
- Incoming server (POP): 110
- Outgoing server (SMTP): 25
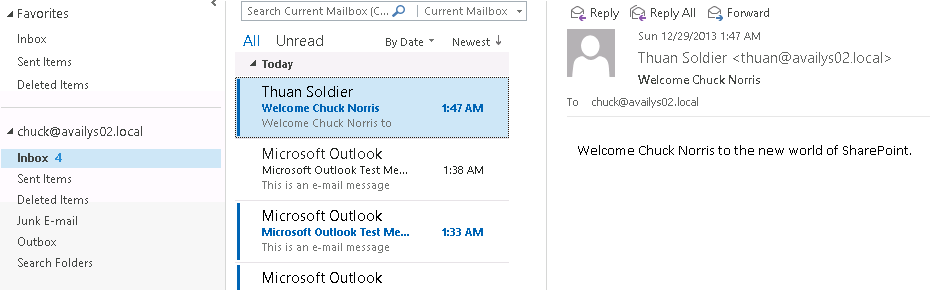
You can add more accounts to Outlook and test by sending a direct message to any of them.
http://i1235.photobucket.com/albums/ff428/thuansoldier/outlook2013-configuration-2_zpsc3e9cde1.png
Configuring email setting in SharePoint 2013
There are countless articles covering steps to configuring outgoing email in SharePoint 2013. Open Central Administration > System Settings > Configure outgoing e-mail settings. Type the STMP server and email address.
http://i1235.photobucket.com/albums/ff428/thuansoldier/sp13-email-configuration-1_zps96299f8e.png
Create a new email with a meaningful name, i.e. sharepoint@availys02.local or intranet@availys02.local because this email is used as the name of the sender of all emails that are distributed to recipients.
http://i1235.photobucket.com/albums/ff428/thuansoldier/sp13-email-configuration-2_zps1dd7d516.png
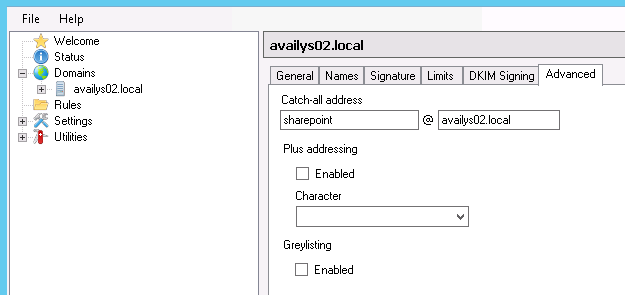
The additional step to complete SharePoint outgoing email configuration is to configure the SharePoint sender address as a catch-all address in hMailServer. Click domain and navigate to Advanced tab then type the sender address. In my case, it’s sharepoint@availys02.local
For some reasons, you don’t see an email address on user information page. You need to run AD Import to synchronize email attribute to SharePoint so it can recognize the existence of email address. AD Import is only available in SharePoint 2013. If you are using SharePoint 2010, you must go with full synchronization in User Profile Synchronize service.
Finally, use one of the following ways below to test email functionality:
- Assign farm administrator role along with sending a notification.
- Set an alert on a document library
- Send an email to someone who is assigned tasks on a built-in Task list (How to enable email notifications for Tasks list in SharePoint 2013)
- Create a simple workflow with If or Yes/No condition
http://i1235.photobucket.com/albums/ff428/thuansoldier/sp13-email-configuration-3_zpsa0b5a63d.png
Conclusion
As said earlier in this article, there are many options you can choose for your email testing. hMailServer is a good option providing good enough features to test notification in SharePoint environment. At the end of the day, hMailServer saves hardware resources and your time.