How to Combine GPO, Powershell and Orchestrator to Implement User Activity Recording for AD-Integrated Critical Servers
Introduction
Having a complete visibility over AD-integrated critical servers is usually difficult and can be expensive to achieve. IT administrators can enable multiple layers of auditing to track changes but it can be very complex to keep track of all the events. Also, some applications are not capable of recording all changes done on them. One of the ways to overcome these complexities and limitations is to have a video recording of all activities done by administrators when they are connected locally or via RDP on critical servers. Achieving that is feasible by using third-party tools but it is also feasible to have the same using Microsoft tools and technologies.
This article shares a way that can be used to implement User Activity Recording for AD-Integrated Critical servers by combining the use of Group Policy, Powershell and Orchestrator. This is explained through a scenario detailed below.
Scenario
CONTOSO is a company that has a Critical application hosted on AD-Integrated Windows Server 2012 R2 servers. Changes on the application are strictly controlled and CONTOSO managers would like to have an implementation that allows them to track all the changes done by administrators when they are connected locally or via RDP on the servers. The application does not have an advanced auditing feature and a User Activity Recording for this server became mandatory.
CONTOSO have the following Microsoft technologies in use:
- Active Directory Domain Services 2012 R2
- System Center Orchestrator 2012 R2
CONTOSO have requested the assistance of a Microsoft partner to develop and deliver a User Activity Recording implementation that:
- Stores the recorded videos on a dedicated File Server named FileServer1
- Archives the recorded videos on Weekly basis
- Removes the videos that were archived since 90 days or more
- Does not require extra licensing costs
Solution
The target setup could be achieved with the following implementation:
- A Powershell script will be used to take periodic screen captures when an administrator has a local or an RDP session on the servers. The screen captures will be stored on CONTOSO File Server
- Orchestrator will be used to distribute the previously described Powershell script on the servers.
- A Group Policy will be used to apply the previously described Powershell script for every user connected locally or via RDP on the servers
- A Powershell script will be used to convert the screen captures to videos
- Orchestrator will be used to archive the videos on Weekly basis
- Orchestrator will be used to remove videos that were archived 90 days or more in the past
Three folders will be then used on the File Server to maintain this setup (They will be created on the D driver in our case):
- D:\Images: It will be used to store screen captures. This folder need to be shared: The share name is \FIleServer1\Images in our case
- D:\Videos: It will be used to store the recorded videos
- D:\Archive: It will be used to store the Video archives
Implementation
Implementation of periodic screen captures for locally and RDP connected users
The following Powershell script can be used to take periodic screen captures. It uses Take-Screenshot function published by Boe Prox in Technet Gallery. It will take screen captures periodically and you can specify the frequency by updating $capturefrequency variable value. The screen captures will be stored in the shared folder mentioned in $storageshare variable.
##############Variables################# ###### $capturefrequency is in seconds ########## $storageshare = "\\FileServer1\Images\" $capturefrequency = 2 ######################################## ##############Function################## Function Take-ScreenShot { <# .SYNOPSIS Used to take a screenshot of the desktop or the active window. .DESCRIPTION Used to take a screenshot of the desktop or the active window and save to an image file if needed. .PARAMETER screen Screenshot of the entire screen .PARAMETER activewindow Screenshot of the active window .PARAMETER file Name of the file to save as. Default is image.bmp .PARAMETER imagetype Type of image being saved. Can use JPEG,BMP,PNG. Default is bitmap(bmp) .PARAMETER print Sends the screenshot directly to your default printer .INPUTS .OUTPUTS .NOTES Name: Take-ScreenShot Author: Boe Prox DateCreated: 07/25/2010 .EXAMPLE Take-ScreenShot -activewindow Takes a screen shot of the active window .EXAMPLE Take-ScreenShot -Screen Takes a screenshot of the entire desktop .EXAMPLE Take-ScreenShot -activewindow -file "C:\image.bmp" -imagetype bmp Takes a screenshot of the active window and saves the file named image.bmp with the image being bitmap .EXAMPLE Take-ScreenShot -screen -file "C:\image.png" -imagetype png Takes a screenshot of the entire desktop and saves the file named image.png with the image being png .EXAMPLE Take-ScreenShot -Screen -print Takes a screenshot of the entire desktop and sends to a printer .EXAMPLE Take-ScreenShot -ActiveWindow -print Takes a screenshot of the active window and sends to a printer #> #Requires -Version 2 [cmdletbinding( SupportsShouldProcess = $True, DefaultParameterSetName = "screen", ConfirmImpact = "low" )] Param ( [Parameter( Mandatory = $False, ParameterSetName = "screen", ValueFromPipeline = $True)] [switch]$screen, [Parameter( Mandatory = $False, ParameterSetName = "window", ValueFromPipeline = $False)] [switch]$activewindow, [Parameter( Mandatory = $False, ParameterSetName = "", ValueFromPipeline = $False)] [string]$file, [Parameter( Mandatory = $False, ParameterSetName = "", ValueFromPipeline = $False)] [string] [ValidateSet("bmp","jpeg","png")] $imagetype = "bmp", [Parameter( Mandatory = $False, ParameterSetName = "", ValueFromPipeline = $False)] [switch]$print
) # C# code $code = @' using System; using System.Runtime.InteropServices; using System.Drawing; using System.Drawing.Imaging; namespace ScreenShotDemo { /// <summary> /// Provides functions to capture the entire screen, or a particular window, and save it to a file. /// </summary> public class ScreenCapture { /// <summary> /// Creates an Image object containing a screen shot the active window /// </summary> /// <returns></returns> public Image CaptureActiveWindow() { return CaptureWindow( User32.GetForegroundWindow() ); } /// <summary> /// Creates an Image object containing a screen shot of the entire desktop /// </summary> /// <returns></returns> public Image CaptureScreen() { return CaptureWindow( User32.GetDesktopWindow() ); } /// <summary> /// Creates an Image object containing a screen shot of a specific window /// </summary> /// <param name="handle">The handle to the window. (In windows forms, this is obtained by the Handle property)</param> /// <returns></returns> private Image CaptureWindow(IntPtr handle) { // get the hDC of the target window IntPtr hdcSrc = User32.GetWindowDC(handle); // get the size User32.RECT windowRect = new User32.RECT(); User32.GetWindowRect(handle,ref windowRect); int width = windowRect.right - windowRect.left; int height = windowRect.bottom - windowRect.top; // create a device context we can copy to IntPtr hdcDest = GDI32.CreateCompatibleDC(hdcSrc); // create a bitmap we can copy it to, // using GetDeviceCaps to get the width/height IntPtr hBitmap = GDI32.CreateCompatibleBitmap(hdcSrc,width,height); // select the bitmap object IntPtr hOld = GDI32.SelectObject(hdcDest,hBitmap); // bitblt over GDI32.BitBlt(hdcDest,0,0,width,height,hdcSrc,0,0,GDI32.SRCCOPY); // restore selection GDI32.SelectObject(hdcDest,hOld); // clean up GDI32.DeleteDC(hdcDest); User32.ReleaseDC(handle,hdcSrc); // get a .NET image object for it Image img = Image.FromHbitmap(hBitmap); // free up the Bitmap object GDI32.DeleteObject(hBitmap); return img; } /// <summary> /// Captures a screen shot of the active window, and saves it to a file /// </summary> /// <param name="filename"></param> /// <param name="format"></param> public void CaptureActiveWindowToFile(string filename, ImageFormat format) { Image img = CaptureActiveWindow(); img.Save(filename,format); } /// <summary> /// Captures a screen shot of the entire desktop, and saves it to a file /// </summary> /// <param name="filename"></param> /// <param name="format"></param> public void CaptureScreenToFile(string filename, ImageFormat format) { Image img = CaptureScreen(); img.Save(filename,format); }
/// <summary> /// Helper class containing Gdi32 API functions /// </summary> private class GDI32 {
public const int SRCCOPY = 0x00CC0020; // BitBlt dwRop parameter [DllImport("gdi32.dll")] public static extern bool BitBlt(IntPtr hObject,int nXDest,int nYDest, int nWidth,int nHeight,IntPtr hObjectSource, int nXSrc,int nYSrc,int dwRop); [DllImport("gdi32.dll")] public static extern IntPtr CreateCompatibleBitmap(IntPtr hDC,int nWidth, int nHeight); [DllImport("gdi32.dll")] public static extern IntPtr CreateCompatibleDC(IntPtr hDC); [DllImport("gdi32.dll")] public static extern bool DeleteDC(IntPtr hDC); [DllImport("gdi32.dll")] public static extern bool DeleteObject(IntPtr hObject); [DllImport("gdi32.dll")] public static extern IntPtr SelectObject(IntPtr hDC,IntPtr hObject); }
/// <summary> /// Helper class containing User32 API functions /// </summary> private class User32 { [StructLayout(LayoutKind.Sequential)] public struct RECT { public int left; public int top; public int right; public int bottom; } [DllImport("user32.dll")] public static extern IntPtr GetDesktopWindow(); [DllImport("user32.dll")] public static extern IntPtr GetWindowDC(IntPtr hWnd); [DllImport("user32.dll")] public static extern IntPtr ReleaseDC(IntPtr hWnd,IntPtr hDC); [DllImport("user32.dll")] public static extern IntPtr GetWindowRect(IntPtr hWnd,ref RECT rect); [DllImport("user32.dll")] public static extern IntPtr GetForegroundWindow(); } } } '@ #User Add-Type to import the code add-type $code -ReferencedAssemblies 'System.Windows.Forms','System.Drawing' #Create the object for the Function $capture = New-Object ScreenShotDemo.ScreenCapture
#Take screenshot of the entire screen If ($Screen) { Write-Verbose "Taking screenshot of entire desktop" #Save to a file If ($file) { If ($file -eq "") { $file = "$pwd\image.bmp" } Write-Verbose "Creating screen file: $file with imagetype of $imagetype" $capture.CaptureScreenToFile($file,$imagetype) } ElseIf ($print) { $img = $Capture.CaptureScreen() $pd = New-Object System.Drawing.Printing.PrintDocument $pd.Add_PrintPage({$_.Graphics.DrawImage(([System.Drawing.Image]$img), 0, 0)}) $pd.Print() } Else { $capture.CaptureScreen() } } #Take screenshot of the active window If ($ActiveWindow) { Write-Verbose "Taking screenshot of the active window" #Save to a file If ($file) { If ($file -eq "") { $file = "$pwd\image.bmp" } Write-Verbose "Creating activewindow file: $file with imagetype of $imagetype" $capture.CaptureActiveWindowToFile($file,$imagetype) } ElseIf ($print) { $img = $Capture.CaptureActiveWindow() $pd = New-Object System.Drawing.Printing.PrintDocument $pd.Add_PrintPage({$_.Graphics.DrawImage(([System.Drawing.Image]$img), 0, 0)}) $pd.Print() } Else { $capture.CaptureActiveWindow() } } } ######################################## ##############Main###################### $i = 0 $hostname = $env:computername $username = $env:username $datetime = Get-Date $year = "{0:D4}" -f $datetime.Year $month = "{0:D2}" -f $datetime.Month $day = "{0:D2}" -f $datetime.Day $hour = "{0:D2}" -f $datetime.Hour $minute = "{0:D2}" -f $datetime.Minute $second = "{0:D2}" -f $datetime.Second $path = $storageshare + $hostname + "\" + $year + "-" + $month + "-" + $day + "-" + $hour + "-" + $minute + "-" + $second + "_" + $username + "" while ($true) { New-Item -ItemType Directory -Force -Path $path $i += 1 $j = "{0:D8}" -f $i $imagename = $path + "\img"+$j + ".png" Take-ScreenShot -screen -file $imagename -imagetype png Start-Sleep $capturefrequency } |
Using this PowerSshell script, the screen captures will be stored in PNG files with the following names: img[number].png where [number] is an eight (8) digit number that increments each time a new screen capture is token (The first value is always 00000001). The PNG files will be stored under the following path \FileServer1\Images\YYYY-MM-DD-HH-mm-ss_sAMAccountName where:
- YYYY represents the year when the first screen capture of the local or RDP session was captured
- MM represents the month when the first screen capture of the local or RDP session was captured
- DD represents the day when the first screen capture of the local or RDP session was captured
- HH represents the hour when the first screen capture of the local or RDP session was captured
- mm represents the minute when the first screen capture of the local or RDP session was captured
- ss represents the second when the first screen capture of the local or RDP session was captured
- sAMAccountName represents the User Logon Name (pre-Windows 2000) of the user havng the local or RDP session

The following permissions can be delegated to the administrators to allow storing the PNG files when the script is launched under their credentials:
- Share Permissions: Full Control for everyone
- NTFS Permissions: Create files / write date and Create folders / append data for the administrators
In our case, these permissions were set on the share \FileServer1\Images.
The PowerShell script code can be compiled to have an executable file where the source code is hidden. PowerGUI Script Editor can be used to achieve that.
Screen Capture script automatic distribution
Orchestrator will be used to distribute the Screen Capture Powershell script on servers that will use it. All you need are:
- A SQL table that will be used to store the name of the servers. Only one column is required:
- Server: This column is used to store the name of servers

- Orchestrator Runbooks to distribute the script on servers
Two Orchestrator Runbooks will be used:
- A Runbook to get the list of servers to which the script should be distributed and invoke the second Runbook
- A Runbook to check if the script is present or not on the target servers and copy it if it is missing
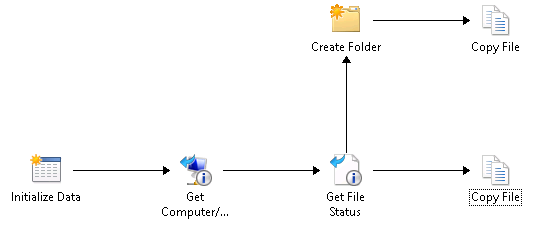
Let’s start with the second Runbook. You will need to use six (6) activities:
- Initialize Data: It will allow the Runbook to take the server name as input

- Get Computer/IP Status: It will allow checking the server status. If it is responding then the next activity can run

- Get File Status: It will allow checking the Powershell script is present on the target server. In our case, we have chosen C:\Tracking folder as the script location on target servers so we are checking the following location \<servername>\c$\tracking\video_tracking.exe where <servername> is the name of the target server and video_tracking.exe is the name of the compiled Powershell script.

The link between Get Computer/IP Status and Get File Status activities need to be set with the following include condition: Get Computer/IP Status returns success. This means that the checks are initiated only if the server is reachable.

- Copy File: It will allow copying the Powershell script on the target server. You need to specify the source file and the destination folder.

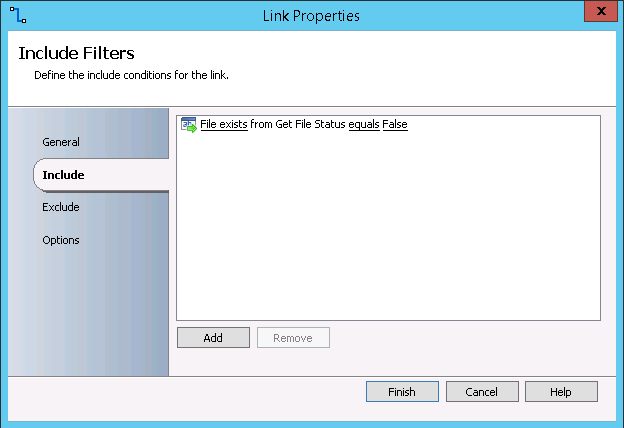
The link between Get File Status and Copy File activities need to be set with the following include condition: File exists from Get File Status equals False.
- Create Folder: It will allow creating C:\Tracking folder on the target server if Get File Status activity ends with an error or warning (When Get File Status activity ends with an error or a warning message then it means that it was not able to check the file status which is due to the absence of the parent folder in most of the cases)

The link between Get File Status and Create Folder activities need to be set with the following include condition: Get File Status returns warning or failed.

- Copy File: It will allow copying the PowerShell script on the target server. You need to specify the source file and the destination folder.

Below is a screen capture of all the activities included in the second Runbook:
Once you have created the second Runbook, you can proceed with the creation of the first one. You will then need to use four (4) activities:
- Monitor Date/Time: It will allow you to specify the time of when the Runbook need to start running

- Check Schedule: It allow you to specify the slot of days and hours when the Runbook can start running (By combining the settings in the activity and the ones from the previous activity, you will be able to precisely set the dates and times when your runbook can start running)

- Query Database: It will identify the servers in the scope of User Activity Recording by querying the SQL table.

- Invoke Runbook: It will allow you to run the second Runbook and to provide the Host name for every server in the scope of User Activity Recording as input.

Below is a screen capture of all the activities included in the first Runbook:

Applying User Activity Recording script as a log on script
Once the User Activity Recording script was automatically distributed by Orchestrator on the Critical servers, a Group Policy can be created to run the script when a user logs on them.
As applying log on scripts is a User Policy and we need to target computers, we need to involve the use of Group Policy Loopback processing.
The following can be implemented:
- An interactive log on message will be displayed to inform the logged on administrator that his activity will be video recorded. This could be achieved by using the following GPO settings which are under Computer Configuration\Policies\Windows Settings\Local Policies\Security Options\Interactive Log on:
- Interactive logon: Message text for users attempting to log on
- Interactive logon: Message title for users attempting to log on

- An automatic execution of the User Activity Recording script by using Run these programs at user logon setting under User Configuration\Policies\Administrative Templates\System\Logon. DO NOT use Logon script GPO feature as the prepared script might not be working properly with this option.
Below is a screen capture of the applied settings – Loopback processing included:

The left part here is to configure the Security Filtering. You can refer to the article below for the configuration:
Back to the Loopback: Troubleshooting Group Policy loopback processing, Part 2: http://blogs.technet.com/b/askds/archive/2013/05/21/back-to-the-loopback-troubleshooting-group-policy-loopback-processing-part-2.aspx
Conversion of screen captures to videos
The previous steps shared how to take screen captures for a local or RDP user session. With the captured and stored images, we will be able to create videos for the User Activities. At this step, we will need to use a tool that is capable of converting images to videos. One of these tools is FFMPEG which is a freeware.
Once downloaded (In our case, we have extracted the tool to be under c:\FFMPEG folder on the File Server), you need to apply and schedule the script below to run periodically on the File Server. You will have to specify the values of the following variables:
- $capturefrequency: You need to specify the same frequency you have set in the previous script
- $foldernotupdate: A folder containing PNG files will be considered as containing all the required data if the current time exceeded the number of minutes you specify for this variable since the last update. The script can then proceed by creating the video using PNG files in this folder.
- $path: You need to specify the local path for the Images folder
##############Variables################# $foldernotupdated = 5 $capturefrequency = 2 $path = "D:\Images" ######################################## ##############Main###################### $datetimereference = (Get-Date).AddMinutes((-1)*$foldernotupdated) $servers = Get-ChildItem $path | ?{ $_.PSIsContainer } foreach ($server in $servers) { $datetimepath = "" + $path + "\" + $server.name + "" $datetime = Get-ChildItem $datetimepath | ?{ $_.PSIsContainer } foreach ($accesstime in $datetime) { if (($accesstime.lastWriteTime) -le $datetimereference) { $sourcepath = $datetimepath + "\" + $accesstime.name $sourceimages = $sourcepath + "\img%08d.png" $destinationpath = $sourcepath -replace 'images','Videos' New-Item -ItemType Directory -Force -Path $destinationpath $mp4filepath = $destinationpath + "\record.mp4" C:\FFMPEG\bin\ffmpeg.exe -r 1/$capturefrequency -i $sourceimages -c:v libx264 -crf 42 -r 10 -pix_fmt yuv420p $mp4filepath Remove-Item $sourcepath -Recurse } } } |
Remark: If you have extracted the tool to be under a different folder then you need to update ffmpeg.exe path in the script.
The script works as described below:
- It will check the folders containing PNG files that were not updated recently (using the parameter described previously)
- It will copy the missing file structures from D:\Images to D:\Videos
- It will convert PNG files to a Video
- It will remove the PNG files after the conversion
Implementation of video archiving
Orchestrator can be used to implement video archiving and a single Runbook would be enough.
You will need to use four (4) activities:
- Monitor Date/Time: It will allow you to specify the time of when the Runbook need to start running

- Check Schedule: It allow you to specify the slot of days and hours when the Runbook can start running (By combining the settings in the activity and the ones from the previous activity, you will be able to precisely set the dates and times when your runbook can start running)

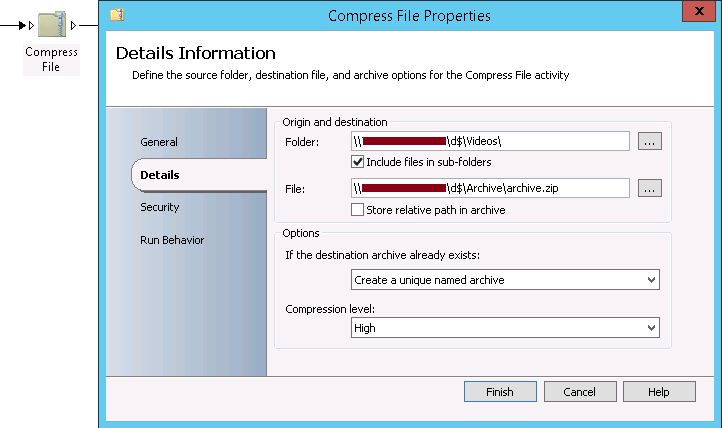
- Compress File: It allows specifying the folder to compress and the destination file. You need to make sure that Create a unique named archive is used and that the compression level is set to High
- Delete Folder: It allows removing Videos folder content after creating the compressed file
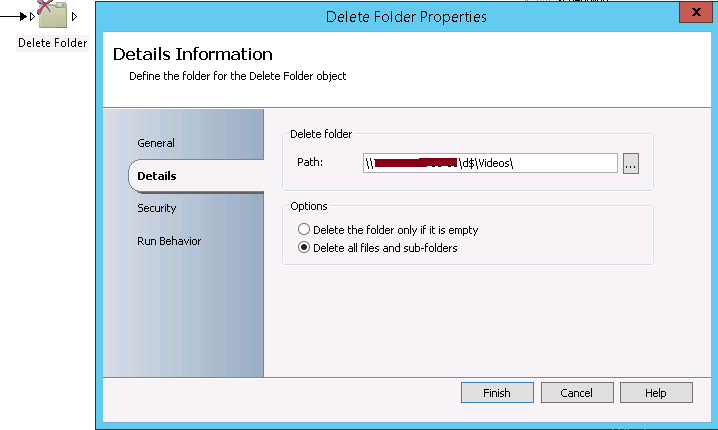
Below is a screen capture of all the activities included in the Runbook:

Implementation of archive automatic retention
To implement an automatic retention for archives using Orchestrator, you will need to use three (3) activities:
- Monitor Date/Time: It will allow you to specify the time of when the Runbook need to start running

- Check Schedule: It allow you to specify the slot of days and hours when the Runbook can start running (By combining the settings in the activity and the ones from the previous activity, you will be able to precise the dates and times of when your runbook can start running)

- Delete File: It will allow removing all the archive files that are aging more than the period you will specify.

Below is a screen capture of all the activities included in the Runbook:

Example of Recorded Video
** View**
Conclusion
This Wiki article shared a way to implement User Activity Recording by combining the use of Group Policy, PowerShell, Orchestrator and a freeware. It allows companies to implement an advanced tracking of changes done by local or RDP sessions on critical servers. The created videos have few Megabytes of size but IT administrators should properly estimate the required size for the storage before implementing the solution.