Exchange 2013 Domain Security
Introduction
In this article, we will be looking at how to configure Domain Security in Exchange 2013.
This Domain Security provides session based authentication by using Mutual TLS. This new feature was introduced from Exchange 2010.The Functionality in Exchange 2013 remains the same as we had in Exchange 2010 except we need to configure this on Exchange 2013 CAS server if we don’t have the edge server configured.
Main Points about Domain Security
The main points about Domain Security are:
1) Domain Security is server-to-server level configuration for securing SMTP traffics.
2) We do not need any user level encryption i.e., without configuring any options for encryption on Outlook on sender as well as recipient end.
3) We can enable this type of connection for trusted partners to secure SMTP traffic on an organization level.
Steps to Configure Domain Security
Below are the steps to configure Domain Security:
I’m just going to explain this with configuring Domain Security between two organizations exchangequery.com and toybox.com in my lab as an example.
The first and the foremost thing is that we would need a valid certificate for Domain Security for these two domains exchangequery.com and toybox.com.
The main reason for a certificate is to establish a trust between two organizations for a secure transmission.
Each server would verify the connections with the other server by means of a valid certificate. This will ensure that the encrypted connection is coming from a valid domain which is already in the Domain Security List.
Configuring Certificate
Configuring Certificate can be achieved in the following ways (we have multiple ways to achieve this is regular practice):
1) We can use public trusted certificates for both the domains.
2) We Can Cross-import Root CA certificates on both the domains as well.
3) Assign certificates for SMTP for both Exchange organizations from a single trusted RootCA.
Note: The Exchange self-signed certificate TLS is only for opportunistic TLS and not for Mutual TLS and so the Exchange self-signed certificate for TLS will not work for Mutual TLS.
4) We must have appropriate names on the certificate. Precisely Certificate that you assign to SMTP service must have the exact same name that your SMTP connector has (created for Domain Security) is using.
Configure Connector Settings
Now we will look into how to configure the Connector Settings.
In our example, we are going to configure Domain Security from Exchangequery.com for Toybox.com
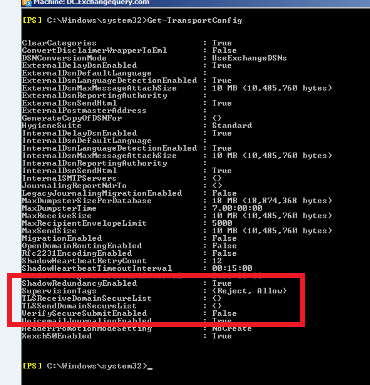
First, we need to run Get-Transportconfig in Exchangequery.com domain to modify few setting globally for sending receiving emails from trusted partners.
All we need to do is to look at below parameters:
- TLSReceiveDomainSecureList
- TLSSendDomainSecureList
In our case, we can see both the values are empty since we haven’t configured it yet.
**Note: **We can have multiple values i.e., multiple domains added in the TLSReceiveDomainSecureList and TLSSendDomainSecureList since this commandlet accepts multivalued parameters.
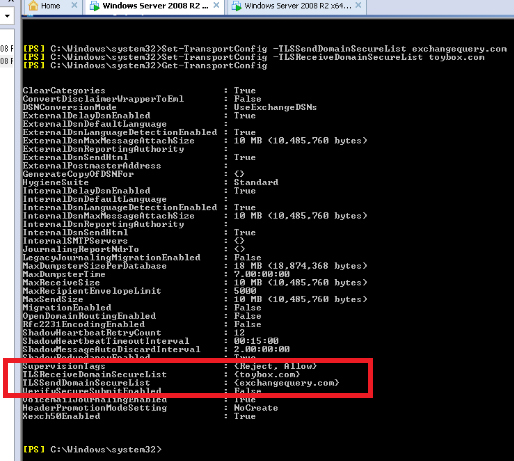
In our case, the following commands needs to be executed:
- Set-TransportConfig -TLSSendDomainSecureList exchangequery.com – for sending secure emails from Exchange query to toybox
- Set-TransportConfig –TLSReceiveDomainSecureList toybox.com – for receiving secure emails from toybox.com
Now we need to run Get-TransportConfig once again and ensure that the domains are added. In our case we have toybox.com and exchangequery.com added respectively.
After making the transport config changes globally now we need to configure CAS server to accept encrypted connections from the trusted partners.
Now we need to create dedicated receive connectors for the same.
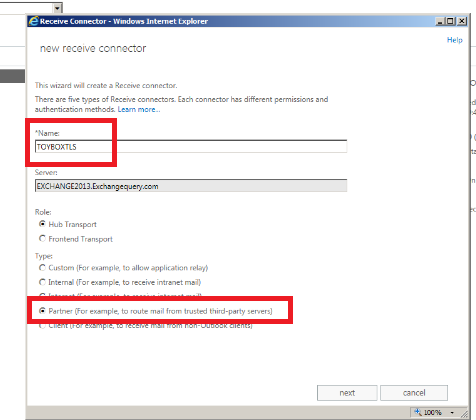
Open EAC – Click Receive Connectors – Select the appropriate CAS server.
Type desired name. Select the connector type as Partner.
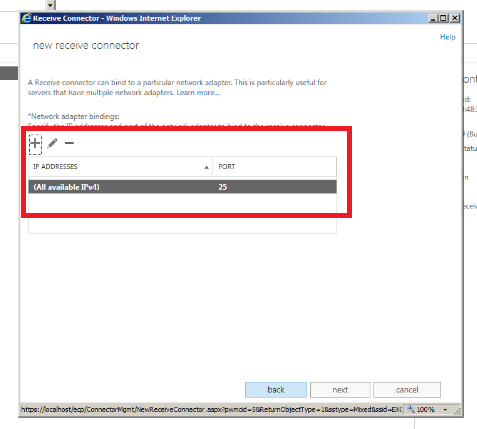
Click next and in the IP address tab just leave all available.
In the remote network settings remove the default value and specify only the public IP of the partner from which we are going to receive the encrypted email.
This is very important because if we leave the remote network as such then all the external emails might hit this connector and all unencrypted emails will not be delivered to the users.
Ensure that TLS and enable domain security is enabled which is enabled by default.
Also, ensure that Partners is selected.
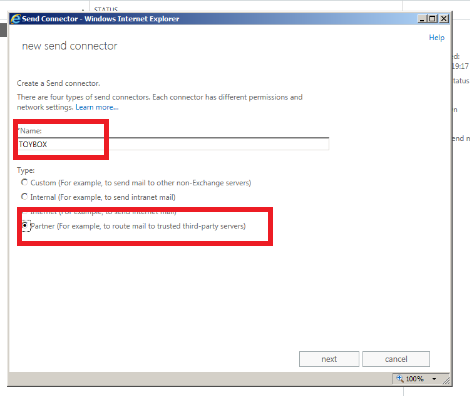
Now we need to configure the send connector to send emails from exchangequery.com totoybox.com.A dedicated send connector for toybox.com from our end.
Click on new send connector and give desired name and select Partner.
Click on next and leave default option as MX record associated with recipient domain and don’t user smart host.
The reason why we are not using smart host is because if we are routing it to any spam filters these encrypted emails might be blocked thinking them to be suspicious.
Click on next and then specify only the address space of the TLS domain. In our case, we need to specify toybox.com as toybox.com is our trusted partner.
Select the source server in Exchange 2013 we have an option to select only CAS server since front end transport proxies all the requests.
Click on finish.
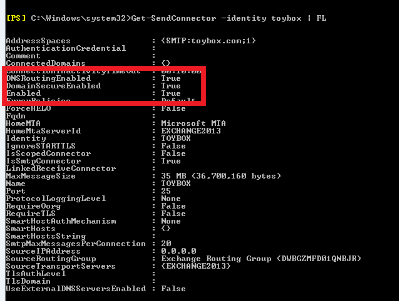
Now we need to ensure that DomainSecureEnabled is set to True.
Run the following command to check it
Get-SendConnector –identity toybox | FL
We could see is enabled.
If it’s not enabled you can enable it by running below command
Set-SendConnector –identityConnectorName –DomainSecureEnabled: $true
That’s all and we are done setting up Domain Security between Exchangequery.com and Toybox.com.
Now we are ready to send and receive secure emails between Exchangequery.com and toybox.com.
