Handling images using T-SQL
Introduction
In some situations, to get a picture directly from a directory path in HD after consulting a table may make the process of data replication and backup very complex. The information on the database and the image stored in the directory does not have a bond that "ties" this relationship, similar to the one T-SQL CONSTRAINT.
To avoid loss data or files, it's recommended to store an image on a SQL Server database. This is a relatively simple task that can make the process much more efficient and with less chance of lost contents (files or data rows).
Including one image in a table requires the file to be converted and a very useful alternative for this task is to use the OPENROWSET method.
Building the Environment for Testing
To reproduce the whole process of insert file to a table, we need:
- To know where the file is stored on the server;
- The user service on SQL Server instance have "read access" to the directory;
- Need to configure SQL instance permissions so that It's possible to obtain this data;
- Validate if this stores binary files correctly (through an "Image" object on a Report).
Let us prepare the environment!
Creating a sample table
In this task, we will create a simple table with only the columns that can be used for the demo (Image 1).
So add the "NM_FILE" column to identify the file and "CD_BYTES" column to store the binary data file.
The file name is used to help identify the file being stored in the database.
Image 1 - See this output SQL script in the image below

Script 1 - See this SQL script below
CREATE TABLE TB_IMAGE (
NM_FILE varchar(25) NOT NULL,
CD_BYTES varbinary(MAX) NOT NULL
)
GO
Browsing an image
Now with the table created in your database, we can identify what image is being added and if the Windows User of your SQL Instance Service has access permissions to the Windows folder where your image is stored.
To avoid slow runs and failures such as "permission denied" it is recommended to just insert files into the tables stored on the same Windows Server of your SQL Server instance (Image 2).
Look at the "MyPhoto.jpg" image we selected below. Know the file format (identified by its extension, which in this case is "image/jpg") as it's essential to rebuilding the binary file once the process of reading data through the OPENROWSET method is complete. Use the SINGLE_BLOB argument to not get the binary data optimally for a particular file type.
This facilitates the inclusion of different file types, but requires that this file type is known and defined in the application destination for any exhibition or file conversion.
Image 2 - See the file sample in the image below

Inserting an image
To insert an image into the database you need to get the Binary Data of the file. The better way to accomplish this is using the OPENROWSET method, adding SINGLE_BLOB argument.
This feature makes it possible to obtain the binary data of any file because it supports all file types of Windows Encoding Conversions (ASCII and UNICODE).
Once the Windows User of SQL Server Instance Service has access to the directory where the image is stored, you can use the INSERT command to include this image in a given table (Image 3). Other information that may assist in their identification becomes easier and only requires the declaration of a BULKCOLUMN for the data file.
Image 3 - See this output SQL script in the image below

Script 2 - See this SQL script in the below
INSERT INTO TB_IMAGE (NM_FILE, CD_BYTES)
SELECT
'MyPhoto.jpg', IMG.BulkColumn AS Bytes
FROM
OPENROWSET(BULK N'C:\images\MyPhoto.jpg', SINGLE_BLOB) AS IMG
GO
SELECT * FROM TB_IMAGE
GO
Reading binary data
The binary data stored into sample table is ready. To verify that the file was correctly stored the best way is to view the image.
We use the "Image" object through a Windows Form (.exe), an ASP.Net (.aspx) or a "Report Data" report (.rdl). As we are working with SQL Server, we validate if the binary data is not corrupt, using a query with these objects are then assembled into Report.
This article doesn't intend to teach you how to create a report in SQL Server Reporting Services (SSRS), but only to demonstrate how to query this information statement.
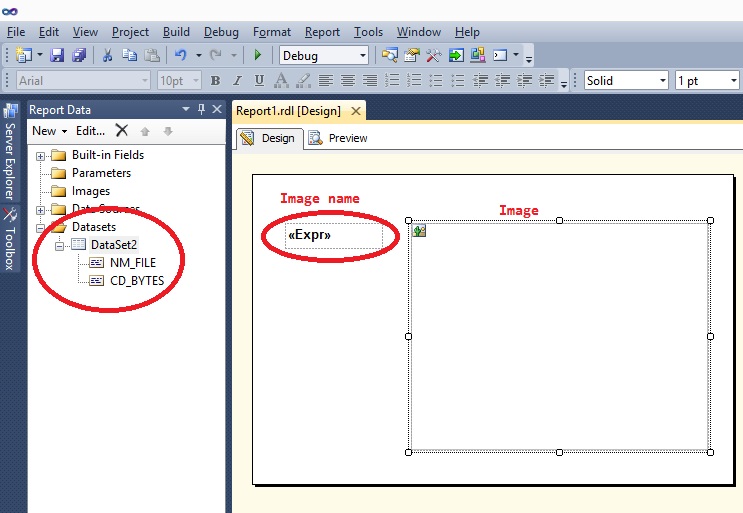
To get data in this validation, we define a DataSet with the desired fields and bind the table columns in the body of the Report (Image 4) using two objects: a "TextBox" object to the file name and an "Image" object to read the binary data and then available for viewing.
Image 4 - See this Design Report in the image below
In the "Image" object is needed to define some details for the correct display (Image 5):
**1 - **Set the data source as "Database".
2 - In "Use this field" option, click the "Fx" button. The "Expression" window will open and we can select the "CD_BYTES" field of our dataset. As we only get the first record (in this sample), we used the "First" method.
See the source of this expression below:
=First(Fields!CD_BYTES.Value, "DataSet2")
3 - In "Use this MIME type" field, select the image type expected. In our sample, we will select**"image/jpeg"**.
Image 5 - See this windows in the image below (click to enlarge)

You can quickly check whether the report is displaying data correctly. Just click the "Preview" tab and then the query is performed for data display (Image 6).
As expected, the file name stored in our sample table was displayed together with the stored image.
Image 6 - See this windows in the image below (click to enlarge)

Conclusion
Knowing an alternative resource for quickly manipulating data and images with T-SQL is extremely useful, especially when a need exists to link a given image to a row from a table in your SQL Server database.
This makes the entire process, from data query and backup faster, and mainly safer.
References
- OPENROWSET (Transact-SQL)
- binary e varbinary (Transact-SQL)
- Blog TechNet - SINGLE_BLOB Size Limit: An Affirmation for Bert
See Also
- SQL Server: How to Find the First Available Timeslot for Scheduling
- Transact-SQL Portal
- Wiki: Portal of TechNet Wiki Portals