Printing pool and priority queuing
Introduction
Print and Document Services enables you to centralize print server and network printer management tasks. With this role, you can also receive scanned documents form network scanners and route the documents to a shared network resource, Windows SharePoint Services site, or email addresses.
**Printing process
**When we send a print job to the logical printer, we actually send the print job to the print spooler. The print spooler then works with the print driver to reformat the data that's coming from the application into a language that the print device can understand. That language might be Escape Codes (used to control dot matrix printers), PostScript (created by Adobe), PCL (created by Hewlett-Packard), or some other, proprietary language. Once the translation is done, the print job is saved in a file on the hard disk drive inside the spooler. The portion of the hard drive where print jobs are stored is called a Print Queue. After that, the job is sent to the print device whenever it's available.
**Concept of logical printer
**The logical printer in Windows is composed of three different parts which are the print device (physical printer), the print driver and the spooler. The computer where we have established printing is called the Print Server.
Printing pool
You can create a printing pool to automatically distribute print jobs to the next available printer. A printing pool is one logical printer connected to multiple printers through multiple ports of the print server. The printer that is idle receives the next document sent to the logical printer. This is useful in a network with a high volume of printing because it decreases the time users wait for their documents. A printing pool also simplifies administration because multiple printers can be managed from the same logical printer on a server.
With a printing pool created, the user prints a document without having to find out which printer is available. The logical printer checks for an available port and sends documents to ports in the order that they are added. Adding the port connected to the fastest printer first ensures that documents are sent to the printer that can print the fastest before they are routed to slower printers in the printing pool.
Before setting a printing pool, consider the following:
- **All printers in a pool must use the same driver. **
Because users will not know which printer in the pool prints a given document, make sure all printers in the pool are located in the same place.
To set up a printer to print to multiple devices
- Open Printers and Faxes.
- Right-click the printer you are using, and then click Properties.
- On the Ports tab, select the Enable printer pooling check box.
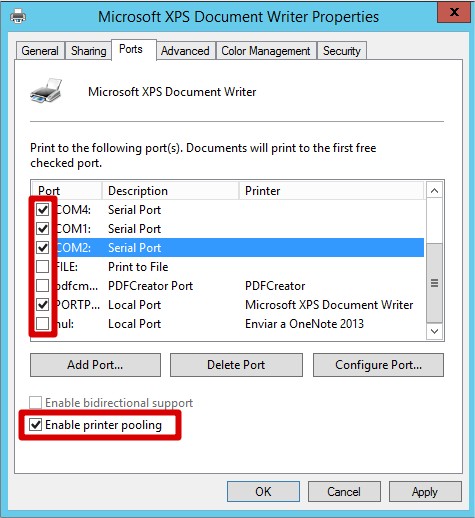
- Click each port where the printers you want to pool are connected.
**
Notes**
- With printer pooling, the printers must be the same type of printer using the same printer driver.
** **
**Priority
**
Documents sent by users with high priority levels can bypass a queue of lower priority documents waiting to be printed. If two logical printers are associated with the same printer, the Windows Server operating system routes documents with the highest priority level to the printer first.
This priority ranges from 1 to 99, with higher numbers receiving higher priority. The default priority is 1. For example, you can assign a printer for managers with a priority of 99 so that their print jobs are completed before those of other employees.
To take advantage of this print priority system, create multiple logical printers for the same printer. Assign each a different priority level, and then create a group of users that corresponds to each printer. For example, users in Group1 might have access rights to a priority 1 printer, users in Group2 might have access rights to a printer with priority 2, and so on.
Then you can deploy the printers trough GPO.
To set different print priority to different groups
- Open Printers and Faxes.
- Right-click the printer you want to set, click Properties, and then click the Advanced tab.
- In Priority, click the up or down arrows, and then click OK.
Or, type a priority level, where 1 is the lowest level and 99 is the highest, and then click OK.
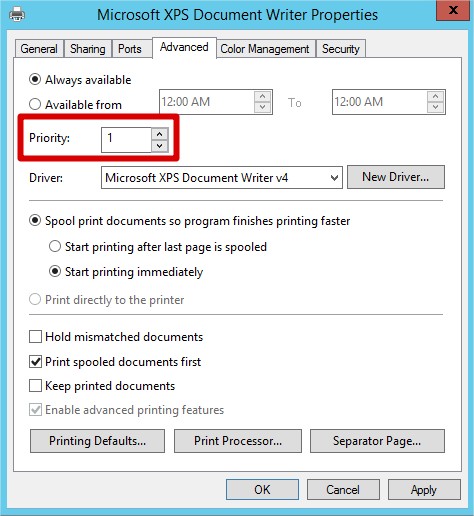
- Click Add Printer to add a second logical printer for the same physical printer.
- Click the Advanced tab.
- In Priority, set a priority higher than that of the first logical printer.
- Instruct the regular group of users to use the first logical printer name and the group with higher priority to use the second logical printer name. Set the appropriate permissions for the different groups.
Notes
- You gain no benefits just from setting a priority to a printer. You need to set at least two different logical printers for the same physical printer to take advantage of this option.
Hope you like.