Integrating a CMDB with Operations Manager
Scope
This article is going to describe the steps needed to integrate an External Datasource into your Operations Manager Monitoring Environment. The scenario I am using is for a CMDB integration, but the same steps work for any data source. If you would like to use the examples in this article I have attached a Zip with all of the resources needed to deploy this. Now to Kick it Off;
Goals of Implementing CMDB Integration with Operations Manager
Drive Monitoring & Control Alerting from Outside Data Sources:
**
**The same groups can be used to control both monitoring and alerting, even though people frequently look at and administer them separately. The value you will get from these groups can vary greatly based on your data source and workflows currently in place. If you already have all of your Servers inventoried in an extendable product like Service Now, this could be a clean solution to tie your monitoring and alerting configuration into your existing process. Simpler data sources can still offer the below benefits with less initial setup, I don’t know if using a CSV like this example would be great in production but something as straight forward as a SharePoint list could be used. When it comes to an implementation the end value will ultimately be determined by your specific case and how people use it, the best design won’t help if no one uses it.
**Reduce Config Churn:
**
Configuration Churn occurs when the Management Servers need to generate and distribute a new configuration to all or many of the servers in the Management Group. For smaller environments this may not present a performance issue, however when you get to environments with agent counts in the thousands this churn can cause excess resource usage on the RMS and SQL Backend in the form of Memory, CPU, and Disk IO. There are a few large contributors to configuration churn, one of which is the addition or modification of overrides. Whenever an override is added or modified all servers that reference the modified management pack and targeted classes will receive a new configuration. This effect can be compounded if someone is making Instance Level overrides through the console, each individual change will start the configuration processing and unless their installation of the console is faster than mine it will be a couple seconds before the next override gets placed, starting the process over again, and again, and possibly again. When you’re targeting overrides at dynamic groups some of this overhead can be reduced, when the override is placed on the group the same processes apply and all agents will receive a new config. The benefit of group based targeting comes into play when the membership of this dynamic group changes. When group membership changes the Management Server performing group calculation begins to generate a new config for itself and the servers that have objects residing in the targeted group. Once built the new configuration is distributed only to impacted computers, as opposed to all computers hosting the monitoring object class the override targeted.
**Simplify Management & Provide Uniform Monitoring:
**
These two go hand in hand, while it isn’t always possible to avoid instance level overrides by targeting dynamic groups, using them when you can has some advantages here.
- Reduce Growth of overrides, especially un-documented ones, as time progresses instance based overrides can build up and become hard to manage. While I have seen convoluted and mysterious administration used as a job-retention tactic it’s probably not the best route.
- Visibility of the current monitoring configuration can be presented to support teams. This is more specific to cases where the group managing SCOM is different to that of the group supporting the OS or Line of Business Applications. From the SCOM Support perspective you can offer the ‘Production Monitoring Configuration’ with your recommended thresholds, baseline monitors and rules enabled. There is always room for adjustment moving forward, but in my experience groups don’t always know where to start with monitoring.
- Improving Management Pack LifeCycle Maintenance. Are year old overrides really needed? In some instances where a product has been replaced by a newer version or depreciated all together multiple servers may need the exact same override changes. A SQL Upgrade from 2008 to 2012 would be along these lines, as a new management pack with unique workflows replaced the existing monitoring; instance level overrides would all need to be re-applied, and the old overrides removed; (which as a side note is a great reason to create an unsealed pack for every sealed pack you import)
- Overlapping Groups. This can be a double-edge sword;
- One caveat is that there is a potential for a single server to receive conflicting overrides via multiple group membership. A single object that belongs to multiple groups isn’t an issue in itself, but if the groups have overrides that target the exact same property there may be a conflict. The option is available to Enforce a specific override, but once multiple overrides have been Enforced you return to the same conflict.
- On the positive side of the Caveat overlapping groups can be helpful if they don’t target the exact same properties, they can successfully target the exact same workflow without issues. Back to the SQL Example; It is possible that you want the same SQL Monitoring configuration across you server environments, but you may not want the same alerting or baseline OS collections. The intersection of the Environment Based Groups and the Product Based Groups like SQL provides these settings with minimal maintenance.
Process Outline
I will go in depth following this, however looking from a 10,000 foot point of view the process is pretty straight forward. You design the class with the properties you need as an extension of the Windows Computer Role. Then instances of this class will be pulled from your CMDB and populated into SCOM via a PowerShell based discovery. Once in SCOM the CMDB properties will be used to dynamically populate groups where your overrides are targeted. **Probably not surprising, but the value of using this technique depends on keeping your CMDB up to date.
Creating SCOM Class:
Here’s a clip of the Class Definition I’ll be using for this example, the class is set with an Accessibility of Public as this example makes references between packs. My preference is to use two packs, this could be consolidated into one if preferred.
<ClassType ID="CMDBServerDisks" Accessibility="Public" Abstract="false" Base="Windows!Microsoft.Windows.LogicalDisk" Hosted="true" Singleton="false" Extension="false"> <Property ID="WarningThreshold" Type="int" AutoIncrement="false" Key="false" CaseSensitive="false" MaxLength="10" MinLength="0" Required="false" Scale="0" /> <Property ID="ErrorThreshold" Type="int" AutoIncrement="false" Key="false" CaseSensitive="false" MaxLength="10" MinLength="0" Required="false" Scale="0" /> <Property ID="CMDBItemId" Type="int" AutoIncrement="false" Key="false" CaseSensitive="false" MaxLength="255" MinLength="0" Required="false" Scale="0" /> </ClassType>
In the class definition I’ve added 5 properties which will extent the base class. These properties are pretty general and could be used for most deployments, you can add and remove additional properties as needed, just keep in mind that as with any discovered property you should stay away from things that change frequently, as these will introduce config churn. This Class Type definition will be the start of an empty pack, and when it’s done an SNK file will be needed to seal it. For the example and what I have posted on my blog I have included the SNK file and visual studio solutions so if you use these examples it should be ready to compile and deploy.
**Discover Hosted Class Instances:
** The discovery is Timed PowerShell Script Probe and this is the PowerShell code within the data source; when we get to the example I’ll pull up the full Management Pack XML. This script takes 3 parameters, one of which will need to be modified for your environment. The SourceID and ManagedEntityId are supplied by the discovery, the csvPath will be specific to your environment and the only thing that needs to be modified before the example code will work in your test environment, or if you’re daring in your production environment. http://practice2perfect.com/wp-content/uploads/2014/08/PowershellDiscovery.png
Once the Module is imported for Operations Manager the script breaks down to 3 simple functions; First we pull a list of SCOM computers via the SDK, there is also an example in the management pack XML using the Data Warehouse directly via SQL if you would prefer to go that route. The Second step is pulling the list of CMDB Computers from our data source, it’s a simple 1-liner here but could be adjusted to a function to accommodate any data source PowerShell can access, opening this up to pretty much anything. Finally we compare the two lists and for computers in both we create an instance of our CMDB Class and add it to our discovery data; In the class creation block you can see the bottom section with our custom properties, these will need to be update if you extend the class beyond this example. The first two properties belong to inherited classes, the discovery will succeed without the display name but the Principal name is required as our custom class is hosted and the Principal Name is used to tie it back to the computer object. Included is a couple LogScriptEvent calls for troubleshooting, these aren’t necessary but come in handy when troubleshooting.
Creating Property Based Groups:
With the custom class and discovery created we need dynamic groups to populate. My preference is to use a separate management pack for these groups but SCOM can function with the two packs merged to one as well. You can see the Group Definition below, they are non-hosted singleton classes with Accessibility set to public again.
<ClassType ID="CMDB.CustomGroups.Infrastructure.Group" Accessibility="Public" Abstract="false" Base="SC!Microsoft.SystemCenter.InstanceGroup" Hosted="false" Singleton="true" Extension="false" /> <ClassType ID="CMDB.CustomGroups.Infrastructure.Notify.Group" Accessibility="Public" Abstract="false" Base="SC!Microsoft.SystemCenter.InstanceGroup" Hosted="false" Singleton="true" Extension="false" />
These groups will extend the SystemCenter.InstanceGroup class and be populated with the SystemCenter.GroupPopulator Data Source. I’ll go into the GroupPopulator a little more on the next slide, it accepts the SCOM XML Expression format providing plenty of flexibility in our queries. In the case of Server based groups we will be populating 2 Class Types, Microsoft.Windows.Computer and the HealthServiceWatcher. Both classes have been included so that workflows that target the HealthServerWatcher are also included, one the most common being the computer down alerts.
Property Based Group Discovery and Population:
This is the XML Block for one of the Populator Data sources, for those not familiar with the expression syntax there is a lot of bulk to the XML but when broken down its pretty easy to understand. We have two MemberShip rules within the outer block, the first MemberShip rule specifies that we want Microsoft.Windows.Computer objects that have a relationship to a CMDB Server Object that has a SendNotification Property of 1. The Second rule indicates that we want the HealthServiceWatchers that are related to the Computer Objects in this group.
<Discovery ID="CMDB.CustomGroups.Infrastructure.Group.Discovery" Enabled="true" Target="CMDB.CustomGroups.Infrastructure.Group" ConfirmDelivery="true" Remotable="true" Priority="Normal"> <Category>Discovery</Category> <DiscoveryTypes> <DiscoveryRelationship TypeID="SC!Microsoft.SystemCenter.InstanceGroupContainsEntities" /> </DiscoveryTypes> <DataSource ID="DS" TypeID="SystemCenter!Microsoft.SystemCenter.GroupPopulator"> <RuleId>$MPElement$</RuleId> <GroupInstanceId>$MPElement[Name="CMDB.CustomGroups.Infrastructure.Group"]$</GroupInstanceId> <MembershipRules> <MembershipRule> <MonitoringClass>$MPElement[Name="Windows!Microsoft.Windows.Computer"]$</MonitoringClass> <RelationshipClass>$MPElement[Name="SC!Microsoft.SystemCenter.InstanceGroupContainsEntities"]$</RelationshipClass> <Expression> <Contains maxDepth="1"> <MonitoringClass>$MPElement[Name="CMDB!CMDBServerRole"]$</MonitoringClass> <Expression> <SimpleExpression> <ValueExpression> <Property>$MPElement[Name="CMDB!CMDBServerRole"]/SupportGroup$</Property> </ValueExpression> <Operator>Equal</Operator> <ValueExpression> <Value>Infrastructure</Value> </ValueExpression> </SimpleExpression> </Expression> </Contains> </Expression> </MembershipRule> <MembershipRule> <MonitoringClass>$MPElement[Name="SystemCenter!Microsoft.SystemCenter.HealthServiceWatcher"]$</MonitoringClass> <RelationshipClass>$MPElement[Name="SC!Microsoft.SystemCenter.InstanceGroupContainsEntities"]$</RelationshipClass> <Expression> <Contains maxDepth="1"> <MonitoringClass>$MPElement[Name="SystemCenter!Microsoft.SystemCenter.HealthService"]$</MonitoringClass> <Expression> <Contained maxDepth="1"> <MonitoringClass>$MPElement[Name="Windows!Microsoft.Windows.Computer"]$</MonitoringClass> <Expression> <Contained maxDepth="1"> <MonitoringClass>$Target/Id$</MonitoringClass> </Contained> </Expression> </Contained> </Expression> </Contains> </Expression> </MembershipRule> </MembershipRules> </DataSource> </Discovery>
Examples:
Now onto the more exciting demo portion;
I’ll be working from the Zip files posted, so if anyone wants to use this as a starting point it should be the exact same process to get it up and going. With some luck it will compile and deploy seamlessly. Included is the CSV based CMDB that we’ll be using and the Visual Studio Solution for the management packs, with a demo SNK key you can use to sign them. In addition to those core items is an override that dramatically shortens the discovery interval, and enables the discoveries, as well as a copy of the discovery script.
Beginning Deployment:
To begin setting up the CMDB integration you need to pick a location for the CSV Files, I’m going to drop a copy into the Root of my file server, but anywhere is fine. Looking inside these CSVs you’ll see my wonderful CMDB and Server list. With the CSV’s in place we’ll pull up the visual studio project that contains both Management packs, the first pack to be compiled and added is the CMDBCustomProperties project. Open up the CMDBCustomProperties.mpx file and you will see two Class definitions at the top of the document. Initially we’ll focus on the CMDBServerRole, when I have extra time I can go into the Secret Disks Class; this process works almost the same way if targeted at the Logical Disk level, allowing you to set disk level overrides without any Instance Level Overrides or Environment Wide Config-Churn. The class definition is the same as we looked at earlier, moving down to the type definitions the first discovery is the Timed Power Shell Discovery Probe, the only item that needs to be updated before compiling and sealing the management pack is the csvPath parameter. Once the parameter reflects the correct path build the pack and cross your fingers there aren’t any errors. Barring any Big Red X’s were are ready to drop this into SCOM.

We're going to use the Simple CSVs as our CMDB
Adding the pack to SCOM:
Once the Management Pack Bundle and the enabling override is imported we can go to Discovered Inventory and watch for the new class to populate, it should come in within a few minutes and match the data in our CSV CMDB.
Testing the Process:
With a very frequent discovery if we go to the CSV and modify a Server, like DC01 and change its environment to test you should see SCOM update the class properties within a minute. Moving over to the Windows Computer view and pulling up the health explorer you can see that under the Computer Roll Health Roll-up our newly created class is tied to this specific system. Now that the Hosted Custom Class is in place we need to compile the groups. 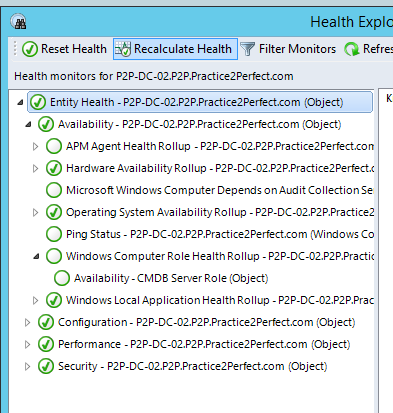
Building the Groups in Visual Studio:
The second project in the visual studio solution is the CMDB.CustomGroups Management Pack, This pack directly references the Custom Properties pack we just built, if there are build errors you may need to remove and re-add the reference with the correct path. Pulling up the CMDB.CustomGroups.mpx file we again see the Disk groups, and if you scroll down a little you can see the Infrastructure group that I pivoted out for readability in the PowerPoint. There is a handful of other groups included and with the exception of the ID the declarations are the same. There is some weight to the number of groups you have and the group population, we have about 75 dynamic groups in the prod and test environments as I support and haven’t run into any issues. I’m sure there is a practical limit but I would guess that it’s pretty high. Scrolling down to the discovery for this Infrastructure group you can see that it’s a simple equals on the SupportGroup Property, followed by the membership rule to include the HealthServiceWatch. The next discovery down is a little more specific and uses an AND between two properties to get a subset. All of these examples are Equals, but SCOM also supports the use of regular expression matching and the negated versions of not-equal and regex not-match. You can get pretty elaborate on the group definitions, but the more complex the more work the RMS is going to do to calculate membership. The pack should build without any changes, as long as there isn’t a reference error on the CMDB Properties management pack.
Deploying the Group Calculation Pack:
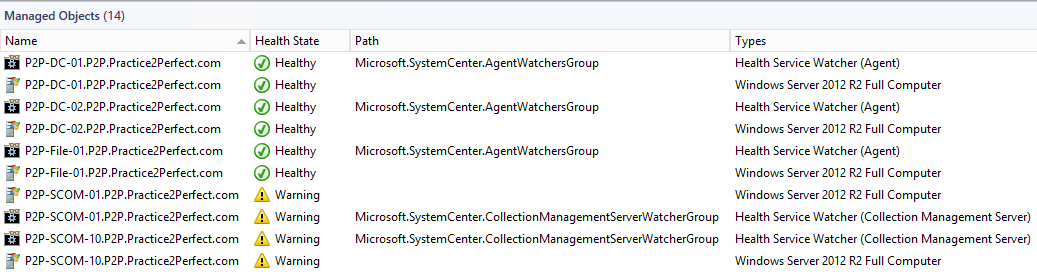
Moving back to SCOM, you can drop the Management Pack bundle in and a handful of new groups will appear. If you pull up the All Production Servers group and you will see it populate quickly with the Computer and HealthServiceWatcher objects marked as production in the CMDB, as we changed the property on DC-01 it isn’t in the list. I’ll quick return that to Production on the CSV and within 2 minutes the group will reflect this change.
Moving Forward:
From here forward these groups can be used to target any monitoring or alerting desired. While I haven’t found a way to have the CMDB populate the Subscriber address you can create subscriptions for each support group and only scope them to server objects supported by that group. Unfortunately when working with the UI and groups for alerting you only have the option of an OR between multiple groups, removing the simple option of adding the Production and Infrastructure group to produce Production Infrastructure alerts. Modifying the notifications MP through XML allows the use of more sophisticated options, but if this subscripting is later modified in the UI everything gets lost.