SharePoint 2013 Promoted Links: Change size, Wrap view, handle click event using JQuery
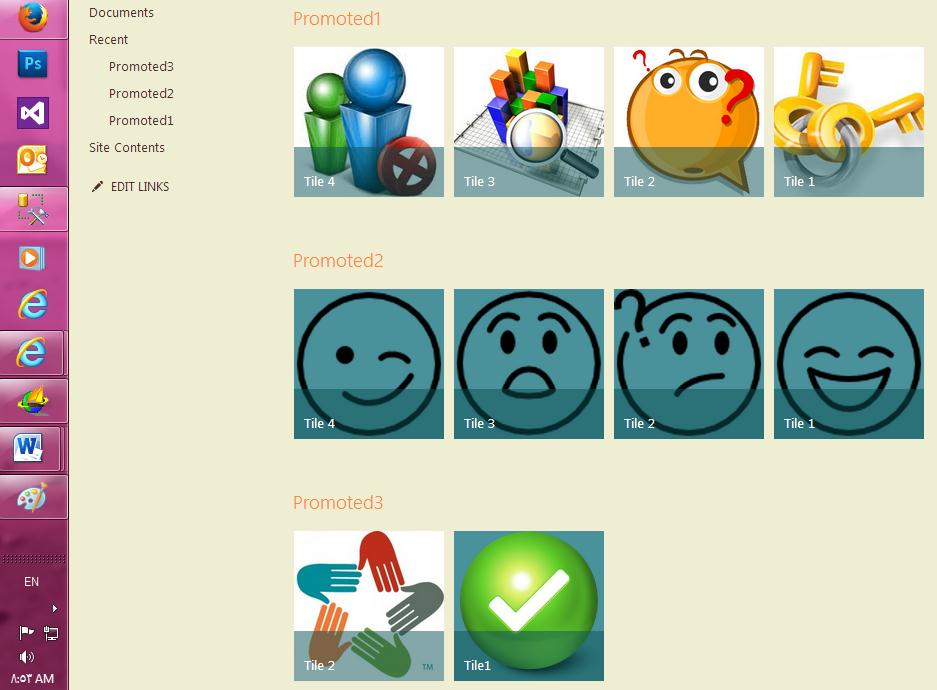
In this scenario, we've got 3 Promoted Links called "Promoted1", "Promoted2" and "Promoted3". What we want is to show "promoted1" in wrapped view. Also, we want to resize "Promoted2" and "Promoted3" to look smaller as well as hidden on Page load. "Promoted2" should be shown on click event of Tile2 and "Promoted3" be shown on click event of Tile3 of "Promoted1".
For the background image of promoted2, png photos are used.
How to show All Promoted Links in multiple lines:
- Insert a script editor to the page and edit it.
- If you have only one promoted link in the page or want to break all of them in lines, you could change the width as below:
<style>
 .ms-promlink-body {
 width: 350px;
 }
</style>
How to show a specific Promoted Link in multiple lines:
Wrapping
However, if you have several Promoted links and you desire to wrap just one of them , the mentioned trick would not work. Considering that "Simple is beautiful", I think the simplest way to wrap a specific promoted link is to define a new style and add it to that promoted link using addClass method. This style will be applied after all the styles defined for this component. (you can inspect it by inspect element).
<style>
 .ms-promlink-body1 {
 width: 350px;
 }
</style>
<script type="text/javascript" src="/Scripts/JQuery/jquery-1.8.1.js"></script>
<script language="javascript">
$(document).ready(function () {
$("#promotedlinksbody_WPQ2").addClass('ms-promlink-body1');
});
</script>
// promotedlinksbody_WPQ2 is the id of the tile you could get using inspect element
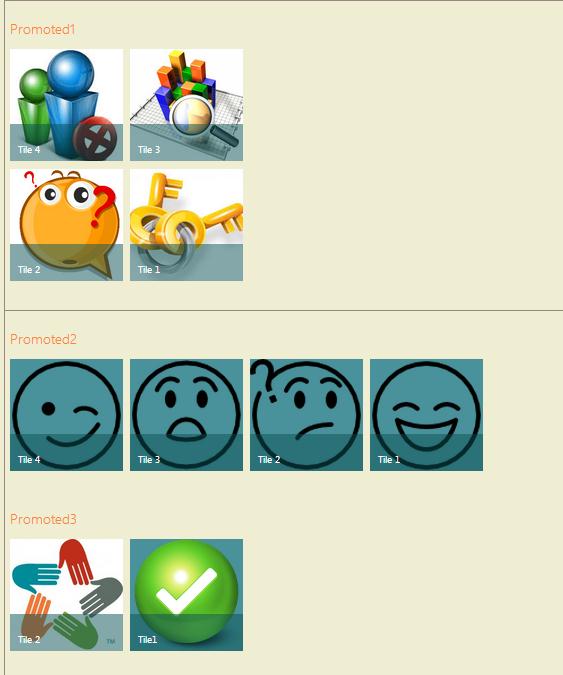
As you can see in the snapshot below, only "Promoted1" has been wrapped in two lines. If you change the width to 480px for example, 3 tiles would be shown in one line.
How to change the size of promoted links
This part is in completion of Umer Pasha's blog post at
on Feb 15, 2013, subj: jQuery to change size of the Promoted Links in Sharepoint 2013
Now, we want to resize "Promoted2" to look smaller.
Open script editor on the page.
Write down the following code:
<script type="text/javascript" src="/Scripts/JQuery/jquery-1.8.1.js"></script>
<script language="javascript">
$(document).ready(function () {
// ImageSize is the size you desire for the tile, the default size is 180
var ImageSize = "80";
// promotedlinksbody_WPQ is the id of Promoted link which you could get using inspector.
var promotedlinksbody_WPQ = "3";
var numberOfPromotedLinks = $('#promotedlinksbody_WPQ' + promotedlinksbody_WPQ + ' > .ms-tileview-tile-root').length;
var ControlID='promotedlinksbody_WPQ';
 ControlID=ControlID + promotedlinksbody_WPQ;
 $("#" + ControlID).height(ImageSize);
 for (i = 1; i <= numberOfPromotedLinks; i++) {
 ControlID='Tile_WPQ' + promotedlinksbody_WPQ + '_' + i ;
 ControlID= ControlID + '_1';
 $("#" + ControlID).width(ImageSize);
 $("#" + ControlID).height(ImageSize);
 ControlID='Tile_WPQ' + promotedlinksbody_WPQ + '_' + i ;
 ControlID= ControlID + '_2';
// when you write "width(ImageSize-1)" , a space sized 1px appears between tiles, otherwise they would be stick together like a ribbon.
 $("#" + ControlID).width(ImageSize-1);
 $("#" + ControlID).height(ImageSize);
 ControlID='Tile_WPQ' + promotedlinksbody_WPQ + '_' + i ;
 ControlID= ControlID + '_7';
 $("#" + ControlID).width(ImageSize);
 ControlID='Tile_WPQ' + promotedlinksbody_WPQ + '_' + i ;
 ControlID= ControlID + '_4';
 $("#" + ControlID).width(ImageSize);
 $("#" + ControlID).height(ImageSize);
 $("#" + ControlID).addClass('ms-tileview-tile-detailsBox2');
 }
ControlID="promotedlinksheader_WPQ" + promotedlinksbody_WPQ;
 $("#" + ControlID).hide();
});
</script>
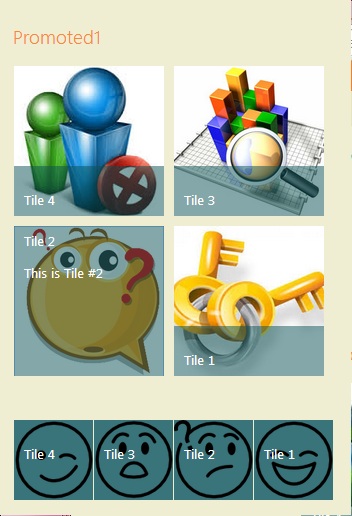
As you can see in the snapshot below, "Promoted2" is in half size of "Promoted1".
The title of the tiles would be appeared on mouse over.

In order to show the title (no need to hover) you could define a new css class, and add it to the promoted link.
<style>
.ms-tileview-tile-detailsBox2
{
position : absolute;
top: 0px!important;
/* [ReplaceColor(themeColor:"TileText")] */ color:``#fff;
/* [ReplaceColor(themeColor:"TileBackgroundOverlay")] */ background-color:rgba( 0,0,0,0.2 );
}
</style>
<script type=``"text/javascript" src=``"/Scripts/JQuery/jquery-1.8.1.js"``></script>
<script language=``"javascript"``>
. ControlID=``'Tile_WPQ' + promotedlinksbody_WPQ + ``'_' + i ;
``ControlID= ControlID + ``'_4'``;
``$(``"#" + ControlID).width(ImageSize);
``$(``"#" + ControlID).height(ImageSize);
``$(``"#" + ControlID).addClass(``'ms-tileview-tile-detailsBox2'``);
.
</script>

Do the same for "Promoted3".
How to handle click event of a promoted link tile
Click event
In order to handle the click event of each tile you have to know the id of each tile when clicked. So, you use this code to get the id by an alert.
<script type=``"text/javascript" src=``"/Scripts/JQuery/jquery-1.8.1.js"``></script>
<script language="javascript">
 $(function () {
 $("a[id^=Tile_WPQ]").each(function () {
 $(this).click(function () {
 var linkTitle = $(this).find('li[title]').attr('id');
alert (linkTitle);
)};
)};
});
</script>
In this scenario we want to hide "Promoted2" and "Promoted3" on Page load, then show "Promoted2" on click event of tile2 of "Promoted1" and show "Promoted3" on click event of tile3 of "Promoted1"
Code
This piece of code will do this for you:
<script type="text/javascript" src="/Scripts/JQuery/jquery-1.8.1.js"></script>
<script language="javascript">
$(document).ready(function() {
$("div#WebPartWPQ3").hide();
$("div#WebPartWPQ4").hide();
});
 $(function () {
 $("a[id^=Tile_WPQ]").each(function () {
 $(this).click(function () {
 var linkTitle = $(this).find('li[title]').attr('id');
 if (linkTitle == "Tile_WPQ2_2_6")
 {
$("div#WebPartWPQ3").show();
 $("div#WebPartWPQ4").hide();
 event.returnValue = false;
 }

 if (linkTitle == "Tile_WPQ2_3_6")
 {
 $("div#WebPartWPQ4").show();
 $("div#WebPartWPQ3").hide();
 event.returnValue = false;
 }
});
 });
 });
</script>
Put "Promoted2" and "Promoted3" in one cell of table and "Promoted1" in another cell. Just like the snapshot below:

How to hide white spaces in a page.
Remove the white space between web part so you can navigate properly; then, "Promoted2" and "Promoted3" would appear instead of each other on click event.
Remove the white space using this piece of code:
<style>
.ms-webpartPage-root {
border-spacing: 0px !important;
}
.ms-webpartzone-cell {
margin: 0px !important;
}
</style>
 |
 |