Background Task: Network Change Trigger
The scope of this tutorial is to cover how to make live tiles that show if the network is active or not.
BACKGROUND TASKS:
The sandboxed environment of windows apps is quite different from other development environments.
Traditionally, user can control when an app is running. The user can run as many applications as he wants at once and each of those applications will continue using the system resources. However, on the windows environment, if an app isn’t active i.e. it isn’t running on the user screen then that app can be sent into suspended mode by the CPU to preserve the system resources.
Therefore, if your app is a real time application and needs to run at all times, then this means trouble for you!
Fortunately, there is a workaround, called as background tasks.
Background tasks are separate JavaScript files that the OS runs in the background. You can use background tasks to provide functionality when your app is suspended or not running.
A background task is simply a class that implements the IBackgroundTask interface located in the Windows.ApplicationModel.Background namespace.
It has a single Run method that has a parameter of type IBackgroundTaskInstance that allows the task to interact with the current run process.
public class SampleBackgroundTask : IBackgroundTask
{
public void Run(IBackgroundTaskInstance taskInstance)
{
// Insert runtime code
}
}
TRIGGERS IN BACKGROUND TASKS:
When a background task is made, it must be associated with a trigger that determines when and how the background task will be executed.
For this particular tutorial, we will use the network state change trigger which is one of the types of a system event trigger.
- System Event: Specifies the system events that can be used to trigger a background task. This trigger has various members like smsReceived, userPresent, networkStateChange, timeZoneChange etc. Each of these events are triggered when various conditions are met as specified by the members of this trigger. For more information on system event triggers, see: More on System Event trigger
Adding a Background Task:
To use the network state change trigger, we have to first learn how to add a background task.
Follow the steps to add a new task:
- Create a new project

- Select the C# windows store apps, select the windows phone apps and use blank app template. Name the project as BackgroundTaskDemo

- The implementations of IBakckgroundTask must reside in a WinRT component library. So after the project BackgroundTaskDemo opens, right click the solution node in the solution explorer and select (1) Add (2) New Project

- Select Windows Runtime Component in the new pop up window that opens. Name it BackgroundTasks and press ok.

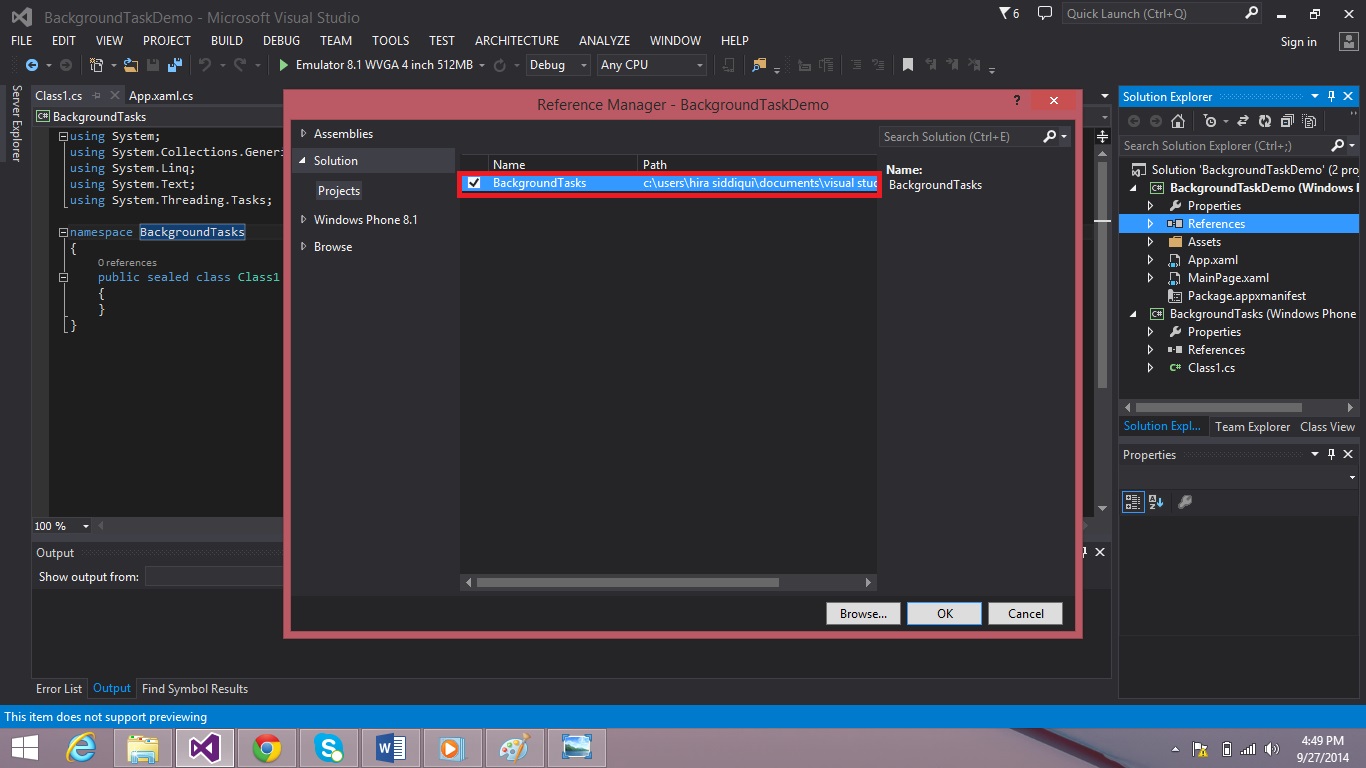
- Add reference to the BackgroundTasks in your project by right-clicking the references in the solution explorer and select add new reference.

- Select the BackgroundTasks in the window that opens. Then press OK.
- Now your solution would have a class named as Class1. Rename the class as BackgroundTasks and implement the task as shown below. Also import the necessary namespaces.
public sealed class MyBackgroundTask : IBackgroundTask
{
public void Run(IBackgroundTaskInstance taskInstance)
{
UpdateStatusAndTime();
}
private void UpdateStatusAndTime()
{
var tileContent = TileUpdateManager.GetTemplateContent(
TileTemplateType.TileSquareText03);
var tileLines = tileContent.SelectNodes("tile/visual/binding/text");
var networkStatus = Windows.Networking.Connectivity.NetworkInformation.GetInternetConnectionProfile();
tileLines[0].InnerText = (networkStatus == null) ?
"No network" :
networkStatus.GetNetworkConnectivityLevel().ToString();
tileLines[1].InnerText = DateTime.Now.ToString("MM/dd/yyyy");
tileLines[2].InnerText = DateTime.Now.ToString("HH:mm:ss");
var notification = new TileNotification(tileContent);
var updater = TileUpdateManager.CreateTileUpdaterForApplication();
updater.Update(notification);
}
}
- Now register your background task with windows, this is done by using a BackgroundTaskBuilder class which actually associates an implementation of an IBackgroundTask with a trigger, a unique name and any other conditions.
- Open the MainPage.xaml.cs class from your solution and add the following code in its OnNavigatedTo event.
protected override void OnNavigatedTo(NavigationEventArgs e)
{
foreach (var task in BackgroundTaskRegistration.AllTasks)
{
task.Value.Unregister(true);
}
var builder = new BackgroundTaskBuilder();
builder.Name = "MySampleTask";
builder.TaskEntryPoint = "BackgroundTasks.MyBackgroundTask";
builder.SetTrigger(new SystemTrigger(SystemTriggerType.NetworkStateChange, false));
var ret = builder.Register();
}
- In the above code, builder.Name represents the unique name which is assigned to the BackgroundTaskBuilder. TaskEntryPoint represents where the tasks are implemented, which is the namespace followed by class name. SetTrigger has two parameters, first is the type of trigger (in this case NetworkStateChange trigger) and the second is OneShot, which determines if this trigger will be fired more than once. There is another method that is not used here but you can use it if need be. That method is SetCondition method. You can set conditions with that method if you want to.
DECLARATION OF THE TASK IN APP MANIFEST:
Open the app manifest from your project’s solution and follow the following steps numbered as 1, 2, 3 and 4

- After selecting the background tasks from the dropdown menu, click the add button. Two types of information will be required:
SUPPORTED TASK TYPES:
For the sake of this example, select the System Event type since we are using that, but if your app is using other types too make sure all of them are selected here.
THE APP SETTINGS:
For this example, use the entry point property and set it to the full path of the IBackgroundTask implementation.
- Run the application by pressing F5.
HOW TO TRIGGER THE SYSTEM EVENT:
After running the application, you wouldn’t see anything on the screen since we haven’t added any UI elements in the MainPage.xaml. However, in this case you need to be more concerned with the app’s tile. Pin the tile of the app on the start screen if it isn’t already pinned. You will see a cross as a tile since we didn’t add any visual assets.
Once this is done, trigger the Network Change Event by turning off wifi, unplugging your device from the network or turn on airplane mode. In short, you have to disconnect your device from the network.
Now go back to the start screen and see the live tile, it would show the current network status and date and time stamp.
Similarly, you can use a number of triggers for your apps to make your app more efficient, elegant and reliable.
We will be covering timer background task in the next tutorial. See you soon. Happy Coding!
References: