Private Cloud in System Center Virtual Machine Manager 2012 - Part 2 – Delegate Control
Introduction
After the Private Clouds creation, it should be interesting to create User Roles to delegate control to virtual machines, templates, and other features in System Center Virtual Machine Manager 2012 (VMM), and also to select the permissions for these features such as create, shutdown, change, etc.
With this model we will able to provide, for example, development team access to create a virtual machine on a specific host group with few limitations or also delegate the Help Desk to make some simple settings that do not impact the production environment. This delegation in VMM is called User Role. Below is the procedure to create and configure a User Roles.
Configuration
To assign a User Role to a Private Cloud, open the management console, click VM and Services, select the Private Cloud, and then click Assign Cloud, as shown in Figure 1. 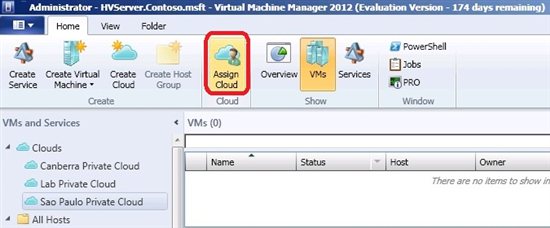 Figure 1 – Assign Cloud Option A Wizard will appear on the first screen. Then add the User Role name and description.
 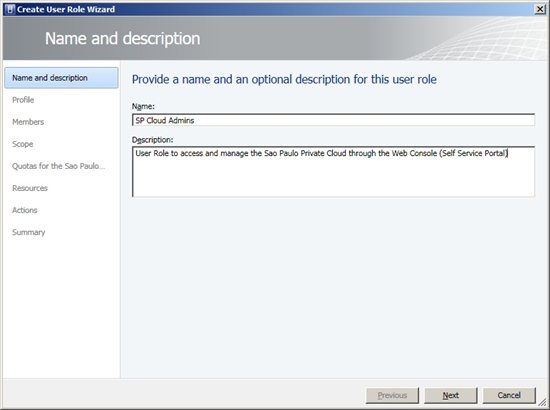 Figure 2 - Name and Description Under Profile will be chosen Profile Type for the User Roles. There are three profile options, including the new Read-Only Administrator. Below is a description for all of them: • Delegated Administrator - Members of this group have full control to all administrative tasks for all Host Groups, Clouds and Library Servers chosen during the group creation. • Read-Only Administrator - This User Role is designated for audit purposes only. Members can view status, job status and properties of objects in Clouds, Library Servers and Host Groups chose during the group creation. • Self Service User - All members of this group access can create, deploy and manage their own virtual machines through the Management Console and Web Console VMM (Self-Service Portal). This option provides access permissions and resources such as virtual machines (VM) templates and Library Servers that members can manage. In this example is created one of the most common profiles: Self Service User. Choose the profile according to our needs and click Next.
 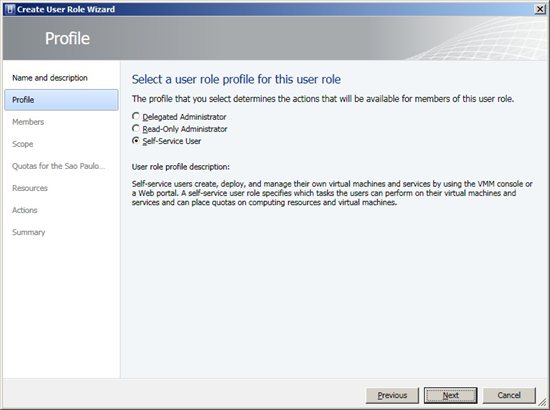 Figure 3 - Profile After that, we need to add User Role members. In the demonstration was used SPCloudAdmins group. Click Add, select the groups and click Next.
 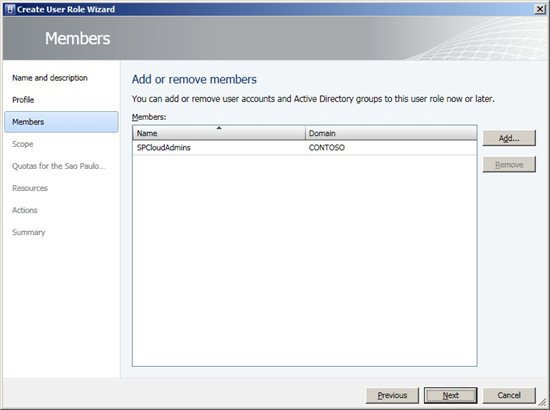 *Figure 4 - Members * On the next screen, we must choose what are the Private Clouds that groups will manage. After selecting them, click Next.
 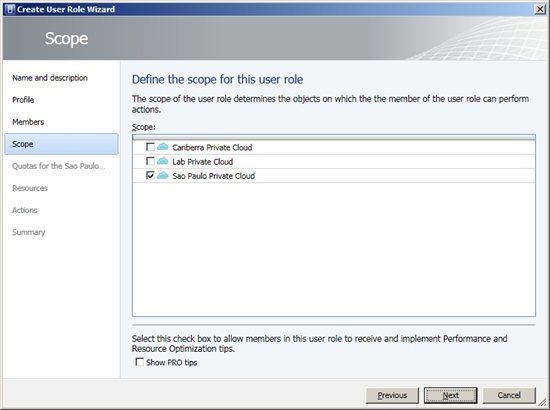 Figure 5 - Scope On Quotas we have two options to create a quota: • Role Level Quotas - Limitations for all group members • Member Level Quotas – Specific limitations to each group member. The resources available are: *• Virtual CPUs • Memory • Storage • Custom Quota (Points) • Virtual Machines * One option that stands out is the Custom Quota (Points). With it, we can specify some points for the group or its members and then they can use only that limit. For example, when a machine is created using a hardware template we need a point. If the user has a limit of 10 points he can only create 10 machines. After this limit, we may not be able to create some features. In the example in Figure 6 are not intended to limit the groups, only for members. NOTE: Member Level Quotas should not be less than the Role Level Quotas. Choose the desired limits, and then click Next.
 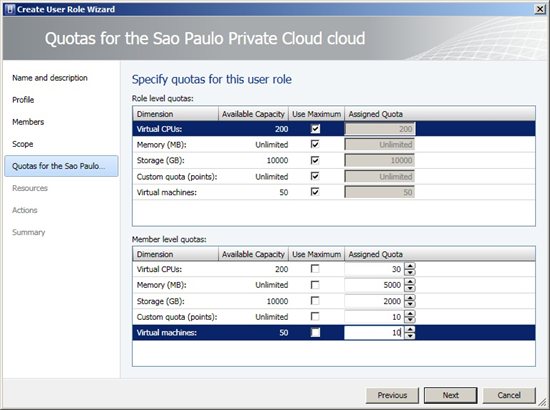 *Figure 6 - Quotas * One of the most interesting and important thing in this process is covered in Resources and Actions. See the list below some resources examples that can be added, as shown in Figure 7: *• Hardware Profiles • Guest OS Profiles • VM Templates • Virtual Machines • Application Profiles • Services Templates • Application Profiles * On the same screen, we can specify a path to the User Roles in a Library Servers, offering a storage folder for the group members. Click Add, select the features we want and click Next. If necessary, add the folder path to be used by group members in a data path.
 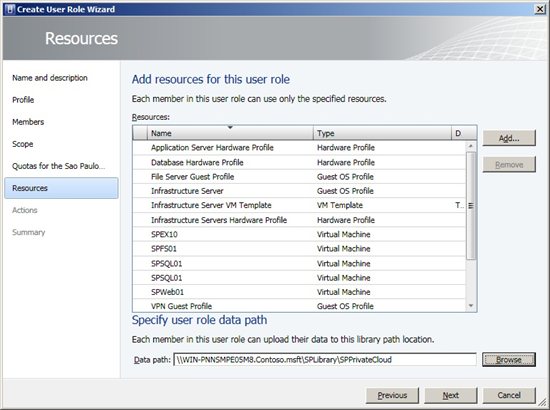 Figure 7 - Resources Now in Actions object permissions are displayed. They work as permissions that we can apply for Virtual Machines. Check below the existing actions:
- Author
- Checkpoint (snapshots)
- Checkpoint (Restore Only)
- Deploy
- Deploy (From Template only)
- Local Administrator
- Pause and Resume
- Receive
- Remote Connection
- Remove
- Save
- Share
- Shut down
- Start
- Stop
- Store
For more info about see http://social.technet.microsoft.com/wiki/contents/articles/12554.actions-available-to-self-service-user-roles-in-vmm-2012.aspx
Choose actions according to our group, and then click Next.
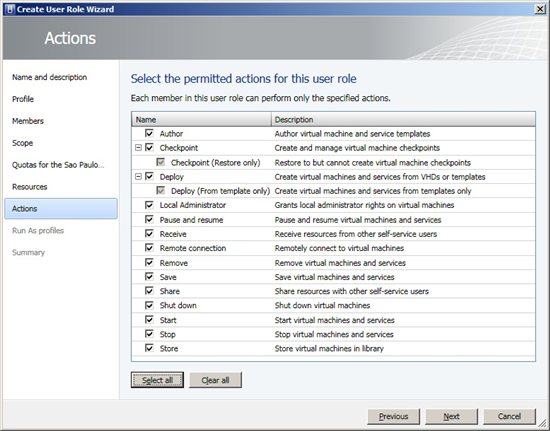
Figure 8 - Actions
In some cases, we may need a different user with specific permissions on a group of hosts or even a cloud. This type of object in the VMM is called Run As Profile. It is nothing more than a service account that can be used by group members. In the example of Figure 9 is the local administrator account used for all hosts, but because the group limitation that we are creating will be used only in virtual machines that are in Sao Paulo Private Cloud.
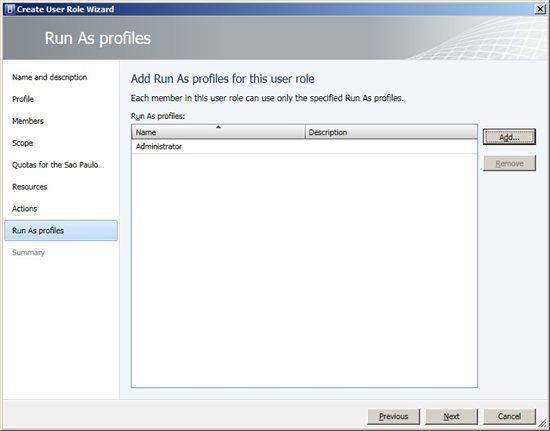
Figure 9 - Run As Profiles
In Summary, confirm the options chosen, and if we prefer, export the script from powershell to create models or future automation.
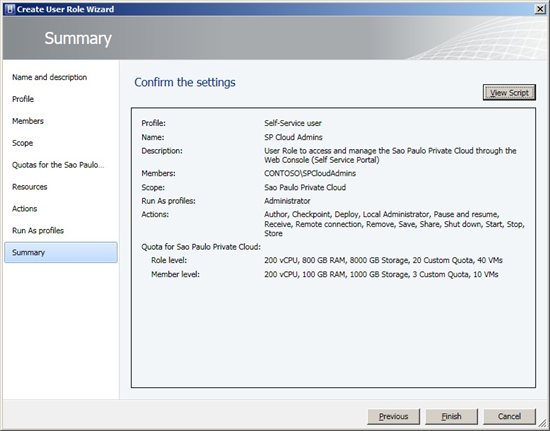
Figure 10 - Summary
Clicking on View Script a text file is displayed with the PowerShell commandlets. Check out the script for the demonstration used in this article:
$cloudsToAdd = @()
$cloudsToAdd += Get-SCCloud -Id "2d34f303-7de0-4371-85cd-a2691b751101"
$runAsProfilesToAdd = @()
$runAsProfilesToAdd += Get-SCRunAsProfile -Name "Administrator"
$scopeToAdd = $cloudsToAdd + $runAsProfilesToAdd
Set-SCUserRole -JobGroup "304bb8d1-d9eb-4d4d-8515-f19085027d2d" -AddMember @("CONTOSO\SPCloudAdmins") -AddScope $scopeToAdd -Permission @("Author", "Checkpoint", "CreateFromVHDOrTemplate", "AllowLocalAdmin", "PauseAndResume", "CanReceive", "RemoteConnect", "Remove", "Save", "CanShare", "Shutdown", "Start", "Stop", "Store") -ShowPROTips $false -UserRoleDataPath "\WIN-PNNSMPE05M8.Contoso.msft\SPLibrary\SPPrivateCloud"
$cloud = Get-SCCloud -Id "2d34f303-7de0-4371-85cd-a2691b751101"
Set-SCUserRoleQuota -Cloud $cloud -JobGroup "304bb8d1-d9eb-4d4d-8515-f19085027d2d" -UseCPUCountMaximum -MemoryMB "800" -StorageGB "8000" -CustomQuotaCount "20" -VMCount "40"
Set-SCUserRoleQuota -Cloud $cloud -JobGroup "304bb8d1-d9eb-4d4d-8515-f19085027d2d" -QuotaPerUser -UseCPUCountMaximum -MemoryMB "100" -StorageGB "1000" -CustomQuotaCount "3" -VMCount "10"
$libResource = Get-SCVirtualMachine -ID "b3de7103-d7df-47cb-a0d7-7fffc0230eb6"
Grant-SCResource -Resource $libResource -JobGroup "304bb8d1-d9eb-4d4d-8515-f19085027d2d"
$libResource = Get-SCVirtualMachine -ID "8d22f54e-012c-42a5-9c14-8d62844abb58"
Grant-SCResource -Resource $libResource -JobGroup "304bb8d1-d9eb-4d4d-8515-f19085027d2d"
$libResource = Get-SCVirtualMachine -ID "c7f018ef-0846-41fb-ac06-5f0c81b185ad"
Grant-SCResource -Resource $libResource -JobGroup "304bb8d1-d9eb-4d4d-8515-f19085027d2d"
$libResource = Get-SCVirtualMachine -ID "8c9042e0-f124-46a4-8419-e0fdda215864"
Grant-SCResource -Resource $libResource -JobGroup "304bb8d1-d9eb-4d4d-8515-f19085027d2d"
$libResource = Get-SCVirtualMachine -ID "e86def06-37cb-4e19-ab78-8a5531b1d4e0"
Grant-SCResource -Resource $libResource -JobGroup "304bb8d1-d9eb-4d4d-8515-f19085027d2d"
$libResource = Get-SCTemplate -ID "f189f57a-0f5c-4502-b219-7b590defccb7"
Grant-SCResource -Resource $libResource -JobGroup "304bb8d1-d9eb-4d4d-8515-f19085027d2d"
$libResource = Get-SCTemplate -ID "c56bfc92-9973-4717-9655-af3d4c874765"
Grant-SCResource -Resource $libResource -JobGroup "304bb8d1-d9eb-4d4d-8515-f19085027d2d"
$libResource = Get-SCHardwareProfile -ID "5dc61fd3-b613-4ece-98be-4be83456c6e6"
Grant-SCResource -Resource $libResource -JobGroup "304bb8d1-d9eb-4d4d-8515-f19085027d2d"
$libResource = Get-SCHardwareProfile -ID "83301787-c270-436d-814e-b8a1f8be9853"
Grant-SCResource -Resource $libResource -JobGroup "304bb8d1-d9eb-4d4d-8515-f19085027d2d"
$libResource = Get-SCHardwareProfile -ID "216d8006-da6d-498a-be99-e0aefd18201a"
Grant-SCResource -Resource $libResource -JobGroup "304bb8d1-d9eb-4d4d-8515-f19085027d2d"
$libResource = Get-GuestOSProfile -Name "Infrastructure Server"
Grant-SCResource -Resource $libResource -JobGroup "304bb8d1-d9eb-4d4d-8515-f19085027d2d"
$libResource = Get-GuestOSProfile -Name "Windows Server 2008 R2 OS Profile"
Grant-SCResource -Resource $libResource -JobGroup "304bb8d1-d9eb-4d4d-8515-f19085027d2d"
$libResource = Get-GuestOSProfile -Name "VPN Guest Profile"
Grant-SCResource -Resource $libResource -JobGroup "304bb8d1-d9eb-4d4d-8515-f19085027d2d"
$libResource = Get-GuestOSProfile -Name "File Server Guest Profile"
Grant-SCResource -Resource $libResource -JobGroup "304bb8d1-d9eb-4d4d-8515-f19085027d2d"
$libResource = Get-SCApplicationProfile -Name "Windows Server x64"
Grant-SCResource -Resource $libResource -JobGroup "304bb8d1-d9eb-4d4d-8515-f19085027d2d"
New-SCUserRole -Name "SP Cloud Admins" -UserRoleProfile "SelfServiceUser" -Description "User Role to access and manage the Sao Paulo Private Cloud through the Web Console (Self Service Portal)" -JobGroup "304bb8d1-d9eb-4d4d-8515-f19085027d2d"
If we want to change the settings of an existing User Role, through the management console, click Settings, Security and User Roles. Select the Role that will change and click Properties, as Figure 11.
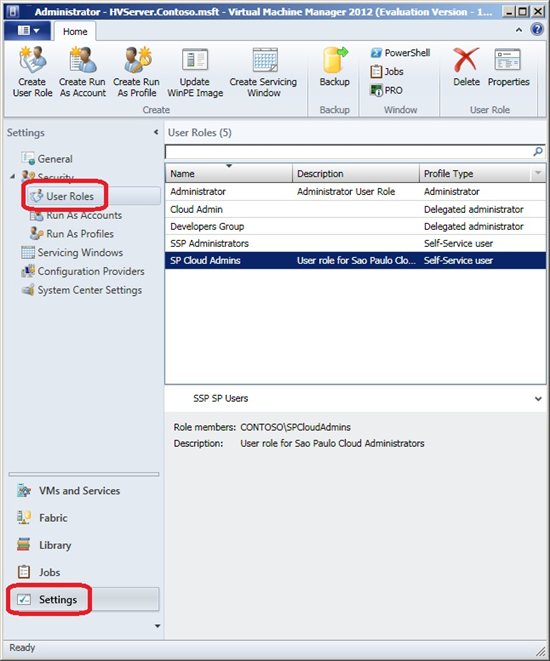
Figure 11 - User Roles
In figure 12 we can see the web console called the VMM Self-Service Portal (SSP). It offers portability for group members to administer the virtual environment using the URL from anywhere, even from the Internet if it is published to the web.
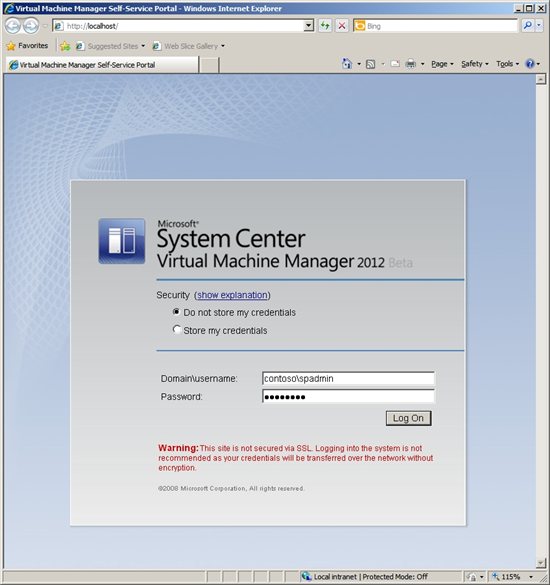
Figure 12 - VMM Self Service Portal
When a specific user from this User Role logs on through the SSP he will only see the virtual machines and the options were assigned to their group.
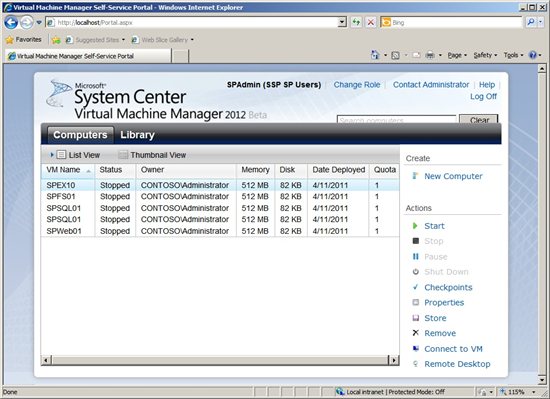
Figure 13 - Virtual machines
See the option of creating a new virtual machine through the SSP in figure 14:
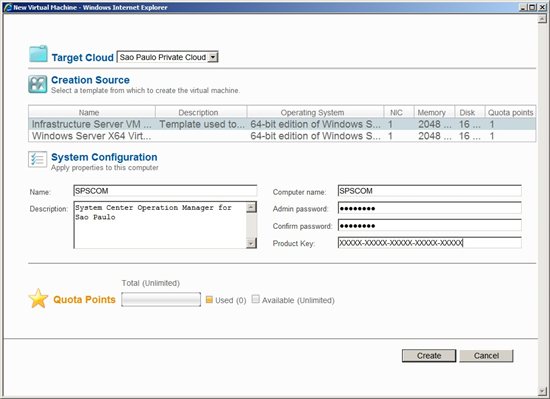
*Figure 14 - Option to create a new virtual machine *