SharePoint Workflow/Workflow Manager 2013 Configuration
Overview
What is the workflow: it is a collection of business steps that enabled to work serially and uniformity in order to transform materials, provide services, or process information [1]. Workflows are founded already in all businesses and works, any business model holds at least one workflow.
The workflow at least consists of two points of actions, the start point (A) and end point (B), but due to a rejection step or an error, it could be start of point (A) and go back to point (A) again, all by all at the end, it must end and close with point (B). The other kind of workflow is more complex, it consists of many points such as (A), (B), (C)….(G), this means the workflow could end with point (E) or (G), its depends on the business itself, as we will show example of business steps later in this tutorial.
Fig (1) show a simple leaves system workflow.
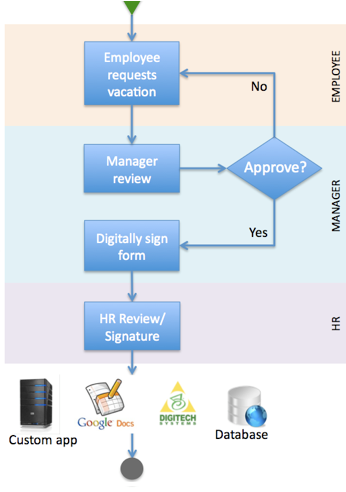
Fig (1) HR leaves system workflow [2]
Workflow systems examples:
- Raw material handling system.
- Logistics system.
- Leaves and vacation system.
- Warehouse system.
- HRMS system.
- New employment procedure
- Employee resigns procedure
- Employee promotion procedure
SharePoint 2013
Nowadays there are many systems in stock can run and control the workflows called workflow management system (WFMS)[3] such as Oracle ERP and our core subject here is SharePoint 2013 workflow. SharePoint was designed by Microsoft to handle the content management term, control the documents transactions and host all organization solutions and list items, therefore it was mandatory for Microsoft to design a system that can handle the workflows from A to Z with high availability value and away of failures.
SharePoint 2013 workflow (what’s new)
Neither of SharePoint 2010, SharePoint 2013 workflow has a new platform which is completely different, the new addition is the workflow manager [4]. Basically, the older versions of SharePoint workflow was installed and configured in the same server that host the MOSS itself, but now, the SharePoint 2013 WF can be installed and configured on a standalone server as shown in Fig (2).

Fig (2) SharePoint 2013 platform [4]
The other news about SP 2013 WF are the new steps and tools which installed already in SP designer and VS 2013 environment, actually am talking about the “Stages” in SP designer that allow the WF jump to a particular stage which wasn't available in SP 2010 WF, beside some several loops which are available in a new standalone menu. About VS 2013, the big change accrued is no need to code anymore, just using a large number of tools and options to build your custom WF.
SharePoint 2013 WF configuration
Before, in MOSS 2010 the SP WF was ready to use, that’s mean just install the SP designer and start your ART. But now things go different, before using SP 2013 WF, several installation and configuration steps must be applied on servers and tools configuration. Back to Fig (2), the SP 2013 WF manager must configured and run right before the rest of the other steps, to make it easy, I’ll short the configuration steps into three major points:
- Prerequisites
- Configuration
- Implementation
Prerequisites
Surely, we need an installed MOSS 2013 with installed SP 2013 designer, for more info about this, please find out how to install SP 2013, after this, we need to check out if the SP 2013 WF already configured or not, to find this:
- Run SP 2013 designer
- Link to your site collection
- From the left side navigator, click on “Workflow”.
- From the up-left corner select “Reusable Workflow”
- A dialog box will appear to you, check the “platform type” combo box, if you see only one type “SharePoint 2010 workflow”, this means that the SP 2012 WF is not implemented yet, but if you see several types of workflows as shown in Fig (3), this means SP 2013 WF is ready for action.
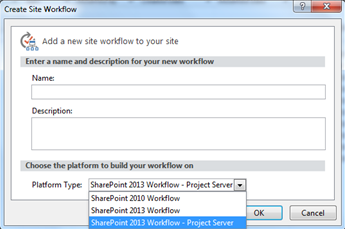
Fig (3) Workflow platforms
Another required step before going to the configuration is making sure that you are the user account of your farm, normal users cannot do the configuration steps, if you are not the user account, contact the SP 2013 admin user to give you the required privileges to do the steps.
** Configuration**
As a first step of the configuration, we need to install and configure the SP 2013 WF manager, its available to download over this link http://go.microsoft.com/fwlink/?LinkID=252092, after the download finish, double-click on the downloaded file, a dialog box will appear as shown in Fig (4)

Fig (4) WF manager first step
Click Iinstall button to start installing and configuring WF manager
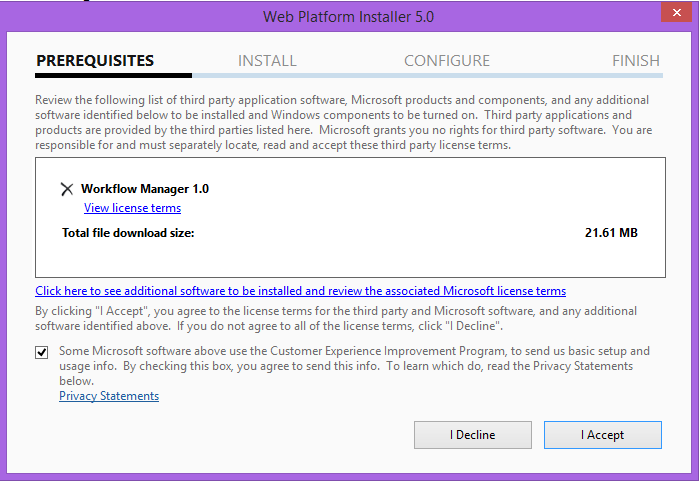
Fig (5) required files to download
Once you click “I Accept button”, the downloading will start, after the download finishing, click the “Next” button and jump to the next step shown in Fig (6)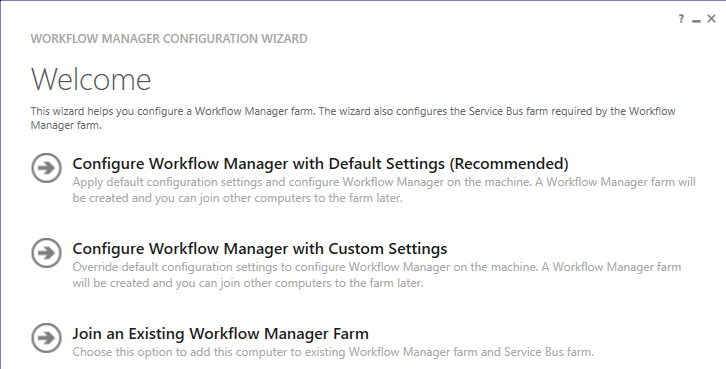
Fig (6) WF manager configuration
While we are fresh, and there is no existing farm yet, we will go throw the first choice
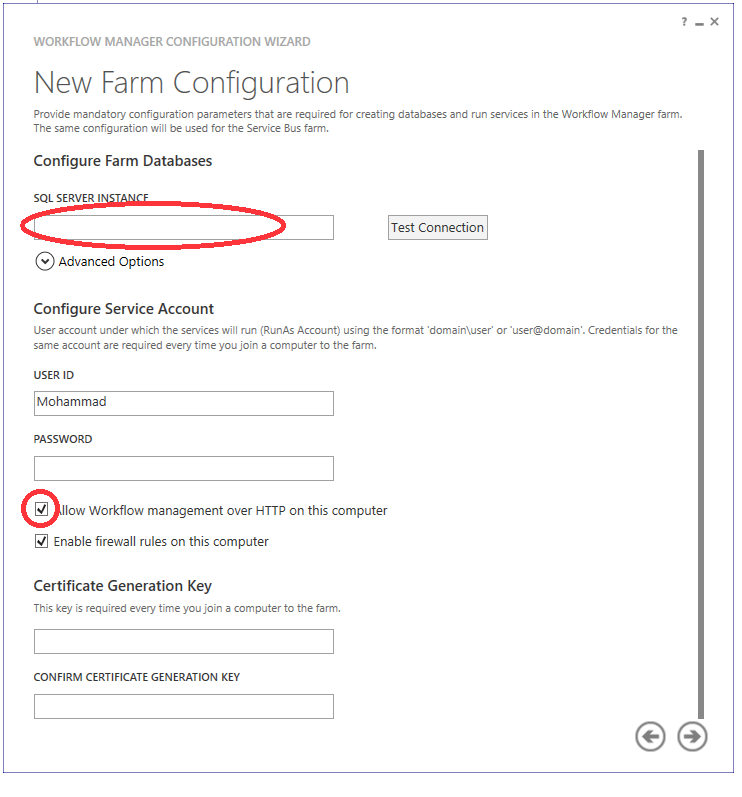
Fig (7) Farm configuration
In Fig (7), type the SQL server instance name, and your system password, then make sure to check the “Allow workflow management over HTTP on this computer” check box, and finally type a certificate generation key, this key used in every time you joined a computer to this farm. Once you finish this step, click the right arrow and review the appeared summary before start configuration.
After the configuration being finished, it is required to check the changes accrued on the DB collections and the IIS site in order to validate the configuration. Firstly, open your SQL server 2012 management studio and expand the database, a new 5 databases was added as appearing in Fig (8).
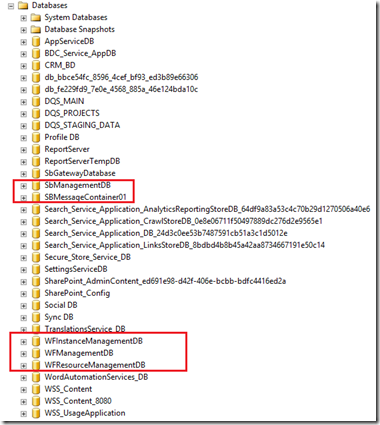
Fig (8) 5 DB was added to the DB collection
After this, open IIS manager by following these steps: Start> type IIS in the search box, you will find a new site as shown in Fig (9) below:
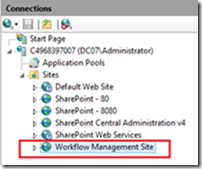
Fig (9) IIS manager
Now, before we can see the Workflow 2013 in SP 2013 designer, we need to do some command on the PowerShell in order to register our work, to do this, run PowerShell as administrator and write the following command
Add-PSSnapin microsoft.sharepoint.powershell
Register-SPWorkflowService –SPSite “http://spdev004/” –WorkflowHostUri 'http://spdev004:12291/' –AllowOAuthHttp
To understand the command above, take a look to Fig (10) which introduce the command lines with a brief work for each of them. This command used to register the WF services.
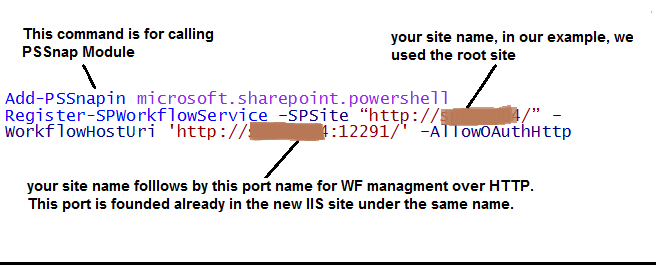
Fig (10) Registering the WF services.
After finishing the last step, the WF 2013 workflow platform is now available to use in SP 2013 designer, however, you are now able to automate your business, but wait, the configuration steps aren't finished yet. By now you can build a WF 2013 with all capabilities and features but the WF won’t be run unless the rest of the other configuration steps being applied, however, these three steps are:
- App Management Service (Check).
- Managed Metadata Web Service (Check).
- User Profile Service (Configuration).
** App Management service**
The App Management Service is responsible for storing and providing information concerning SP App licenses and permissions [5]. All we need to do with this service is just checkout if it is available and running already, to do this, follow this navigation:
Central administration >> Application Management >> Manage services on server
Find out in the services list the “App Management service” and start it, if it is not listed, Go through this navigation:
Central administration >> Application Management >> Manage services application
Then click on the “New” button which located in the upper left corner, then select “App management service, Give a name for the new service and finish the rest of the steps.
** Managed metadata web service**
Managed metadata is a hierarchical collection of centrally managed terms that you can define and then use as attributes for items in SharePoint Server 2013 [6]. Like “App management service” use the following navigation path to check out the mange metadata web service:
Central administration >> Application Management >> Manage services on server
Find out the managed metadata web service and run it if it stopped, or else add a new one if it does not exist by following this navigation path:
Central administration >> Application Management >> Manage services application
Then from the upper left side, click “New” button then choose “Managed metadata service”, give it a name, and finish the other steps.
** User Profile Service**
The User Profile service application stores information about users in a central location [7]. It’s the last configuration step before going live with the first WF 2013 platform, contrariwise of the last two service which both of them was available in the services list, “user profile service application” must be created and run from scratch, to do this, follow this navigation path:
Central administration >> Application Management >> Manage services application
Of course, you need to click onto “Add” button from the upper left corner then select “User Profile service”, then the dialog box will appear for you as shown in Fig (11).
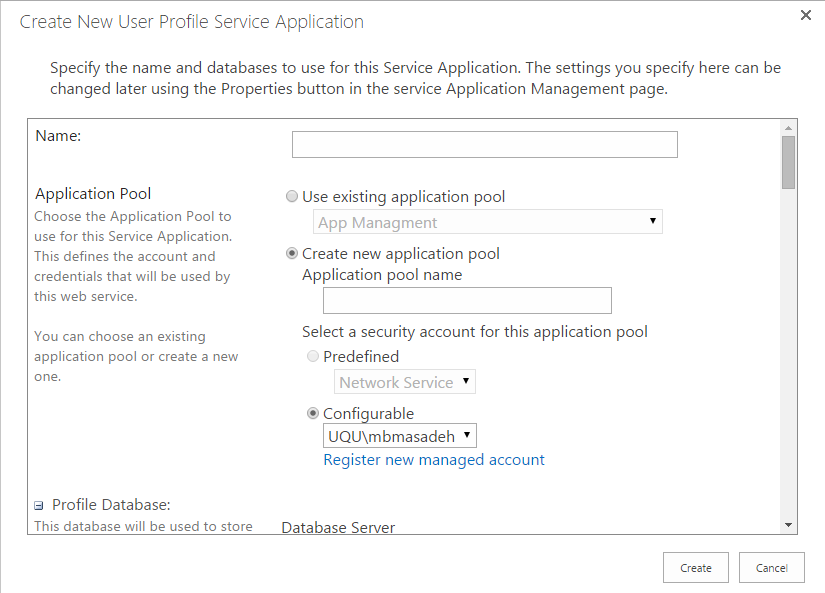
Fig (11) Create new User Profile Service Application
In Fig (11) note that not all the blank fields are mandatory to fill, however, after creating this service, run it by following this navigation path:
Central administration >> Application Management >> Manage services on server
The running procedure could be log (maybe 3 or 4 min), but if the statues of this service got stuck on (Running…), this means there is an error, could be located in the given data while creating the service, edit the service again and restart your machine. (Note in Win server 2012 R2, if you restart the machine, you are still able to access the local sites while the machine is restarting.
** **
Implementation
Now the configuration has been done, all we need now to sync some users from Exchange system to SharePoint users groups, note that you must do this step due to WF 2013 can’t be run without available users, to make the sync, follow these steps:
- Follow this navigation path
Central administration >> Application Management >> Manage services on server
- Find “User Profile Synchronization Service” and make sure to run it.
- Follow this navigation path
Central administration >> Application Management >> Manage services application
- Click on “User profile service”.
- Click on “Configure Synchronization Connections” under “Synchronization” title as shown in Fig (12).

Fig (12) Sync Config
- Click on “Create new connection” link.
- Now you are in the Sync configuration page, before everything, you must have the “Forest Name” which is your organization domain name, and a user called “Replicating domain changes”, this user is required to have a permission to access the active directory and a password for the replicating domain user.
Jump to Fig (13) and Fig (14) for more details.
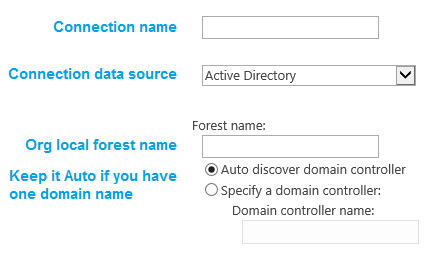
Fig (13) Sync Config
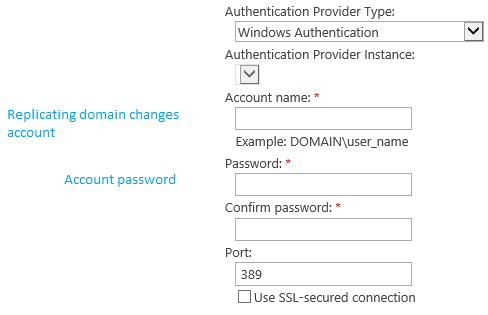
Fig (14) Sync Config
- In Fig (15) choose the required users you want from the available user's containers, or else choose them all.
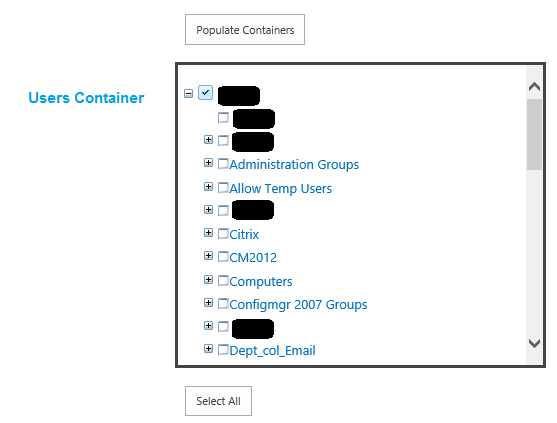
Fig (15) Sync Config
- After finish, the last step, click on “Ok” button to create the connection.
- Follow this navigation path, in order to start a full sync for one time:
Central administration >> Application Management >> Manage services application >> User Profile Service >> Synchronization >> Start Profile Synchronization
- You have to choose between “Start Incremental Synchronization” options or “Start Full Synchronization”, for the first time use, choose the full one after this choose the incremental one to save time and memory space. You are able to set a timer Job for an Auto Sync by navigating to this navigation path:
Central administration >> Application Management >> Manage services application >> User Profile Service >> Synchronization >> Configure Synchronization Timer Job
Now, and finally, we can create and run our first SP 2013 WF.
References
[1] |
Business Process Management (BPM), Center of Excellence (CoE) , 2009. [Online]. Available: http://www.ijssst.info/info/IEEE-Citation-StyleGuide.pdf. |
[2] |
A. Confluence, "Leave Approval Workflow Tutorial," frevvo, [Online]. Available: http://docs.frevvo.com/d/display/frevvo/Leave+Approval+Workflow+Tutorial. |
[3] |
School of Computer Science, "What is a Workflow Management System," University of Manchester, 2010 . [Online]. Available: http://www.taverna.org.uk/introduction/what-is-a-workflow-management-system/. |
[4] |
"Getting started with SharePoint Server 2013 workflow," Microsoft, 23 October 2014. [Online]. Available: http://technet.microsoft.com/en-us/library/jj227177(v=office.15).aspx#feedback. |
[5] |
Microsoft TechNet Social , "SharePoint 2013: App Management Service," Microsoft, 2013. [Online]. Available: http://social.technet.microsoft.com/wiki/contents/articles/12516.sharepoint-2013-app-management-service.aspx. |
[6] |
Microsoft TechNet Social, "Overview of managed metadata service applications in SharePoint Server 2013," Microsoft, 2013. [Online]. Available: http://technet.microsoft.com/en-us/library/ee424403(v=office.15).aspx. |
[7] |
Microsoft TechNet Social, "Overview of the User Profile service application in SharePoint Server 2013," Microsoft, 2014. [Online]. Available: http://technet.microsoft.com/en-us/library/ee662538(v=office.15).aspx. |