Using Prism for Windows Runtime
This wiki explains how you can include Prism for Windows Runtime in your Windows Runtime app.
Now you must be wondering what is Prism for Windows Runtime and why should I use it in my application. To know why, let’s start off with an introduction to Prism for Windows Runtime.
Prism for Windows Runtime
Prism for Windows Runtime was developed by Microsoft Patterns & Practices Team (the same team who developed Enterprise Library). If you have been doing WPF/Silverlight, there is Prism for WPF which is widely used and popular among the developers. So basically what Prism does is, it is a framework providing set of guidelines and functionalities for you to develop large scale applications which is flexible, loosely coupled, easily maintainable etc. It does this by applying various practices like dependency injection, MVVM, Messaging etc. throughout the project.
Prism for Windows Runtime is (as the name suggests) for Windows Runtime apps which are Windows 8.1 apps and Windows Phone 8.1 apps. It has nothing to do with Prism for WPF. Since this lightweight framework targets Windows Runtime, it abstracts most of the code for state management, navigation etc. into base classes, so developers can totally focus on business logic. When we go through the demo, you will see that how Prism simplifies tones of boilerplate code in App.xaml.cs.
Now let’s see Prism for Windows Runtime in action. To implement Prism, you need to follow below set of rules.
- Derive App.xaml.cs from MvvmAppBase instead of Application
- Every View should implement IView
- Every View Model should be inherited with ViewModel
As mentioned before Prism uses its own Navigation Service. For that Views use ViewModelLocator.AutoWireViewModel. In simple what this does is based on the Views and ViewModels name it finds associated ViewModel to the View and do the binding on the runtime. For design time binding it uses d:Page.DataContext property in the XAML.
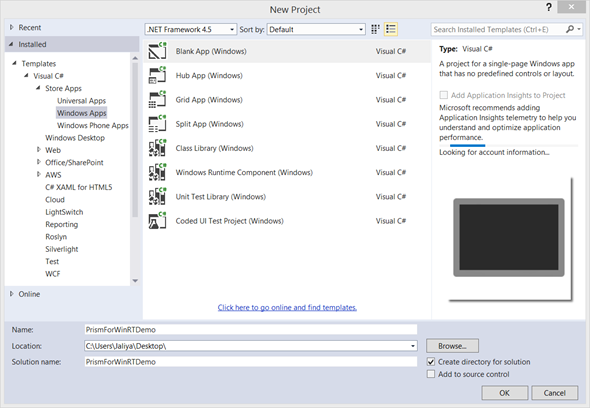
Now let’s start by creating a blank Windows App.
| http://lh3.ggpht.com/-cMn_hUdJN7U/VEduwcjSbxI/AAAAAAAAC1I/IXsZKhBR-pA/image_thumb%25255B2%25255D.png?imgmax=800 |
| Blank App |
Now let's add Prism for Windows Runtime by running following command in Package Manager Console.
Install-Package Prism.StoreApps
Once the command got executed successfully, let’s modify the App.xaml.cs first by removing all the boilerplate code inside App class. Instead of deriving from Application, let's modify the App class to derive from MvvmAppBase as follows.
namespace PrismForWinRTDemo
{
sealed partial class App : MvvmAppBase
{
}
}
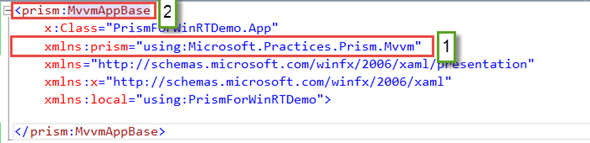
Then let’s go to designer of App.xaml and modify it as follows.
<prism:MvvmAppBase
x:Class="PrismForWinRTDemo.App"
xmlns:prism="using:Microsoft.Practices.Prism.Mvvm"
xmlns="http://schemas.microsoft.com/winfx/2006/xaml/presentation"
xmlns:x="http://schemas.microsoft.com/winfx/2006/xaml"
xmlns:local="using:PrismForWinRTDemo">
</prism:MvvmAppBase>
| http://lh3.ggpht.com/-Mhh_P8RWCo8/VEdtrm5dmzI/AAAAAAAACy0/3h8NV99jcFI/image_thumb12.png?imgmax=800 |
| App.xaml |
So here, first we have added a xml namespace to Prism MVVM (it’s where MvvmAppBase is located) and instead of Application, and then changed the page base to MvvmAppBase.
Moving back to the App.xaml.cs, here in MvvmAppBase, there is this abstract method “OnLaunchApplicationAsync” which you really must implement. So let’s add it.
sealed partial class App : MvvmAppBase
{
public App()
{
this.InitializeComponent();
}
protected override Task OnLaunchApplicationAsync(LaunchActivatedEventArgs args)
{
return Task.FromResult<object>(null);
}
}
Since, “OnLaunchApplicationAsync” expects a Task to be returned, we are returning an empty task. Let’s keep it as it is for now and let’s proceed.
Now let’s create a folder named “Views” and move default created MainPage to the Views folder (remember to update the namespace accordingly after moving). Then let's modify the MainPage.xaml.cs as follows. Here the MainPage is inheriting from VisualStateAwarePage. If you have a look at the implementation of VisualStateAwarePage, it’s inheriting from Page and implementing IView.
namespace PrismForWinRTDemo.Views
{
public sealed partial class MainPage : VisualStateAwarePage
{
public MainPage()
{
this.InitializeComponent();
}
}
}
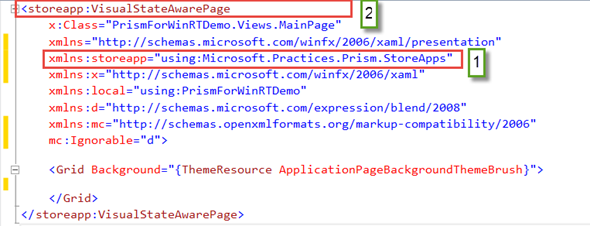
Let’s modify the designer as well.
<storeapp:VisualStateAwarePage
x:Class="PrismForWinRTDemo.Views.MainPage"
xmlns="http://schemas.microsoft.com/winfx/2006/xaml/presentation"
xmlns:storeapp="using:Microsoft.Practices.Prism.StoreApps"
xmlns:x="http://schemas.microsoft.com/winfx/2006/xaml"
xmlns:local="using:PrismForWinRTDemo"
xmlns:d="http://schemas.microsoft.com/expression/blend/2008"
xmlns:mc="http://schemas.openxmlformats.org/markup-compatibility/2006"
mc:Ignorable="d">
<Grid Background="{ThemeResource ApplicationPageBackgroundThemeBrush}">
</Grid>
</storeapp:VisualStateAwarePage>
| http://lh4.ggpht.com/-Yz69recHzDo/VEdtvITMe_I/AAAAAAAACzE/ICZtk08pUmE/image_thumb%25255B19%25255D.png?imgmax=800 |
| MainPage.xaml |
Here instead of basing on Page, the view is now based VisualStateAwarePage which is available in Microsoft.Practices.Prism.StoreApps namespace.
Now let's create a folder named “Interfaces” and creating an interface named “IMainPageViewModel” which exposes two string properties.
namespace PrismForWinRTDemo.Interfaces
{
public interface IMainPageViewModel
{
string FirstName { get; set; }
string LastName { get; set; }
}
}
Now let’s add a folder named “ViewModels” and add the “MainPageViewModel” class which inherit from the ViewModel and implements IMainPageViewModel.
namespace PrismForWinRTDemo.ViewModels
{
public class MainPageViewModel : ViewModel, IMainPageViewModel
{
}
}
Once the class is added, let's modify it further by adding two properties (which are FirstName and LastName) and overriding the OnNavigatedTo in ViewModel (in prism, viewmodel has OnNavigatedTo/OnNavigatedFrom events), let's set some values for declared properties.
public class MainPageViewModel : ViewModel, IMainPageViewModel
{
private string firstName;
public string FirstName
{
get
{
return firstName;
}
set
{
SetProperty(ref firstName, value);
}
}
private string lastName;
public string LastName
{
get
{
return lastName;
}
set
{
SetProperty(ref lastName, value);
}
}
public override void OnNavigatedTo(object navigationParameter, NavigationMode navigationMode, Dictionary<string, object> viewModelState)
{
this.FirstName = "Jaliya";
this.LastName = "Udagedara";
}
}
Here since the ViewModel inherits from BindableBase (BindableBase is a Implementation of INotifyPropertyChanged to simplify models), we don’t want to implement INotifyPropertyChanged in MainPageViewModel. Instead SetProperty method in BindableBase will do that for us.
Next thing we need to do is we need to map corresponding View with the ViewModel. For that let's modify the MainPage.xaml as follows.
<storeapp:VisualStateAwarePage
x:Class="PrismForWinRTDemo.Views.MainPage"
xmlns="http://schemas.microsoft.com/winfx/2006/xaml/presentation"
xmlns:prism="using:Microsoft.Practices.Prism.Mvvm"
xmlns:storeapp="using:Microsoft.Practices.Prism.StoreApps"
xmlns:x="http://schemas.microsoft.com/winfx/2006/xaml"
xmlns:local="using:PrismForWinRTDemo"
xmlns:d="http://schemas.microsoft.com/expression/blend/2008"
xmlns:mc="http://schemas.openxmlformats.org/markup-compatibility/2006"
prism:ViewModelLocator.AutoWireViewModel="True"
mc:Ignorable="d">
<Grid Background="{ThemeResource ApplicationPageBackgroundThemeBrush}">
</Grid>
</storeapp:VisualStateAwarePage>
| http://lh3.ggpht.com/-TUH-MSntfpM/VEdtxcyK20I/AAAAAAAACzU/eTCx8rjguAg/image_thumb%25255B20%25255D.png?imgmax=800 |
| MainPage.xaml |
Here we have included Microsoft.Practices.Prism.Mvvm namespace and set ViewModelLocator.AutoWireViewModel to True. So the Prism framework will map the view with the corresponding view model at the run time.
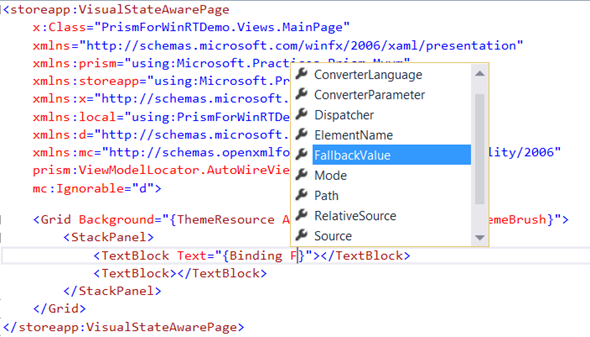
Now let's add a StackPanel and create two text blocks to display FirstName and LastName. Those textblocks content will be bound to MainPageViewModels’ two properties.
<Grid Background="{ThemeResource ApplicationPageBackgroundThemeBrush}">
<StackPanel>
<TextBlock Text="{Binding }"></TextBlock>
<TextBlock></TextBlock>
</StackPanel>
</Grid>
| http://lh6.ggpht.com/-isNDEyvOlmI/VEdtzCMeXWI/AAAAAAAACzk/Kf7Oe2Xiitg/image_thumb%25255B21%25255D.png?imgmax=800 |
| No IntelliSense support for available properties |
One of the advantages, Prism will give you is it will show the available properties to bind. But here as you can see in the above image, FirstName is not displayed in the IntelliSense. The thing here is, in the design time my view has no idea about what it's ViewModel is. ViewModelLocator.AutoWireViewModel="True" will only work in the runtime. So for that let’s create a design time view model.
Now let's create a folder named “DesignTime” and add a class named MainPageViewModel which will only implement IMainPageViewModel. The reason for only to implement IMainPageViewModel is since this is only for design time, we don’t have many functionalities like OnNavigatedTo, INotifyPropertyChanged etc. So we don’t need to inherit from ViewModel. Here let's just have only two properties in which in the constructor, we are setting some design time values to be displayed. The thing to note here is constructor will be executed in the design time as well.
namespace PrismForWinRTDemo.DesignTime
{
public class MainPageViewModel : IMainPageViewModel
{
public string FirstName { get; set; }
public string LastName { get; set; }
public MainPageViewModel()
{
this.FirstName = "Design time first name";
this.LastName = "Design time last name";
}
}
}
Next let’s modify the MainPage.xaml back again to show design time data.
<storeapp:VisualStateAwarePage
x:Class="PrismForWinRTDemo.Views.MainPage"
xmlns="http://schemas.microsoft.com/winfx/2006/xaml/presentation"
xmlns:prism="using:Microsoft.Practices.Prism.Mvvm"
xmlns:storeapp="using:Microsoft.Practices.Prism.StoreApps"
xmlns:x="http://schemas.microsoft.com/winfx/2006/xaml"
xmlns:local="using:PrismForWinRTDemo"
xmlns:d="http://schemas.microsoft.com/expression/blend/2008"
xmlns:mc="http://schemas.openxmlformats.org/markup-compatibility/2006"
prism:ViewModelLocator.AutoWireViewModel="True"
xmlns:designtime="using:PrismForWinRTDemo.DesignTime"
mc:Ignorable="d">
<d:Page.DataContext>
<designtime:MainPageViewModel />
</d:Page.DataContext>
<Grid Background="{ThemeResource ApplicationPageBackgroundThemeBrush}">
<StackPanel>
<TextBlock Text="{Binding FirstName}" Style="{StaticResource HeaderTextBlockStyle}"></TextBlock>
<TextBlock Text="{Binding LastName}" Style="{StaticResource SubheaderTextBlockStyle}"></TextBlock>
<TextBlock></TextBlock>
</StackPanel>
</Grid>
</storeapp:VisualStateAwarePage>
| http://lh4.ggpht.com/-7lpEeGs8AGA/VEdt1RCbVVI/AAAAAAAACz0/SaXbnzhiBZ0/image_thumb%25255B22%25255D.png?imgmax=800 |
| MainPage.xaml |
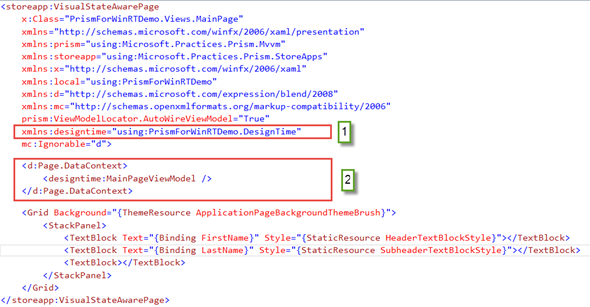
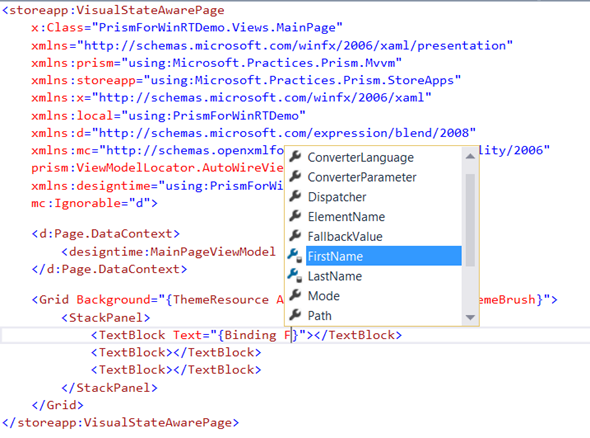
Here we have added the xml namespace for DesignTime and have set the design time view model under Page.DataContext. Since it is provided with “d:”, this will be removed in the runtime. Another thing is, as you can see in the below image, as typing, IntelliSense was suggesting the available properties.
| http://lh4.ggpht.com/-kXmdpCbKv30/VEdt3APMhZI/AAAAAAAAC0E/Z78QsupeNxE/image_thumb%25255B23%25255D.png?imgmax=800 |
| IntelliSense support for available properties |
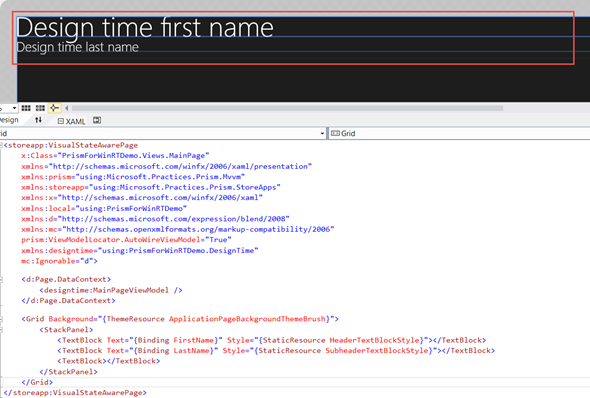
So the Design time data is working.
| http://lh6.ggpht.com/-Zo_VqTzUG0w/VEdt5s-cGOI/AAAAAAAAC0U/cprWiOOMXBQ/image_thumb%25255B24%25255D.png?imgmax=800 |
| Design time |
Now we are all set. Final thing to do is navigate to “MainPage” in the App.xaml.cs. So in the OnLaunchApplicationAsync, let's navigate to the MainPage.
| http://lh4.ggpht.com/-f8thCl65qqM/VEdt7JBsLfI/AAAAAAAAC0k/NUW8aIua8TY/image251_thumb.png?imgmax=800 |
| NavigationService.Navigate() |
As in the above image, when we try to Navigate using the NavigationService provided by Prism, it is expecting a string. But in Windows Runtime, default behavior is, it is expecting a type of the page to be navigated. In Prism for Windows Runtime, there is this nice concept called Experiences. To give you a understanding about experiences, let’s take the view “MainPage” and the view model “MainPageViewModel”. Here the default experience is “Main.”. (It’s same as the naming convention used in ASP.NET MVC. If we take the “HomeController”, the controller name is “Home.”). Of course the default experience naming convention can be changed according to your requirement. For now let’s adopt the default behavior.
So let's add the Navigation experience as follows.
protected override Task OnLaunchApplicationAsync(LaunchActivatedEventArgs args)
{
this.NavigationService.Navigate("Main", null);
return Task.FromResult<object>(null);
}
Since we don’t want any parameters to be passed, our second parameter is null.
Now we are all done. Let’s run the application.
| http://lh6.ggpht.com/-COXldOOXZqQ/VEdt8s94KoI/AAAAAAAAC00/8imCpdbMtvo/image_thumb%25255B25%25255D.png?imgmax=800 |
| Result |
So that’s it. For more information on Prism for Windows Runtime visit,
You can find the full code sample on MSDN Code Gallery.
Download Sample
Happy Coding.