BizTalk Server: How to (un)deploy Oracle PL/SQL scripts with BTDF
Introduction
Often the deployment of BizTalk solutions consists of more than deploying sole BizTalk Applications. For example, when Oracle databases are involved it might be necessary to create and fill new tables and deploy new stored procedures and/or packages. It is usually an Oracle DBA who would perform such deployments. By incorporating this task into your BTDF-project, you can reduce the coordination necessary with other people, while improving the quality of the entire deployment.
Whilst in English something like "removal" would probably be more correct, undeployment is used here for clarity in the context of this article.
This article describes the steps to prepare deployment and undeployment of Oracle PL/SQL scripts with BTDF. Meanwhile we learn how certain things are achieved with BTDF. Including:
- copying additional files to the redistribution folder
- adding Custom Deploy Targets to your BTDF project file for (un)deployment
- preprocessing non-XML files
Disclaimer: This article is based on BizTalk Server 2013 R2, Deployment Framework v6.0 and Oracle Express v11.2.0.
The whole process of preparation of deploying and undeploying PL/SQL scripts consists of the following steps:
- Store PL/SQL scripts in your solution
- Store variables for Oracle stuff in the settings file
- Prepare copying the PL/SQL scripts to the file system
- Prepare a batch file for executing the PL/SQL scripts
- Prepare undeployment of the PL/SQL scripts
Store PL/SQL scripts in your solution
The first step is to store your PL/SQL scripts in a solution folder. Therefore it is convenient to create a solution folder called ‘PLSQL’ under your Deployment project. For sake of simplicity we name the scripts following this convention:
<CreateDBLogic | InsertData | RemoveDBLogic>.sql
Examples:
- CreateDBLogic.sql
- InsertData.sql
- RemoveDBLogic.sql
If you follow this naming convention, you always have a maximum of 3 PL/SQL scripts per Deployment project. You could also decide to create scripts for the different types of objects, like tables, stored procedures, packages and so on. This results of course in more scripts, but gives a better overview of what exactly is deployed.
Perform the following steps:
- Open your BizTalk solution
- Navigate to the folder which contains the Deployment project
- Create a solution folder named ‘PLSQL’
The screenshot below shows a solution which contains a BizTalk project and a BTDF project for deployment. The BTDF project, called Deployment, contains a solution folder named ‘PLSQL’ which contains 3 PL/SQL scripts.

Store variables for Oracle stuff in the settings file
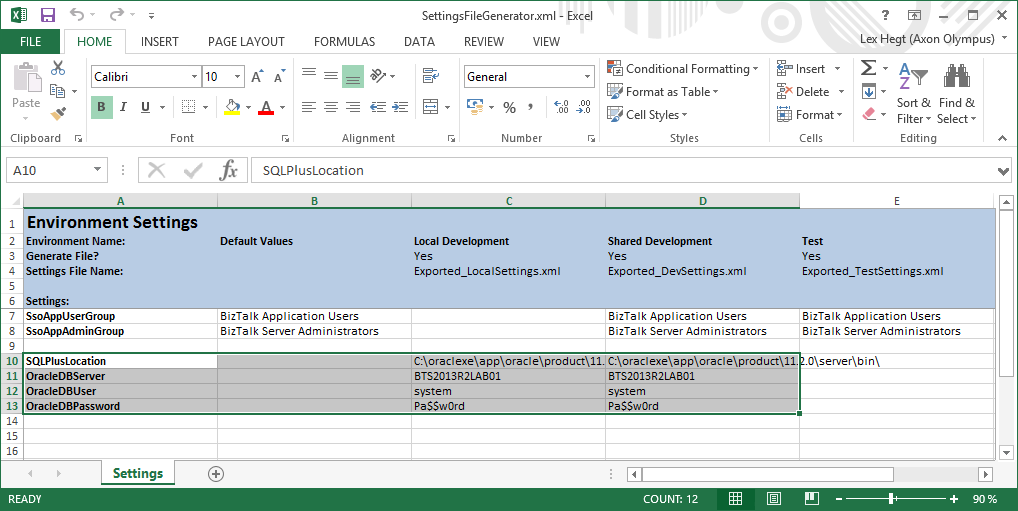
Next we’ll create variables in the SettingsFileGenerator.xml file from the Deployment project. These variables contain the credentials under which the PL/SQL scripts will become (un)deployed, the (remote) server on which the PL/SQL scripts will be applied and the location of a utility called SQLPlus. SQLPlus is a command line utility which comes with Oracle and actually executes the PL/SQL scripts. All will be used later in this document.
Note: In BizTalk Deployment Framework v6.0 the file SettingsFileGenerator.xml is stored directly in the BTDF project folder, while in previous versions it was stored in the EnvironmentSettings folder.
Perform the following steps:
- Open the SettingsFileGenerator.xml file in Excel
- Create the following variables:
- SQLPlusLocation
- OracleDBServer
- OracleDbUser
- OracleDbPassword
- Give each variable, per environment, the appropriate value
The variable ‘OracleDBServer’ refers to the (remote) server on which the PL/SQL scripts will be executed. The variable ‘SQLPlusLocation’ refers to the file location of the earlier mentioned command line tool SQLPlus. For writing this article a virtual machine was used on which Oracle Express v11.2.0 was installed. SQLPlus was found in:
C:\oraclexe\app\oracle\product\11.2.0\server\bin\
Note: Make sure that the location you specify in the settings file ends with a backslash (‘\), otherwise an invalid command will be executed.
The screenshot below shows a settings file, which was opened in Excel and contains all variables.
Now that we have the PL/SQL scripts and some variables in place, we will continue with the preparation of copying the PL/SQL scripts to the target file system, prepare a batch file for executing the PL/SQL scripts and the preparation of the actual execution of the PL/SQL scripts.
Prepare copying the PL/SQL scripts to the file system
To be able to execute the PL/SQL scripts during (un)deployment, the scripts need to be copied to the file system of the server on which the (un)deployment becomes executed. Therefore we need to modify an already existing Target called ‘CustomRedist’.
Perform the following steps:
In the already opened Deployment project file, navigate to the Target called ‘CustomRedist’
Add the following XML to the Target:
 <MakeDir Directories="$(RedistDir)\PLSQL" />

 <!-- Force MSBuild to expand the item spec into physical file specs -->
 <CreateItem Include="PLSQL\*.*">
    <Output TaskParameter="Include" ItemName="PLSQL" />
 </CreateItem>

 <Copy DestinationFolder="$(RedistDir)\PLSQL\%(RecursiveDir)" SourceFiles="@(PLSQL)"/>
Afterwards the Target will look like below:
  <Target Name="CustomRedist">
    <MakeDir Directories="$(RedistDir)\PLSQL" />
     <!-- Force MSBuild to expand the item spec into physical file specs -->
    <CreateItem Include="PLSQL\*.*">
      <Output TaskParameter="Include" ItemName="PLSQL" />
    </CreateItem>
    <Copy DestinationFolder="$(RedistDir)\PLSQL\%(RecursiveDir)" SourceFiles="@(PLSQL)"/>
  </Target>
Prepare a batch file for executing the PL/SQL scripts
By using a batch file for executing the PL/SQL scripts you achieve a couple advantages, namely:
- Keep a simple command line in the BTDF project file
- Hiding the credentials which are used by SQLPlus by putting them into the batch file
This step describes how the creation of a batch file will be prepared. We will create and prepare a text file for preprocessing, which, during deployment will become transformed into a batch file for executing the PL/SQL scripts. Preprocessing is necessary to be able to use the variables from the settings file. So we actually create a text file with placeholders that refer to those variables.
That text file will look like this:
exit | ${SQLPlusLocation}sqlplus -S ${OracleDBUser}/${OracleDBPassword}@${OracleDBServer} %1
Let´s explain a little bit what´s happening here. This command starts SQLPlus from a given location (${SQLPlusLocation}), uses the given credentials (${OracleDBUser}/${OracleDBPassword}) and executes the PL/SQL script ‘%1’, which will be set later in this article on the given server (${OracleDBServer}). The parameter ‘-S’ hides the initial banner and command prompts, while the @-sign is used to execute the PL/SQL script on a remote server. As you can see, the command contains references to all 4 variables which we declared earlier in the settings file. The ‘exit |’ command makes sure that SQLPlus becomes closed after the PL/SQL script has been executed.
Perform the following steps:
- Create a text file called ExecuteDbScript.txt in the PLSQL folder within your Deployment project
- Add the text as shown above to the text file
- Save and close the text file
Afterwards the BTDF project will look like this:

picture solution explorer
Now we have arrived at the point where we will preprocess the previously created text file. To do so, we need to add a Custom Post Deploy Target to the Deployment project file. This Target will contain the commands to preprocess the text file. After this step the PL/SQL scripts are almost ready to become deployed.
Perform the following steps:
Navigate to the lower end of the project file, just before the Project closing tag (</Project>) and create a Target called ‘CustomPostDeployTarget’. Therefore you’ll have to add the following XML:
  <Target Name="CustomPostDeployTarget">
  </Target>
Next add the following lines:
<Message Text="*** Create batch file to execute database scripts ***"/>
<Exec Command=""$(DeployTools)\xmlpreprocess.exe"
/f /c /noDirectives /i:"$(MSBuildProjectDirectory)\PLSQL\ExecuteDbScript.txt"
/o:"$(MSBuildProjectDirectory)\PLSQL\ExecuteDbScript.bat"
/d:CurDir="$(MSBuildProjectDirectoryParent)"
/s:"$(SettingsFilePath)"" ContinueOnError="false" />
Afterwards the XML will look like this:
<Target Name="CustomPostDeployTarget">
<Message Text="*** Create batch file to execute database scripts ***"/>
<Exec Command=""$(DeployTools)\xmlpreprocess.exe"
/f /c /noDirectives /i:"$(MSBuildProjectDirectory)\PLSQL\ExecuteDbScript.txt"
/o:"$(MSBuildProjectDirectory)\PLSQL\ExecuteDbScript.bat"
/d:CurDir="$(MSBuildProjectDirectoryParent)"
/s:"$(SettingsFilePath)"" ContinueOnError="false" />
</Target>
The previously created Custom Deploy Target will now become extended with the commands to execute the PL/SQL scripts.
Perform the following steps:
Navigate to the Custom Deploy Target called ‘CustomPostDeployTarget’.
Next add a line to the Custom Deploy Target for each PL/SQL file you want to deploy. You might add an extra informational message line (<Message Text="Some informational message"/>). The lines look like this:
<Message Text="*** Create database logic ***"/> <Exec Command="PLSQL\ExecuteDbScript.bat @"PLSQL\CreateDBLogic.sql"" />
Afterwards the entire Custom Deploy Target might look like this:
<Target Name="CustomPostDeployTarget">
<Message Text="*** Create batch file to execute database scripts ***"/>
<Exec Command=""$(DeployTools)\xmlpreprocess.exe"
/f /c /noDirectives /i:"$(MSBuildProjectDirectory)\PLSQL\ExecuteDbScript.txt"
/o:"$(MSBuildProjectDirectory)\PLSQL\ExecuteDbScript.bat"
/d:CurDir="$(MSBuildProjectDirectoryParent)"
/s:"$(SettingsFilePath)""ContinueOnError="false" />
<Message Text="*** Create database logic ***"/>
<Exec Command="PLSQL\ExecuteDbScript.bat @"PLSQL\CreateDBLogic.sql"" />
<Message Text="*** Fill tables ***"/>
<Exec Command="PLSQL\ExecuteDbScript.bat @"PLSQL\InsertData.sql"" />
</Target>
Undeployment of the PL/SQL scripts
To make sure everything is cleaned up nicely on removal of the BizTalk application, the final step is to prepare for undeploying the PL/SQL stuff during undeployment of the BizTalk Application. Undeployment scripts contain the reverse actions of the deployment scripts like:
- revoking user permissions to execute Stored Procedures
- dropping Stored Procedures, tables and other objects
Also here counts that the earlier defined variables are used to define on which server the T-SQL scripts will become executed.
To achieve all this we need to add a Custom Post Undeploy Target.
Perform the following steps:
Navigate to the lower end of the project file, just before the Project closing tag (</Project>) and create a Target called ‘CustomPostDeployTarget’. Therefore you’ll have to add the following XML:
  <Target Name="CustomPostUnDeployTarget">
  </Target>
Now add a line for each PL/SQL script you want to execute during undeployment. You also might add an extra informational message and a line for deletion of the created ExecuteDbscript.bat.
-
<Message Text="*** Remove database logic ***"/> <Exec Command="PLSQL\ExecuteDbScript.bat @"PLSQL\RemoveDBLogic.sql"" /> <Delete Files="PLSQL\ExecuteDbScript.bat" />
3. Afterwards the custom undeploy target may look like this:
<Target Name="CustomPostUnDeployTarget"> <Message Text="*** Remove database logic ***"/> <Exec Command="PLSQL\ExecuteDbScript.bat @"PLSQL\RemoveDBLogic.sql"" /> <Delete Files="PLSQL\ExecuteDbScript.bat" /> </Target>
We now have the entire deployment and undeployment of PL/SQL scripts in place and you should be ready to test the solution!
Summary
This ends the entire preparation of deployment and undeployment of Oracle PL/SQL scripts. Let’s end with a couple of possible improvements and recommendations:
- To make the solution more robust, you could modify the PL/SQLSQL creation scripts and check if the, to be, created objects already exist. If they do, first delete the object and then recreate it. This is especially handy while you are still in the development and unit testing phase
- Create the PL/SQL scripts with a tool like TOAD or SQL Developer. This saves you the hassle of having to write the scripts entirely on your own
See Also
Another important place to find an extensive amount of BizTalk related articles is the TechNet Wiki itself. The best entry point is BizTalk Server Resources on the TechNet Wiki.